

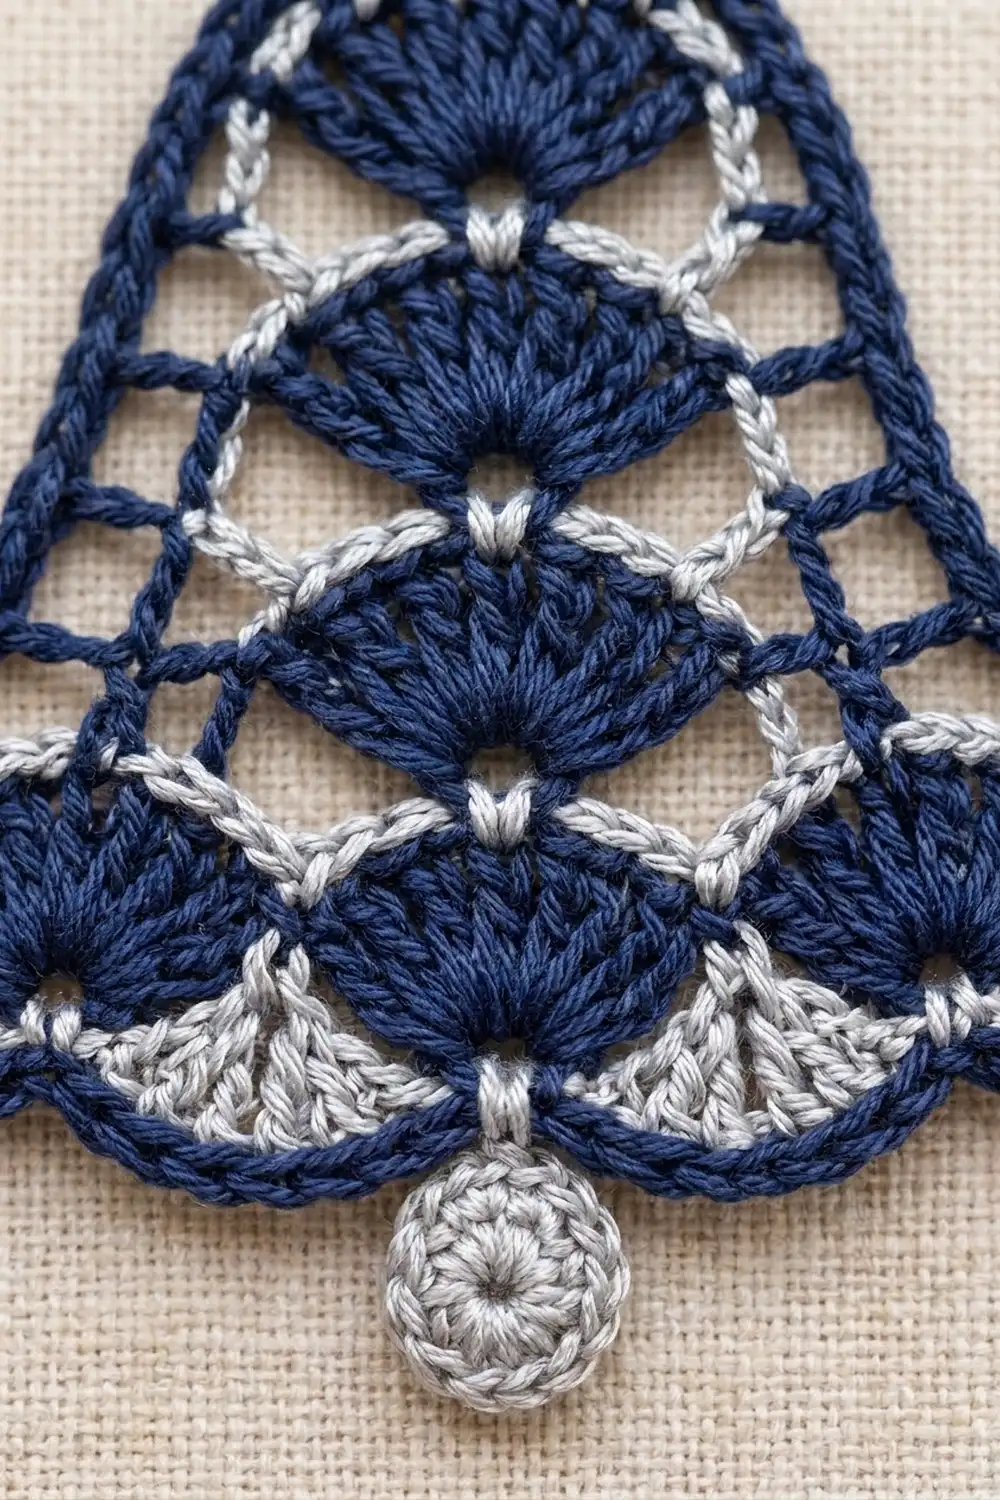
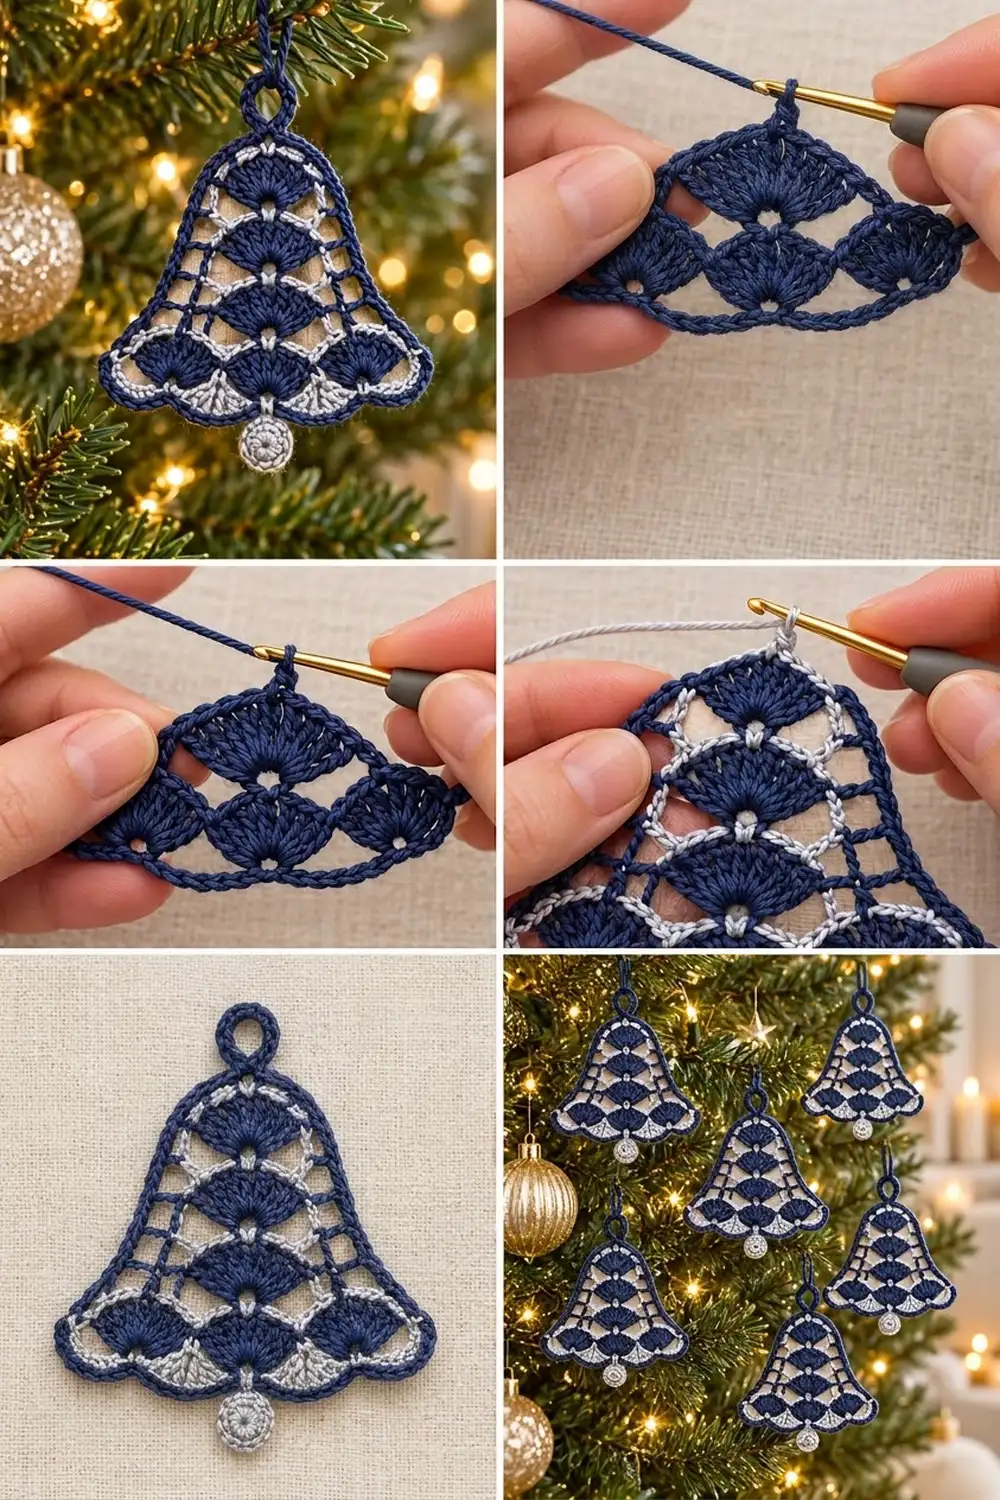
This lacy bell ornament pairs deep navy thread with soft silver. Navy fan shells stack up the center of the bell, and silver arcs curve over each tier of fans. The sloping sides are an open lattice of navy posts and chain windows, so tree lights glow through the bell when it hangs.
The style is classic thread lace with a modern, two-tone palette. The hem flares out into gentle scallops with small silver shells peeking out underneath. A flat silver clapper hangs below the hem, and a thick navy loop at the top makes hanging easy.
This pattern uses US crochet terms. The finished bell measures 3½ in (8.9 cm) wide and 3⅞ in (9.8 cm) tall. The total height is 5¼ in (13.3 cm) with the loop and clapper included.
You work the body flat from the bottom up in 15 rows, using a 3-row repeat: a navy fan row, a navy mesh row, and a silver arc row. The sides step inward at the start of each new tier. After that come a silver shell row along the hem, a navy edging round with the hanging loop, and the clapper disc.
Finished Size and Construction
- Finished size: 3½ in (8.9 cm) wide × 3⅞ in (9.8 cm) tall; 5¼ in (13.3 cm) overall with loop and clapper
- Skill level: Intermediate
- Terminology: US crochet terms
- Yarn weight: Size 3 cotton crochet thread (Lace, weight 0)
- Hook: 2.0 mm
- Number of pieces: 1 bell body + 1 clapper disc (attached)
- Layout: Single bell, no joining
- Body size before border: 3¼ in (8.3 cm) wide × 3⅜ in (8.6 cm) tall
- Border depth: ⅛ in (0.3 cm) on the sides and top; ⅜ in (1.0 cm) on the hem (silver shells plus navy edging)
Materials
Use a mercerized cotton thread, size 3, with about 150 yd (137.2 m) per 50 g. Mercerized cotton holds stitch definition, keeps the fans crisp, and takes starch well. Pick a silver-gray with a slight sheen if you can find one; it reads as metallic without the scratchiness of real metallic thread.
- Navy: 8 g, about 22 m
- Silver-gray: 4 g, about 11 m
These quantities include a margin of roughly 30% for your gauge swatch and weaving in ends.
Tools:
- 2.0 mm crochet hook
- Tapestry needle (small eye)
- Scissors
- 2 locking stitch markers
- Rustproof pins and a foam blocking board
- Spray starch or a fabric stiffener
- Ruler or tape measure
Abbreviations (US Terms)
- ch: chain
- sl st: slip stitch
- sc: single crochet
- sc2tog: single crochet 2 together
- dc: double crochet
- sk: skip
- sp(s): space(s)
- st(s): stitch(es)
- RS / WS: right side / wrong side
Special stitches:
- Fan: 7 dc worked into the same stitch.
- Standing sc: Start with a slip knot on the hook, insert the hook in the stitch, yarn over, pull up a loop, yarn over, and pull through both loops.
- Parked loop: When you change to silver, enlarge the navy loop and slip it onto a stitch marker. Don’t cut navy; you’ll pick it up again at the same edge.
Gauge and Checkpoints
Work Rows 1–4 as a test swatch before committing to the full bell.
Gauge: 25 sc = 3¼ in (8.3 cm). One 3-row tier (fan row, mesh row, silver row) = ¾ in (1.9 cm) tall. A single sc row is about ⅛ in (0.3 cm) tall.
Checkpoints (measured flat, unblocked):
- After Row 4: 3¼ in (8.3 cm) wide, ⅞ in (2.2 cm) tall
- After Row 7: 2¾ in (7.0 cm) wide at the top row, 1⅝ in (4.1 cm) tall
- After Row 10: 2¼ in (5.7 cm) wide at the top row, 2⅜ in (6.0 cm) tall
- After Row 13: 1¾ in (4.4 cm) wide at the top row, 3⅛ in (7.9 cm) tall
- After Row 15: 1⅛ in (2.9 cm) wide at the top, 3⅜ in (8.6 cm) tall
If your swatch is wider than 3¼ in (8.3 cm), switch to a 1.75 mm hook. If it’s narrower, switch to a 2.25 mm hook. If the width is right but the tier is too tall, try drawing each dc loop up a little shorter rather than changing hooks.
Bell Body
You’ll fasten off silver at the end of every silver row. Navy is parked and carried up the right edge (the edge where RS rows begin), and the edging hides the carry later.
Foundation: With navy, ch 26.
Row 1 (WS): Sc in 2nd ch from hook and in each ch across. Turn. (25 sc)
Row 2 (RS, fan row): Ch 1, sc in first sc, [sk 3 sc, Fan in next sc, sk 3 sc, sc in next sc] 3 times. Turn. (4 sc + 3 Fans = 25 sts)
Row 3 (WS, mesh row): Ch 3 (counts as dc), [ch 3, sk 3 dc, sc in 4th dc of Fan, ch 3, dc in next sc] 3 times. Park navy. (4 dc, 3 sc, 6 ch-3 sps)
Row 4 (RS, silver): With RS facing, join silver with a standing sc in the last dc made. [3 sc in ch-3 sp, sc in sc, 3 sc in ch-3 sp, sc in next dc] 3 times, working the final sc in the top of the turning ch-3. Fasten off silver. (1 + 8 × 3 = 25 sc)
This is a conversion row. Each of the 7 dc and sc is worked once (7 sts), and each of the 6 ch-3 spaces takes 3 sc (18 sts): 7 + 18 = 25.
Row 5 (RS, navy fan row): Pick up the parked navy loop. Sl st in the first 3 sc (2 sts stepped in). Ch 3 (counts as dc, sitting in the 3rd sc), [ch 1, sk 1, dc in next] 3 times, sk 3, Fan in next, sk 3, dc in next, [ch 1, sk 1, dc in next] 3 times. Leave the last 2 sc unworked. Turn. (8 dc posts, 1 Fan, 6 ch-1 sps; 21 sts wide)
Row 6 (WS, mesh row): Ch 4 (counts as dc + ch 1), [dc in next dc, ch 1] 2 times, dc in next dc, ch 3, sk 3 dc, sc in 4th dc of Fan, ch 3, dc in next dc, [ch 1, dc in next dc] 2 times, ch 1, dc in top of turning ch-3. Park navy. (8 dc, 1 sc, 6 ch-1 sps, 2 ch-3 sps)
Row 7 (RS, silver): Join silver with a standing sc in the last dc made. [Sc in ch-1 sp, sc in next dc] 3 times, 3 sc in ch-3 sp, sc in sc, 3 sc in ch-3 sp, sc in next dc, [sc in ch-1 sp, sc in next dc] 2 times, sc in ch-1 sp, sc in 3rd ch of turning ch-4. Fasten off. (9 sts worked 1-per-stitch + 6 ch-1 sps × 1 + 2 ch-3 sps × 3 = 9 + 6 + 6 = 21 sc)
Row 8 (RS, navy fan row): Pick up navy. Sl st in the first 3 sc, ch 3 (counts as dc), [ch 1, sk 1, dc in next] 2 times, sk 3, Fan in next, sk 3, dc in next, [ch 1, sk 1, dc in next] 2 times. Leave 2 sc unworked. Turn. (6 dc posts, 1 Fan, 4 ch-1 sps; 17 sts wide)
Row 9 (WS): Ch 4 (counts as dc + ch 1), dc in next dc, ch 1, dc in next dc, ch 3, sc in 4th dc of Fan, ch 3, dc in next dc, ch 1, dc in next dc, ch 1, dc in top of turning ch-3. Park navy. (6 dc, 1 sc, 4 ch-1 sps, 2 ch-3 sps)
Row 10 (RS, silver): Join with a standing sc in the last dc made. [Sc in ch-1 sp, sc in next dc] 2 times, 3 sc in ch-3 sp, sc in sc, 3 sc in ch-3 sp, sc in next dc, sc in ch-1 sp, sc in next dc, sc in ch-1 sp, sc in 3rd ch of turning ch-4. Fasten off. (7 + 4 + 6 = 17 sc)
Row 11 (RS, navy fan row): Pick up navy. Sl st in the first 3 sc, ch 3 (counts as dc), ch 1, sk 1, dc in next, sk 3, Fan in next, sk 3, dc in next, ch 1, sk 1, dc in next. Leave 2 sc unworked. Turn. (4 dc posts, 1 Fan, 2 ch-1 sps; 13 sts wide)
Row 12 (WS): Ch 4 (counts as dc + ch 1), dc in next dc, ch 3, sc in 4th dc of Fan, ch 3, dc in next dc, ch 1, dc in top of turning ch-3. Park navy. (4 dc, 1 sc, 2 ch-1 sps, 2 ch-3 sps)
Row 13 (RS, silver): Join with a standing sc in the last dc made. Sc in ch-1 sp, sc in dc, 3 sc in ch-3 sp, sc in sc, 3 sc in ch-3 sp, sc in dc, sc in ch-1 sp, sc in 3rd ch of turning ch-4. Fasten off. (5 + 2 + 6 = 13 sc)
Row 14 (RS, navy crown): Pick up navy. Ch 1, sc2tog, sc in next 9 sc, sc2tog. Turn. (11 sc)
Row 15 (WS): Ch 1, sc2tog, sc in next 7 sc, sc2tog. Fasten off. (9 sc)
The body now has four tiers of fans: three across the bottom, then three single fans stacked up the center. Silver arcs sit above each tier, and the mesh windows narrow toward the crown.
Border
Border gauge: About 8 sc per 1 in (2.5 cm) along straight edges. The scalloped hem needs a few extra stitches to curve around the shells.
Hem Row (silver): With RS facing, turn the bell upside down. Join silver with a standing sc in the first free loop of the foundation chain at the corner. [Sk 2 loops, 5 dc in next loop, sk 2 loops, sc in next loop] 4 times. Fasten off. (5 sc + 4 shells; 1 + 6 × 4 = 25 sts, matching the 25 foundation loops)
Edging Round (navy): With RS facing, join navy in the first sc of the Hem Row.
- Bottom: 3 sc in this sc (corner), [sc in next 2 dc, 3 sc in center dc, sc in next 2 dc, sc in next sc] 4 times, working 2 more sc in the final sc so that it also holds 3 sc (corner). Bottom = 37 sc, with both corner groups included.
- First side (29 sc, corners not included): Working into row ends, place 1 sc in each sc row end and 2 sc in each fan row and mesh row end. At each step where 2 stitches were left unworked or slipped, add 2 sc across them. Row by row: Rows 1–4 = 1 + 2 + 2 + 1, step 2; Rows 5–7 = 2 + 2 + 1, step 2; Rows 8–10 = 2 + 2 + 1, step 2; Rows 11–13 = 2 + 2 + 1; Rows 14–15 = 1 + 1. That gives 8 + 7 + 7 + 5 + 2 = 29.
- Top with loop: Sc in next 4 sc, sc in center sc, ch 12, sl st in the sc just made, work 20 sc over the ch-12 loop, sl st in the same center sc, sc in next 4 sc. (9 sc + 20 loop sc)
- Second side: Repeat the first side in reverse order. (29 sc)
- Sl st in the first sc. Fasten off.
Round total: 37 + 29 + 9 + 29 = 104 sc, plus 20 sc on the loop.
Why the math works: The bottom edge follows the 25-stitch hem exactly. Each of the 4 shell repeats takes 8 sc (2 + 3 + 2 + 1), which gives 32. The opening sc adds 3 for its corner group, and the final sc gets 2 extra for the other corner: 3 + 32 + 2 = 37. The 3-sc groups at the shell tips make the scallops. The side counts follow the row heights, so the edging lies flat.
Clapper: With silver, make a magic ring. Ch 3 (counts as dc), work 11 dc in the ring, and sl st to the top of ch-3. (12 dc) Ch 1, work 2 sc in each st around, and sl st to the first sc. (24 sc) Fasten off, leaving a 6 in (15.2 cm) tail. The disc measures ⅝ in (1.6 cm) across.
To attach it, find the 19th sc of the 37-sc bottom edge. This is the valley sc at the exact center of the hem. Insert the hook in any edge sc of the disc, pull up the tail, ch 3, and sl st into that 19th sc. Weave in the tail.
Final Blocking
- Weave in all ends along the carried edge and behind the fans, keeping them out of the mesh windows.
- Soak the bell in cool water for 5 minutes, then press out the water in a towel.
- Pin it flat on the board, RS up, to 3½ in (8.9 cm) wide and 3⅞ in (9.8 cm) tall.
- Pin each scallop tip and each bottom corner, and open every mesh window into a neat square.
- Pin the loop into a smooth oval, about ½ in (1.3 cm) tall.
- Spray with starch, let it dry completely, then spray a second time if you want a stiffer ornament.
Final Quality-Control Checklist
- Rows 1–15 match the counts: 25, 25, 25, 25, 21, 21, 21, 17, 17, 17, 13, 13, 13, 11, 9.
- Four fan tiers: 3 fans at the bottom, then 1 + 1 + 1 up the center
- Each fan has a visible eyelet at its base
- The Hem Row has 4 silver shells
- The edging has 104 sc plus 20 loop sc
- The clapper hangs at the exact center of the hem
- Blocked size is 3½ in × 3⅞ in (8.9 × 9.8 cm)
Troubleshooting
- Fans ruffle: Your dc are too loose. Go down one hook size for the Fan rows only.
- The sides look jagged: Add 1 extra sc at each step in the edging, and repeat the extra stitch on the other side so both sides match.
- The navy carry shows: Work the edging stitches over the carried strand to hide it.
- The hem cups: Your 3-sc corner groups are too tight. Block firmly at the corners.
- The clapper twists: Starch the ch-3 link and let it dry hanging straight.
Care
Hand wash in cool water with mild soap, press dry in a towel, and re-block with starch. Store the ornament flat between tissue paper.
Final Notes
Here is the measurement chain from start to finish:
- 25 sc foundation = 3¼ in (8.3 cm) wide
- Four ¾ in (1.9 cm) tiers plus three sc rows = a 3⅜ in (8.6 cm) tall body
- Silver hem shells and navy edging bring the bell to 3½ in × 3⅞ in (8.9 × 9.8 cm)
- The loop and clapper bring the overall height to 5¼ in (13.3 cm)
Check your gauge at Row 4 and your top width at Rows 7, 10, and 13, and the bell will block to size. Make a few in the same colors for a matching set on your tree.
Happy crocheting!