

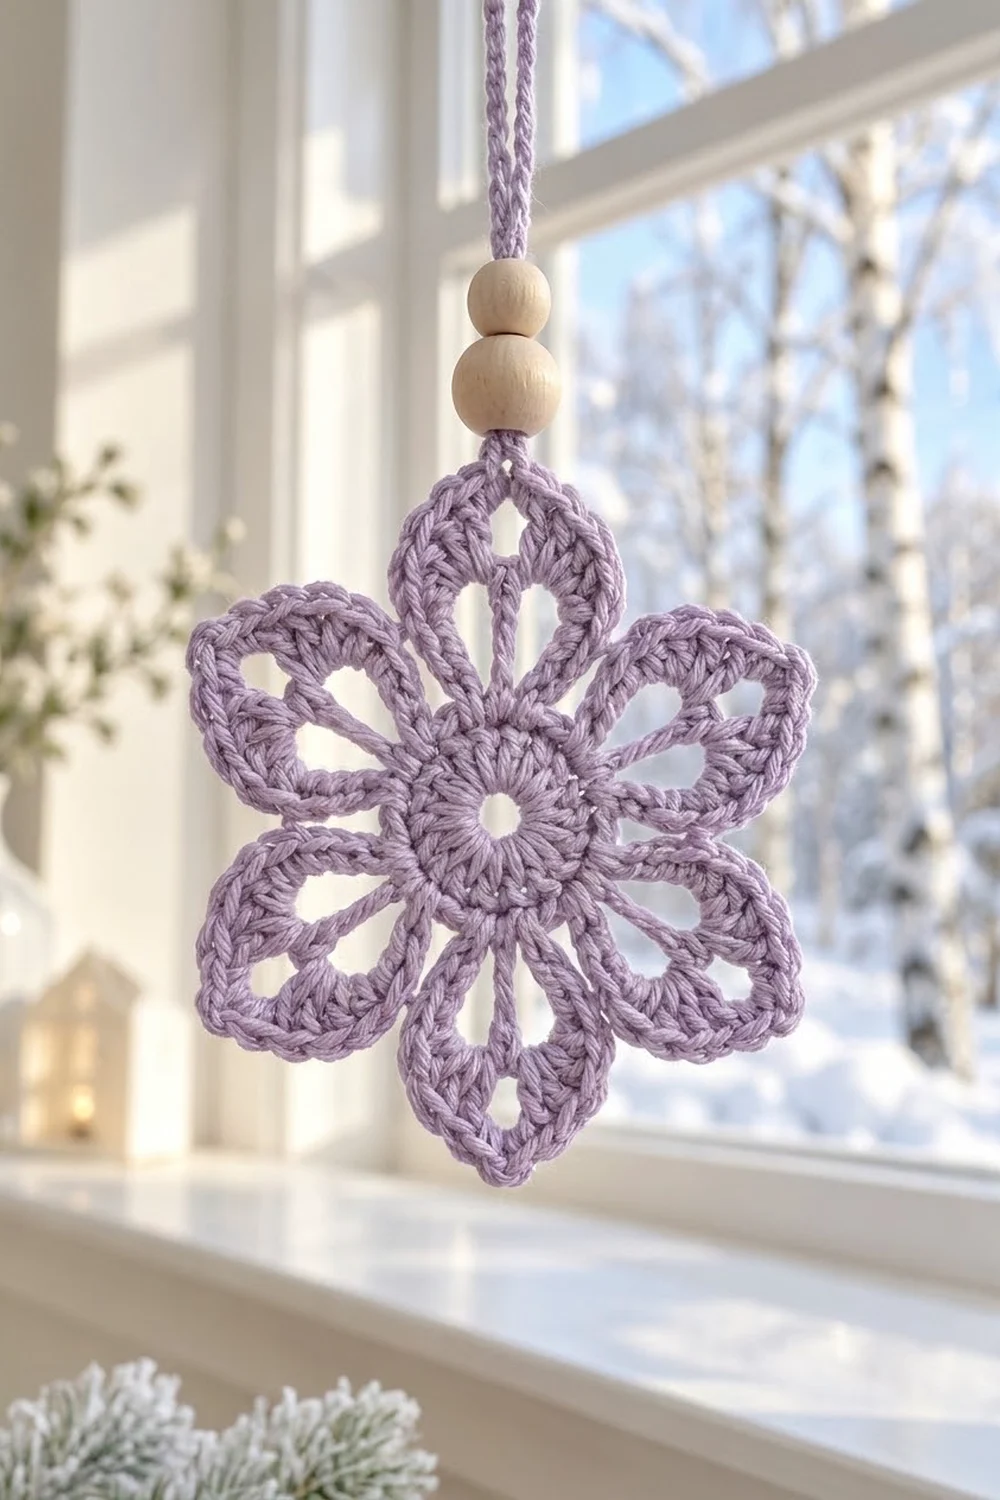
The Lavender Frost Flower Ornament is a small, lacy six-petal flower that looks like a snowflake. It hangs from a chained cord with two natural wooden beads. Hang one in a window and the light shines through the petal openings, which shows off the stitch work.
This design uses one color, a soft lavender cotton, with plain wooden beads as the only accent. The style is clean and Scandinavian-inspired. It works as a winter ornament, a gift topper, or a year-round window charm. The pattern uses US crochet terms throughout.
The finished ornament measures 4.25 in (10.8 cm) from tip to opposite tip, not counting the hanger. The hanging loop adds about 5 in (12.7 cm).
You work the ornament in the round as one piece. Rounds 1 and 2 make a solid center. Round 3 adds the petal frames, with tall center spokes and chain arcs. Round 4 fills each arc to shape the petal, and Round 5 is a single crochet border that sharpens each tip. A beaded chain hanger finishes the piece. There is no joining and no sewing.
Finished Size and Construction
- Finished size: 4.25 in (10.8 cm) tip to tip
- Skill level: Advanced beginner
- Terminology: US crochet terms
- Yarn weight: DK / light worsted (#3), cotton or cotton blend
- Hook: 3.5 mm (E-4)
- Number of pieces: 1
- Layout: Single radial motif with six petals
- Piece size: 4.25 in (10.8 cm) after border and blocking
- Size before border (after Round 4): 3.75 in (9.5 cm)
- Border depth: 0.25 in (0.6 cm) on each side
Materials
Yarn: Use a smooth DK-weight cotton or cotton blend in a light lavender. Cotton holds the pointed tips and open spaces crisply and blocks well. Fuzzy or very splitty yarns blur the lace, so avoid them.
- Lavender: 10 g, about 23 m (25 yd) per ornament, including the hanger
Tools:
- 3.5 mm (E-4) crochet hook
- 2 natural wooden beads, 12 mm to 14 mm, with holes of at least 3 mm
- Tapestry needle
- Scissors
- Blocking mat or folded towel, plus 12 rust-proof pins
- Spray bottle with water
- Stitch marker (optional)
The yarn amount includes a margin for a test swatch and the hanger. One ornament actually uses about 6 g.
Abbreviations (US Terms)
- ch – chain
- sl st – slip stitch
- sc – single crochet
- hdc – half double crochet
- dc – double crochet
- tr – treble crochet (yarn over twice, insert hook, pull up a loop, then [yarn over, pull through 2 loops] three times)
- sp – space
- st(s) – stitch(es)
- MR – magic ring
Special stitch: Petal tip (sc, ch 3, sc). Work 1 sc, ch 3, and 1 sc all into the same stitch or space. The ch-3 makes the point of the petal and gives Round 5 a space to work into.
Gauge and Checkpoints
Gauge matters less here than for a garment. Still, an accurate size keeps the petals from cupping or ruffling, so work one full test ornament first and measure it at each stage.
Checkpoints (measured flat, unblocked):
- After Round 1: 1.25 in (3.2 cm) across
- After Round 2: 1.75 in (4.4 cm) across
- After Round 3: 3 in (7.6 cm) from tr top to opposite tr top
- After Round 4: 3.75 in (9.5 cm) from tip to opposite tip
- After Round 5: 4.25 in (10.8 cm) from tip to opposite tip
Tolerance: Within 0.125 in (0.3 cm) at each checkpoint is fine.
If your ornament is too big: Go down to a 3.25 mm hook, or tighten the chain arcs in Round 3.
If it is too small: Go up to a 3.75 mm hook. If the petals cup instead of lying flat, your tr spokes are probably too short. Pull the first loop of each tr up a little taller.
Pattern
Round 1: Center ring
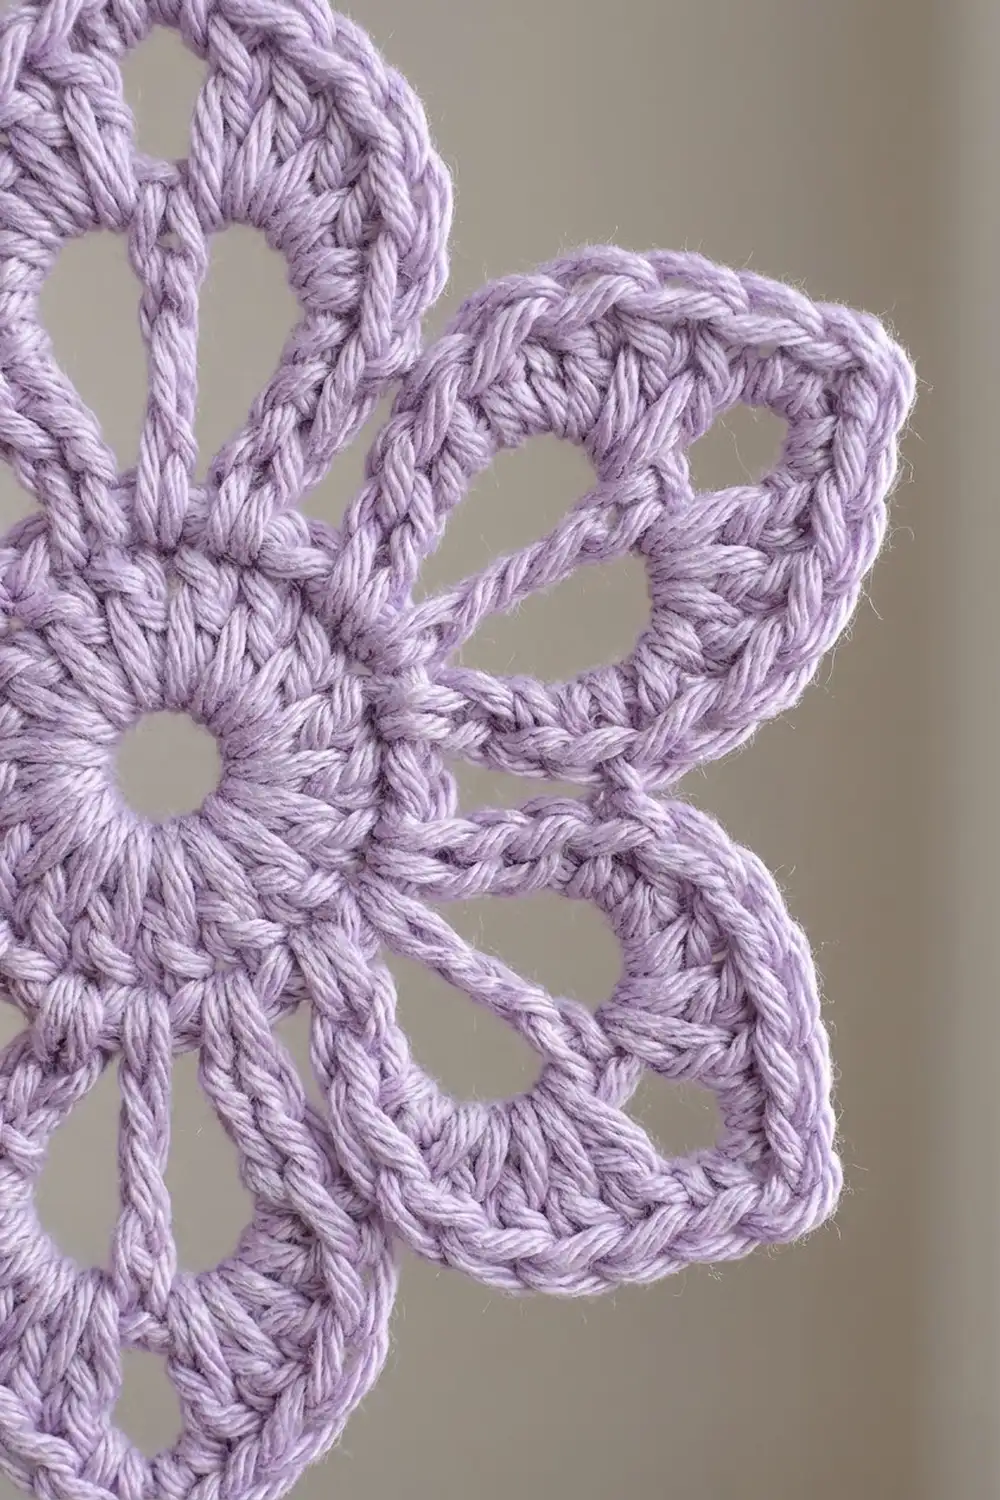
Make a MR. Ch 3 (counts as the first dc). Work 17 dc into the ring. Pull the ring partly closed, leaving a small hole about 0.25 in (0.6 cm) wide, as in the photo. Sl st to the top of the beginning ch-3.
Stitch count: 18 dc.
The ring should measure 1.25 in (3.2 cm) across.
Round 2: Solid center round
Ch 2 (does not count as a stitch). Work 2 hdc in the next st, then hdc in each of the next 2 sts. Repeat from * to * 5 more times. Sl st to the first hdc.
Stitch count: 24 hdc (18 stitches worked once each, plus 6 increases).
The center should now measure 1.75 in (4.4 cm) across and lie flat.
Round 3: Petal frames and spokes
This round sets up all six petals. Each repeat uses 4 stitches of Round 2: 1 for the sc base, 1 skipped, 1 for the tr spoke, and 1 skipped.
Ch 1. Sc in the same st as the join. Ch 6, skip the next st, tr in the next st, ch 6, skip the next st, sc in the next st. Repeat from * to * 5 more times. On the last repeat, leave out the final sc and sl st to the first sc instead.
Stitch count: 6 sc, 6 tr, and 12 ch-6 spaces.
Check: 6 repeats × 4 stitches = 24, which uses every stitch of Round 2 exactly once.
Each tr is a petal’s center spoke. The two ch-6 arcs that run from the tr down to the sc on either side form the petal frame. The openings between the spoke, the arcs, and the center become the two teardrop windows in each petal.
Measure from the top of one tr to the top of the opposite tr. It should be 3 in (7.6 cm). Lay the piece flat and straighten each tr so it points straight out from the center.
Round 4: Petal fill
Here you wrap stitches around the arcs to give each petal its rising, tapered outline. You work into each ch-6 space, not into the chains, so the windows underneath stay open.
Do not turn. Work around the motif one petal at a time:
In the next ch-6 sp, work sc, hdc, 3 dc, hdc (6 sts). In the top of the tr, work a petal tip (sc, ch 3, sc). In the next ch-6 sp, work hdc, 3 dc, hdc, sc (6 sts). Sl st in the next sc of Round 3. Repeat from * to * 5 more times. The final sl st goes into the first sc of Round 3, which is the same spot you started from.
Stitch count per petal: 6 + 2 + 6 = 14 sts, plus 1 ch-3 tip and 1 sl st.
Stitch count for the round: 84 sts (6 × 14), plus 6 ch-3 tips and 6 sl sts.
The stitch heights rise from sc at the base to dc along the sides. Then the tip narrows into the point.
After Round 4, the piece should measure 3.75 in (9.5 cm) from tip to opposite tip.
Round 5: Border
The border is covered in its own section below. Work it now, then come back to make the hanger.
Beaded Hanger
- Cut a new length of lavender yarn about 36 in (91.4 cm) long. Thread both wooden beads onto it, using a tapestry needle if needed, and slide them down the yarn.
- Pick one petal to be the top. Join the yarn with a sl st in that petal’s ch-2 tip space from Round 5.
- Ch 3.
- Slide both beads up against the hook. Ch 1 snugly around the yarn above the beads. This locks them in place just above the petal tip.
- Ch 80, which makes about 10 in (25.4 cm) of chain.
- Sl st into the locking ch-1 to form the loop. Fasten off.
The finished loop hangs about 5 in (12.7 cm) above the beads. Weave the tails back down through the bead holes if they fit, or into the back of the top petal.
Border
Border gauge: One round of sc adds 0.25 in (0.6 cm) on every edge. That takes the piece from 3.75 in (9.5 cm) to 4.25 in (10.8 cm) tip to tip.
Round 5: Single crochet edge with sharp tips
Ch 1 (does not count as a stitch). For each petal:
Sc in each of the next 7 sts. These are the 6 sts from the first side of the petal plus the first sc of the tip. Work (2 sc, ch 2, 2 sc) in the ch-3 tip space. Sc in each of the next 7 sts, which are the second sc of the tip plus the 6 sts from the second side. Sl st in the sl st between petals. Repeat from * to * 5 more times. Make the final sl st into the first sl st between petals, then fasten off.
Count per petal side: 7 sc from one-for-one stitches, plus 2 sc added at the tip, for 9 sc per side.
Count per petal: 18 sc, plus 1 ch-2 tip and 1 sl st.
Count for the round: 108 sc (6 × 18), plus 6 ch-2 tips and 6 sl sts.
Why the math works: Each petal side in Round 4 has exactly 7 stitches: 6 in the arc plus 1 tip sc. Working one sc into each keeps the edge flat. The only increases are the 4 extra sc and the ch-2 at each tip, so the points sharpen without the sides ruffling. The sl sts between petals add nothing, so the valleys stay deep and the six petals stay separate. Six identical petals of 18 sc each gives 108 sc. Nothing is counted twice, because the tip sc from Round 4 already belongs to the 7-stitch side count.
Final Blocking
- Weave in all ends except the hanger tail before you block.
- Spray the ornament until it is evenly damp but not dripping. Soaking it in cool water and pressing it in a towel also works.
- Lay it face up on the blocking mat.
- Pin the center first by placing a pin through the center hole. Make sure it is round, 1.75 in (4.4 cm) across Round 2.
- Pin each ch-2 petal tip outward. Opposite tips should be 4.25 in (10.8 cm) apart, and the six tips should be evenly spaced, like the points of a hexagon.
- Pin each valley between petals, gently easing it toward the center so the petal shapes stand out.
- Use a pin tip or your fingertip to open each teardrop window and straighten each tr spoke.
- For a crisper ornament, mist it lightly with spray starch or a sugar-water stiffener.
- Let it dry completely, at least 6 hours. Unpin it, then add or straighten the hanger.
Final Quality-Control Checklist
- Round 2 has 24 hdc and lies flat.
- Round 3 has 6 tr spokes, each centered between two ch-6 arcs.
- Every petal has two clear teardrop openings.
- Round 4 has 14 stitches per petal and a ch-3 tip at every point.
- Round 5 has 108 sc in total: 9 per petal side and 18 per petal.
- Opposite petal tips measure 4.25 in (10.8 cm) apart.
- All six petals are the same length and evenly spaced.
- The beads sit snugly just above the top petal tip and do not slide.
- The hanger loop is about 5 in (12.7 cm) long and not twisted.
- All tails are woven in and invisible from the front.
Troubleshooting
The center ripples. Your Round 2 is too loose, or you added extra increases. Recount to 24 hdc, or redo the round with a 3.25 mm hook.
The petals cup upward. The tr spokes are shorter than the ch-6 arcs. Make each tr taller, or reduce the arcs to ch 5 and keep the rest of the counts the same.
The petals ruffle. The ch-6 arcs are too long for your tension. Try ch 5, and block firmly.
The tips look rounded instead of pointed. Make sure the ch-3 in Round 4 and the ch-2 in Round 5 are worked into spaces, not into stitches, and pin each tip outward while it dries.
The petals are uneven. You probably skipped the wrong stitch in Round 3. Each petal must use exactly 4 Round-2 stitches. Mark every fourth stitch before starting the round.
The beads slide around. Ch 1 again above the beads, tighter this time, or tie a small overhand knot in the chain above the beads.
The center hole is too big. Pull the magic ring tail tighter before weaving it in.
Care
Hand wash in cool water with mild soap, press out the water in a towel, and dry the ornament flat, pinned to shape. Do not machine wash or tumble dry, because this can loosen the pointed tips and the wooden beads.
Final Notes
Each size step builds on the one before it. The 18-dc ring measures 1.25 in (3.2 cm). The 24-hdc center grows that to 1.75 in (4.4 cm). Round 3 adds six spokes and twelve arcs, reaching 3 in (7.6 cm). Round 4 fills the petals to 3.75 in (9.5 cm). The 108-sc border, with 18 per petal, adds 0.25 in (0.6 cm) on every edge, for a finished 4.25 in (10.8 cm) ornament.
If you check your measurements after each round, the finished ornament will come out at the right size. Once your first one blocks correctly, the others will match it.
Happy crocheting!