

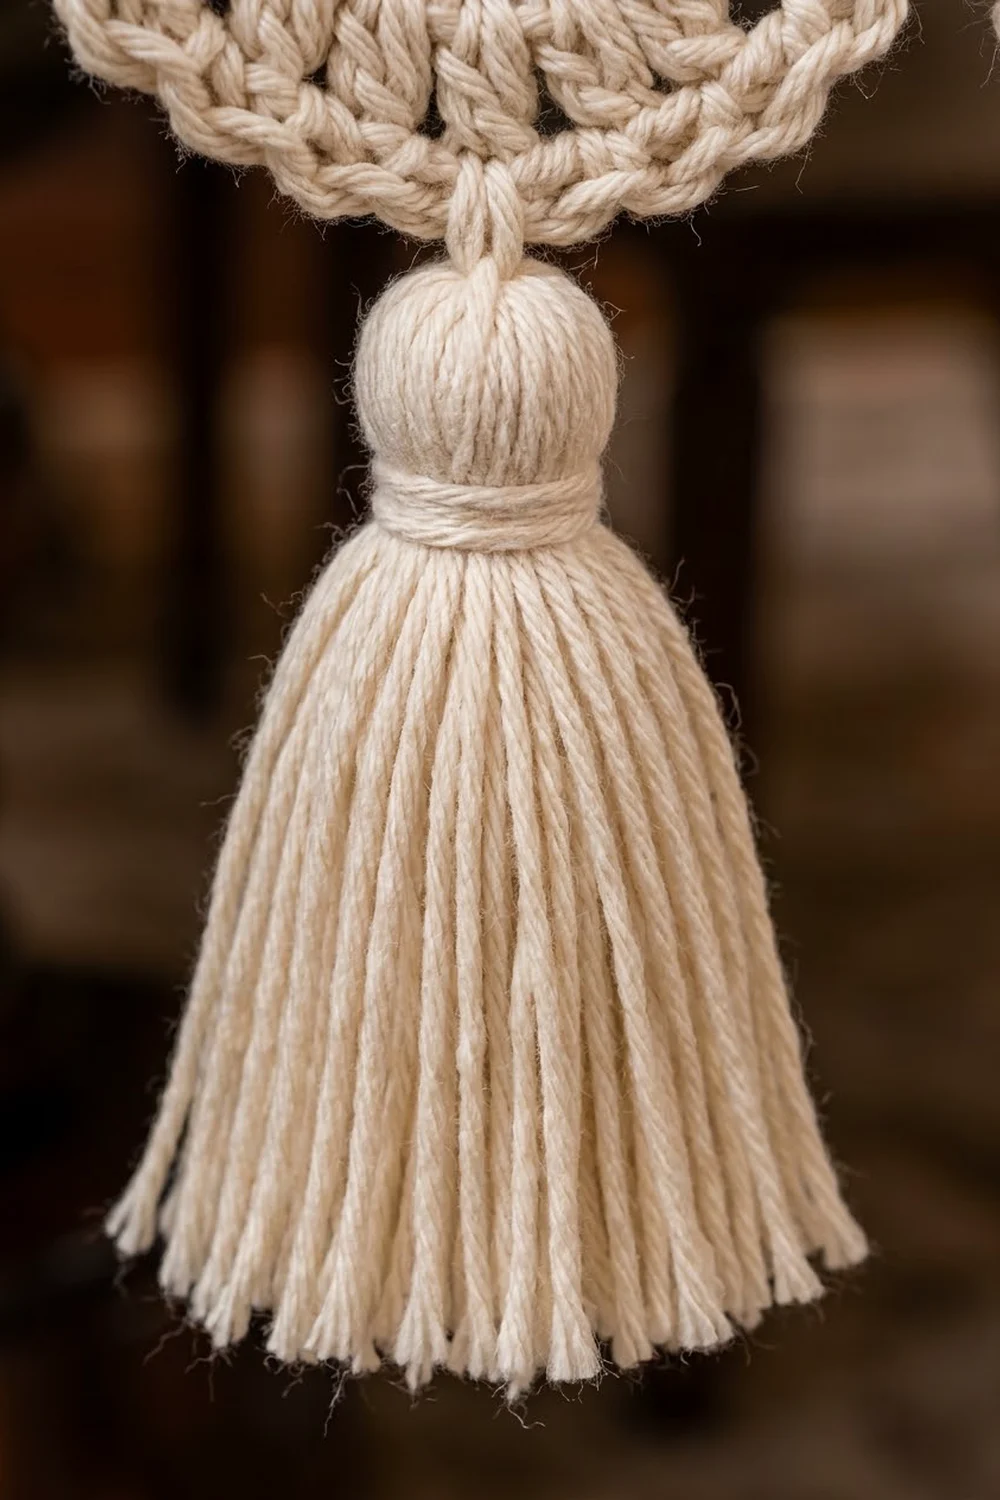
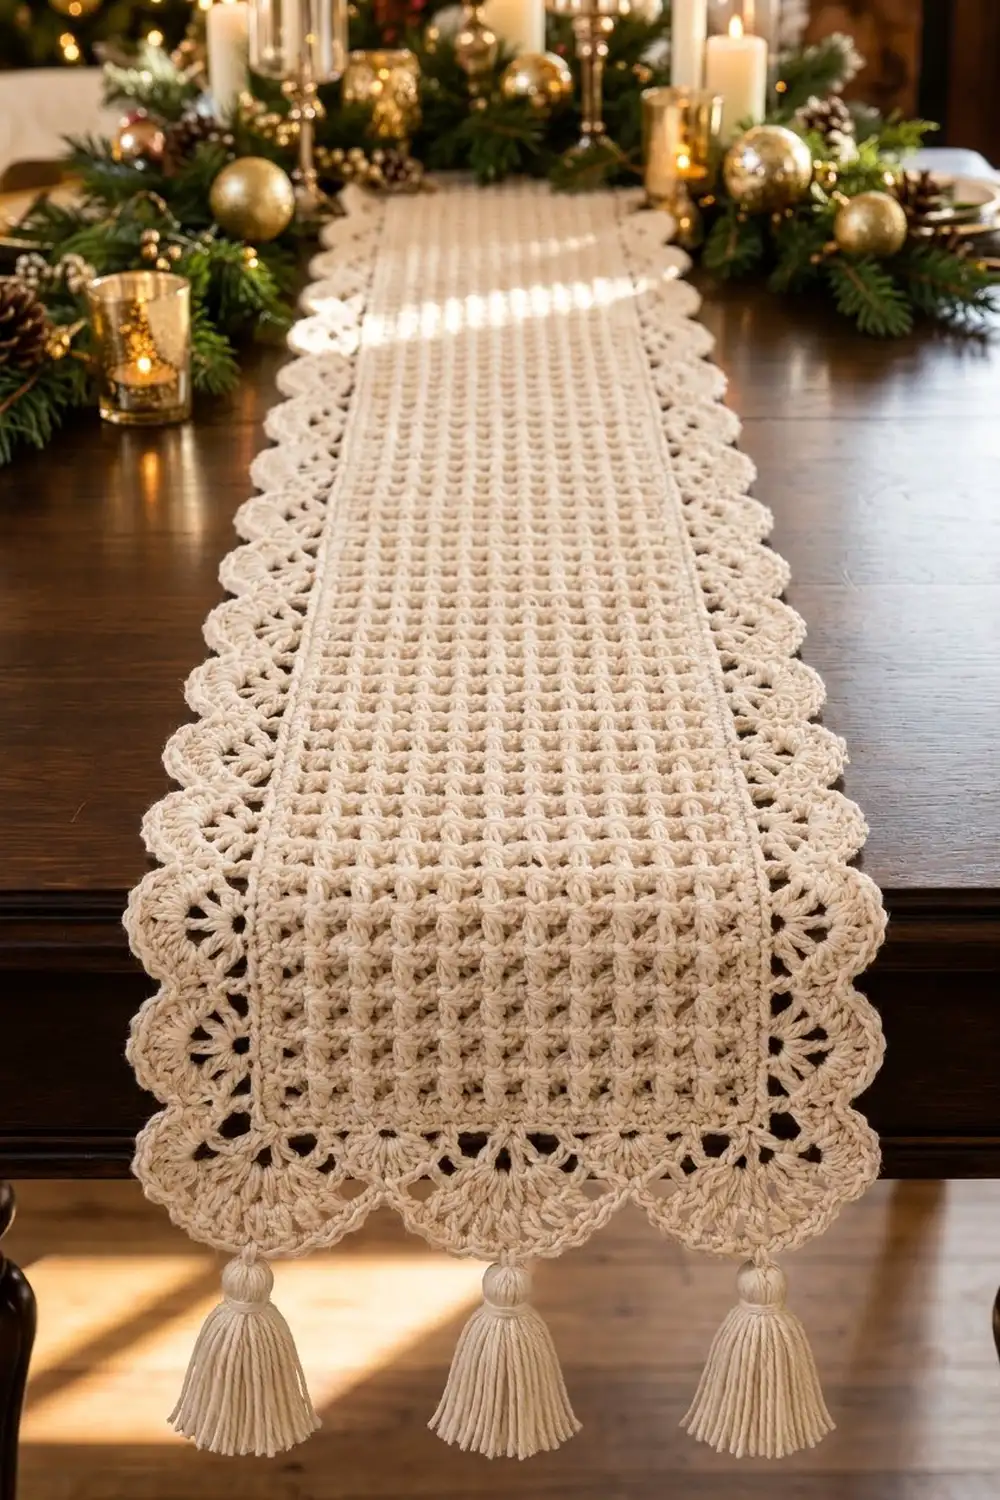
This runner is all texture. A deep waffle-stitch center panel makes a grid of small square cells, and a lacy shell edge runs along both long sides. Each short end finishes with two large openwork fans and three plump tassels.
The runner uses one solid color, a warm cream or ivory cotton, so the stitches do all the decorating. It looks right on a holiday table with gold and greenery, and it works just as well the rest of the year.
The pattern uses US crochet terms. The finished runner measures 11.1 in (28.2 cm) wide by 49.2 in (125.0 cm) long without the tassels. The 4 in (10.2 cm) tassels at each end bring the total length to 57.2 in (145.3 cm).
Construction happens in a clear order:
- Work the waffle panel in rows.
- Work two border rounds all the way around.
- Add the fans in rows across each short end.
- Attach six tassels.
The runner is a single piece, so there is no joining.
Finished Size and Construction
- Finished size: 11.1 in x 49.2 in (28.2 cm x 125.0 cm), not including tassels
- Skill level: Intermediate
- Terminology: US crochet terms
- Yarn weight: Worsted (#4) cotton
- Hook: 5.0 mm (H-8)
- Number of pieces: 1 runner plus 6 tassels
- Layout: One rectangular panel, with fans on both short ends
- Panel size: 36 sts x 100 rows = 9.6 in x 44.4 in (24.4 cm x 112.8 cm)
- Size before border: 9.6 in x 44.4 in (24.4 cm x 112.8 cm)
- Border depth: 0.75 in (1.9 cm) on each long side; 2.4 in (6.1 cm) on each short end, measured at the fan peaks
Materials
Yarn. Choose a smooth combed or mercerized worsted cotton. Cotton gives the waffle cells crisp edges and helps the fans keep their shape after blocking. Acrylic also works, but the fans will be softer. Avoid fuzzy yarns, which blur the grid.
- Cream / ivory: 900 g, about 1,530 m (1,673 yd), based on a cotton with about 170 m per 100 g
Waffle stitch uses a lot of yarn, so buy all your skeins from one dye lot. The amount above includes a margin of about 15%. That margin covers your gauge swatch and the six tassels.
Tools:
- 5.0 mm (H-8) crochet hook
- Tapestry needle
- 4 locking stitch markers
- Stiff card 4.5 in (11.4 cm) tall, for the tassels
- Scissors and a tape measure
- Blocking mats and rust-proof pins
- Spray bottle or steamer
Abbreviations (US Terms)
- ch: chain
- sl st: slip stitch
- sc: single crochet
- dc: double crochet
- FPdc: front post double crochet. Yarn over, insert the hook from front to back to front around the post of the stitch, then complete as a dc.
- sk: skip
- sp(s): space(s)
- st(s): stitch(es)
- RS / WS: right side / wrong side
- rep: repeat
Special stitch: Waffle Stitch. Waffle stitch is worked over a multiple of 3 stitches. On RS rows, work an FPdc around every third stitch. On WS rows, work an FPdc around the two stitches between those columns, which pushes them to the back. From the RS you see raised ridges around sunken square cells. Throughout this pattern, the ch 2 at the start of a row never counts as a stitch.
Gauge and Checkpoints
Gauge: 15 sts and 9 rows = 4 in (10.2 cm) in waffle stitch, after blocking.
Make a test piece first.
- Ch 20.
- Work Row 1 as written in the pattern. You will have 18 dc.
- Repeat Rows 2 and 3 until you have 10 rows. On RS rows, work: dc, (FPdc, dc 2) 5 times, FPdc, dc.
- Block the swatch.
The 18 stitches should measure 4.8 in (12.2 cm) across, and 9 rows should measure 4 in (10.2 cm).
- Too big: go down to a 4.5 mm hook.
- Too small: go up to a 5.5 mm hook.
- Width is right but the rows are too short or too tall: keep your hook. Change how high you pull up the first loop of each dc.
Checkpoints:
- After Row 1: 9.6 in (24.4 cm) wide.
- After Row 9: 4 in (10.2 cm) tall.
- After Row 50: 22.2 in (56.4 cm) tall.
- After Row 100: 9.6 in x 44.4 in (24.4 cm x 112.8 cm).
- After Border Round 2: 11.1 in x 45.4 in (28.2 cm x 115.3 cm).
- After the fans on both ends: 11.1 in x 49.2 in (28.2 cm x 125.0 cm).
If checkpoint 1 or 2 is off by more than 0.2 in (0.5 cm), change your hook now. Over 100 rows, a small error becomes a big one.
Center Panel
The panel is 36 stitches wide. That is a multiple of 3, which the waffle stitch needs, and every row has 36 stitches.
Foundation: Ch 38.
Row 1 (WS): Dc in the 3rd ch from the hook and in each ch across. Turn. (36 dc)
Row 2 (RS): Ch 2, dc in first st, FPdc around next st, dc in next 2 sts. Rep from * 10 more times. FPdc around next st, dc in last st. Turn. (36 sts: 12 FPdc + 24 dc)
Row 3 (WS): Ch 2, dc in first st, dc in next st, FPdc around each of next 2 sts. Rep from * 10 more times. Dc in each of the last 2 sts. Turn. (36 sts: 22 FPdc + 14 dc)
In Row 3, each Row 2 post gets a plain dc on top. Each pair of plain dc between the posts gets an FPdc from the WS, which pushes the pair to the back. Those sunken pairs become the floors of the cells.
Row 4 (RS): Repeat Row 2. Each FPdc goes around the plain dc sitting on top of a post column.
Rows 5–99: Keep alternating. Odd rows are WS rows worked like Row 3, and even rows are RS rows worked like Row 2. Row 99 is worked like Row 3. (36 sts every row)
Row 100 (RS): Ch 2, dc in each st across. Fasten off. (36 dc)
Row 100 is plain like Row 1, so both short ends of the panel are flat and even, ready for the fans. Measure for checkpoint 4 before you start the border: 9.6 in x 44.4 in (24.4 cm x 112.8 cm).
Border
Border gauge: about 15.75 sc = 4 in (10.2 cm). That works out to 7 sc for every 4 panel rows. Four panel rows measure 1.8 in (4.6 cm), and 7 sc cover that distance without ruffling or pulling in.
Here, “per side” counts are the stitches between the corner spaces. The corners are counted separately, so no corner stitch gets counted twice.
Round 1 (RS): Single Crochet Base
With the RS facing, join yarn in the first st of Row 100. Ch 1.
- Top short side: Sc in each of the 36 sts, working 2 sc in the 18th st. (36 + 1 = 37 sc)
- Corner: Ch 2.
- Long side: Work 175 sc along the row-ends. Work the row-ends in groups of 4: 2 sc, 2 sc, 2 sc, 1 sc. (25 groups x 7 = 175 sc)
- Corner: Ch 2.
- Bottom short side: Sc in each of the 36 foundation ch loops, working 2 sc in the 18th loop. (36 + 1 = 37 sc)
- Corner: Ch 2.
- Second long side: Work 175 sc as in step 3.
- Corner: Ch 2. Join with a sl st to the first sc.
Round 1 total: 37 + 175 + 37 + 175 = 424 sc, plus 4 corner ch-2 sps.
Place a marker in the 19th sc of each short side. That is the exact center, with 18 sc on each side of it.
Why the math works:
- Long sides: The shell repeat in Round 2 needs a multiple of 6, plus 1. 175 = (6 x 29) + 1.
- Short ends: Each end needs two 18-stitch fans plus 1 shared point. 37 = (18 x 2) + 1.
- The extra sc: Working 2 sc in the 18th st turns the panel’s 36 stitches into 37.
Round 2 (RS): Shell Edge
Ch 1. Do not turn.
- Top short side: Sc in each of the 37 sc.
- Corner: Sc in the corner ch-2 sp.
- Long side: Sc in first sc, sk 2 sc, 5 dc in next sc, sk 2 sc, sc in next sc. Rep from * 28 more times. (29 shells: 145 dc + 30 sc = 175 sts)
- Corner: Sc in the corner ch-2 sp.
- Bottom short side: Sc in each of the 37 sc.
- Corner: Sc in the corner ch-2 sp.
- Second long side: Repeat step 3. (29 shells)
- Corner: Sc in the corner ch-2 sp. Join with a sl st to the first sc. Fasten off.
Round 2 total: 37 + 175 + 37 + 175 + 4 corner sc = 428 sts.
Each shell uses 6 Round 1 stitches. 29 shells x 6 = 174 stitches, and the final sc lands in st 175. That means every long side starts and ends on an sc, and the last shell stops right at the corner.
Checkpoint 5: 11.1 in x 45.4 in (28.2 cm x 115.3 cm).
Fan Ends
The fans are worked in rows across the 37 short-side sc of Round 2 only. The corner sc stays as a small nub beside the outer fan points. Work each end separately.
With the RS facing, join yarn in the first of the 37 short-side sc.
Row 1 (RS): Ch 1, sc in same st, ch 4, sk 8 sts, work (dc, ch 2) 4 times in next st, dc in same st, ch 4, sk 8 sts, sc in next st. Rep from * once more. Turn. (2 fans of 5 dc + 4 ch-2 sps each, and 3 sc points)
To check placement: the sc points land in sts 1, 19 (the marked center) and 37. The fans land in sts 10 and 28.
Row 2 (WS): Ch 1, sc in first sc, ch 2, sk ch-4 sp, dc in next dc, (ch 3, dc in next dc) 4 times, ch 2, sk ch-4 sp, sc in next sc. Rep from * once more. Turn. (Each fan: 5 dc + 4 ch-3 sps)
Row 3 (RS): Ch 1, sc in first sc, ch 1, sk ch-2 sp, dc in next dc, (5 dc in next ch-3 sp, dc in next dc) 4 times, ch 1, sk ch-2 sp, sc in next sc. Rep from * once more. Turn. (Each fan: 5 + 20 = 25 dc)
Row 4 (WS): Ch 1, sc in first sc, sk ch-1 sp, sc in first dc, (ch 3, sk 1 dc, sc in next dc) 12 times, sk ch-1 sp, sc in next sc. Rep from * once more. Fasten off. (Each fan: 13 sc + 12 ch-3 loops)
The loops come out even because 1 + (12 x 2) = 25, so the last loop ends on the 25th dc. Each fan spans 4.8 in (12.2 cm) and adds 1.9 in (4.8 cm) of length at its peak. Repeat on the other short end.
Checkpoint 6: 11.1 in x 49.2 in (28.2 cm x 125.0 cm).
Tassels (Make 6)
- Wrap yarn 25 times around the 4.5 in (11.4 cm) card.
- Thread a 10 in (25.4 cm) strand under the wraps at the top and knot it tightly.
- Cut through the wraps at the bottom.
- Take a 15 in (38.1 cm) strand and wrap it 8 times around the bundle, 0.5 in (1.3 cm) below the top. This forms the rounded head. Knot it and bury the ends inside the tassel.
- Trim the tassel to 4 in (10.2 cm).
Tie one tassel to each of the 3 sc points on Row 4 of each end: the two outer points and the center point. Knot on the WS and weave the ends into the fan.
Final Blocking
- Weave in all ends, but leave 1 in (2.5 cm) of each tail unclipped for now.
- Soak the runner in cool water for 15 minutes. Press out the water without wringing, then roll the runner in a towel.
- Lay the runner flat, RS up. Pin the panel to 9.6 in x 44.4 in (24.4 cm x 112.8 cm), keeping all four edges straight.
- Pin the shell edges so the runner is 11.1 in (28.2 cm) wide, with one pin at the center of each shell.
- Open each fan into a half circle. Pin the 3 points first, then pin out each ch-3 loop.
- Check that the length is 49.2 in (125.0 cm).
- Let the runner dry completely. Do not pin the tassels.
- Unpin, clip the tails, then comb and trim the tassels.
Final Quality-Control Checklist
- Every panel row has 36 sts, with 12 raised columns on the RS.
- The cells line up straight from Row 2 through Row 99.
- Rows 1 and 100 are plain dc, and the short edges are straight.
- Round 1 has 37 sc on each short side and 175 sc on each long side.
- Each long side has 29 shells, with an sc at each end.
- Each fan has 25 dc and 12 ch-3 loops.
- The center fan point sits over the marked 19th sc.
- All 6 tassels are 4 in (10.2 cm) long.
- The finished size is 11.1 in x 49.2 in (28.2 cm x 125.0 cm).
Troubleshooting
The columns zigzag. Your stitch count is off. Count to 36, and make sure each FPdc goes around the dc sitting directly above its column.
The panel narrows. You are probably missing the last dc of a row. Put a marker in the final stitch of each row.
The long edges ruffle or pull in. Change your hook size for Round 1 only, and keep the count at 175. The shell repeat depends on that number.
The fans cup. Loosen the ch-3 sps in Row 2 and block firmly into half circles.
The fans flare. Work 4 dc in each ch-3 sp instead of 5. Each fan will then have 21 dc, so work 10 ch-3 loops in Row 4 (1 + 20 = 21).
The tassels look thin. Use 30 wraps instead of 25.
Care
Hand wash in cool water with mild soap, then dry flat and re-pin the fans if needed. Do not tumble dry. Steam lightly to refresh the waffle texture.
Final Notes
Here is the measurement chain from start to finish:
- At a gauge of 15 sts and 9 rows per 4 in (10.2 cm), the 36-stitch, 100-row panel measures 9.6 in x 44.4 in (24.4 cm x 112.8 cm).
- Round 1 sets the stitch counts at 37 sc on each short side and 175 sc on each long side.
- Round 2 adds 29 shells to each long side and brings the runner to 11.1 in x 45.4 in (28.2 cm x 115.3 cm).
- The fans finish the runner at 11.1 in x 49.2 in (28.2 cm x 125.0 cm), and the tassels add 4 in (10.2 cm) at each end.
Check your gauge on the test piece and count at every checkpoint. If those numbers are right, the border will lie flat and the fans will sit evenly.
Happy crocheting!