

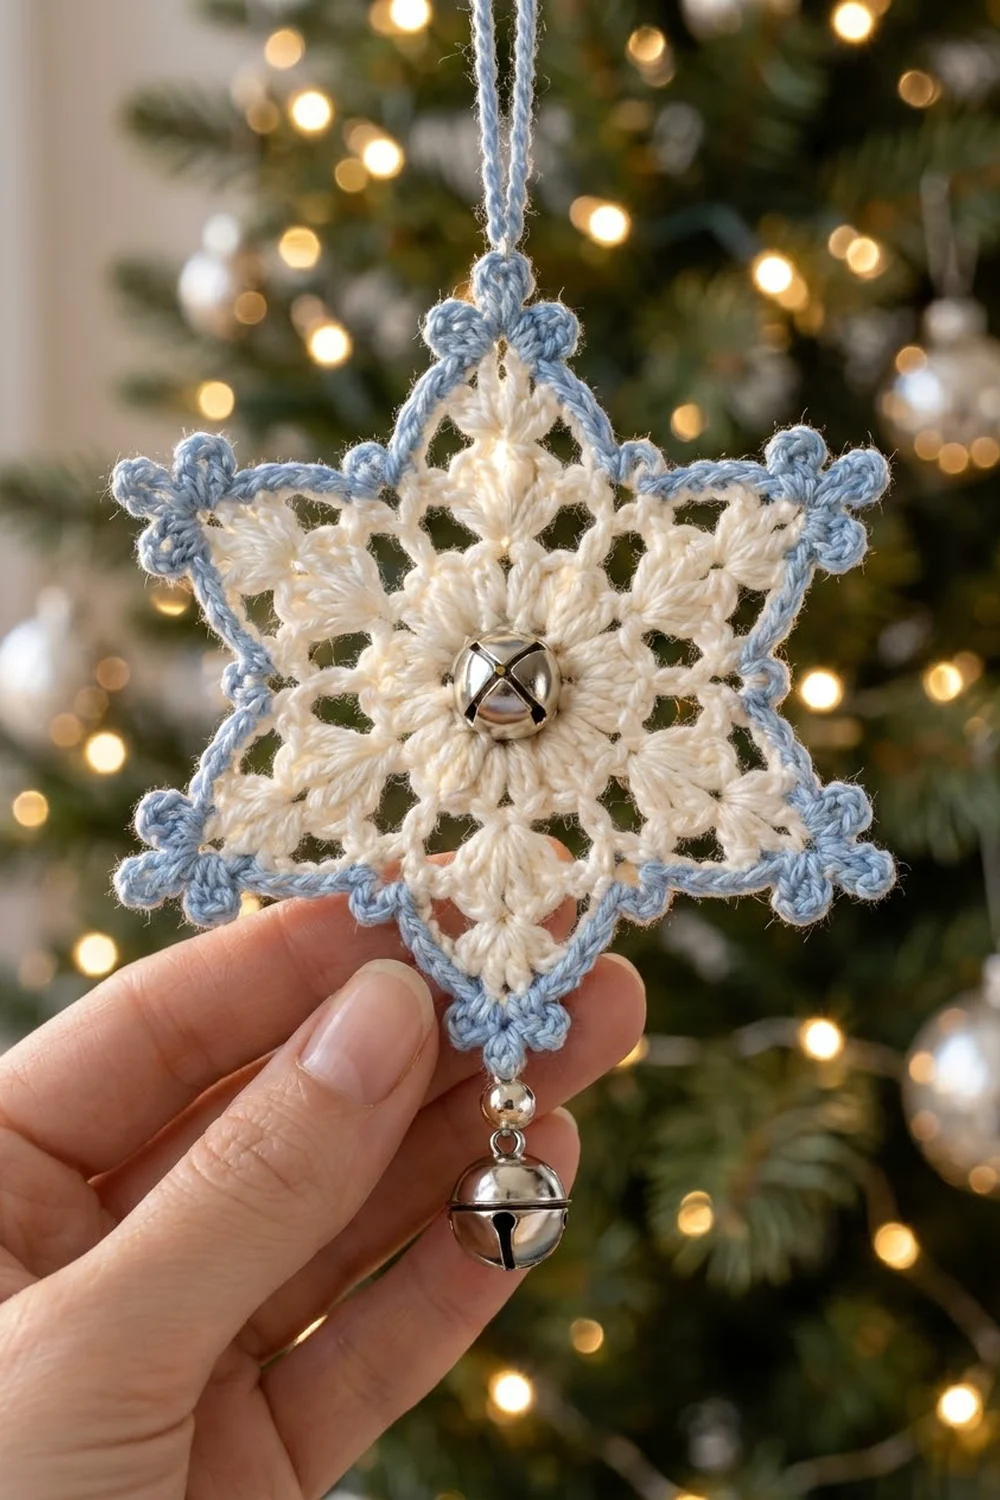
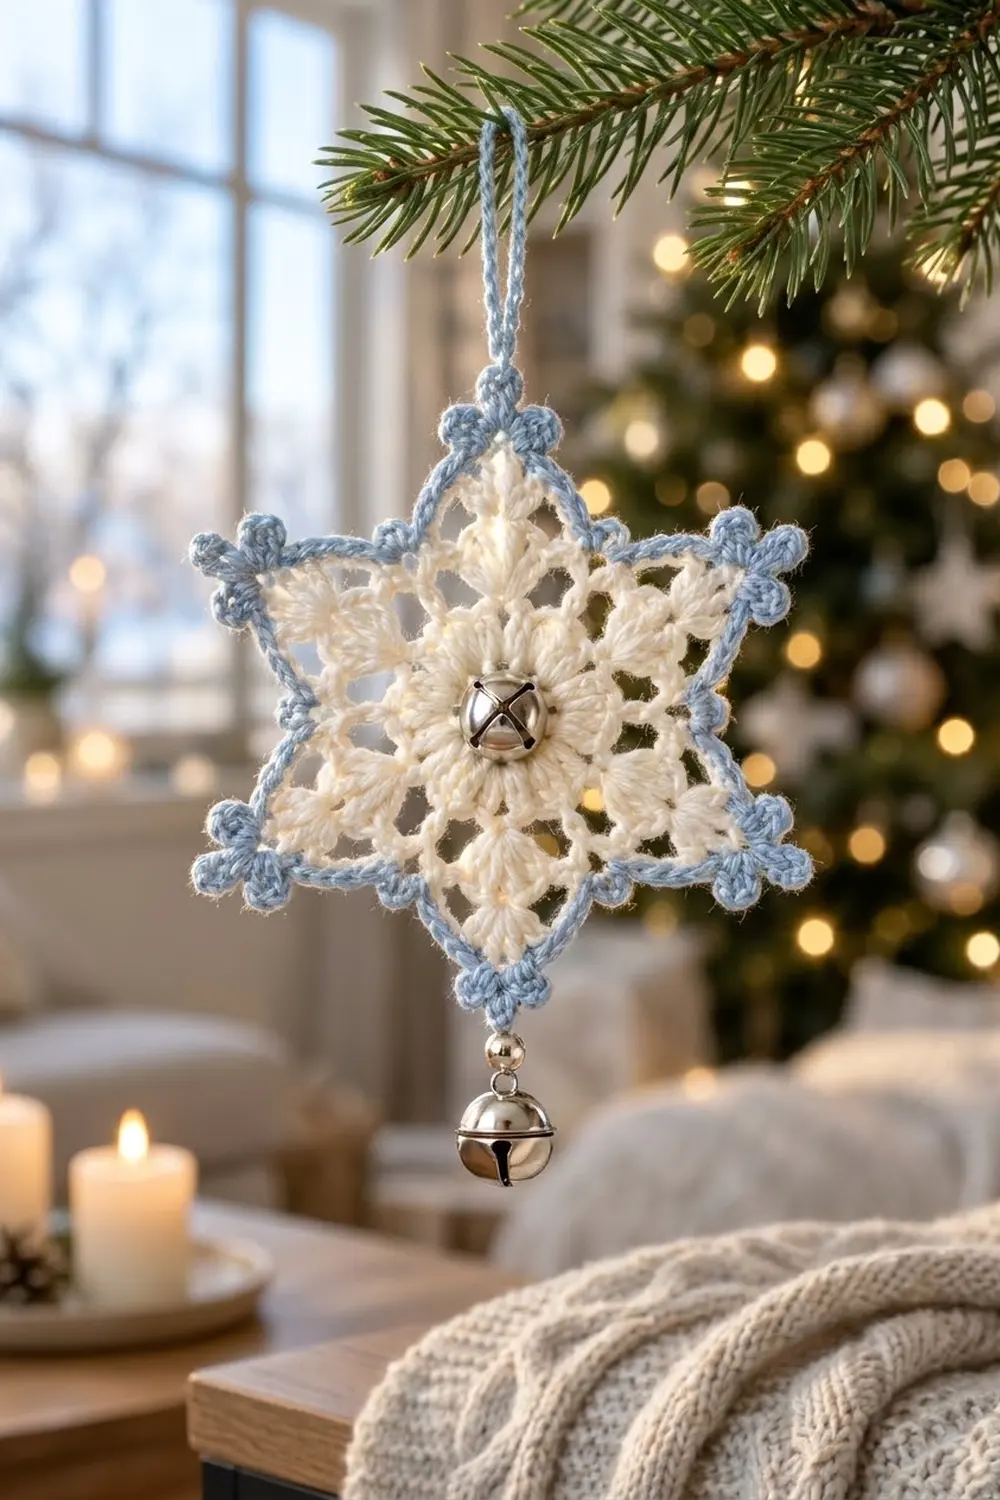
The Frosted Jingle Star is a small lace ornament with a wintry look. It’s a six-pointed star in soft cream with a crisp ice-blue edge. A silver jingle bell sits in the center, and a second bell hangs from the bottom tip, so it chimes a little when the tree moves.
The colors are deliberately simple. The cream body shows off the lace, and the light blue outline sharpens each point. Tiny three-loop picot clusters at the tips look like frost crystals, and the open windows between the points let the tree lights shine through.
This pattern uses US crochet terms. The finished ornament measures 4.5 in (11.4 cm) from point to point, not counting the hanging loop and bell.
The star is worked in one piece, in the round, from the center out. You’ll work four cream rounds (a dc ring, a puff ring, small shells, then large point shells), then one blue sc border round with picots. After that you add the hanging loop and sew on the bells. There’s no joining and no seaming.
Finished Size and Construction
- Finished size: 4.5 in (11.4 cm) point to point
- Skill level: Easy–Intermediate
- Terminology: US crochet terms
- Yarn weight: DK (3), cotton or cotton blend
- Hook: 3.5 mm (E-4)
- Number of pieces: 1 (single motif)
- Layout: one standalone six-point star
- Piece size: 4.5 in (11.4 cm) point to point
- Size before border: 4 in (10.2 cm) point to point after Round 4
- Border depth: 0.25 in (0.6 cm) on each side, so the border adds 0.5 in (1.3 cm) point to point
- Hanging loop: about 3 in (7.6 cm) tall
Materials
Yarn advice: Mercerized or soft matte DK cotton gives the clearest stitch definition and holds the points well after blocking. Acrylic works too, but the points will stay a little rounder. Choose a true cream or ivory instead of bright white so the blue edge stands out gently.
- Color A – Cream: 8 g / about 18 m (20 yd)
- Color B – Ice Blue: 4 g / about 9 m (10 yd), including the hanging loop and bell tie
Quantities include a safety margin of about 30% for swatching, joins, and tails. One ornament uses roughly 6 g of cream and 3 g of blue.
Tools and notions:
- 3.5 mm (E-4) crochet hook
- 1 silver jingle bell, 12 mm (0.5 in), for the center
- 1 silver jingle bell, 15 mm (0.6 in), for the bottom drop
- 1 silver bead, 6 mm, with a hole wide enough for doubled thread
- Tapestry needle
- Sewing needle and cream or white thread (optional, for securing the center bell)
- Scissors
- Rust-proof pins and a foam blocking mat
- Spray bottle or light fabric stiffener (optional)
Abbreviations (US Terms)
- ch – chain
- sl st – slip stitch
- sc – single crochet
- dc – double crochet
- sp – space
- st(s) – stitch(es)
- MR – magic ring
- beg – beginning
- rep – repeat
Special stitches:
- Puff: (Yo, insert hook in st, yo and pull up a loop to dc height) 3 times, yo and pull through all 7 loops on hook.
- Beg puff: Ch 2. (Yo, insert hook in same st, yo and pull up a loop) 2 times, yo and pull through all 5 loops. Counts as the first puff.
- Shell: (3 dc, ch 2, 3 dc) in the same sp. Used in Round 3.
- Point shell: (3 dc, ch 3, 3 dc) in the same sp. Used in Round 4.
- Triple picot: Ch 3, sl st in 3rd ch from hook; ch 4, sl st in 4th ch from hook; ch 3, sl st in 3rd ch from hook. This makes a small three-loop cluster with a slightly taller middle loop.
Gauge and Checkpoints
Gauge isn’t critical for an ornament, but it controls whether the star lies flat. Make one test star before you buy bells for a full set. If your test star matches the checkpoints below, the rest will match too.
Measure each round flat, without stretching:
- After Round 1: 0.75 in (1.9 cm) across
- After Round 2: 1.5 in (3.8 cm) across
- After Round 3: 2.75 in (7.0 cm) shell tip to shell tip
- After Round 4: 4 in (10.2 cm) point to point
- After Round 5 (border): 4.5 in (11.4 cm) point to point, after blocking
If your star is too big by more than 0.25 in (0.6 cm) at Round 4, go down to a 3.25 mm hook. Also check that your puffs aren’t pulled up too tall.
If your star is too small or cups upward, go up to a 3.75 mm hook. Also check that your ch-4 spaces in Round 4 are loose enough. Tight chains are the most common reason a lace star curls.
If the star ruffles, your chains are too loose. Work them on the hook shaft, not the throat, and keep the same tension all the way around.
Pattern
Round 1 – Center Ring (Color A, Cream)
Make an MR. Ch 3 (counts as dc), work 11 dc in the ring. Pull the ring tight. Sl st to the top of the beg ch-3 to join.
Stitch count: 12 dc.
Leave the center fully closed. The 12 mm jingle bell will sit on top of it.
Round 2 – Puff Ring
Work a beg puff in the same st as the join, ch 2. Puff in the next dc, ch 2. Rep from * to * 10 more times. Sl st to the top of the beg puff to join.
Stitch count: 12 puffs and 12 ch-2 sps.
This round makes the soft ring of clusters that frames the bell.
Round 3 – Small Shells
Sl st into the first ch-2 sp. Ch 3 (counts as dc), then work (2 dc, ch 2, 3 dc) in the same sp. This is your first shell. Ch 2, sc in the next ch-2 sp, ch 2.
Shell in the next ch-2 sp, ch 2, sc in the next ch-2 sp, ch 2. Rep from * to * 4 more times. Sl st to the top of the beg ch-3 to join.
Stitch count: 6 shells (36 dc), 6 sc, 6 ch-2 shell tips, and 12 ch-2 side sps.
Check: Round 2 had 12 sps. Six of them hold shells and six hold sc, so all 12 are used and none are skipped.
Round 4 – Star Points
Sl st in the next 2 dc and into the ch-2 tip sp of the first shell. Ch 3 (counts as dc), then work (2 dc, ch 3, 3 dc) in the same sp. This is your first point shell.
Ch 4, skip the last 3 dc of this shell and the ch-2 sp, sc in the next sc. This sc is the valley. Ch 4, skip the next ch-2 sp and the first 3 dc of the next shell.
Point shell in the ch-2 tip sp, ch 4, sc in the next sc, ch 4. Rep from * to * 4 more times. Sl st to the top of the beg ch-3 to join. Fasten off Color A and weave in the tails.
Stitch count: 6 point shells (36 dc), 6 valley sc, 6 ch-3 point tips, and 12 ch-4 sps.
Each point shell sits on top of a Round 3 shell, which stretches the fan outward into a point. The ch-4 sps pull the valleys in and leave the open lace windows.
Checkpoint: 4 in (10.2 cm) point to point. Pin it out briefly to check before you add the border.
Border
Border Gauge
The border is one round of sc in Color B, with a triple picot at each tip. Every dc gets 1 sc, and every ch-4 sp gets 4 sc. In DK cotton on a 3.5 mm hook, this adds about 0.25 in (0.6 cm) to each edge.
Round 5 – Ice-Blue Edge (Color B)
Join Color B with a sl st in any ch-3 point tip. Ch 1.
First point: In the same tip sp, work (2 sc, triple picot, 2 sc). Sc in each of the next 3 dc. Work 4 sc in the next ch-4 sp. Skip the valley sc. Work 4 sc in the next ch-4 sp. Sc in each of the next 3 dc.
In the next tip sp, work (2 sc, triple picot, 2 sc). Sc in each of the next 3 dc, 4 sc in the next ch-4 sp, skip the valley sc, 4 sc in the next ch-4 sp, sc in each of the next 3 dc. Rep from * to * 4 more times. Sl st to the first sc to join. Fasten off and weave in the tails.
Count per point:
- Tip: 2 + 2 = 4 sc, plus 1 triple picot
- Right edge from tip to valley: 3 sc over dc + 4 sc in the ch-4 sp = 7 sc
- Left edge from valley to tip: 4 sc in the ch-4 sp + 3 sc over dc = 7 sc
- Per point: 4 + 7 + 7 = 18 sc
Round total: 6 × 18 = 108 sc, plus 6 triple picots.
From tip center to valley, each edge of a point has 2 tip sc + 3 + 4 = 9 sc. Two edges per point give 18 sc, which matches the per-point count above.
Why the Math Works
The border uses one sc for every dc in Round 4 (36 dc = 36 sc). Each of the 12 ch-4 sps gets 4 sc (48 sc), and each of the 6 tips gets 4 sc (24 sc). That’s 36 + 48 + 24 = 108 sc, with nothing added or skipped except the 6 valley sc.
Skipping the valley sc is what makes the sharp inward corner. Putting 4 sc in a ch-4 sp keeps the edge flat without ruffling. Putting 4 sc plus a picot in each tip gives the points enough room to stay crisp.
Hanging Loop
With Color B, insert your hook into the middle (ch-4) loop of the triple picot at the top point and pull up a loop. Ch 24, then sl st into the same picot loop. Fasten off and weave the tails back into the border.
The loop stands about 3 in (7.6 cm) tall.
Bells
Center bell: With a length of Color A or sewing thread, sew the 12 mm bell through its shank to the center of Round 1. Go through the ring 3–4 times and knot it on the back.
Bottom drop: Cut a 10 in (25.4 cm) length of Color B. Thread it through the middle picot loop of the bottom point. Pass both ends through the 6 mm bead, then through the shank of the 15 mm bell. Go back up through the bead, then tie a secure knot behind the picot. Aim for about 0.5 in (1.3 cm) of drop between the point and the bead. Weave in the ends.
Final Blocking
- Take the bells off, or block the star before you attach them.
- Lightly mist the star with water, or dip it in diluted fabric stiffener and gently press out the excess.
- Lay it face up on a blocking mat.
- Pin the center first, then pin each of the 6 tips at an even 4.5 in (11.4 cm) point to point. Use a ruler between opposite tips.
- Pin each of the 6 valleys toward the center so the inner corners stay sharp.
- Pin open the middle loop of each triple picot.
- Gently open the lace windows with your fingertips so they’re even.
- Let it dry completely, at least 6 hours, then unpin it.
- Attach the bells and hanging loop if you haven’t already.
Final Quality-Control Checklist
- Round 1 has 12 dc and the center is fully closed.
- Round 2 has 12 puffs, all the same height.
- Round 3 has 6 shells and 6 sc.
- Round 4 has 6 point shells and 12 ch-4 sps, and measures 4 in (10.2 cm) point to point.
- Round 5 has 108 sc and 6 triple picots.
- All 6 valleys are sharp and all 6 points are the same length.
- The star measures 4.5 in (11.4 cm) point to point after blocking.
- The hanging loop is centered on the top point and stands about 3 in (7.6 cm).
- Both bells are secure and ring freely.
- All tails are woven in and invisible from the front.
Troubleshooting
The star cups like a bowl. Your chains are too tight. Redo Round 4 with looser ch-4s, or go up a hook size.
The star ruffles. Your chains are too loose, or you added extra sc in the ch-4 sps. Check for exactly 4 sc per sp.
The points are uneven. Your point shells probably landed in the wrong sp. Each one must go in the ch-2 tip sp of a Round 3 shell, not a side sp.
The valleys look rounded. You worked into the valley sc instead of skipping it. Skip it, then pin the valleys firmly when blocking.
The picots are floppy. Tighten the sl st that closes each picot loop, then pin them open while blocking.
The center bell droops. Sew it through the ring more times, or add a dot of fabric glue under the shank.
The ornament hangs crooked. Move the hanging loop so it’s exactly on the middle picot loop of the top point.
Care
Spot clean or hand wash gently in cool water with the bells removed, then reshape and dry flat. Store the ornament flat in tissue paper so the points stay crisp.
Final Notes
Here is the measurement chain to follow. Round 1 should be 0.75 in (1.9 cm), and Round 2 should be 1.5 in (3.8 cm). Round 3 should measure 2.75 in (7.0 cm), and Round 4 should be 4 in (10.2 cm) point to point. The 0.25 in (0.6 cm) border brings the finished star to 4.5 in (11.4 cm).
The counts carry through every round: 12 dc, then 12 puffs, then 6 shells, then 6 point shells. The border adds 18 sc per point, for 108 sc in total.
If you hit each checkpoint, your Frosted Jingle Star will block flat and sharp every time.
Happy crocheting!