

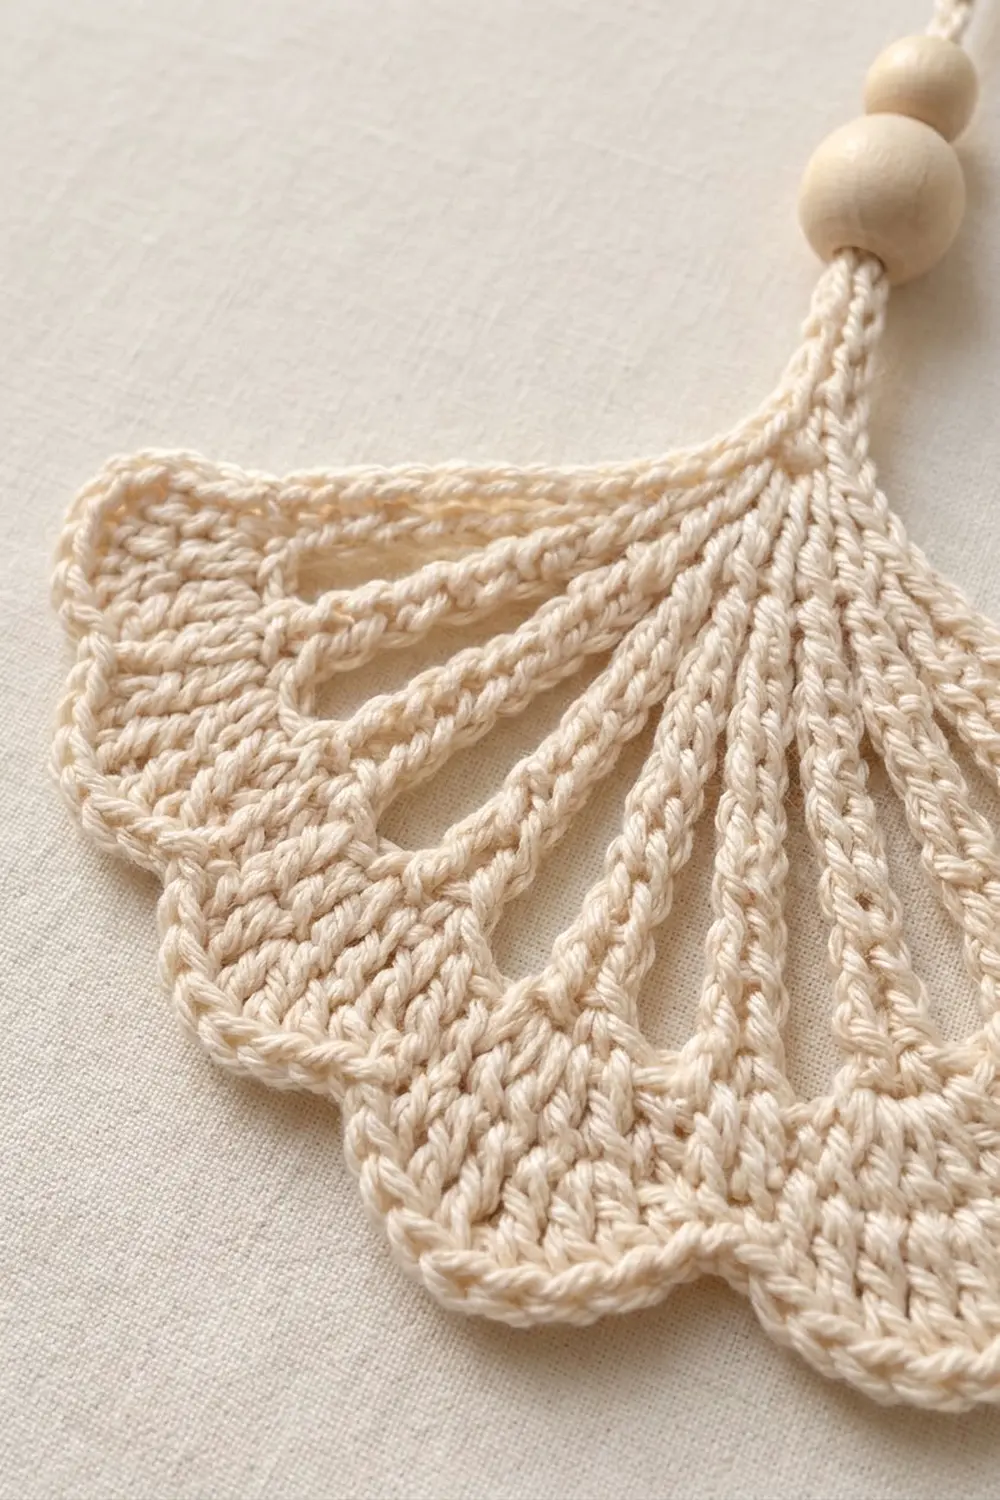
This little ginkgo leaf is made to hang in a window. It has a fan shape, open rays that let the daylight through, and a soft scalloped edge. A short cord and two natural wooden beads finish the top so the leaf hangs straight.
The sample is worked in a single shade of cream cotton. One plain color shows off the texture best: long rays, solid lobes, and a neat single crochet edge. The style is calm and Scandinavian, so it suits winter windows, a minimal tree, or a gift tag.
This pattern uses US crochet terms. The finished leaf measures 6 in (15.2 cm) wide and 3.5 in (8.9 cm) tall from base to scallop tips. The folded cord and beads add 3.5 in (8.9 cm) above the leaf.
Construction is simple. You start with a magic ring, work 6 flat rows outward into a fan, then edge the whole leaf in one round. A slip-stitch cord is added at the base, the beads slide on, and the top of the cord is folded into a hanging loop.
Finished Size and Construction
- Finished size: 6 in (15.2 cm) wide x 3.5 in (8.9 cm) tall, plus a 3.5 in (8.9 cm) cord and loop
- Skill level: Easy to intermediate
- Terminology: US crochet terms
- Yarn weight: DK (#3) cotton
- Hook: 3.5 mm (E-4)
- Number of pieces: 1 leaf, worked in one piece with an attached cord
- Layout: single hanging leaf, base at the top, scallops pointing down
- Piece size: 6 in x 3.5 in (15.2 cm x 8.9 cm)
- Size before border: 5.5 in x 3.25 in (14.0 cm x 8.3 cm) after Row 6
- Border depth: 0.25 in (0.6 cm), one round of single crochet
Materials
Choose a smooth mercerized or combed cotton in DK weight. Cotton keeps the rays crisp, blocks flat, and does not fuzz in sunlight. Avoid fluffy or very soft acrylic, because the open rays will sag.
- Cream (main and only color): 10 g / 23 m (25 yd) per leaf
- Two round wooden beads, 16 mm, with a hole of at least 5 mm
- 3.5 mm (E-4) crochet hook
- Yarn needle
- Scissors
- Rust-proof pins and a foam blocking mat
- Spray bottle with water
- Optional: liquid fabric stiffener for a firmer leaf
The amount above includes about a 30 percent margin for gauge differences, the cord, and tails. One leaf actually uses about 7 g (16 m).
Abbreviations (US Terms)
- ch: chain
- sl st: slip stitch
- sc: single crochet
- dc: double crochet
- tr: treble crochet (yarn over twice)
- dtr: double treble crochet (yarn over 3 times)
- sk: skip
- sp(s): space(s)
- st(s): stitch(es)
Special stitch: Shell. Work 9 dc in the same stitch. Each shell becomes one rounded lobe of the leaf.
Turning chains: In this pattern, ch-3 counts as a dc, ch-4 counts as a tr, and ch-5 counts as a dtr.
Gauge and Checkpoints
Gauge: 18 dc and 10 rows = 4 in (10.2 cm) with a 3.5 mm hook. Each dc row is about 0.4 in (1.0 cm) tall.
Exact gauge matters less for an ornament than for a garment, but it decides whether the fan lies flat. Make one test leaf first and check it at each stage below. Measure the width straight across the flat lower edge of the fan. Measure the height from the ring to the top of the last row.
- After Row 2: 2 in (5.1 cm) wide x 1 in (2.5 cm) tall
- After Row 4: 4.5 in (11.4 cm) wide x 2.25 in (5.7 cm) tall
- After Row 6 (before border): 5.5 in (14.0 cm) wide x 3.25 in (8.3 cm) tall
- After the border: 6 in (15.2 cm) wide x 3.5 in (8.9 cm) tall
If your leaf is too big or the edge ruffles, go down to a 3.25 mm (D-3) hook. If it is too small or the fan cups like a bowl, go up to a 3.75 mm (F-5) hook. If the rays are long and floppy, your tr and dtr are usually too loose. Pull each loop snug before the next yarn over.
Leaf Pattern
The leaf is worked flat in turned rows. Every row starts at one straight edge of the fan and ends at the other.
Row 1: Make a magic ring. Ch 3 (counts as dc), work 8 dc into the ring. Pull the ring closed. Turn. (9 dc)
The 9 dc form a small half-circle. Pull the ring tight so the base is a neat point.
Row 2 (growth row): Ch 3 (counts as dc), dc in the same st, 2 dc in each of the next 7 sts, dc in the last st (the top of the turning ch). Turn. (17 dc)
Check: 2 + (7 x 2) + 1 = 17.
Row 3 (ray row): Ch 4 (counts as tr), ch 3, sk 1 st, tr in next st; repeat from * 7 more times. Turn. (9 tr, 8 ch-3 sps)
The tr land in sts 1, 3, 5, 7, 9, 11, 13, 15, and 17. The last tr goes into the top of the Row 2 turning chain.
Row 4 (long ray row): Ch 5 (counts as dtr), ch 4, dtr in next tr; repeat from * 7 more times, working the last dtr in the top of the turning ch. Turn. (9 dtr, 8 ch-4 sps)
These long stitches stack on the Row 3 tr to make the 9 rays. The ch-4 spaces become the long, narrow openings between them.
Row 5 (solid band): Ch 3 (counts as dc), 4 dc in next ch-4 sp, dc in next dtr; repeat from * 7 more times. Turn. (41 dc)
This is a conversion row. Count it as 9 dc worked 1 per dtr + 32 dc added in the spaces (8 sps x 4 dc) = 41 dc. The rays now flow into a solid band.
Row 6 (scallop row): Ch 1, sc in first dc, sk 3 dc, Shell in next dc, sk 3 dc, sc in next dc; repeat from * 4 more times. Turn. (5 shells, 6 sc; 51 sts)
Each repeat uses 8 sts of Row 5, so 5 x 8 + 1 = 41. The sc land in sts 1, 9, 17, 25, 33, and 41, and the shells land in sts 5, 13, 21, 29, and 37. The middle shell sits on st 21, the exact center, so the lobes are symmetrical. Count: 6 sc + (5 x 9 dc) = 51 sts.
Do not fasten off. The border round continues from here.
Checkpoint: the leaf should now be 5.5 in (14.0 cm) wide and 3.25 in (8.3 cm) tall when patted flat.
Border
The border is one round of sc. It outlines the scallops, runs down one straight edge to the base, and climbs back up the other edge.
Border gauge: about 5 sc per 1 in (2.5 cm) of edge. On the side edges, that means 2 sc per dc row-end, 3 sc per tr row-end, and 4 sc per dtr row-end. These counts match the height of each stitch, so the edge neither pulls in nor waves.
Border round, scalloped edge: Ch 1, sc in first sc. Sc in next 4 dc, 3 sc in next dc (the 5th dc of the shell), sc in next 4 dc, sl st in next sc; repeat from * 3 more times. Sc in next 4 dc, 3 sc in next dc, sc in next 4 dc, sc in last sc.
Scalloped edge count: 1 sc + (5 shells x 11 sc) + 1 sc = 57 sc, plus 4 sl st in the valleys. Total: 61 sts.
Border round, first side edge: Without turning, rotate the leaf and work down the row-ends. Work 2 sc in the Row 5 row-end, 4 sc in the Row 4 row-end, 3 sc in the Row 3 row-end, 2 sc in the Row 2 row-end, and 2 sc in the Row 1 row-end. (13 sc)
Base: Sl st into the center of the magic ring at the base point. (1 sl st)
Border round, second side edge: Work 2 sc in the Row 1 row-end, 2 sc in the Row 2 row-end, 3 sc in the Row 3 row-end, 4 sc in the Row 4 row-end, and 2 sc in the Row 5 row-end. (13 sc) Sl st in the first sc of the round. Fasten off and weave in the tails.
Border total: 57 sc + 4 sl st along the scallops, 13 sc on each side, and 1 sl st at the base.
Why the math works: Row 6 has 5 shells of 9 dc. Working 4 sc, then 3 sc in the center dc, then 4 sc covers all 9 dc and gives 11 sc per lobe. The 2 extra sc at each lobe tip let the curve turn without cupping. A sl st in each valley sc keeps the 4 notches sharp instead of filling them in. Both side edges use the same 2-3-4-2-2 sequence, so the leaf stays symmetrical.
Cord and Beads
Cord: Leaving a 10 in (25.4 cm) starting tail, ch 41. Sl st in the back bump of the 2nd ch from the hook and in each ch across. (40 sl st) The cord measures about 5 in (12.7 cm).
Sl st the end of the cord into the base point of the leaf, right on top of the border sl st. Fasten off and weave this end into the base.
Beads: Thread the 10 in (25.4 cm) starting tail onto the yarn needle. Pass the needle through both beads, then gently pull the tip of the cord through the bead holes. Slide both beads down until the lower bead rests on the base of the leaf.
Hanging loop: Fold the top 1.5 in (3.8 cm) of the cord down onto itself to form a loop. Wrap the tail tightly around the join 4 times, then stitch through both layers twice. Weave the tail in along the cord.
Checkpoint: the folded cord should stand about 3.5 in (8.9 cm) above the leaf. That leaves about 2.25 in (5.7 cm) from the top of the beads to the top of the loop.
Final Blocking
- Weave in all ends before blocking, but do not trim them yet.
- Soak the leaf in cool water for 5 minutes, then press out the water in a towel. Do not wring.
- Lay the leaf face up on a foam mat.
- Pin the base point first. Then pin both straight side edges so the fan opens into a wide arc.
- Pin the tip of each of the 5 lobes, then the 4 valleys between them.
- Measure: 6 in (15.2 cm) wide and 3.5 in (8.9 cm) tall. Adjust the pins until you hit these numbers.
- Gently straighten each ray so all 9 rays point out from the base like spokes. Pin the ch-4 openings open if needed.
- Optional: for a leaf that holds its shape in a sunny window, brush on fabric stiffener while it is still pinned.
- Let it dry completely, for at least 12 hours. Unpin it and trim the tails.
- Hang it by the cord and check that the beads rest on the base.
Final Quality-Control Checklist
- 9 rays, evenly spaced, with 8 open spaces between them
- 41 dc in Row 5, with 4 dc in every space
- 5 lobes of the same size, with the middle lobe centered
- 4 sharp valleys between the lobes
- 13 sc on each straight edge, with no gaps at the tr and dtr row-ends
- Base point closed tightly, with no hole at the ring
- Leaf measures 6 in (15.2 cm) x 3.5 in (8.9 cm) after blocking
- Cord stands 3.5 in (8.9 cm) above the leaf once folded, with both beads snug against the leaf
- Hanging loop stitched firmly
- All tails woven in and trimmed
Troubleshooting
The fan cups or curls up. Row 5 or the border is too tight. Go up a hook size, or work the 4 dc in each space more loosely.
The edge ruffles. The shells are too loose. Go down a hook size for Row 6 and the border only.
The rays twist or lean. The tr and dtr are uneven. Pull each loop snug and keep the same tension on every yarn over. Blocking will straighten slight leaning.
The lobes are lopsided. Count Row 5 again. With 41 dc, the middle shell must land on st 21.
There is a hole at the base. The magic ring was not pulled closed. Weave the starting tail around the ring and pull it tight before blocking.
The beads will not fit over the cord. Choose beads with a 5 mm hole, or work the cord as a plain chain of 40 without the sl st row.
The side edges pucker. Check the 2-3-4-2-2 sc sequence. Too few sc in the dtr row-end pulls the edge in.
Care
Hand wash in cool water with a mild soap and lay flat to dry, pinning the lobes back into shape. If you used stiffener, spot clean only and add more stiffener as needed.

Final Notes
The measurement chain is short and easy to follow. Row 2 gives 17 dc and a fan 2 in (5.1 cm) wide. Row 4 gives 9 long rays and a fan 4.5 in (11.4 cm) wide. Row 5 converts the rays into 41 dc, and Row 6 turns those 41 dc into 5 shells at 5.5 in (14.0 cm) wide. The border adds 0.25 in (0.6 cm) all around, for a finished leaf of 6 in (15.2 cm) x 3.5 in (8.9 cm). On top sits a 5 in (12.7 cm) cord folded into a 3.5 in (8.9 cm) hanger with two wooden beads.
Once your test leaf matches these numbers, the next one will be quick. Hang one alone in a small window, or make a few and let them catch the winter light together.
Happy crocheting!