

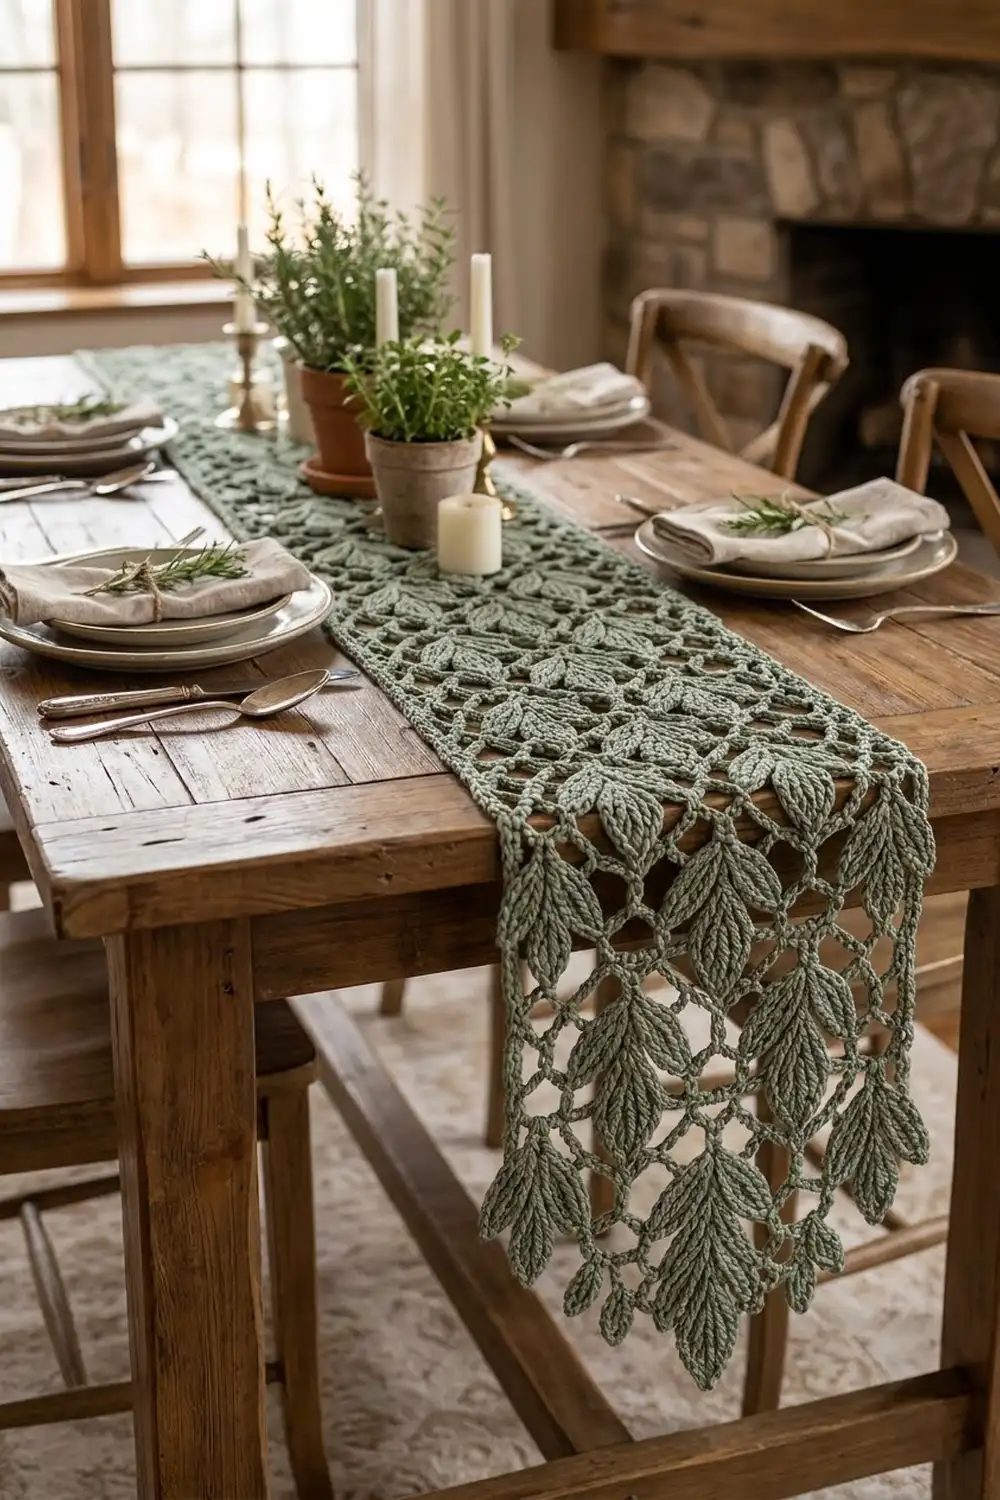
The Evergreen Sprig Table Runner is a long, narrow strip of open lace in soft sage green. Small three-leaf sprigs sit across a light square mesh. Each end narrows to a point that finishes in a hanging cluster of leaves.
The runner uses just one color, so the texture does all the work. The ridged leaves rise a little above the mesh, and the open spaces let the tabletop show through. The look is quiet and natural. It suits a holiday console table and works on a dining table all year.
This pattern uses US crochet terms. The finished runner is 13.25 in (33.7 cm) wide and 54.25 in (137.8 cm) from point to point. Including the hanging leaf drops, it is 57.25 in (145.4 cm) long.
You make the runner as one piece. First you work the rectangular body in short rows across the width. Then you add a pointed end to each short edge. Two border rounds go around the whole outline. There is no joining.
Finished Size and Construction
- Finished size: 13.25 in (33.7 cm) x 54.25 in (137.8 cm) point to point; 57.25 in (145.4 cm) including leaf drops
- Skill level: Intermediate
- Terminology: US crochet terms
- Yarn weight: DK (light, #3)
- Hook: 4.0 mm (US G-6)
- Number of pieces: 1
- Layout: one rectangular lace body with a pointed end on each short edge
- Body size: 12.25 in (31.1 cm) x 41 in (104.1 cm)
- Each point: 6 in (15.2 cm) deep
- Size before border: 12.25 in (31.1 cm) x 53.25 in (135.3 cm)
- Border depth: 0.5 in (1.3 cm) on every edge
Materials
Yarn: Choose a smooth DK cotton or cotton blend. Cotton shows the leaf stitches clearly and blocks flat, which matters on a table. Avoid fuzzy or very soft acrylic, because the mesh loses its crisp shape.
- Sage green: 300 g, about 690 m (755 yd). For example, six 50 g balls of about 115 m (125 yd) each.
This amount includes a margin of about 10% for the gauge swatch and small differences in tension.
Tools:
- 4.0 mm (US G-6) crochet hook
- Tapestry needle
- 12 locking stitch markers
- Scissors and a measuring tape
- Blocking mats, rust-proof pins, and a spray bottle
Abbreviations (US Terms)
- ch – chain; sl st – slip stitch; sc – single crochet
- hdc – half double crochet; dc – double crochet
- sk – skip; sp(s) – space(s); st(s) – stitch(es)
- RS / WS – right side / wrong side
- LT – Leaf Trio
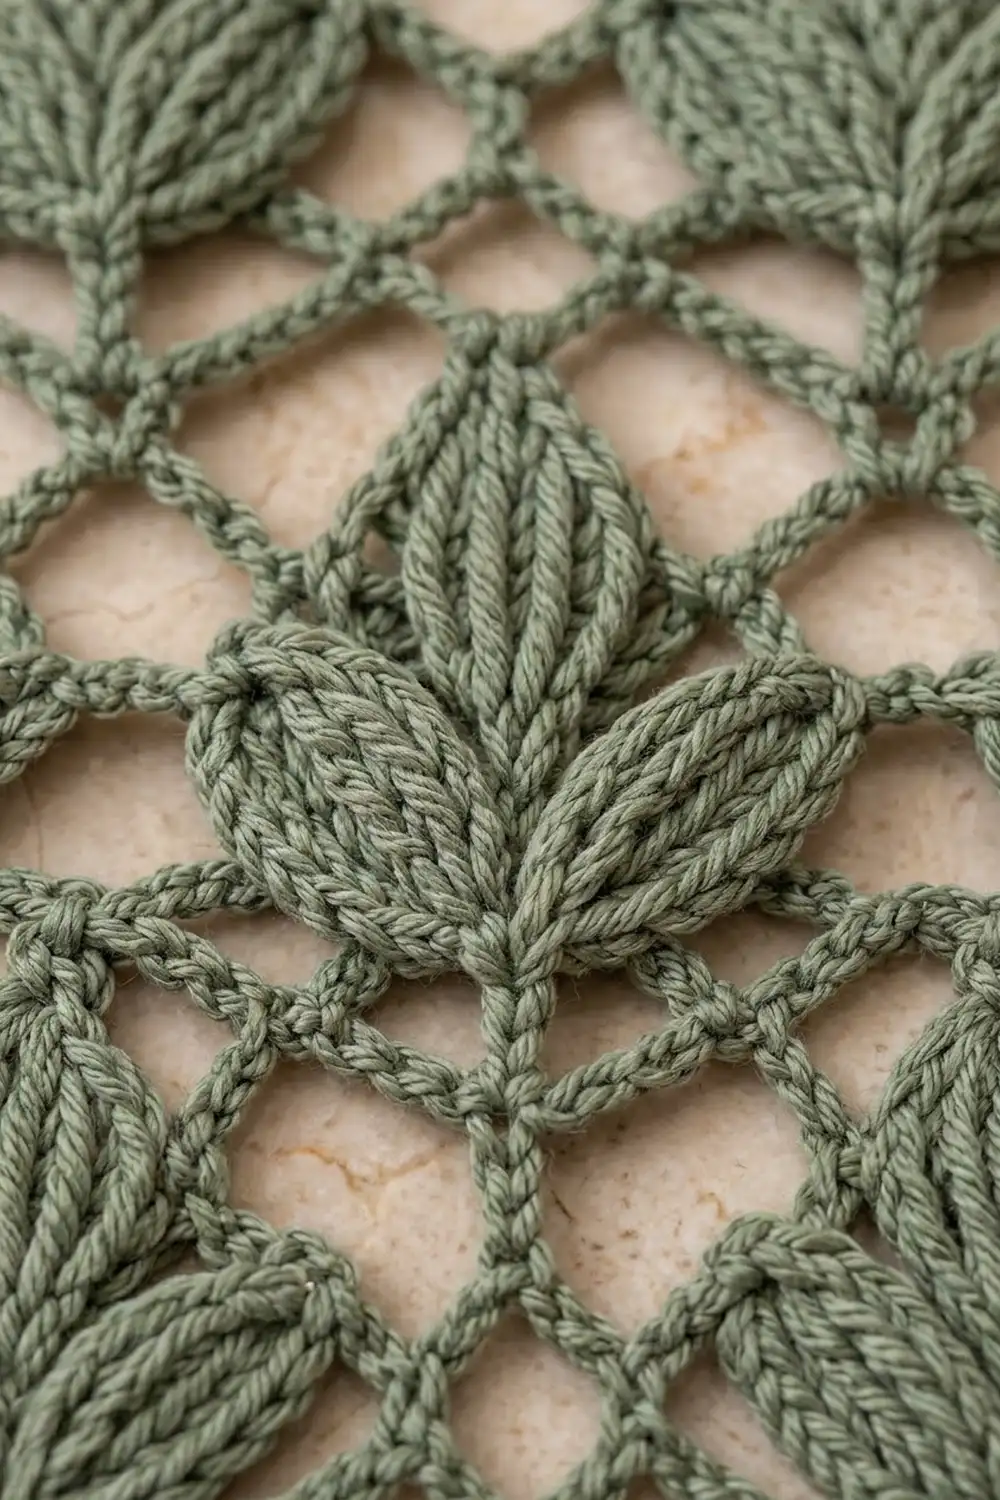
Leaf: Ch 8. Work into the back bumps of the chain, starting in the 2nd ch from the hook and moving back toward the base: sl st, sc, hdc, dc, dc, hdc, sc (7 sts). Sl st in the base st. This makes one slim leaf about 1.5 in (3.8 cm) long, with a ridged chain edge.
Leaf Trio (LT): After you finish the dc named in the instructions, [make a Leaf, sl st in top of same dc] 3 times. Lay the first leaf to the left, the second straight up, and the third to the right.
Picot: Ch 3, sl st in 3rd ch from hook.
Anchoring a leaf: When you work the named dc, yo, insert the hook through the leaf tip and then into the dc below, and finish the dc as usual. If the anchor falls on a turning ch-3 or on the sl st that starts a Decrease Row, sl st through the leaf tip and the st below together before you continue.
Column numbering: In every mesh row, the dc are numbered 1 to 13, starting from the right edge of a RS row. The turning ch-3 counts as a dc.
Gauge and Checkpoints
Gauge: 16 sc = 4 in (10.2 cm). 8 mesh rows = 4 in (10.2 cm). One mesh sp (ch 3 plus dc) is about 1 in (2.5 cm) wide.
Test swatch first. Ch 18.
- Row 1 (RS): Sc in 2nd ch from hook and in each ch across. (17 sc)
- Row 2 (WS): Ch 3 (counts as dc), [ch 3, sk 3 sc, dc in next sc] 4 times. (5 dc, 4 sps)
- Row 3: Mesh, with an LT after dc 3.
- Row 4: Plain mesh.
- Row 5: Mesh, anchoring the side leaves in dc 2 and dc 4.
- Row 6: Mesh, anchoring the center leaf in dc 3.
- Rows 7–9: Plain mesh.
Block the swatch. It should measure 4.25 in (10.8 cm) x 4.25 in (10.8 cm).
- Swatch too big: Go down 0.5 mm.
- Swatch too small: Go up 0.5 mm.
- Width correct but leaves pucker: Your leaf chains are tighter than your mesh. Work the ch 8 a little looser.
Checkpoints (measured lightly stretched):
- After Row 1: 12.25 in (31.1 cm) wide
- After Row 10: 4.75 in (12.1 cm) long
- After Row 42: 20.75 in (52.7 cm) long
- After Row 83: 41 in (104.1 cm) long
- Each point: 6 in (15.2 cm) deep
- Before border: 53.25 in (135.3 cm) long
Body
Every body mesh row has 13 dc and 12 ch-3 sps. Leaf rows are always RS rows, so the leaves always sit on the front.
Plain Mesh Row: Ch 3 (counts as dc 1), [ch 3, dc in next dc] 12 times. Work the last dc in the top of the turning ch. (13 dc, 12 sps)
Ch 50.
Row 1 (RS): Sc in 2nd ch from hook and in each ch across. (49 sc)
Row 2 (WS, conversion row): Ch 3 (counts as dc), [ch 3, sk 3 sc, dc in next sc] 12 times. (13 dc, 12 sps)
Repeat A (three sprigs)
Row 3 (RS, leaf row): Work a Plain Mesh Row, adding an LT after dc 3, dc 7, and dc 11. (13 dc, 12 sps, 3 LT)
Row 4 (WS): Plain Mesh Row. Keep the leaves on the RS, away from you. Work each dc into the top loops of the dc below, not into the sl sts at the base of the leaves.
Row 5 (RS): Plain Mesh Row. Anchor each side leaf in the column next to its sprig: dc 2 and 4, dc 6 and 8, and dc 10 and 12.
Row 6 (WS): Plain Mesh Row. Anchor each center leaf in its own column: dc 3, dc 7, and dc 11. The leaf tips lie behind the work, so catch them from the back.
Repeat B (two sprigs)
Row 7 (RS): Work as Row 3, but add the LTs after dc 5 and dc 9. (13 dc, 12 sps, 2 LT)
Row 8 (WS): Plain Mesh Row.
Row 9 (RS): Plain Mesh Row. Anchor the side leaves in dc 4 and 6, and in dc 8 and 10.
Row 10 (WS): Plain Mesh Row. Anchor the center leaves in dc 5 and dc 9.
Rows 3–10 make one 8-row repeat, 4 in (10.2 cm) long. Because the rows alternate three sprigs and two sprigs, the sprigs stagger into a diamond lattice.
Rows 11–82: Repeat Rows 3–10 nine more times. That gives 10 repeats in total, 80 pattern rows, and 50 sprigs.
Row 83 (RS, trim row): Ch 1, sc in first dc, [3 sc in next sp, sc in next dc] 12 times. Count: 13 sc (1 per dc) + 36 sc (3 per sp) = 49 sc. Do not fasten off.
The body measures 12.25 in (31.1 cm) x 41 in (104.1 cm).
Pointed Ends
Each point loses one mesh sp on each side every other row. The column numbers below always use the original 1–13 numbering.
Decrease Row: Turn, sl st in each of the first 3 ch and in the next dc. Ch 3 (counts as dc). Work the mesh across, stopping at the second-to-last dc, and leave the last sp and dc unworked. This removes 2 dc and 2 sps.
Point 1 (continuing from Row 83)
P1 (WS): Ch 3 (counts as dc), [ch 3, sk 3 sc, dc in next sc] 12 times. (13 dc, 12 sps)
P2 (RS): Plain Mesh Row with an LT after dc 3, 7, and 11. (13 dc, 12 sps)
P3 (WS): Decrease Row. (dc 2–12: 11 dc, 10 sps)
P4 (RS): Mesh. Anchor side leaves in dc 2 and 4, 6 and 8, and 10 and 12. (11 dc, 10 sps)
P5 (WS): Decrease Row. Anchor center leaves in dc 3, 7, and 11. (dc 3–11: 9 dc, 8 sps)
P6 (RS): Mesh with an LT after dc 5 and 9. (9 dc, 8 sps)
P7 (WS): Decrease Row. (dc 4–10: 7 dc, 6 sps)
P8 (RS): Mesh. Anchor side leaves in dc 4 and 6, and in dc 8 and 10. (7 dc, 6 sps)
P9 (WS): Decrease Row. Anchor center leaves in dc 5 and 9. (dc 5–9: 5 dc, 4 sps)
P10 (RS): Mesh with an LT after dc 7. (5 dc, 4 sps)
P11 (WS): Decrease Row. (dc 6–8: 3 dc, 2 sps)
P12 (RS): Mesh. Anchor side leaves in dc 6 and 8. (3 dc, 2 sps)
P13 (WS, tip): Turn, sl st in each of the first 3 ch. Sl st through the center leaf tip and dc 7 together. Leave the last sp unworked.
Leaf drop: Ch 1, sc in the same dc. [Make a Leaf, sl st in sc] 3 times. Let the three leaves hang free past the tip. Fasten off.
Each point is 12 mesh rows deep, or 6 in (15.2 cm), with 6 sprigs and a leaf drop.
Point 2
With the RS facing, join the yarn in the first free loop of the foundation chain.
P0 (RS): Ch 1, sc in each free loop across. (49 sc)
Work P1–P13 and the leaf drop exactly as for Point 1. P0 adds 0.25 in (0.6 cm) and keeps the RS/WS order correct.
Border
Border gauge: 4 sc per 1 in (2.5 cm), the same as the main sc gauge.
- Work 1 sc in each sc row end.
- Work 2 sc in each dc row end.
- Work 2 sc across each step. A step is the sl-st edge or the unworked sp that a decrease leaves.
Rnd 1 (RS): Join with sc in the Row 83 row end on Long Side A and work toward Point 2.
- Each long side: Row 83 (1) + Rows 2–82 (81 x 2 = 162) + Row 1 (1) + P0 (1) = 165 sc
- Each slanted edge: P1–P12 (12 x 2 = 24) + 6 steps (6 x 2 = 12) = 36 sc
- Each tip: 1 sc in the tip sc, under the leaf drop
Work in this order: Long Side A (165), slant (36), tip (1), slant (36), Long Side B (165), slant (36), tip (1), slant (36). Sl st to the first sc. Total: 330 + 144 + 2 = 476 sc.
Rnd 2: Ch 1. Along each side, [sc in next 3 sc, picot] across. At each tip, work (sc, picot, sc) in the tip sc.
- Each long side: 165 sc, 55 picots
- Each slanted edge: 36 sc, 12 picots
- Each tip: 2 sc, 1 picot
Total: 478 sc and 160 picots. Sl st to the first sc and fasten off.
Why the math works:
- At 4 sc per inch, 165 sc covers 41.25 in (104.8 cm). That is exactly the body plus P0.
- Each slanted edge measures about 8.5 in (21.6 cm) in a straight line. Its 36 sc cover 9 in (22.9 cm), which gives the point a little ease so it lies flat.
- Both 165 and 36 divide evenly by 3, so every picot repeat ends cleanly at a corner.
Final Blocking
- Weave in all ends along the mesh columns, not through the leaves.
- Soak the runner in cool water for 15 minutes. Roll it in a towel and press the water out without wringing.
- Lay it flat on blocking mats. Pin the long sides straight, 13.25 in (33.7 cm) apart.
- Pin the length to 54.25 in (137.8 cm) from point to point. Check that both points are centered.
- Pin each slanted edge straight, then pin out every picot.
- Smooth each leaf into place with your fingers. Fan out the three leaves of each drop.
- Mist lightly and let the runner dry completely, at least 24 hours.
Final Quality-Control Checklist
- Every body mesh row has 13 dc and 12 sps
- All 50 body sprigs are anchored at all three tips
- Each point has 6 sprigs plus a 3-leaf drop
- Each long side measures 41.25 in (104.8 cm)
- The width is 13.25 in (33.7 cm) after the border
- Rnd 1 has 476 sc and Rnd 2 has 160 picots
- No loose tails show on the RS
Troubleshooting
- Leaves flip to the back: A tip was anchored from the wrong side. Undo that dc and anchor again with the leaf on the RS.
- Runner gets narrower as you go: Your ch-3 sps are tightening. Count your chains and check the width at each checkpoint.
- Leaves buckle: Your leaf chain is looser than your mesh. Make the ch 8 a little tighter.
- Point twists to one side: Each Decrease Row must remove exactly 1 sp from each side.
- Slanted border ruffles: Check that you worked 2 sc per step, not 3.
Care
Hand wash in cool water and dry flat. If the leaves need reshaping, pin them again while the runner is damp.
Final Notes
Each measurement builds on the one before. A 4.25 in (10.8 cm) swatch confirms 16 sc and 8 mesh rows per 4 in (10.2 cm). That gauge gives a body of 12.25 in (31.1 cm) x 41 in (104.1 cm). Two 6 in (15.2 cm) points plus P0 bring the length to 53.25 in (135.3 cm) before the border. The 0.5 in (1.3 cm) border finishes the runner at 13.25 in (33.7 cm) x 54.25 in (137.8 cm). Check each stage as you go, and the leaves will fall neatly into place.
Happy crocheting!