

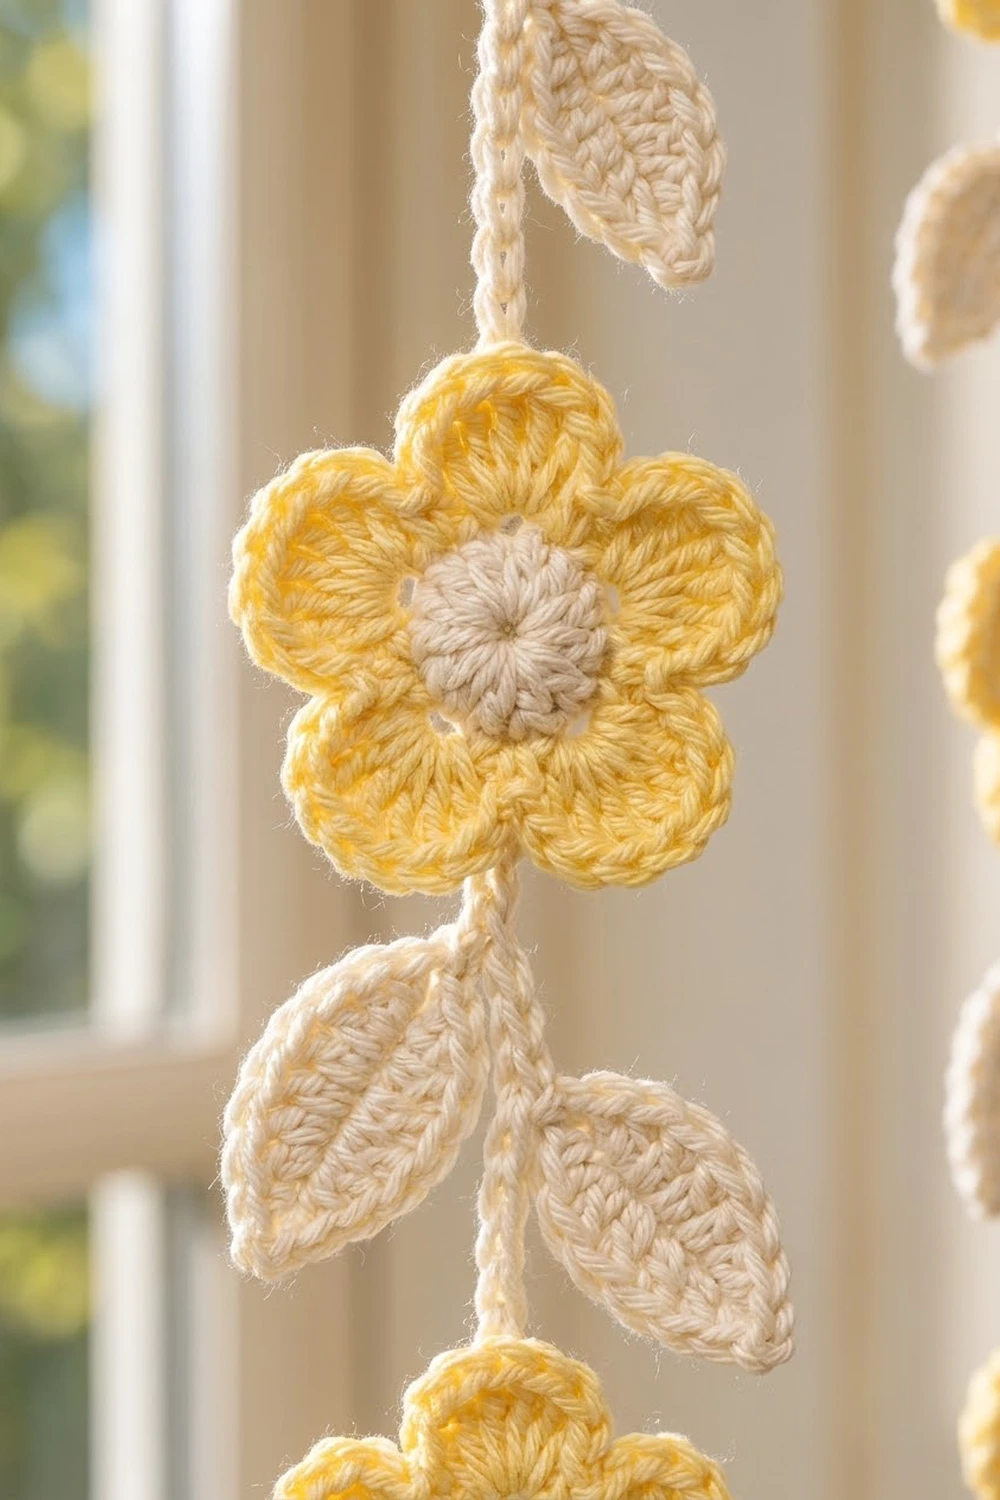
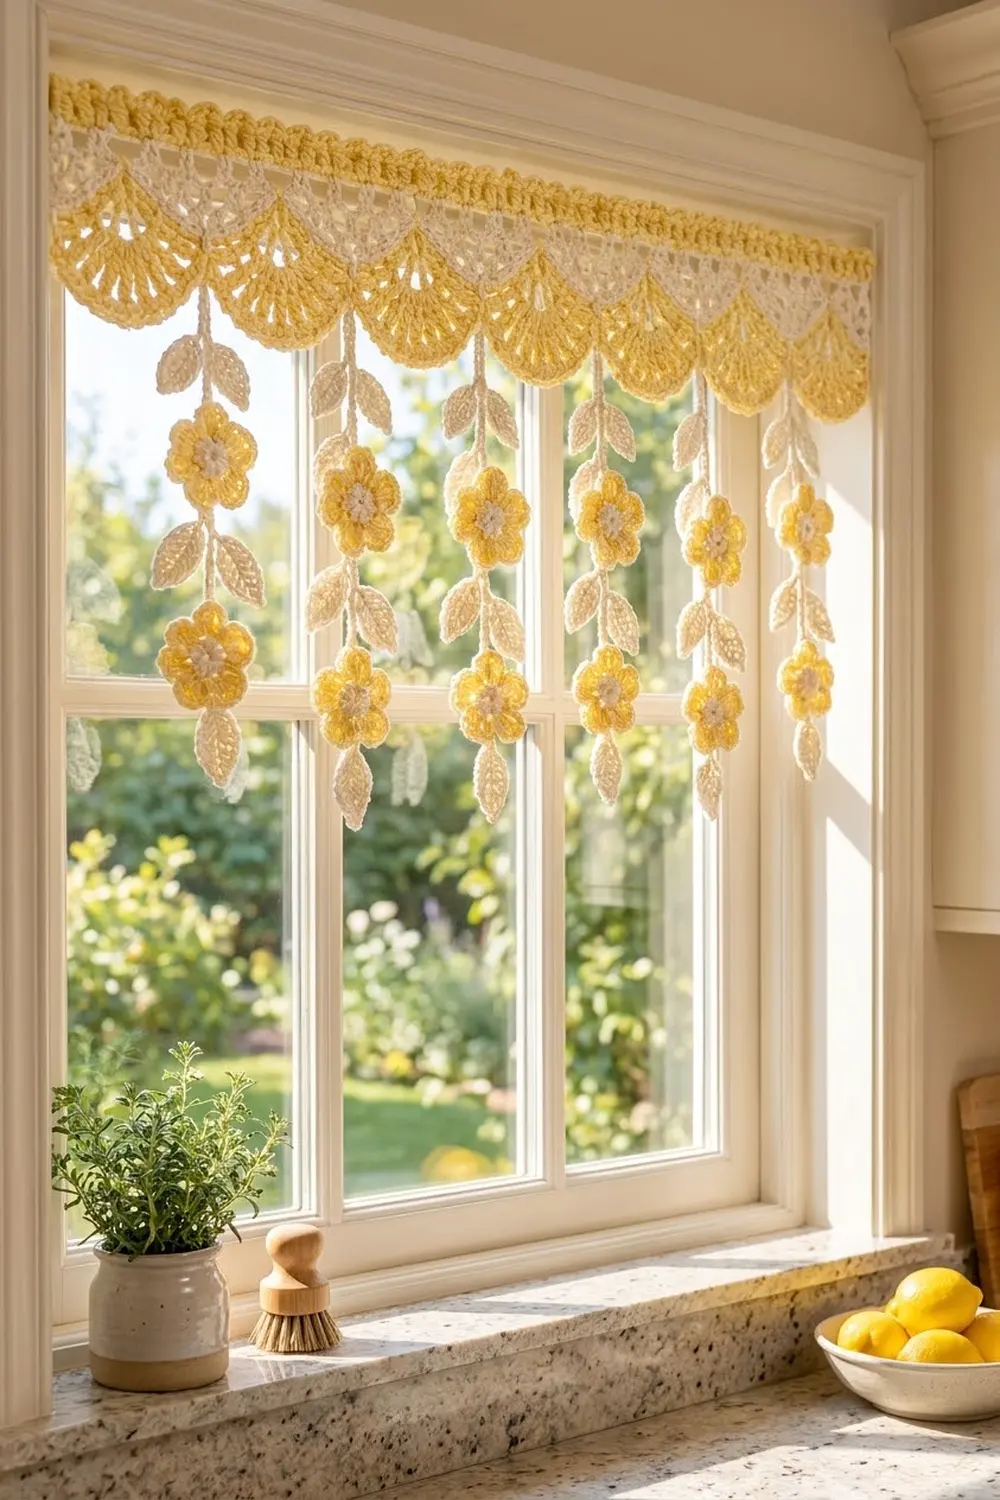
The Lemon Blossom Valance brings a bit of sunshine to a kitchen window. A solid butter-yellow header band sits above a delicate cream lace row. Under the lace, seven deep yellow fan scallops form a soft wave. Eight cream vines hang from the scallop points, and each vine carries leaf pairs and three little yellow flowers with cream centers.
The palette is just two colors: soft lemon yellow and natural cream. The style is cottage-kitchen and vintage, airy enough to let light through but structured enough to hold its shape on a rod.
This pattern uses US crochet terms throughout. The finished valance measures 35¼ in (89.5 cm) wide and 4½ in (11.4 cm) deep at the scallop centers. The strands add about 12 in (30.5 cm) below the scallop points.
Construction is simple and seamless. You crochet the lace and scallop body downward from a foundation chain. The cream vines are worked straight off the scallop points, so there’s nothing to sew there. The 24 small flowers are made separately and sewn onto the vines. Last, you work the yellow header band into the top of the foundation chain.
Finished Size and Construction
- Finished size: 35¼ in (89.5 cm) wide × 4½ in (11.4 cm) deep at scallop centers; about 14½ in (36.8 cm) from the top edge to the bottom flower
- Skill level: Intermediate
- Terminology: US crochet terms
- Yarn weight: Worsted (#4) cotton
- Hook: 5.0 mm (H-8)
- Number of pieces: 1 valance; 8 strands worked directly from it; 24 flower appliqués sewn on
- Layout: 7 scallops across, 8 strands (one at each scallop point and one at each end)
- Scallop repeat: 20 sts = 5 in (12.7 cm) wide
- Size before border: 35¼ in (89.5 cm) wide × 3½ in (8.9 cm) deep at scallop centers
- Border depth: 1 in (2.5 cm) yellow header band
Materials
Use a smooth mercerized or combed worsted cotton. Cotton blocks crisply, holds the scallop shape and resists kitchen humidity better than acrylic. These quantities assume about 170 m per 100 g.
- Yellow (soft lemon): 125 g, about 213 m, for the scallops, header band and flower petals
- Cream (natural): 75 g, about 128 m, for the lace rows, strands, leaves and flower centers
Both amounts include a margin of roughly 20% for gauge swatching and small differences in tension.
Tools:
- 5.0 mm (H-8) crochet hook
- Tapestry needle
- Locking stitch markers (at least 8)
- Rust-proof pins and a blocking mat
- Spray bottle
- Measuring tape
- Scissors
Abbreviations (US Terms)
- ch: chain
- sl st: slip stitch
- sc: single crochet
- hdc: half double crochet
- dc: double crochet
- sk: skip
- sp(s): space(s)
- st(s): stitch(es)
- RS: right side
- LP: leaf pair (see below)
Special stitch: Leaf Pair (LP).
- Ch 8, sc in 2nd ch from hook, hdc in next ch, dc in each of next 2 ch, hdc in next ch, sc in next ch, sl st in last ch. One leaf is done: 6 sts + 1 sl st, and you’re back at the stem.
- Repeat once more from the same stem point for the second leaf.
- Each leaf is about 1¾ in (4.4 cm) long.
Gauge and Checkpoints
Gauge: 16 sc and 16 sc rows = 4 in (10.2 cm). Unstretched chain: 4 ch = 1 in (2.5 cm).
Test one repeat first. Ch 22. Work Rows 1–6 below on 21 sts; this gives exactly 2 small fans and 1 big scallop. The swatch should measure 5¼ in (13.3 cm) wide and 3½ in (8.9 cm) deep at the scallop center. Also make one flower, which should be 2 in (5.1 cm) across.
Checkpoints:
- After Row 1: 35¼ in (89.5 cm) wide
- After Row 3: 1½ in (3.8 cm) deep
- After Row 6: 3½ in (8.9 cm) deep at scallop centers; each scallop 5 in (12.7 cm) wide
- After the border: 4½ in (11.4 cm) deep
- Each strand: about 12 in (30.5 cm) below its scallop point
If the swatch is too big, go down one hook size (4.5 mm). If it’s too small, go up to 5.5 mm (I-9). Don’t add or remove stitches. Every count below depends on the 20-stitch repeat.
Valance Body
The body is worked in rows, downward from the foundation chain.
Foundation (Cream): Ch 142.
Row 1 (RS): Sc in 2nd ch from hook and in each ch across. Turn. (141 sc)
Check that the piece is 35¼ in (89.5 cm) wide. The count is 141 because it is 7 repeats × 20 sts + 1 balancing st.
Row 2 (small fans): Ch 1, sc in first sc, sk 4 sts, 7 dc in next st, sk 4 sts, sc in next st; rep from * 13 more times. Turn.
(14 fans: 98 dc + 15 sc = 113 sts)*
Each repeat uses exactly 10 sts of Row 1, and 1 + 14 × 10 = 141.
Row 3 (mesh): Ch 3 (counts as dc in first sc), ch 3, sc in 4th (center) dc of next fan, ch 3, dc in next sc; rep from * 13 more times. Turn. Fasten off Cream.
(15 dc, 14 sc, 28 ch-3 sps)*
These rows make the cream lace band: little fans opening downward, tied together by a chain mesh. The 15 dc are the anchors for the scallop row. Number them 1 to 15 from the right edge.
Row 4 (scallop base, Yellow): Join Yellow in first dc. Ch 1, sc in same dc, ch 4, sk next ch-3 sp, sc and ch-3 sp, 9 dc in next dc, ch 4, sk next ch-3 sp, sc and ch-3 sp, sc in next dc; rep from * 6 more times. Turn.
(7 fans: 63 dc, 8 sc, 14 ch-4 sps)*
The fans land on dc 2, 4, 6, 8, 10, 12 and 14. The sc land on dc 1, 3, 5, 7, 9, 11, 13 and 15. Those 8 sc become the scallop points.
Row 5 (spokes): Ch 1, sc in first sc, ch 2, dc in first dc of fan, [ch 2, dc in next dc] 8 times, ch 2, sk ch-4 sp, sc in next sc; rep from * 6 more times. Turn.
(Per scallop: 9 dc, 10 ch-2 sps. Total: 63 dc, 8 sc, 70 ch-2 sps)*
Skip the ch-4 spaces completely; the ch-2 at each end of a scallop reaches straight to the sc. This row opens the fan into wide spokes with gaps between them.
Row 6 (scallop edge): Ch 1, sc in first sc, 3 sc in each of next 10 ch-2 sps, sc in next sc; rep from * 6 more times. Do not fasten off yet.
(8 sc worked 1 per existing sc + 210 sc worked into sps = 218 sc)*
Each scallop has 30 sc along its curve. Place a locking marker in each of the 8 point sc. Fasten off Yellow.
Check that the piece is 3½ in (8.9 cm) deep at each scallop center. Each curve should lie flat without ruffling. Thirty sc fit the arc of a 5 in (12.7 cm) half-circle, which is about 7.9 in (20.1 cm) around.
Hanging Strands
Make 8 strands, one from each marked point sc, working each one downward. Hold the body with the RS facing you.
- Join Cream with a sl st in a marked point sc. Ch 8, LP.
- Ch 6, LP.
- Ch 6. Place a marker in the last ch for Flower 1.
- Ch 6, LP.
- Ch 6. Place a marker for Flower 2.
- Ch 6, LP.
- Ch 6. Place a marker for Flower 3. Fasten off, leaving a 6 in (15.2 cm) tail.
Per strand: 44 stem ch, 4 LPs (8 leaves) and 3 flower spots. The 44 stem chains measure 11 in (27.9 cm) at 4 ch per in. The bottom flower adds about 1 in (2.5 cm), so the strand hangs about 12 in (30.5 cm).
The flower spots fall about 5 in (12.7 cm), 8 in (20.3 cm) and 11 in (27.9 cm) below the point. Gently open each leaf pair into a V on either side of the stem.
Flowers (Make 24)
Round 1 (Cream): Make a magic ring, ch 1, 10 sc in ring, sl st to first sc. Fasten off. (10 sc)
Round 2 (Yellow): Join Yellow in any sc. (Sc, hdc, 2 dc) in next sc, (2 dc, hdc, sc) in next sc; rep from * 4 more times. Sl st to first sc. Fasten off, leaving an 8 in (20.3 cm) tail.
(5 petals × 8 sts = 40 sts)*
Each petal sits over 2 center sts, so the 10 center sts make exactly 5 petals. Check that the flower is 2 in (5.1 cm) across.
Attaching: Center a flower over each marked stem ch, with the RS facing out. Use the yellow tail to whipstitch around the back of the cream center, catching the marked ch and the ch on each side of it. On Flower 3, also weave the stem tail into the back of the flower.
Border (Yellow Header Band)
Border gauge: same as the body. 1 sc row = ¼ in (0.6 cm) and 1 dc row = ½ in (1.3 cm). The 3 rows add 1 in (2.5 cm) of depth.
Turn the valance upside down so the foundation chain runs along the top, with the RS facing you.
Border Row 1: Join Yellow in the first ch at the right end. Ch 1, sc in the opposite side of each foundation ch across. Turn. (141 sc)
Border Row 2: Ch 3 (counts as dc), dc in each st across. Turn. (141 dc)
Border Row 3: Ch 1, sc in each st across. (141 sc) Don’t fasten off.
Side edges: Ch 1, rotate the work and sc down the short end of the header band: 1 sc per sc row and 2 sc around the dc row, for 4 sc. Fasten off. Join Yellow at the other end of Border Row 3 and work 4 sc down that side the same way.
Why the math works: the foundation has 142 ch. Row 1 used 141 of them (the first ch skipped is the turning chain), so the opposite side gives exactly 141 sts for Border Row 1. That matches Body Row 1, so the band is exactly as wide as the lace body, 35¼ in (89.5 cm), and won’t flare or pull in. Each border row keeps 141 sts, worked 1 per st, with no increases. Thread a curtain rod in and out of the dc posts of Border Row 2, or slip a tension rod behind the band.
Final Blocking
- Weave in all ends, then soak the valance in cool water for 10 minutes.
- Roll it in a towel and press out the excess water. Don’t wring it.
- Lay it face up on the blocking mat. Pin the top edge straight at 35¼ in (89.5 cm).
- Pin every scallop point and the center of each scallop curve to 3½ in (8.9 cm) below the body’s top edge.
- Pin out each fan’s spokes so the gaps are even.
- Lay each strand straight down. Pin its tip so the strand measures 12 in (30.5 cm), and open the leaves into neat Vs.
- Shape the flower petals with your fingertips and pin each petal tip.
- Let it dry completely, about 24 hours, before you unpin it.
Final Quality-Control Checklist
- Top edge is 35¼ in (89.5 cm) wide and straight
- Total depth is 4½ in (11.4 cm) at scallop centers
- 7 scallops, each 5 in (12.7 cm) wide with 30 edge sc
- 14 cream fans in the lace row, evenly spaced
- 8 strands, each hanging about 12 in (30.5 cm)
- Each strand has 4 leaf pairs and 3 flowers in the correct order
- All 24 flowers are 2 in (5.1 cm) across with 5 even petals
- No loose ends showing on the RS
- Header band is 1 in (2.5 cm) deep with tidy side edges
Troubleshooting
- Scallops ruffle: Your tension is loose in Row 6. Work 3 sc in only 8 of the 10 sps and 2 sc in the first and last sps of each scallop (28 sc per scallop, 204 sc total). Or go down a hook size for Row 6 only.
- Scallops cup or pull: Your ch-2 spaces in Row 5 are too tight. Loosen the chains or use a larger hook for that row.
- Fans don’t line up: Count Row 1 again; it must be exactly 141 sc.
- Strands twist: Block them wet and pinned straight, and make sure every chain is untwisted before the leaves are worked.
- Flowers droop forward: Sew through the center back as well as the stem chain, so each flower sits flat against the strand.
- Header band flares: Your border hook is looser than the body hook. Rework the band with a smaller hook.
Care
Hand wash in cool water with mild soap, press out water in a towel and dry flat, pinning the scallops and strands back into shape. Don’t hang it to dry while wet, because the strands will stretch.
Final Notes
The whole valance comes from one number. Row 1’s 141 sc is 7 scallop repeats of 20 sts plus 1. That gives 14 small fans, then 15 anchor dc, then 7 big fans with 8 points. Each scallop has 30 edge sc and measures 5 in (12.7 cm). The body is 35¼ in (89.5 cm) by 3½ in (8.9 cm). The 141-st header band adds 1 in (2.5 cm), for a total depth of 4½ in (11.4 cm). The eight 44-chain strands add 12 in (30.5 cm) of vines and blossoms. Check your gauge first, check each measurement as you go, and the valance will hang straight in your window.
Happy crocheting!