

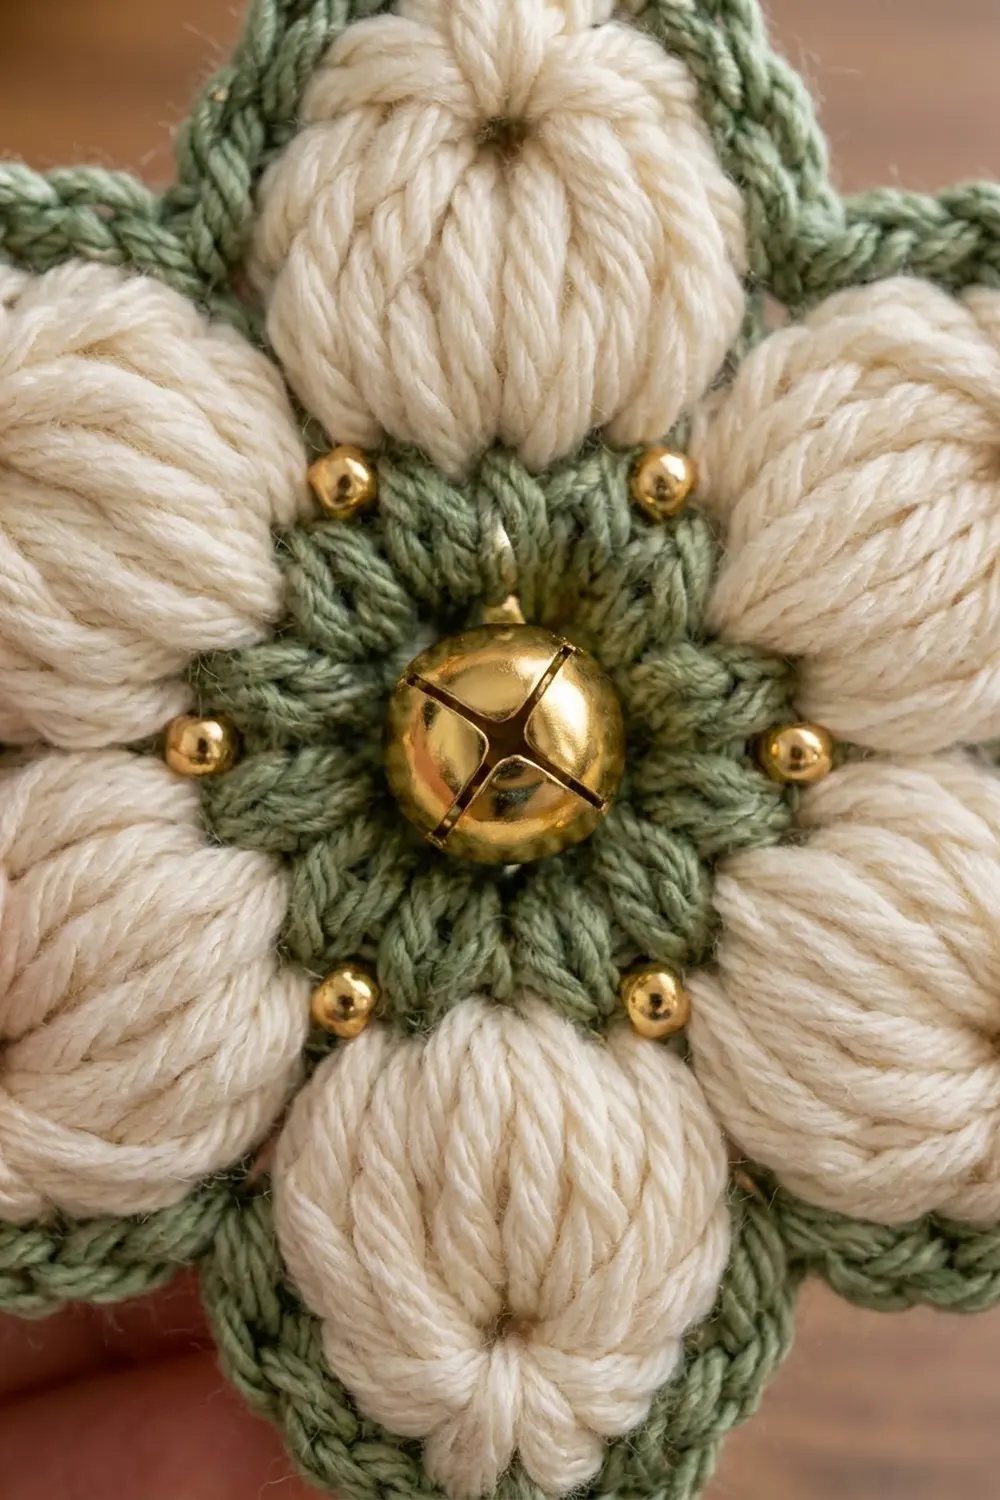
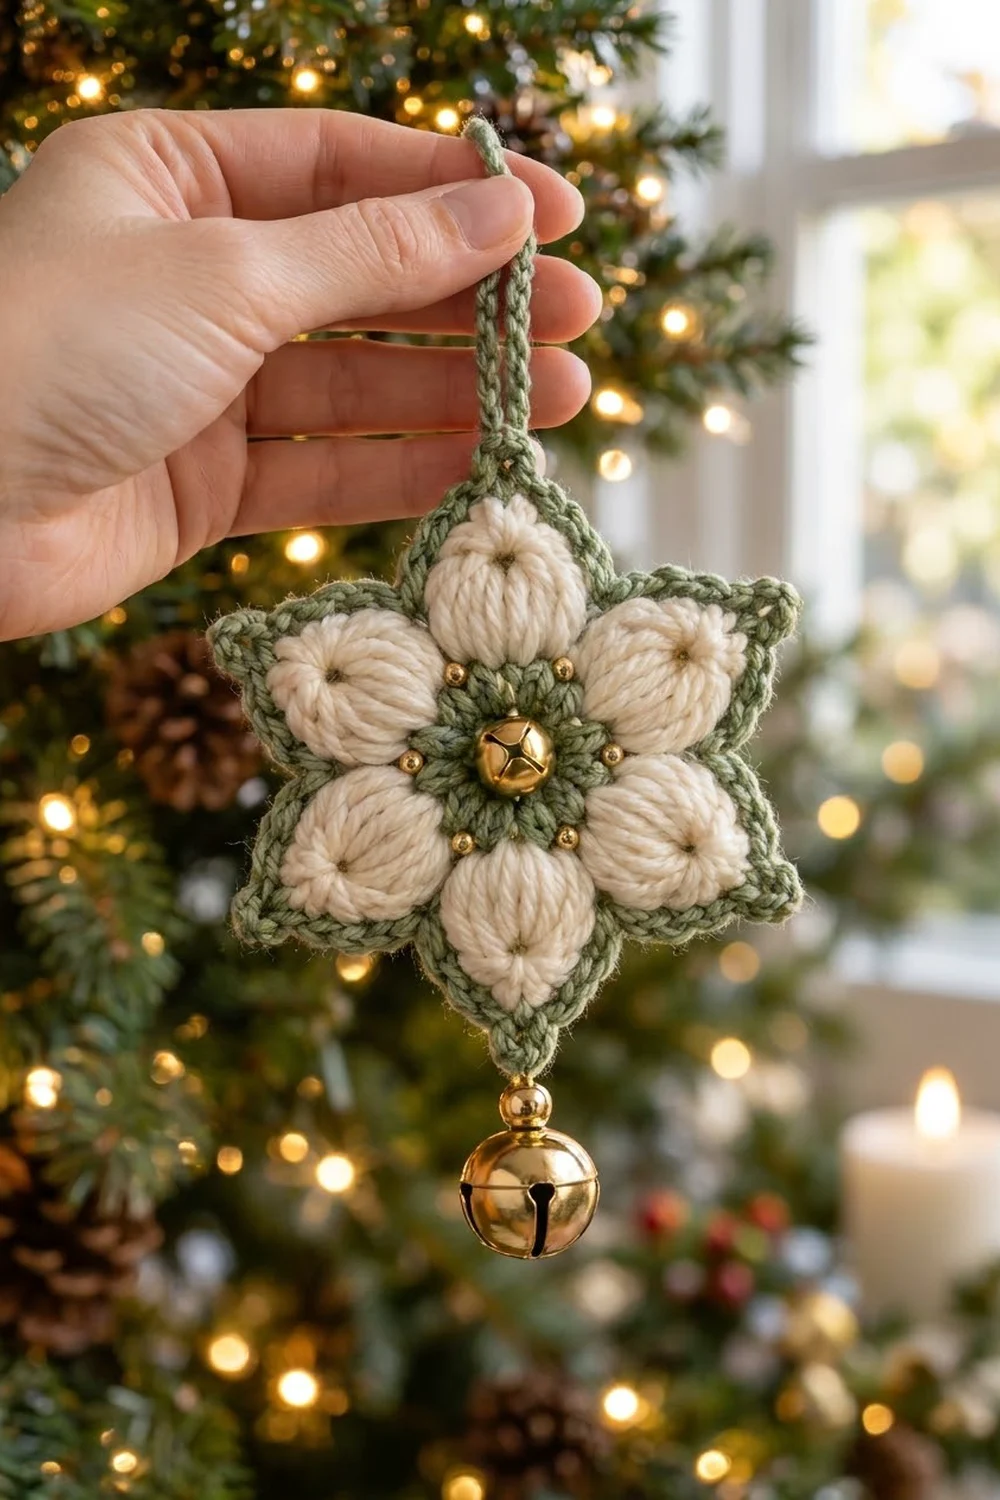
This little star ornament has six puffy cream petals around a sage-green center. A gold jingle bell sits in the middle, and a ring of tiny gold beads surrounds it. A crisp sage edging outlines every petal and pulls each tip into a sharp point, so the flower reads as a star from across the room.
The palette is soft and wintry: warm cream, muted sage green, and bright gold. It looks rustic and handmade, with a bit of sparkle. A chain loop at the top makes it ready for the tree, and a second bell dangles from the bottom point so it jingles when the branch moves.
This pattern uses US crochet terms throughout. The finished ornament is 3.75 in (9.5 cm) from tip to tip, not counting the hanging loop or the bell drop.
Construction is simple and worked in the round. You make a two-round green center, add a round of cream chain loops, work one cream petal (with a big puff in the middle) into each loop, then finish with one round of green edging that shapes the points. The beads and bells are sewn on last.
Finished Size and Construction
- Finished size: 3.75 in (9.5 cm) tip to tip
- Skill level: Advanced beginner
- Terminology: US crochet terms
- Yarn weight: DK (#3), cotton or cotton blend
- Hook: 3.5 mm (E-4)
- Number of pieces: 1 (a single motif, worked in one piece)
- Layout: Six-pointed star, petals radiating from a round center
- Center disc size: 1.25 in (3.2 cm) across after Round 2
- Size before border: 3.25 in (8.3 cm) tip to tip after Round 4
- Border depth: about 0.25 in (0.6 cm), one round of single crochet
Materials
Yarn: Use a smooth DK cotton or cotton blend, about 120 m per 50 g (2.4 m per gram). Cotton gives crisp stitch definition and holds the star points after blocking. Acrylic also works but gives softer points.
- Cream (petals, Rounds 3–4): 5 g / 12 m
- Sage green (center, edging, hanging loop): 4 g / 10 m
These quantities include a margin of about 30% for your gauge swatch, joins, and weaving in ends. One 50 g ball of each color makes about ten ornaments.
Tools and notions:
- 3.5 mm (E-4) crochet hook
- Tapestry needle
- Sewing needle and gold or cream sewing thread
- 1 gold jingle bell, 12 mm (center)
- 1 gold jingle bell, 15 mm (bottom drop)
- 1 gold round bead, 6 mm (above the bottom bell)
- 6 gold seed beads, 4 mm (ring around the center)
- Stitch marker
- Scissors
- Blocking mat, rustproof pins, and a spray bottle
Abbreviations (US Terms)
- ch – chain
- sl st – slip stitch
- sc – single crochet
- hdc – half double crochet
- dc – double crochet
- sc2tog – single crochet 2 together: (insert hook in next st, yo, pull up a loop) twice, yo, draw through all 3 loops
- sk – skip
- sp – space
- st(s) – stitch(es)
- yo – yarn over
- rep – repeat
Special stitch – Petal Puff (PP): Work it in the space given. (Yo, insert hook in the space, yo, pull up a loop to 0.75 in / 1.9 cm tall) 6 times. You now have 13 loops on the hook. Yo and draw through all 13 loops, then ch 1 to lock the puff. The ch-1 is the top of the PP, and it does not count as a separate stitch. Pulling the long loops up evenly gives the strand lines that meet toward each petal tip.
Standing sc: Start with a slip knot on the hook, insert the hook in the stitch, and work a sc as usual.
Gauge and Checkpoints
Make one complete ornament first, including the edging, before you commit to a batch. A single motif is the most reliable gauge swatch for this design.
Basic gauge: 20 sc × 22 rows = 4 in (10.2 cm) with a 3.5 mm hook in DK yarn.
Checkpoints:
- After Round 1: center about 0.75 in (1.9 cm) across.
- After Round 2: center disc 1.25 in (3.2 cm) across, lying flat.
- After Round 4: 3.25 in (8.3 cm) from petal tip to opposite petal tip.
- After Round 5: 3.75 in (9.5 cm) tip to tip, before blocking it may be 3.6 in (9.1 cm).
Too big? Drop to a 3.25 mm (D-3) hook, or pull the puff loops up to only 0.6 in (1.5 cm).
Too small? Go up to a 4.0 mm (G-6) hook, or check that your puff loops reach the full 0.75 in (1.9 cm).
Center cupping or rippling? That is a tension issue in Round 2. Cupping means you are working too tight, and rippling means too loose. Fix it before you go on, because every later round sits on this disc.
Center Disc (Sage Green)
Round 1: With green, make a magic ring. Ch 1 (does not count as a st), work 12 sc into the ring. Pull the ring tight and join with a sl st to the first sc. (12 sc)
Leave the center hole very slightly open, about 0.2 in (0.5 cm), so you can stitch the center bell through it later.
Round 2 (growth round): Ch 1, 2 sc in each st around. Join with a sl st to the first sc. (24 sc)
Fasten off and leave a 4 in (10.2 cm) tail.
Checkpoint: the disc should measure 1.25 in (3.2 cm) across and lie flat.
Petals (Cream)
Round 3: Join cream with a standing sc in any st of Round 2. Ch 5, sk 3 sts, sc in next st. Rep from * 4 more times, then ch 5, sk the last 3 sts, and join with a sl st to the first sc. (6 sc and 6 ch-5 loops)
Math check: each repeat uses 1 sc + 3 skipped sts = 4 sts, and 6 × 4 = 24, which is every stitch of Round 2.
Round 4: Sl st into the first ch-5 loop. Ch 1 (does not count). In the same loop, work (sc, hdc, dc, PP, dc, hdc, sc). In each remaining ch-5 loop, work (sc, hdc, dc, PP, dc, hdc, sc). Skip the sc of Round 3 between loops each time. Join with a sl st to the first sc. (6 petals; 42 sts: 12 sc, 12 hdc, 12 dc, 6 PP)
Fasten off and leave a 4 in (10.2 cm) tail.
Each petal has 7 stitches. The short stitches at each side and the tall puff in the middle give the petal its oval, pointed shape. Push each puff gently toward the front so it sits plump and rounded.
Checkpoint: 3.25 in (8.3 cm) from petal tip to opposite petal tip.
Border (Sage Green Edging)
Border gauge: 5 sc per 1 in (2.5 cm) along the curved petal edge. The edging adds about 0.25 in (0.6 cm) at each tip, which takes the piece from 3.25 in (8.3 cm) to 3.75 in (9.5 cm).
Round 5 (conversion/trim round): Join green with a standing sc in the first hdc of any petal. Then:
- 2 sc in the next dc
- (sc, ch 3, sc) in the top of the PP (this makes the star point)
- 2 sc in the next dc
- sc in the next hdc
Sc2tog over the next 2 sc (the last sc of this petal and the first sc of the next petal), sc in the next hdc, 2 sc in the next dc, (sc, ch 3, sc) in the top of the PP, 2 sc in the next dc, sc in the next hdc. Rep from * 4 more times. Sc2tog over the last 2 sc, then join with a sl st to the first sc.
Count: 42 existing sts → 36 sc worked one per existing stitch (the 12 valley sc are paired into 6 sc2tog, so 42 − 6 = 36) + 18 extra sc (12 from the dc increases, 6 from the second sc at each point) = 54 sc + 6 ch-3 points.
Per point: 9 sc (1 sc2tog, 1 sc, 2 sc, 1 sc, ch-3 point, 1 sc, 2 sc, 1 sc) + 1 ch-3 point. 6 × 9 = 54.
Why the math works: Each 7-stitch petal is used exactly once. The sc2tog at each valley merges two neighboring petal edges into one stitch, which pulls the valley in. The extra stitches at the dc keep the edging flat around the curve of the puff. The ch-3 at the top of each puff makes a firm, sharp point. Because all six petals have the same 9-stitch edge, all six points match.
Hanging loop: Don’t fasten off. Sl st in the next 3 sc to reach the first ch-3 point (counting from the join: 2 sc in the dc, then 1 sc). Sl st into that ch-3 sp, ch 24, then sl st into the same ch-3 sp. Fasten off and leave a 10 in (25.4 cm) tail. The 24-chain is about 3 in (7.6 cm) long, which makes a folded loop about 1.5 in (3.8 cm) tall.
This point is now the top of the ornament.
Embellishments
Center bell: With sewing thread, sew the 12 mm bell over the magic ring and pass the thread through the center hole several times. Knot it on the back.
Seed beads: Sew the six 4 mm beads onto Round 2, one in line with each petal valley. This puts them in the small gaps between the petal bases, as in the finished piece.
Bottom bell: Find the point opposite the hanging loop (three points away on either side). Thread the green tail from Round 4, or a new 8 in (20.3 cm) length of green, onto a tapestry needle. Pass it through that ch-3 point, then string the 6 mm bead and the 15 mm bell. Go back up through the bead, secure the yarn in the ch-3 point, and weave it in. The bead should sit right under the tip, with the bell hanging about 1.25 in (3.2 cm) below the point.
Final Blocking
- Weave in every tail along stitches of the same color before blocking. Leave the bells in place, because cotton blocking won’t hurt them.
- Lay the ornament face up on a blocking mat with the hanging loop at the top.
- Mist it until it is evenly damp but not soaked.
- Pin the top and bottom points 3.75 in (9.5 cm) apart.
- Pin the other four points so all six are evenly spaced, about 1.9 in (4.8 cm) from the center.
- Put a pin straight down into each ch-3 point and pinch the tip sharp.
- Push each puff gently upward from below so it dries rounded, not flattened.
- Let it dry completely, usually 4 to 6 hours, before you take out the pins.
Final Quality-Control Checklist
- Center disc is flat and 1.25 in (3.2 cm) across.
- Six petals, each with 7 stitches and one centered puff.
- Puff strand lines are even and meet toward the tip.
- Edging has 54 sc and 6 ch-3 points, with 9 sc per point.
- Every valley dips cleanly at its sc2tog.
- Size is 3.75 in (9.5 cm) tip to tip after blocking.
- Hanging loop is secure at the top point, about 1.5 in (3.8 cm) tall.
- Center bell and six seed beads are firmly sewn on.
- Bottom bead and bell hang straight from the opposite point.
- No visible tails on the front.
Troubleshooting
Petals look flat instead of puffy. Your puff loops are too short. Pull each one up to the full 0.75 in (1.9 cm) before the final yo.
Puff loops are uneven or messy. Hold the loops on the hook with your index finger as you work so earlier loops don’t shrink.
Points are rounded, not sharp. Make sure the (sc, ch 3, sc) goes into the ch-1 top of the PP, not beside it. Pin the points firmly when blocking.
Edging ruffles. Your tension is loose. Go down half a hook size for Round 5 only.
Edging pulls and the petals cup. Check that you worked 2 sc in each dc. Missing increases tighten the curve.
Valleys are puffy, not crisp. Work the sc2tog into the two sc that sit side by side at the base of neighboring petals.
Ornament twists when hung. The loop is off center. Make sure the hanging chain starts and ends in the same ch-3 point.
Bells are too loud or heavy. Use a 10 mm bell at the bottom. It keeps the shape and makes a softer sound.
Care
Spot clean with cool water and mild soap, then reshape and dry flat. Don’t machine wash, because the bells and beads can pull loose.
Final Notes
Each measurement leads to the next. The 24-stitch green center measures 1.25 in (3.2 cm). Six 4-stitch segments give six ch-5 loops. Each loop takes one 7-stitch petal, for 42 stitches and 3.25 in (8.3 cm) tip to tip. The edging turns those 42 stitches into 54 sc and six ch-3 points, 9 sc per point, for a finished star of 3.75 in (9.5 cm).
If your center disc and Round 4 checkpoints match, the edging will fall into place. Make one ornament, check it against the list, then make as many as your tree needs.
Happy crocheting!