

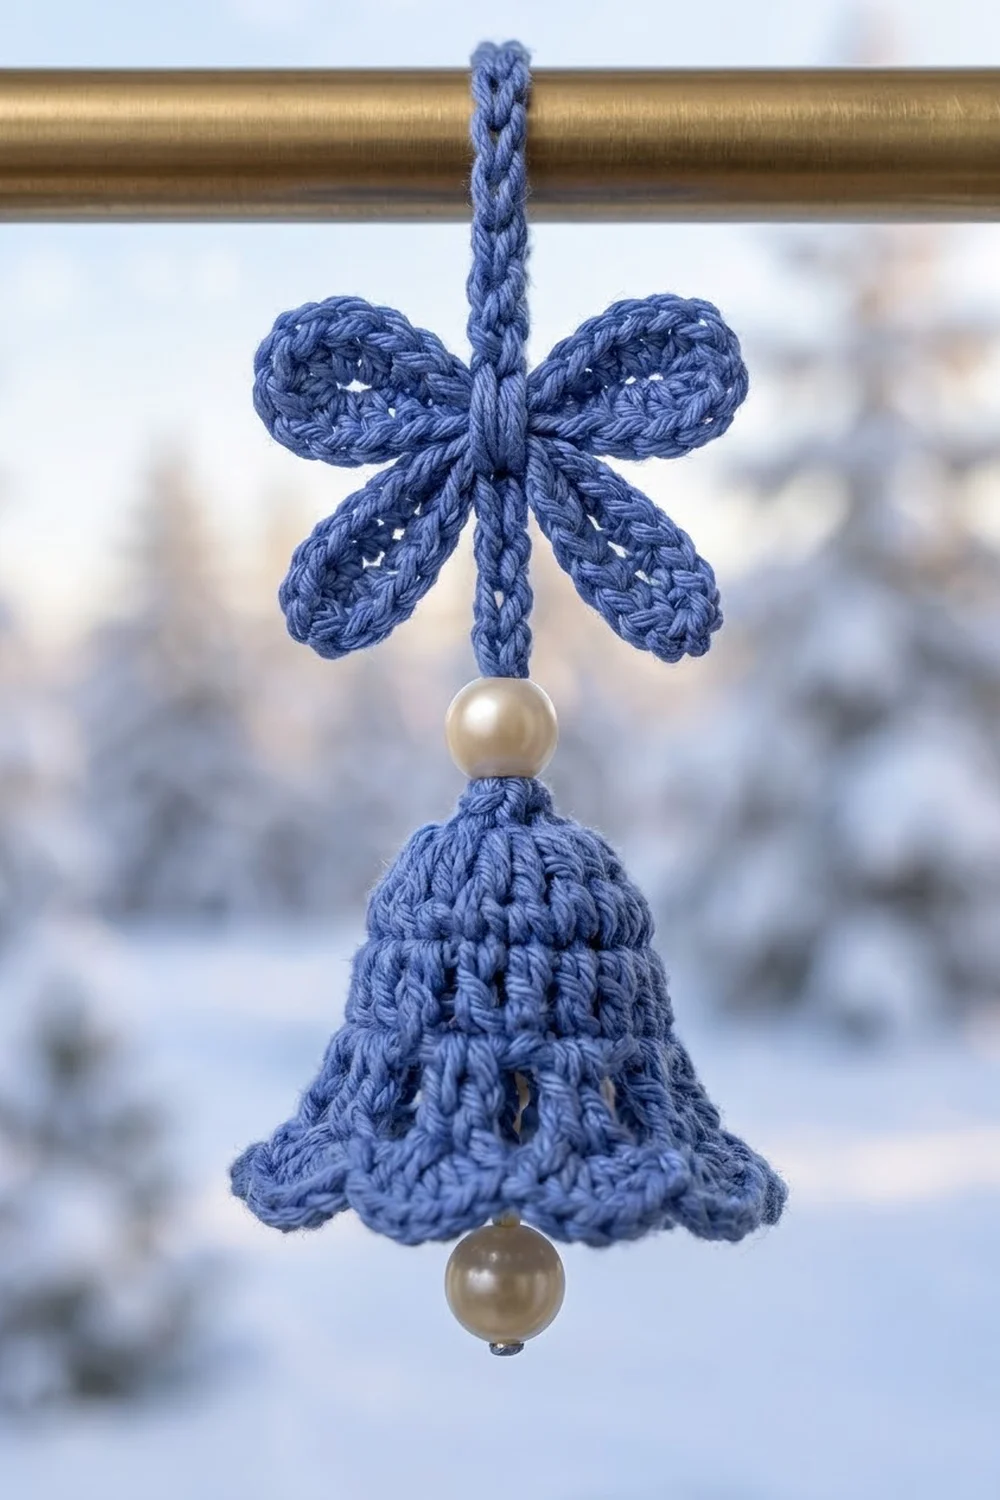
This valance turns a plain window into a winter scene. A lacy band of fan scallops runs along the curtain rod. Seventeen slim chain cords hang from it, carrying crocheted bells, small four-loop bows, and pearl beads that catch the light.
Everything is worked in one cornflower blue cotton, so the texture does the work: open fans, eyelet hems, and pearl clappers. The style is classic holiday lace in a calm, wintry color that suits the whole season.
The pattern uses US crochet terms. The finished header measures 37¼ in (94.6 cm) wide and 5 in (12.7 cm) deep. The longest cords hang 18¼ in (46.4 cm) below the header, for a total drop of 23¼ in (59.1 cm).
You crochet the header as one long strip in rows. Then you add a two-round border with picot arches along the bottom and crochet each cord straight down from the header, threading on beads and bells as you go. The bows are made separately and sewn on.
Finished Size and Construction
- Finished size: 37¼ in (94.6 cm) wide × 23¼ in (59.1 cm) longest drop
- Skill level: Intermediate
- Terminology: US crochet terms
- Yarn weight: Worsted (4) cotton
- Hook: 4.0 mm (G-6)
- Number of pieces: 1 header, 17 cords, 43 bells, 43 bows
- Layout: 17 cords in one row, alternating long Cord A (3 bells) and short Cord B (2 bells)
- Piece sizes: bell 2¼ in (5.7 cm) tall; bow 2¼ in (5.7 cm) wide × 1¾ in (4.4 cm) tall
- Header size before border: 36¼ × 3¾ in (92.1 × 9.5 cm)
- Border depth: ½ in (1.3 cm) on the top and sides; ¾ in (1.9 cm) on the bottom edge
Materials
Use a smooth, mercerized worsted-weight cotton. Cotton holds the bell shape after starching and shows the fan lace clearly. Avoid stretchy yarns, because the cords will stretch under the weight of the bells.
- Cornflower blue: 400 g (about 760 m)
- Pearl beads: 90 ivory pearls, 10 mm, with large holes (at least 2.5 mm). You need 86; the rest are spares.
- 4.0 mm (G-6) crochet hook
- Tapestry needle
- Big-eye beading needle or dental floss threader
- Stitch markers
- Measuring tape
- Blocking mat, rust-proof pins, spray starch
- Scissors
The quantities include a margin of about 20%. The header takes about 70 g, the bells about 175 g, the bows about 65 g, and the cords about 15 g.
Abbreviations (US Terms)
- ch – chain
- sl st – slip stitch
- sc – single crochet
- hdc – half double crochet
- dc – double crochet
- tr – treble crochet
- sc2tog / hdc2tog / dc2tog / tr2tog – work the named stitch in each of the next 2 sts, leaving the last loop of each on the hook, then yarn over and pull through all loops on the hook
- sk – skip
- sp – space
- st(s) – stitch(es)
- MR – magic ring
Picot: ch 3, sl st in 3rd ch from hook.
Bead lock: slide 1 pre-strung bead up against the hook, then ch 1 around it so the bead is locked into the cord.
Gauge and Checkpoints
Gauge: 16 sc and 16 sc rows = 4 in (10.2 cm). For the cords, 4 ch = 1 in (2.5 cm).
Make a test piece first: a one-repeat header swatch. Ch 18 and work Rows 1–8 below over 17 sts. It should measure 4¼ in (10.8 cm) wide and 3¾ in (9.5 cm) tall. Then make one bell and one bow.
Checkpoints:
- Header Row 1: 36¼ in (92.1 cm) wide
- Header after Row 4: 2 in (5.1 cm) tall
- Header after Row 6: 3 in (7.6 cm) tall
- Header after Row 8: 3¾ in (9.5 cm) tall
- Bell after Round 3 (flat disc): 1½ in (3.8 cm) across
- Finished bell: 2¼ in (5.7 cm) tall, hem 2½ in (6.4 cm) across when flattened
- Finished bow: 2¼ in (5.7 cm) wide
If the swatch is too big, go down 0.5 mm in hook size. If it is too small, go up 0.5 mm. Get gauge right before you start, because the cord positions depend on the stitch count matching the width.
Header
The header is worked in rows from the bottom edge up. Each fan repeat is 16 sts wide, and there are 9 repeats.
Foundation: Ch 146.
Row 1 (RS): Sc in 2nd ch from hook and in each ch across, turn. (145 sc)
Row 2: Ch 1, sc in first sc, *ch 3, sk 7 sc, 7 dc in next sc, ch 3, sk 7 sc, sc in next sc; rep from * 8 more times, turn. (63 dc in 9 fans, 10 sc, 18 ch-3 sps)
Row 3: Ch 5 (counts as dc and ch 2), [dc in next dc, ch 1] 6 times, dc in next dc, ch 2, dc in next sc, ch 2; rep from * 8 more times, ending the last rep at *, turn. (73 dc: 63 fan dc + 10 post dc; 54 ch-1 sps; 18 ch-2 sps)
Row 4: Ch 1, sc in first dc, *ch 2, sk ch-2 sp, [tr in next dc, ch 2] 6 times, tr in next dc, ch 2, sk ch-2 sp, sc in next post dc; rep from * 8 more times, working the last sc in the 3rd ch of the turning ch, turn. (63 tr, 10 sc, 72 ch-2 sps)
The fans are now complete. Each one opens upward, with a sc dip between fans.
Row 5: Ch 1, sc in first sc, *[2 sc in next ch-2 sp, sc in next tr] 7 times, 2 sc in next ch-2 sp, sc in next sc; rep from * 8 more times, turn. (217 sc: 1 + 9 repeats of 24)
Row 6 (leveling row): Ch 4 (counts as tr), *tr2tog, dc2tog, hdc2tog, sc2tog, sc in next 7 sts, sc2tog, hdc2tog, dc2tog, tr2tog, tr in next sc; rep from * 8 more times, turn. (145 sts: 1 + 9 repeats of 16)
Each repeat works into 24 sts and makes 16. Tall stitches fill the dips and short stitches sit on the fan peaks, so the top edge comes out straight.
Row 7 (rod row): Ch 5 (counts as dc and ch 2), sk 2 sts, *dc in next st, ch 2, sk 2 sts; rep from * to last st, dc in top of turning ch, turn. (49 dc, 48 ch-2 sps)
Row 8: Ch 1, sc in each dc and 2 sc in each ch-2 sp across. Do not fasten off. (145 sc: 49 sc in the dc + 96 sc in the sps)
To hang the valance, thread a rod up to ⅜ in (1.0 cm) thick in and out through the Row 7 spaces, or use clip rings.
Bell (make 43)
The bell is worked from the top down in joined rounds. Leave a 10 in (25.4 cm) starting tail.
Round 1: MR, 6 sc in ring, sl st to first sc. Pull the ring closed to a ¼ in (0.6 cm) opening only, so the cord can pass through. (6 sc)
Round 2: Ch 1, 2 sc in each st around, sl st to first sc. (12 sc)
Round 3: Ch 1, *sc in next st, 2 sc in next st; rep from * around, sl st to first sc. (18 sc)
Rounds 4–5: Ch 1, hdc in each st around, sl st to first hdc. (18 hdc)
Round 6 (eyelet round): Ch 4 (counts as dc and ch 1), *dc in next st, ch 1; rep from * around, sl st to 3rd ch of beginning ch. (18 dc worked 1 per st + 18 ch-1 sps added)
Round 7 (scalloped hem): Sl st in first ch-1 sp, ch 1, sc in same sp, *5 dc in next ch-1 sp, sc in next ch-1 sp; rep from * 7 more times, 5 dc in last ch-1 sp, sl st to first sc. (9 shells = 45 dc, 9 sc)
Fasten off and weave in the hem tail. Keep the starting tail.
Bow (make 43)
Round 1: Ch 4, sl st in first ch to form a ring. [Ch 14, sl st in ring] twice for the 2 upper loops. [Ch 10, sl st in ring] twice for the 2 lower loops.
Round 2: Sl st into first ch-14 loop, 20 sc in that loop, sl st in ring, 20 sc in next ch-14 loop, sl st in ring, [14 sc in next ch-10 loop, sl st in ring] twice. (68 sc)
Fasten off with a 12 in (30.5 cm) tail. Wrap the tail 5 times around the center to pinch the bow. Keep the tail for sewing.
Make All Pieces
- Bells: 43 (27 for Cord A, 16 for Cord B)
- Bows: 43
- Pearls: 86 (2 per bell)
- Cord A: 9 cords, 3 bell units each
- Cord B: 8 cords, 2 bell units each
Layout from left to right along the bottom of the header:
ROW 1: A B A B A B A B A B A B A B A B A
Cord A hangs under each fan center and Cord B under each dip between fans. The layout is symmetrical.
Joining
Cord positions: After the border, the bottom edge has 37 sc between and around the picot arches, not counting the 2 corner sc. Counting from the left, attach cords to sc #3, #5, #7, and so on up to #35. That gives 17 positions, 8 sts or 2 in (5.1 cm) apart. Cord A goes on #3, #7, #11 … #35, which sit under the fan centers. Cord B goes on #5, #9 … #33, which sit under the dips.
Bell unit: Work a bead lock for the top pearl and drop the loop from the hook. Insert the hook into the bell from the hem, push it through the ring opening, catch the dropped loop, and pull it down into the bell. Ch 9 inside the bell, then work a bead lock for the clapper pearl. One unit measures about 2¾ in (7.0 cm).
Cord A: String 6 pearls onto the yarn. Join with a sl st in the marked sc, then ch 8. *Work 1 bell unit, ch 16; rep from * once more, then work 1 bell unit. Fasten off. (18¼ in / 46.4 cm)
Cord B: String 4 pearls onto the yarn. Join with a sl st in the marked sc, ch 24, work 1 bell unit, ch 16, work 1 bell unit. Fasten off. (15½ in / 39.4 cm)
The different starting lengths (ch 8 and ch 24) stagger the bells on neighboring cords.
Tacking: Use each bell’s starting tail to sew its ring to the cord with 2 small stitches, so the bell sits right under its top pearl. Sew a bow through its wrapped center onto the cord ¾ in (1.9 cm) above each top pearl.
Tension: Keep the chains firm and even. Loose chains stretch under the bells.
Size checkpoint: Hang the valance. Cord A should end 23¼ in (59.1 cm) below the top edge, and Cord B should end 20½ in (52.1 cm) below it.
Border
Border gauge is the same as the header: 16 sc = 4 in (10.2 cm). On each side, 15 row-end sc cover 3¾ in (9.5 cm), which is also 4 sts per inch.
Continue from Row 8 without turning. Work each corner as (sc, ch 1, sc). Each sc in the pair counts toward the side it faces.
Round 1:
- Top: 145 sc, one in each Row 8 st, including both corner sc
- Each side: 17 sc (1 corner sc + 15 row-end sc + 1 corner sc). Work the row ends as Row 1: 1, Row 2: 2, Row 3: 2, Row 4: 3, Row 5: 1, Row 6: 3, Row 7: 2, Row 8: 1.
- Bottom: 145 sc, one in each foundation ch, including both corner sc
- Total: 324 sc + 4 corner ch-1 sps
Round 2:
- Top: 147 sc (145 + 1 from each corner sp)
- Each side: 19 sc (17 + 1 from each corner sp)
- Bottom: sc in corner sp, sc in first sc, *ch 2, picot, ch 2, sk 3 sc, sc in next sc; rep from * 35 more times, sc in next corner sp. (39 sc, 36 picot arches)
Sl st to the first sc and fasten off.
Why the math works: The bottom edge has 145 sc. After the first sc, 144 remain, and 144 ÷ 4 = 36 arches with nothing left over. That puts the anchor sc every 4 sts, so the odd-numbered anchors from #3 to #35 fall every 8 sts (sts 9, 17 … 137). Each fan is 16 sts wide, so these points line up with the fan centers and the dips. The border adds ½ in (1.3 cm) to each side: 36¼ + 1 = 37¼ in (94.6 cm). For the height, 3¾ + ½ + ¾ = 5 in (12.7 cm).
Final Blocking
- Before you attach the cords, wet the header and roll it in a towel.
- Pin it to 37¼ × 5 in (94.6 × 12.7 cm), keeping the top edge straight.
- Pin the tr spokes into even fans and open each picot arch.
- Spray with starch and let it dry completely.
- Starch the bells. Stuff each one with a cone of plastic wrap, flare the hem, and dry them upright.
- Starch the bows flat, pinning the loops open.
- After joining, hang the valance for 24 hours, then check the lengths again.
Final Quality-Control Checklist
- Header measures 37¼ × 5 in (94.6 × 12.7 cm)
- 9 fans, all the same size
- Top edge is straight and the Row 7 spaces are open
- 36 picot arches along the bottom
- 17 cords in the order A B A B … A
- 43 bells, each with a top pearl and a clapper pearl
- 43 bows, sewn ¾ in (1.9 cm) above the top pearls
- Drops: Cord A 23¼ in (59.1 cm), Cord B 20½ in (52.1 cm)
- All tails woven in
Troubleshooting
Header too wide: Go down a hook size and start again. The width is set by the 145 sc in Row 1.
Wavy top edge: Recount Row 6. Each repeat must turn 24 sts into 16.
Fans cupping: Loosen the Row 4 ch-2 sps, or block more firmly.
Bell slides down the cord: Tack the ring to the cord more firmly.
Hem curls inward: Starch it again and dry it over a cone.
Beads won’t fit on the yarn: Use a floss threader, or switch to pearls with 3 mm holes.
Uneven cords: Recount the chains, then pull out and redo any cord that is too long.
Care
Hand wash in cool water with mild soap, roll in a towel, and dry flat. Starch the bells again and reshape them after washing.

Final Notes
Here is the measurement chain. A gauge of 16 sc = 4 in (10.2 cm) makes Row 1 36¼ in (92.1 cm) wide. Eight rows bring the header to 3¾ in (9.5 cm) tall. Two border rounds finish it at 37¼ × 5 in (94.6 × 12.7 cm). Seventeen cords of 18¼ in (46.4 cm) and 15½ in (39.4 cm) carry 43 bells to a longest drop of 23¼ in (59.1 cm).
Check each stage before moving on, and the bells will hang straight and even.
Happy crocheting!