

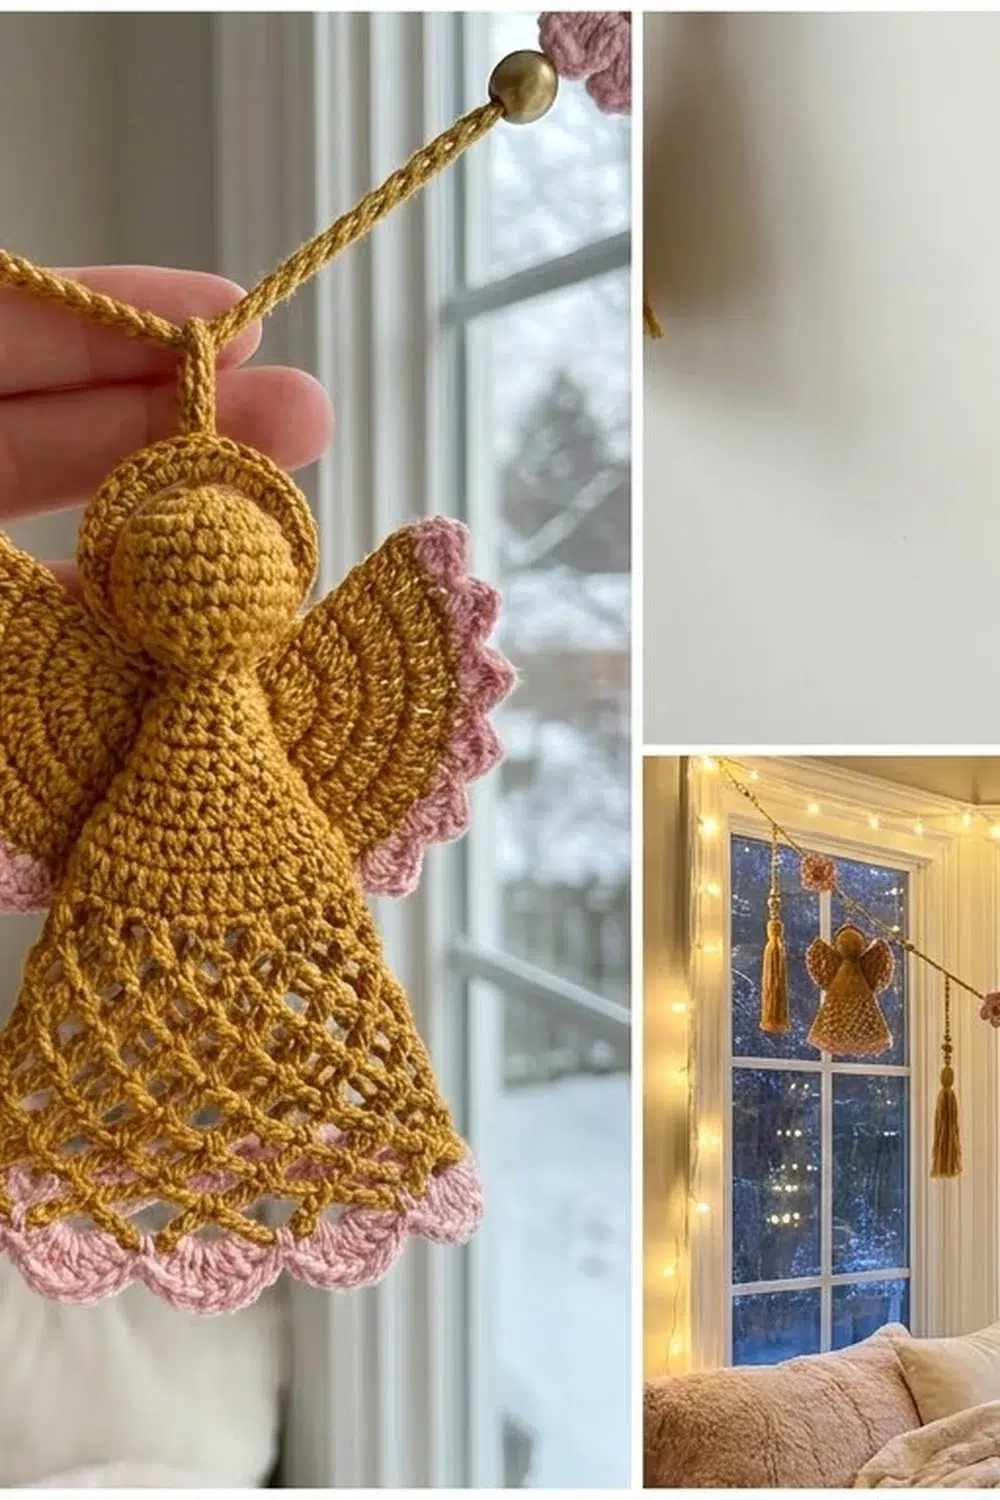
This angel is a small, lacy ornament with a mustard-gold body and a soft pink scalloped hem. It has a stuffed round head, a tiny halo, fan-shaped wings with a picot edge, and an open diamond-net skirt that catches the light. It looks delicate, but every part is simple stitch work.
The colors are warm and vintage: gold for the head, halo, wings, and lattice skirt, and blush pink for the hem. The style is somewhere between thread-crochet lace and a modern holiday ornament. It looks good on a tree or in a window, or tied onto a gift.
This pattern uses US crochet terms throughout. The finished angel measures about 4.6 in (11.7 cm) across the wings and 4.7 in (11.9 cm) tall from the top of the halo to the bottom of the hem. The hanging loop adds about 2 in (5.1 cm).
The angel is one finished motif built from small parts. You crochet a stuffed head ball first. Next, you work a shoulder bar, with the wings worked off its top edge and the lattice skirt off its bottom edge. Then you add the pink hem, make a halo ring with a hanging loop, and sew everything together.
Finished Size and Construction
- Finished size: 4.6 in (11.7 cm) wide x 4.7 in (11.9 cm) tall, plus a 2 in (5.1 cm) hanging loop
- Skill level: Advanced beginner to intermediate
- Terminology: US crochet terms
- Yarn weight: Sport weight (category 2) cotton
- Hook: 3.0 mm (US C/D)
- Number of pieces: 1 finished angel (head, body, and halo sewn together into one ornament)
- Layout: Single motif, no joining
- Head size: 1 in (2.5 cm) diameter
- Shoulder bar: 2.2 in (5.6 cm) long
- Skirt before hem: 3.6 in (9.1 cm) wide at the bottom, 2.4 in (6.1 cm) long
- Hem (border) depth: 0.75 in (1.9 cm), flaring to 4.2 in (10.7 cm) wide
Materials
Use a smooth mercerized or combed cotton in sport weight. Cotton shows the lattice clearly, takes starch well, and holds the wing shape. Avoid fuzzy acrylic, because it blurs the diamond net.
- Color A, Mustard Gold: 10 g, about 31 m (34 yd)
- Color B, Blush Pink: 5 g, about 16 m (17 yd)
These quantities include a margin for your gauge swatch and for tails. One angel uses less than this.
Tools:
- 3.0 mm (US C/D) crochet hook
- Small pinch of polyester fiberfill
- Tapestry needle
- 2 locking stitch markers
- Scissors
- Rust-proof pins and a foam blocking board
- Spray starch or a fabric stiffener (optional, recommended for the wings)
- Ruler or tape measure
Abbreviations (US Terms)
- ch – chain
- sl st – slip stitch
- sc – single crochet
- dc – double crochet
- inc – 2 sc in the same stitch
- dec – sc2tog (single crochet 2 together)
- st(s) – stitch(es)
- sp – space
- RS / WS – right side / wrong side
Special stitches:
- Shell: 7 dc in the same stitch.
- Picot loop: ch 3, then sc in the next stitch, so a small arch sits between two sc.
Gauge and Checkpoints
Gauge: 12 sc = 2 in (5.1 cm) with a 3.0 mm hook. Each ch-5 net loop, gently stretched into a diamond, spans about 0.4 in (1.0 cm) across. Each net row adds about 0.34 in (0.9 cm) of length.
This is a single small motif, so the angel itself is your swatch. Start with the head and the shoulder bar, and measure before you go on.
Checkpoints:
- Head: after stuffing, 1 in (2.5 cm) diameter.
- Shoulder bar: 2.2 in (5.6 cm) long, laid flat.
- Skirt Row 4: 6 loops, about 2.4 in (6.1 cm) wide and 1.4 in (3.6 cm) long from the bar.
- Skirt Row 7: 9 loops, about 3.6 in (9.1 cm) wide and 2.4 in (6.1 cm) long.
- Finished angel: 4.6 in (11.7 cm) wide x 4.7 in (11.9 cm) tall after blocking.
If your pieces are too big, go down to a 2.75 mm hook, or make the net chains ch 4 instead of ch 5. If they are too small, go up to a 3.25 mm hook. Keep the stitch counts the same, because the hem math depends on them.
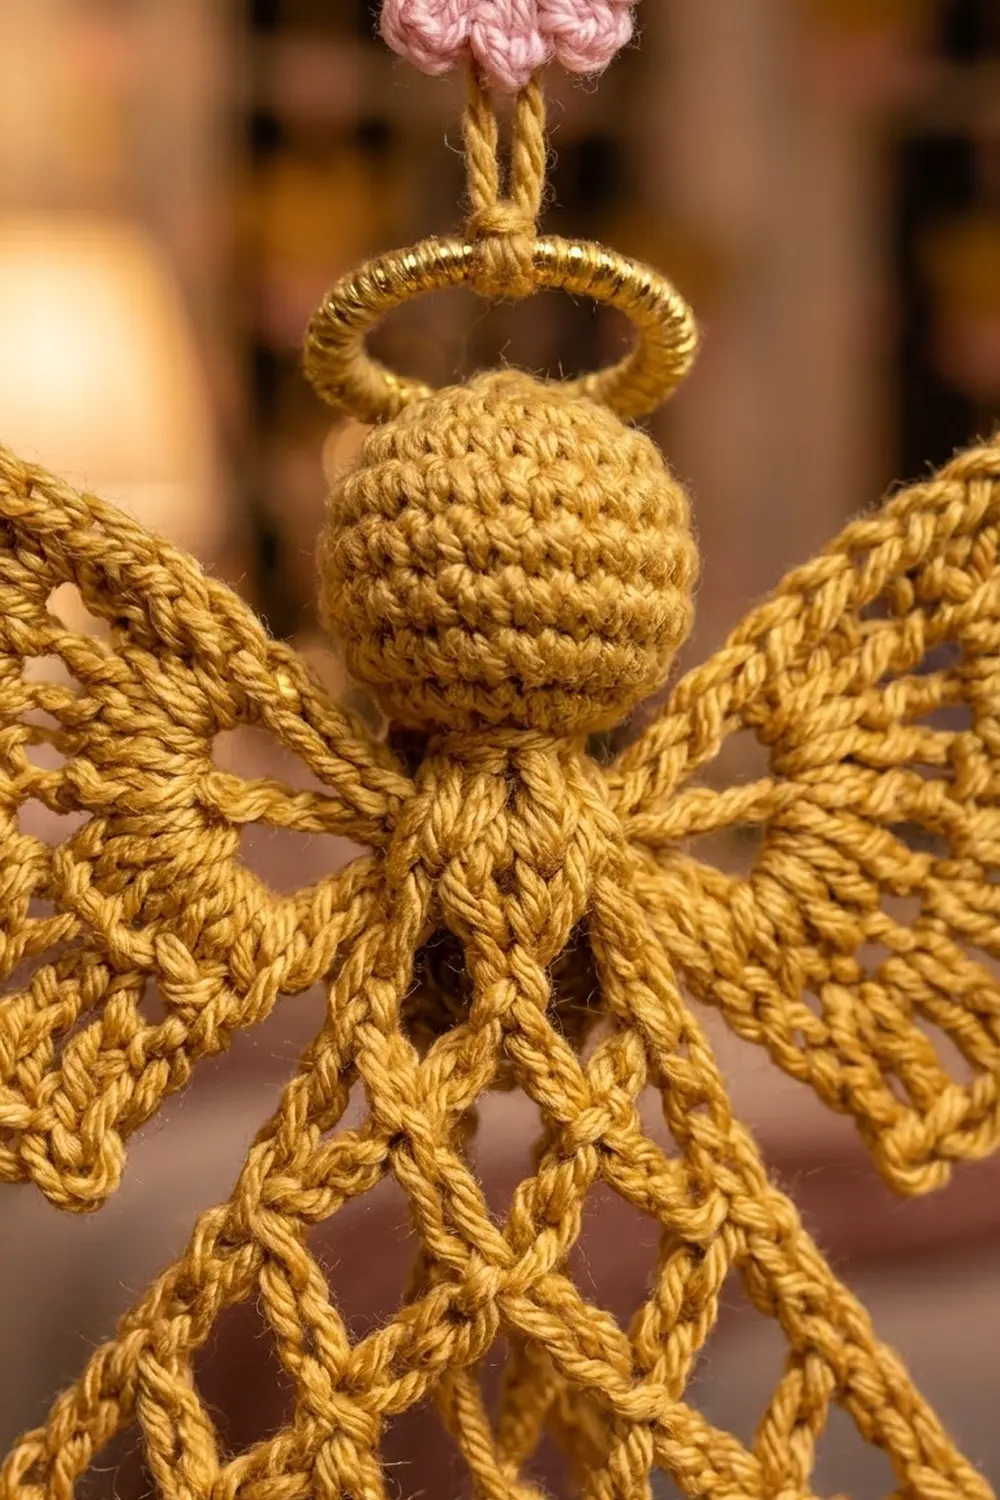
Head
Make the head with Color A. Work in continuous spiral rounds, and use a marker to show the first stitch of each round.
Rnd 1: Make a magic ring, then work 6 sc in the ring. (6 sts)
Rnd 2: Inc in each st around. (12 sts)
Rnd 3: Sc in next st, inc in next st; repeat from * 6 times. (18 sts)
Rnds 4–6: Sc in each st around. (18 sts in each round)
Rnd 7: Sc in next st, dec; repeat from * 6 times. (12 sts)
Stuff the head firmly so it is round and smooth. Push the fiberfill toward the center so it doesn’t show through the stitches.
Rnd 8: Dec 6 times. (6 sts)
Fasten off and leave a 10 in (25.4 cm) tail. Weave the tail through the front loops of the last 6 sts and pull it tight to close the hole. Keep the tail for sewing.
Checkpoint: the head should be 1 in (2.5 cm) across.
Shoulder Bar
The shoulder bar is the base of the angel. The wings are worked into its top edge, and the skirt into its bottom edge.
With Color A, ch 14.
Row 1: Sc in the 2nd ch from the hook and in each ch across. (13 sc)
Fasten off. Number the sc 1 to 13 from right to left as you look at the RS. Place a marker in sc 4 and sc 10 on the bottom edge (the free loops of the foundation chain). Those 7 chain loops, 4 through 10, are where the skirt goes. Sc 1–3 hold the left wing and sc 11–13 hold the right wing.
Checkpoint: 2.2 in (5.6 cm) long.
Wings (Make 2, Worked Directly onto the Bar)
Each wing is a small fan with radiating rows of double crochet and a picot edge. Because you work it into the top of three end stitches, it angles up and out from the shoulder, just like the photo.
First wing:
Row 1: With the RS facing, join Color A in sc 3 with a sl st. Ch 3 (counts as dc), then work 2 dc in the same st, 3 dc in sc 2, and 3 dc in sc 1. (9 dc)
Row 2: Ch 4, turn. The ch 4 counts as the first dc plus a ch-1 sp. Dc in the same st. Ch 1, (dc, ch 1, dc) in the next dc; repeat from * 8 times. (18 dc and 17 ch-1 sps)
Row 3: Ch 1, turn. Sc in the first dc. Ch 3, sc in the next dc; repeat from * 17 times, working the last sc in the 3rd ch of the turning ch. (18 sc and 17 picot loops)
Fasten off and weave in the end.
Second wing: With the RS facing, join Color A in sc 13 and work Rows 1–3 across sc 13, 12, and 11 in that order. Make sure the stitch counts match the first wing.
Checkpoint: each wing reaches about 1.2 in (3.0 cm) out from the end of the bar. Tip to tip, the span is about 4.6 in (11.7 cm).
Lattice Skirt
The skirt is worked flat in turned rows into the free loops of the foundation chain. Every row adds one ch-5 loop, so the net makes a trapezoid of diamonds.
Turn the bar so the bottom edge faces up and the wings point down.
Row 1 (RS): Join Color A in the free loop at the marked chain 4. Ch 1, sc in the same loop. Ch 5, skip 1 chain loop, sc in the next chain loop; repeat from * 3 times, ending with an sc in the marked chain 10. (3 ch-5 loops, 4 sc)
Row 2 (increase row): Ch 5, turn. Sc in the first ch-5 loop. Ch 5, sc in the next loop; repeat from * to the end, so the last sc goes into the last loop. Ch 5, then sc again in that same last loop. (4 loops)
This increase works on both edges. The turning ch 5 makes a new loop at the start of the row. The extra “ch 5, sc in the same loop” makes a new loop at the end. The loop count goes up by one: 1 + (previous loops – 1) + 1.
Row 3: Repeat Row 2. (5 loops)
Row 4: Repeat Row 2. (6 loops)
Checkpoint: about 2.4 in (6.1 cm) wide and 1.4 in (3.6 cm) long.
Row 5: Repeat Row 2. (7 loops)
Row 6: Repeat Row 2. (8 loops)
Row 7 (RS): Repeat Row 2. (9 loops)
Fasten off Color A.
Checkpoint: stretch the net gently so the diamonds open. It should be 3.6 in (9.1 cm) wide at the bottom and 2.4 in (6.1 cm) long from the bar.
Border: Pink Scalloped Hem
The hem is the angel’s only border, and it runs along the bottom of the skirt. You work it in three rows across the 9 loops of Skirt Row 7.
Border gauge: 4 dc per ch-5 loop. The three hem rows together are 0.75 in (1.9 cm) deep.
Hem Row 1 (WS): Turn the work so the WS faces you. Join Color B in the first ch-5 loop. Ch 3 (counts as dc), then work 3 dc in the same loop. Work 4 dc in each of the remaining 8 loops. (36 dc)
That is 9 loops x 4 dc = 36. The dense dc covers the bottom of the net and makes the solid band shown in the photo.
Hem Row 2 (RS): Ch 3, turn (counts as the first dc). Dc in the next 3 sts, 2 dc in the next st. Dc in the next 4 sts, 2 dc in the next st; repeat from * 6 more times. Dc in the last st, which is the top of the turning ch. (43 dc)
That is 36 sts worked one per stitch + 7 extra = 43. The 7 increases spread across the row so the hem flares a little, like the photo.
Hem Row 3 (WS, scallops): Ch 1, turn. Sc in the first st. Skip 2 sts, shell in the next st, skip 2 sts, sc in the next st; repeat from * 7 times. (7 shells, 8 sc)
Why the math works: each scallop repeat uses 6 sts (2 skipped + 1 shell + 2 skipped + 1 sc). The first sc uses 1 st. So 1 + (7 x 6) = 43, which matches Hem Row 2 exactly, and the last sc lands in the last stitch. The result is 7 even scallops and no leftover stitches.
Fasten off and weave in all ends along the WS of the hem.
Checkpoint: hem depth 0.75 in (1.9 cm), bottom width about 4.2 in (10.7 cm).
Halo and Hanging Loop
With Color A, ch 16 and join with a sl st to make a ring.
Rnd 1: Ch 1, work 20 sc into the ring (not into the chains), then join with a sl st to the first sc. (20 sc)
Hanging loop: Ch 20, then sl st into the same st at the join to make the loop. Fasten off and leave a 6 in (15.2 cm) tail.
Checkpoint: the halo is about 1.25 in (3.2 cm) across.
Assembly
- Center the head on the top edge of the shoulder bar, over sc 5 through 9, between the wings.
- Use the head tail to sew the bottom of the head to those 5 sts with small whipstitches. Go around twice so the head doesn’t wobble.
- Set the halo behind the top back of the head, tilted slightly so it frames the head from the front. The hanging loop should point straight up.
- Use the halo tail to tack the halo to the back of the head in two places.
- Weave in all ends.
Final Blocking
- Wet the angel in cool water and gently squeeze out the extra water. Don’t wring it.
- Lay it RS up on the foam board.
- Pin the shoulder bar straight at 2.2 in (5.6 cm).
- Spread each wing into a fan and pin every picot loop. The wingspan should be 4.6 in (11.7 cm).
- Pull the skirt net down and out so every diamond opens evenly. Pin the bottom corners 3.6 in (9.1 cm) apart.
- Pin the tip of each of the 7 scallops so the hem is 4.2 in (10.7 cm) wide.
- Spray the wings and skirt lightly with starch. Keep starch off the head.
- Let it dry completely, which usually takes 12–24 hours, before you unpin.
Final Quality-Control Checklist
- The head is round, firm, and 1 in (2.5 cm) across, with no stuffing showing.
- The shoulder bar has 13 sc.
- Each wing ends with 18 sc and 17 picot loops, and both wings are the same size.
- The skirt has 9 loops in Row 7 and the diamonds are even.
- Hem Row 1 = 36 dc, Row 2 = 43 dc, Row 3 = 7 shells.
- The halo sits behind the head and the hanging loop is centered.
- The angel hangs straight when held by the loop.
- The finished size is 4.6 in (11.7 cm) x 4.7 in (11.9 cm).
Troubleshooting
The skirt curls toward the center. Your net chains are tight. Chain more loosely, or go up a hook size for the skirt only.
The skirt edges are uneven or one side is longer. Check that every row ends with “ch 5, sc in the same last loop.” If you skip it on one row, that side stays narrow.
The hem ruffles. Hem Row 1 may have more than 4 dc in some loops. Count again to 36.
The scallops don’t fit. Hem Row 2 must be exactly 43 sts. Count the turning ch as a stitch.
The wings droop. Starch them again and pin them flat. You can also use a firmer cotton.
The head leans. Add a second round of whipstitches along the back of the neck.
Care
Hand wash in cool water with mild soap, press out the water in a towel, and dry flat. Starch again after washing if you want the wings stiff.
Final Notes
The measurement chain is short and easy to check. The head is 1 in (2.5 cm), and the shoulder bar is 13 sc at 2.2 in (5.6 cm). The wings grow from 9 to 18 dc and reach 4.6 in (11.7 cm) tip to tip. The skirt grows from 3 to 9 loops, ending at 3.6 in (9.1 cm) wide and 2.4 in (6.1 cm) long. The hem goes from 36 to 43 sts and finishes with 7 shells, 0.75 in (1.9 cm) deep. If each checkpoint matches, the finished angel will be 4.6 in (11.7 cm) x 4.7 in (11.9 cm).
Make one angel for a tree branch or a gift tag. If you want a whole window of them, repeat the same motif and hang each one by its loop.
Happy crocheting!