

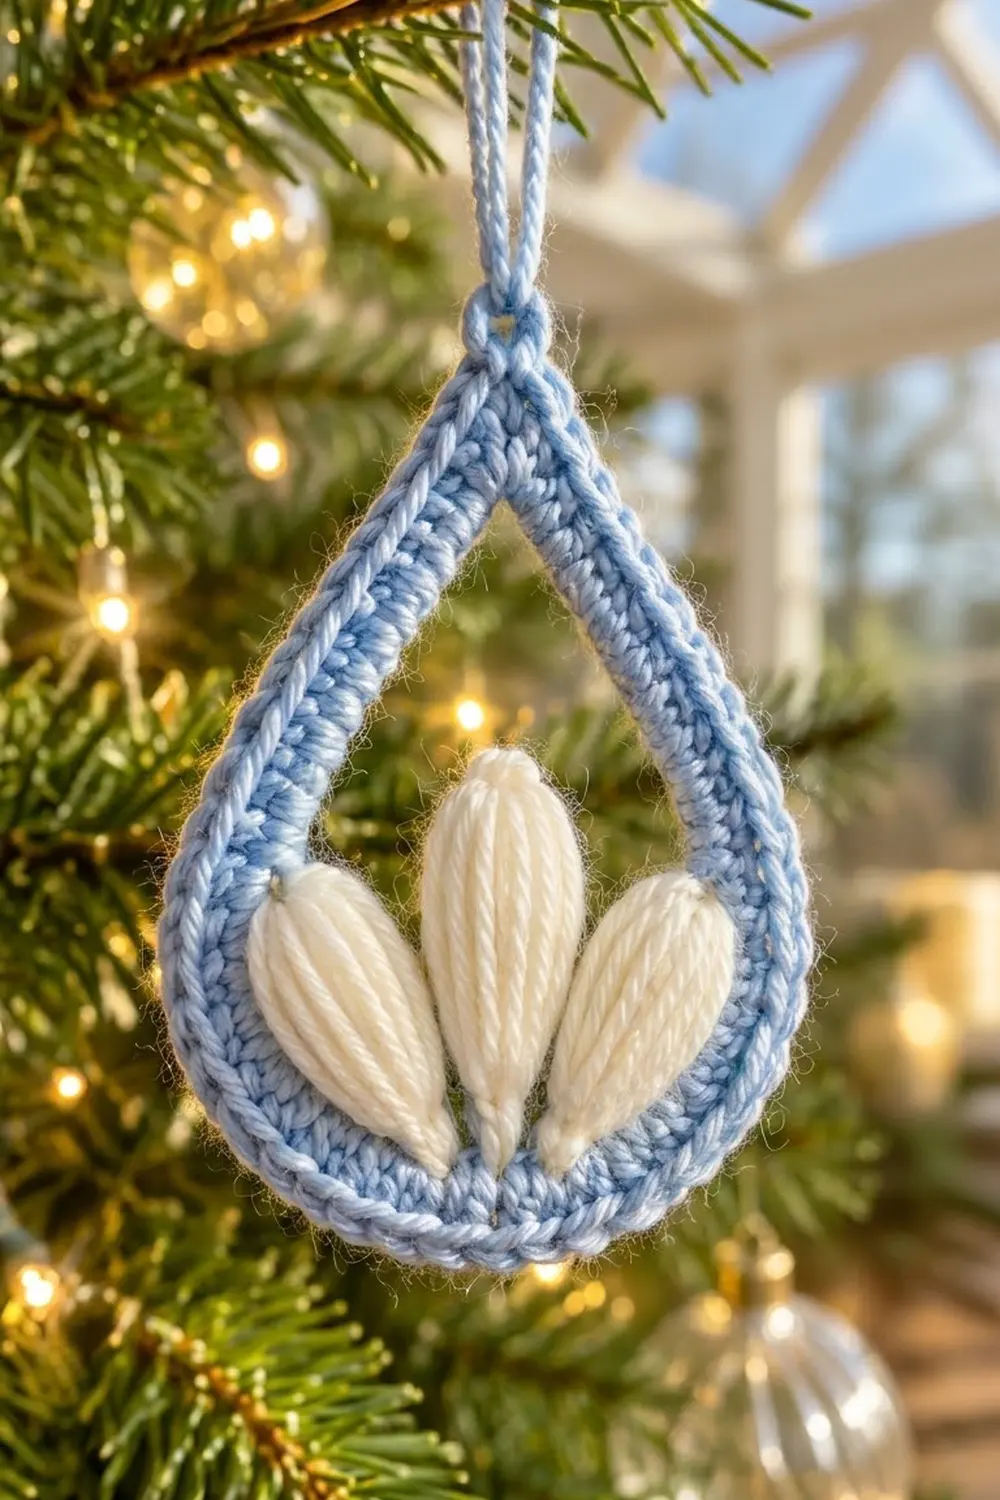
The Frosted Tulip Teardrop is a small, open-frame Christmas ornament. A light blue teardrop frame surrounds three soft cream petals that rise from the bottom like a winter tulip. The center of the frame is left open, so tree lights and branches show through.
Two colors do the work here: a cool light blue for the frame and a warm cream for the petals. The frame is firm and flat, and the petals are plump and ribbed, with their strands running from base to tip. The style is clean and Scandinavian-inspired. Make one ornament, or a whole tree’s worth.
This pattern uses US crochet terms. The finished ornament measures 3.5 in (8.9 cm) tall and 2.75 in (7.0 cm) wide, not counting the hanging loop. The loop adds about 1.25 in (3.2 cm).
Construction is simple. You chain a ring and shape it into a teardrop over three rounds of single crochet. A pointed corner at the top and increases along the bottom curve create the shape. A slip-stitch round finishes the edge and makes the hanging loop. Last, you work three long-puff petals straight into the free loops of the foundation chain, so there is nothing to sew on.
Finished Size and Construction
- Finished size: 3.5 in (8.9 cm) tall × 2.75 in (7.0 cm) wide, without the loop
- Hanging loop: about 1.25 in (3.2 cm)
- Skill level: Easy-intermediate
- Terminology: US crochet terms
- Yarn weight: Sport / light DK (category 2)
- Hook: 3.25 mm (US D-3)
- Number of pieces: 1 (petals are worked directly onto the frame)
- Layout: Single ornament, worked in joined rounds
- Frame band width: just under 1/2 in (1.3 cm)
- Size before border: 3.375 in (8.6 cm) × 2.625 in (6.7 cm)
- Border depth: about 1/16 in (0.2 cm) on each edge
Materials
Yarn advice: Choose a smooth sport-weight cotton or cotton blend for the frame so the stitches look crisp and the shape holds. For the petals, a soft wool or acrylic blend with a little halo gives the plump, slightly fuzzy look. Any sport-weight yarn works as long as it matches the gauge.
- Light blue (frame and loop): 8 g, about 26 m (28 yd)
- Cream (petals): 5 g, about 16 m (18 yd)
These amounts include a small safety margin, so one ornament won’t use all of it.
Tools:
- 3.25 mm (US D-3) crochet hook, ideally one with a straight, even shaft for the long puffs
- Tapestry needle
- 2 locking stitch markers
- Scissors
- Ruler or tape measure
- Pins and a blocking mat or folded towel
- Spray bottle; fabric stiffener or light spray starch (optional)
Abbreviations (US Terms)
- ch – chain
- sc – single crochet
- sl st – slip stitch
- st(s) – stitch(es)
- sp – space
- BLO – back loop only
- yo – yarn over
- rnd – round
Special stitch: Long Puff Petal (LPP-n)
- Insert the hook in the stated place, yo, and pull up a loop.
- Lengthen that loop to the stated height.
- [Yo, insert the hook in the same place, yo, pull up a loop to the same height] until you have made n loops in total. You’ll have (2 × n) + 1 loops on the hook.
- Yo and pull through all loops on the hook.
- Ch 1 tightly to close. This makes the small knot at the petal tip.
LPP-7: 7 loops pulled to 1.25 in (3.2 cm), giving 15 loops on the hook.
LPP-9: 9 loops pulled to 1.5 in (3.8 cm), giving 19 loops on the hook.
Gauge and Checkpoints
Gauge: 6 sc and 6 rnds = 1 in (2.5 cm) in tight single crochet.
Make one full ornament as your test piece. The frame is small, so a separate swatch wouldn’t tell you much more. Check your size at each stage:
- Foundation chain (41 ch), laid straight: about 6.75 in (17.1 cm)
- After Rnd 1, opening laid flat as a teardrop: about 2.5 in (6.4 cm) tall × 1.75 in (4.4 cm) wide
- After Rnd 2, outer edge: about 3 in (7.6 cm) × 2.25 in (5.7 cm)
- After Rnd 3, outer edge: 3.375 in (8.6 cm) × 2.625 in (6.7 cm)
- After Rnd 4 (border): 3.5 in (8.9 cm) × 2.75 in (7.0 cm)
If your frame is too big, go down one hook size, to 3.0 mm.
If your frame is too small or stiff, go up one size, to 3.5 mm (US E-4).
If the bottom curve ripples, your increases are fine but your tension is loose. Tighten your tension rather than removing stitches, because the counts are planned to lie flat.
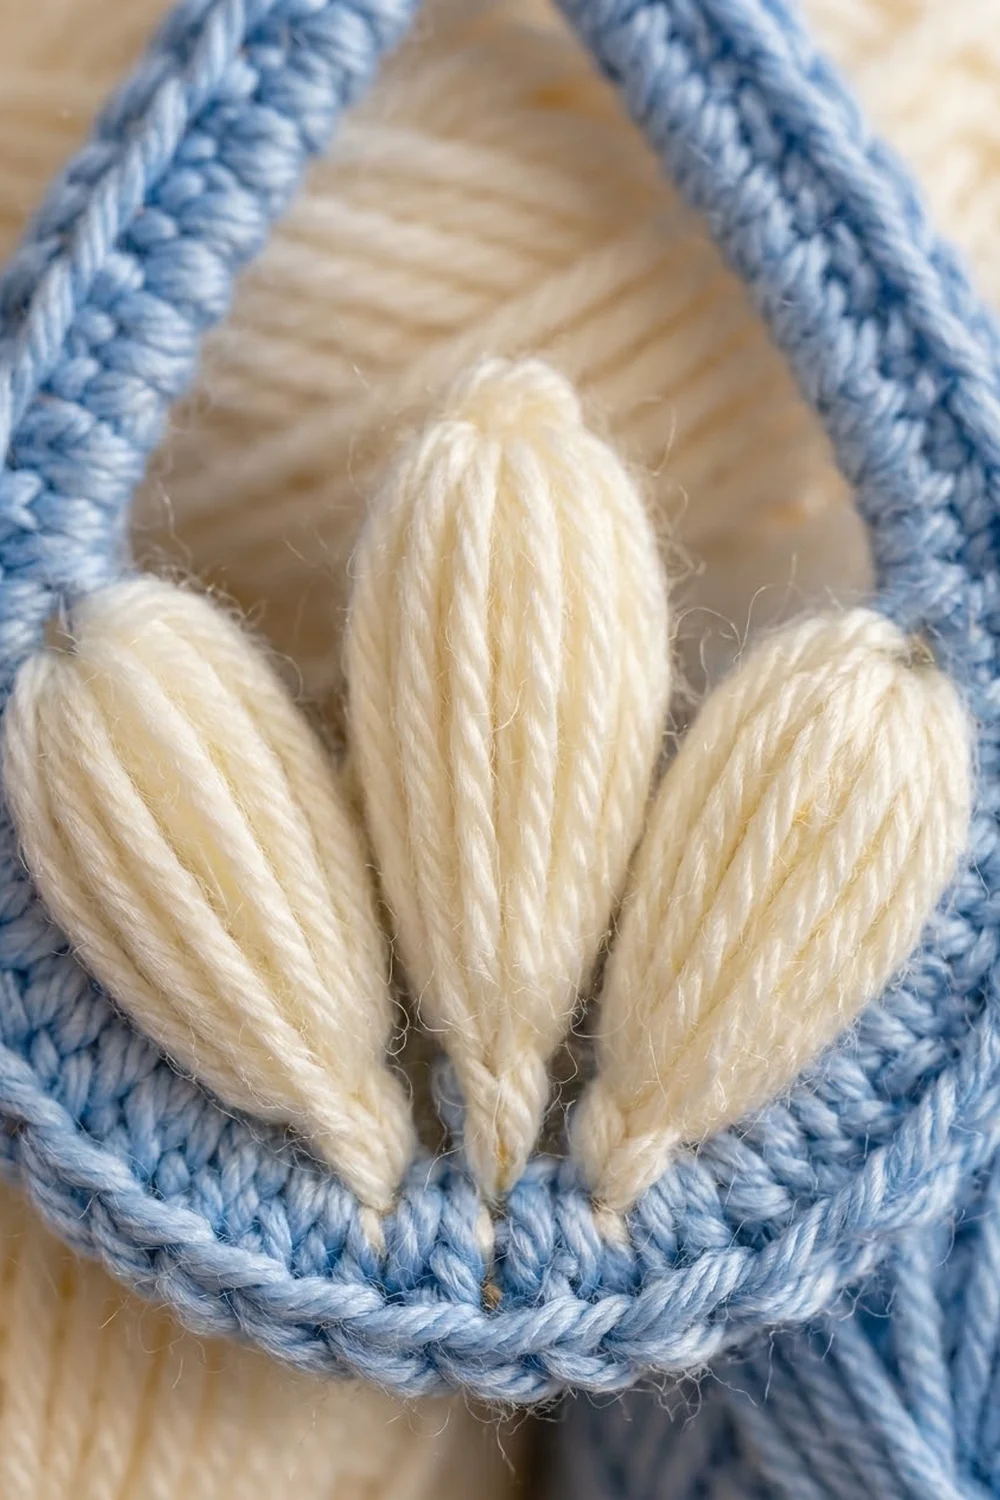
Frame
The frame is worked in light blue, in joined rounds, with the front facing you. Don’t turn.
Foundation: Ch 41. Join with a sl st to the first ch to form a ring. Make sure the chain isn’t twisted.
Rnd 1: Ch 1. Work 1 sc into the back bump of each ch around, so the front “V” of each chain stays free on the inner edge for the petals. Join with a sl st to the first sc. (41 sc)
Now map the round. St 1 is the top point. Sts 2–13 are the right side (12 sts). Sts 14–29 are the bottom curve (16 sts). Sts 30–41 are the left side (12 sts). Check: 1 + 12 + 16 + 12 = 41. Place markers in st 14 and st 29.
Rnd 2 (growth round): Ch 1.
- Work (sc, ch 1, sc) in st 1 for the top point.
- Sc in each of the next 12 sts.
- [2 sc in next st, sc in next st] 8 times. This turns the 16 bottom sts into 24.
- Sc in each of the next 12 sts.
- Join with a sl st to the first sc.
(50 sc + 1 ch-1 sp)
Check: 2 + 12 + 24 + 12 = 50.
From the top: the first sc of the point, the ch-1 sp, the second sc of the point, 12 side sts, 24 bottom sts, 12 side sts.
Rnd 3 (growth round, BLO): Sl st into the ch-1 sp. Ch 1.
- Work (sc, ch 1, sc) in the ch-1 sp.
- Sc BLO in each of the next 13 sts: the second point sc plus the 12 side sts.
- [2 sc BLO in next st, sc BLO in each of next 2 sts] 8 times. This turns the 24 bottom sts into 32.
- Sc BLO in each of the next 13 sts: 12 side sts plus the first point sc.
- Join with a sl st to the first sc.
(60 sc + 1 ch-1 sp)
Check: 2 + 13 + 32 + 13 = 60. The bottom uses 8 × 3 = 24 sts, which matches the Rnd 2 bottom.
Working in the back loop leaves the front loops of Rnd 2 showing as the raised ridge in the middle of the band.
Checkpoint: The frame should lie flat and measure 3.375 in (8.6 cm) × 2.625 in (6.7 cm). The top should come to a clear point.
Border and Hanging Loop
Border gauge: The slip stitches add only about 1/16 in (0.2 cm) on each edge. They tighten the edge and give it a rope-like finish without widening the band.
Rnd 4 (trim round): Sl st into the ch-1 sp. Ch 18 for the hanging loop, then sl st into the same ch-1 sp. Now work 1 loose sl st in each sc around. Finish with a sl st into the ch-1 sp.
(60 sl st worked 1 per existing sc + 0 extra; the loop is not counted)
Count per section:
- Right side: 14 sl st (1 point sc + 13)
- Bottom curve: 32 sl st
- Left side: 14 sl st (13 + 1 point sc)
Check: 14 + 32 + 14 = 60.
Fasten off, leaving a 6 in (15.2 cm) tail. Wrap the tail tightly 3 times around the base of the hanging loop, then weave it into the back of the frame. Weave in the starting tail too.
Why the math works: A slip stitch adds almost no height. One sl st per sc keeps the edge exactly the size of Rnd 3, so no increases are needed. The point stays sharp because the hanging loop sits in the ch-1 sp and not in a stitch. Earlier, each round added 8 stitches on the bottom curve, and the extra corner stitch at the point added 1 to each side. That’s what lets the band widen outward and still lie flat.
Petals
The petals are worked in cream into the free front “V” loops of the foundation chain along the bottom inner edge. Hold the frame with the front facing you and the point at the top.
Find the chains under Rnd 1 sts 21 and 22. These are the bottom center, since 21.5 is the middle of sts 14–29. The side petals go 3 sts out from the center on each side, under sts 18–19 and sts 24–25. That makes the layout symmetric.
Right petal (viewed from front):
- Leave a 6 in (15.2 cm) tail.
- Insert the hook under the free chain loops beneath sts 18 and 19 together.
- Work LPP-7, angling the loops up and outward toward the right side of the frame.
- Fasten off, leaving a 6 in (15.2 cm) tail at the tip.
Center petal:
- Insert the hook under the free chain loops beneath sts 21 and 22 together.
- Work LPP-9 straight up.
- Fasten off, leaving a 6 in (15.2 cm) tail.
Left petal:
- Insert the hook under the chain loops beneath sts 24 and 25 together.
- Work LPP-7, angling it toward the left side of the frame.
- Fasten off, leaving a 6 in (15.2 cm) tail.
Shaping and securing:
- Fan the strands of each petal so they lie side by side, in a teardrop shape that is widest just below the tip.
- Thread the tip tail of each side petal onto the needle. Take it down the back of the petal to its outer widest point.
- Tack that point to the inner edge of the frame, at the Rnd 1 stitch it touches. That’s about st 9 on the right and st 34 on the left.
- For the center petal, run the tip tail down inside the strands to the base. This stiffens the petal.
- Weave all base tails along the back of Rnd 1.
Checkpoint:
- The center petal stands about 1.5 in (3.8 cm) tall and reaches a little past the middle of the opening.
- The side petals are about 1.25 in (3.2 cm) tall.
- The three bases meet at the bottom center with no gap.
Final Blocking
- Lightly spritz the ornament with water, or dip it in diluted fabric stiffener and squeeze out the excess.
- Lay it flat with the front facing up.
- Pin the top point and the bottom center first. Check the height: 3.5 in (8.9 cm).
- Pin the widest point on each side. Check the width: 2.75 in (7.0 cm).
- Ease the bottom curve into a smooth arc, pinning every 1/2 in (1.3 cm).
- Use your fingertips to plump each petal and fan its strands evenly. Keep the side petals angled outward.
- Let it dry completely, about 6–12 hours.
- Unpin it, then hang it by the loop to check that it hangs straight.
Final Quality-Control Checklist
- [ ] Rnd 1 = 41 sc, Rnd 2 = 50 sc, Rnd 3 = 60 sc, Rnd 4 = 60 sl st
- [ ] The top point is sharp and centered under the hanging loop
- [ ] The BLO ridge shows evenly on the front all the way around
- [ ] The frame lies flat with no ripples or cupping
- [ ] The ornament measures 3.5 in (8.9 cm) × 2.75 in (7.0 cm)
- [ ] The center petal is taller and upright, and the side petals lean evenly outward
- [ ] Petal tips are closed with a neat knot, and the strands are even
- [ ] No tails show on the front, and the hanging loop is firmly wrapped
Troubleshooting
The bottom curve cups. You’re working too tightly on the increase rounds. Loosen your tension slightly on the 2-sc stitches.
The bottom curve ruffles. Your tension is too loose. Go down one hook size and check that you made exactly 8 increases per round.
The top is rounded instead of pointed. Make sure the (sc, ch 1, sc) goes into the ch-1 sp each round, and pull the ch 1 snug.
The long puff loops are uneven. Hold each new loop against the previous one with your finger before you yo again. Keep the hook shaft level.
You can’t pull through 19 loops. Use a hook with a straight, even shaft, and pull through with a slight rocking motion. Or work LPP-8 for the center petal.
The petals flop forward. Stiffen them with fabric stiffener during blocking, and make sure the tip tails are tacked.
The ornament twists when hung. The hanging loop isn’t centered. Re-wrap the base of the loop so it sits exactly in the ch-1 sp.
Care
Spot clean with cool water and mild soap, then reshape and dry flat. Store flat or hanging so the petals don’t get crushed.
Final Notes
The measurement chain is simple to follow:
- The 41-ch foundation, about 6.75 in (17.1 cm), forms an opening about 2.5 in (6.4 cm) × 1.75 in (4.4 cm).
- Rnds 2 and 3 grow the frame from 41 to 50 to 60 sts and bring it to 3.375 in (8.6 cm) × 2.625 in (6.7 cm).
- The 60-st slip-stitch border finishes it at 3.5 in (8.9 cm) × 2.75 in (7.0 cm).
- Three long-puff petals, 1.25 in (3.2 cm) and 1.5 in (3.8 cm) tall, fill the lower opening.
If each checkpoint matches, the ornament will match too. Once you’ve made one, the next ones go quickly.
Happy crocheting!