

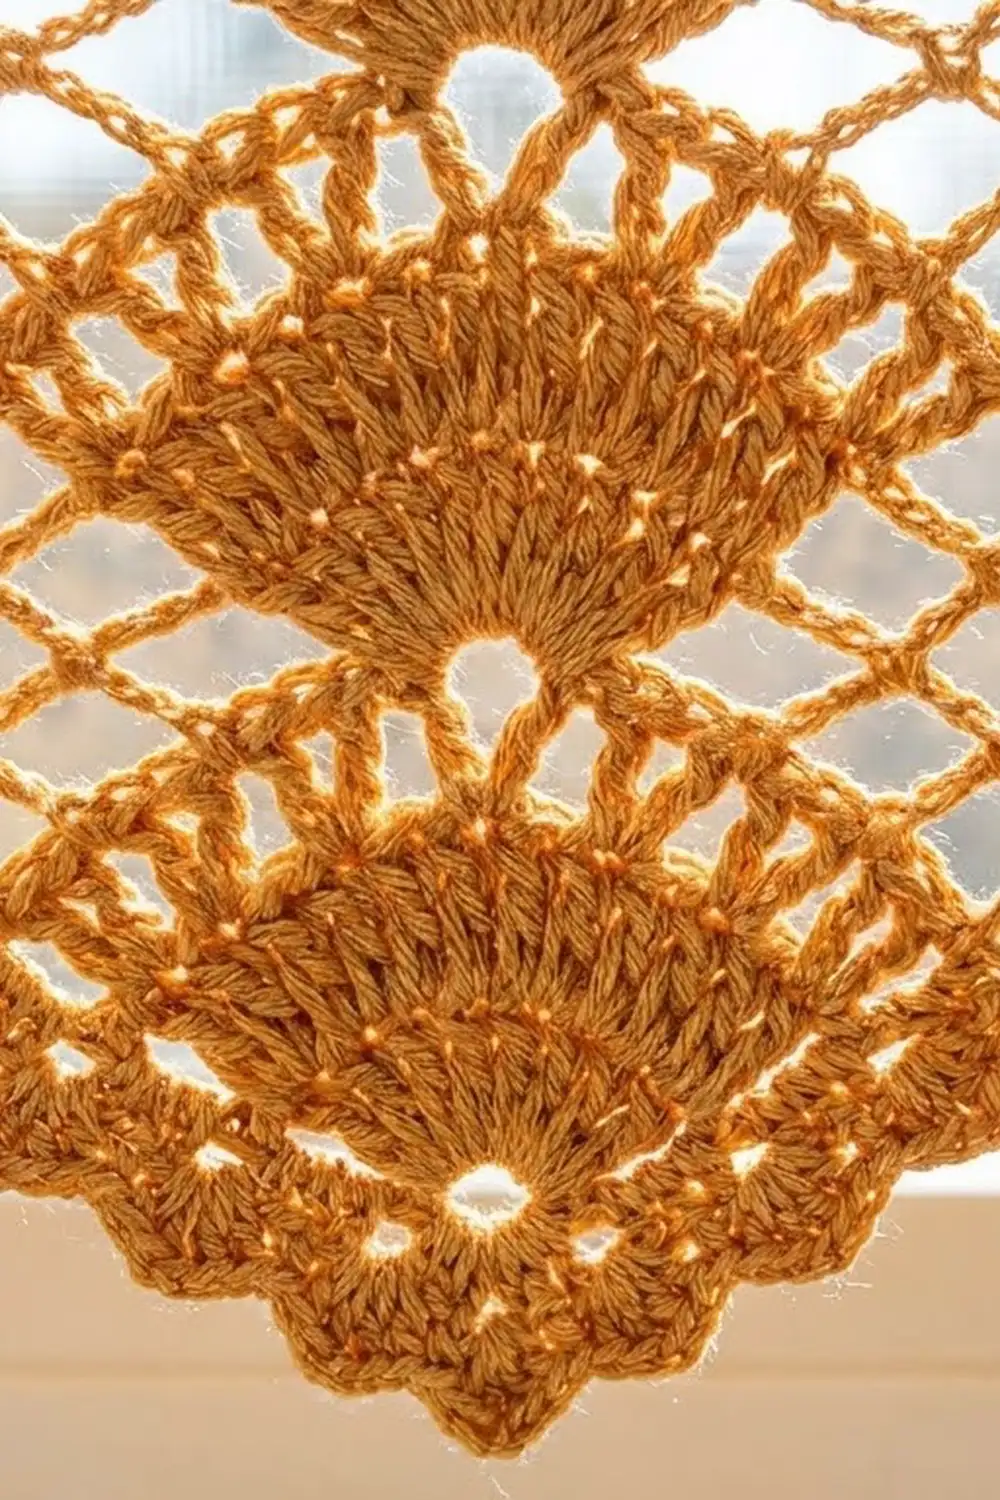
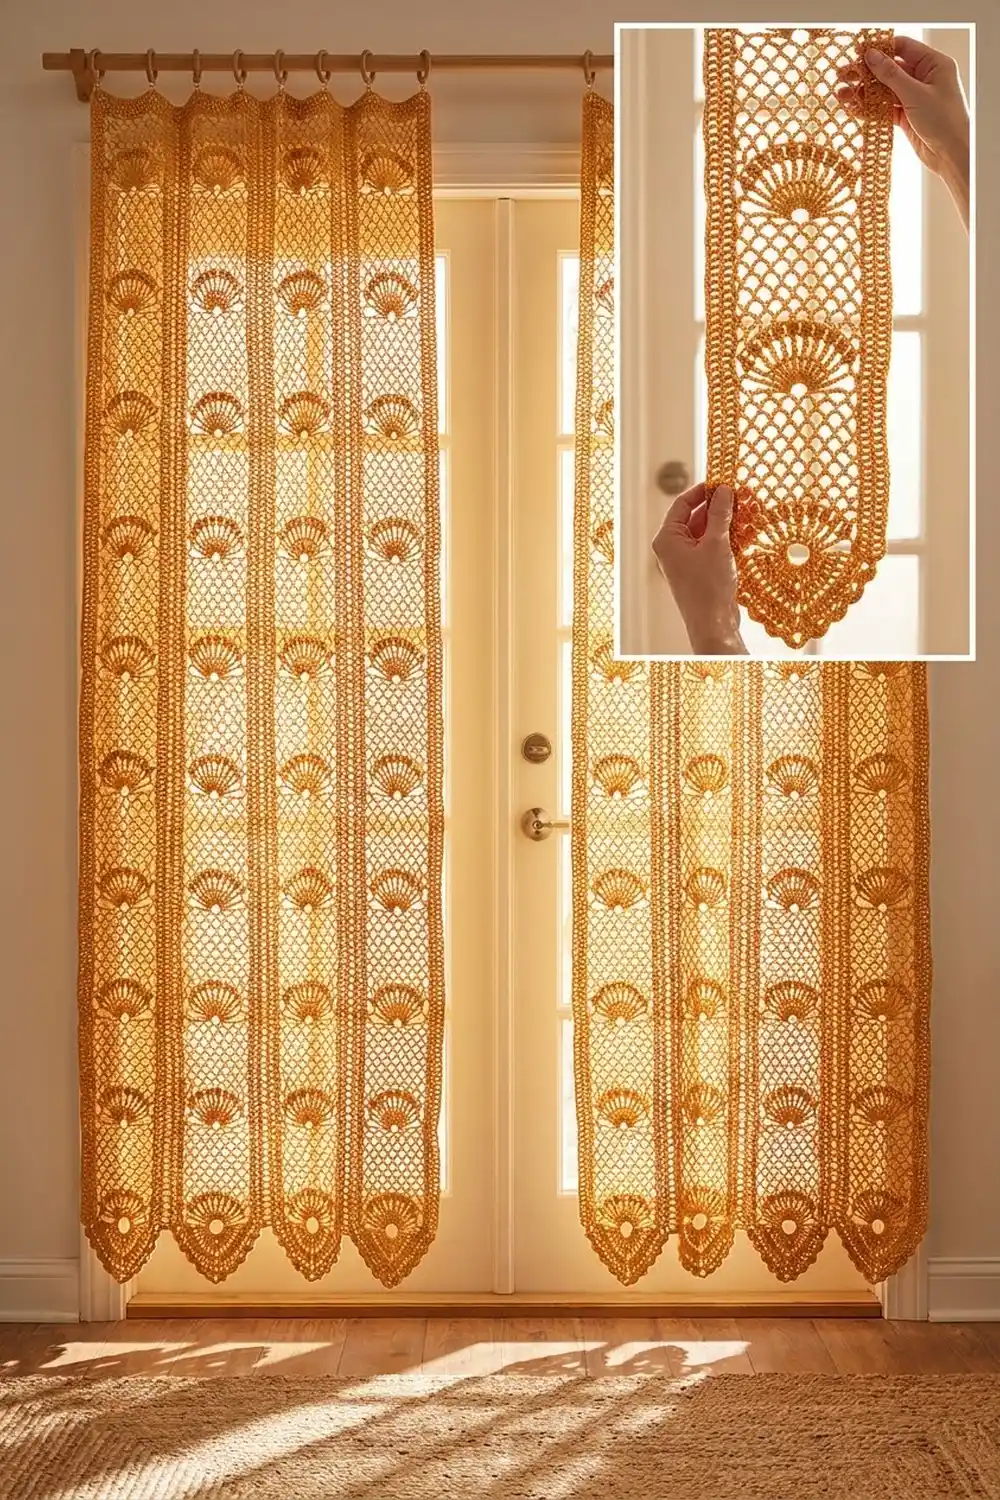
The Marigold Fan Lace Curtain Panel fills a window with warm, filtered light. Each panel is made of long vertical strips, and each strip has a column of stacked fans. The fans are solid double crochet that open into a lacy spray and finish with a crown of small arches. Diamond chain mesh runs along both sides of every fan column.
The design uses one golden-apricot cotton. Light shining through the mesh shows off the strip structure, and the pointed, scalloped bottom tips give the hem a soft edge. The style is classic filet-and-fan lace with a calm, modern look.
This pattern uses US crochet terms. One finished panel measures 30.5 in (77.5 cm) wide by 84 in (213.4 cm) long. Make two panels for a pair.
To build it, you work six strips from the bottom up, starting each one at a small ring. Then you join the strips side by side with a flat zigzag seam. A firm single-crochet band goes across the top for the curtain clips, and a narrow edging runs down both long sides.
Finished Size and Construction
- Finished panel size: 30.5 in x 84 in (77.5 cm x 213.4 cm)
- Skill level: Intermediate
- Terminology: US
- Yarn weight: Sport (#2) mercerized cotton
- Hook: 3.5 mm (E/4)
- Number of pieces: 6 strips per panel, 12 strips for a pair
- Layout: 6 strips side by side (6 across x 1 down)
- Strip size: 5 in x 83 in (12.7 cm x 210.8 cm)
- Panel size before border: 30 in x 83 in (76.2 cm x 210.8 cm)
- Border depth: 1 in (2.5 cm) top band; 0.25 in (0.6 cm) side edging; the bottom tips stay unbordered
Materials
Use a smooth, mercerized sport-weight cotton or a cotton blend. Mercerized cotton gives crisp fans and holds its shape when it hangs. Avoid fuzzy yarns, because they blur the mesh.
- Golden apricot (marigold): 550 g, about 1,815 m (11 balls of 50 g / 165 m each) for a pair of panels. One panel needs 275 g, about 908 m.
The yarn amounts include a margin of roughly 20% for gauge differences and a test strip.
Tools:
– 3.5 mm (E/4) crochet hook
– Tapestry needle
– Stitch markers
– Measuring tape (at least 60 in / 152.4 cm)
– Rust-proof pins and a large blocking surface
– Spray bottle
– Curtain ring clips (8–10 per panel)
Abbreviations (US Terms)
- ch – chain
- sl st – slip stitch
- sc – single crochet
- dc – double crochet
- sp – space
- st(s) – stitch(es)
- tch – turning chain
- RS / WS – right side / wrong side
Special stitch – V-stitch (V-st): (dc, ch 3, dc) in the stated space.
Terms used:
– Side loops: the ch-5 loops in the mesh on either side of the fan.
– Connectors: the short chains between the mesh and the fan. Never work into a connector.
– Crown loops: the ch-3 arches across the top of each fan.
Gauge and Checkpoints
Gauge: 26 sc = 5 in (12.7 cm), which is 5.2 sc per inch. Rows 1–7 measure 4.5 in (11.4 cm) tall. Each 4-row fan tier measures 2.5 in (6.4 cm) tall.
Test with one short strip before you start the full panels. Work Rows 1–11, then work the two Top Rows (Rows 132 and 133) right away. Pin the test strip out flat without stretching it.
Checkpoints:
– After Row 3, the scalloped point is about 2 in (5.1 cm) tall.
– After Row 7, the strip is 4.5 in (11.4 cm) tall.
– The Top Row sc should measure 5 in (12.7 cm) across.
– After Row 31, the strip is 19.5 in (49.5 cm) tall.
– After Row 131, the strip is 82 in (208.3 cm) tall.
If your strip is too wide or too tall, go down 0.25 mm in hook size. If it is too narrow or too short, go up 0.25 mm. Treat chain length as a separate check: loose chains make the mesh sag, so you may need to tighten only your chains while keeping your dc tension the same.
Strip (Make 6 per Panel)
Turn at the end of every row.
Bottom Point
Foundation: Ch 6, then sl st in the first ch to form a ring.
Row 1 (RS): Ch 3 (counts as dc), 8 dc in the ring. (9 dc)
Row 2: Ch 4 (counts as dc + ch 1), (dc in next dc, ch 1) 7 times, dc in top of tch. (9 dc, 8 ch-1 sps)
Row 3: Ch 1, sc in first dc. Then (ch 5, skip next ch-1 sp, dc, and ch-1 sp, sc in next dc) 4 times. Work the last sc in the 3rd ch of the tch. (5 sc, 4 ch-5 loops) These loops form the scalloped tip.
Row 4 (first fan base): Ch 8 (counts as dc + ch 5), sc in first ch-5 loop, ch 5, sc in next ch-5 loop, ch 2. Work a V-st in the center sc between the 2nd and 3rd loops. Ch 2, sc in next ch-5 loop, ch 5, sc in last ch-5 loop, ch 5, dc in last sc. (2 edge dc, 4 side loops, 4 sc, 2 ch-2 connectors, 1 V-st)
The strip has now reached its full width. Every row from here on starts and ends the same way, with two side loops on each side:
- Row start: Ch 8 (counts as dc + ch 5), sc in next ch-5 loop, ch 5, sc in next ch-5 loop.
- Row end: sc in next ch-5 loop, ch 5, sc in next ch-5 loop, ch 5, dc in 3rd ch of tch.
Each new sc goes into the center of a side loop from the row below, so the diamond mesh builds up evenly.
Fan Tier Rows
Row 5 (Fan): Row start, ch 2, 9 dc in ch-3 sp of the V-st, ch 2, row end. (2 edge dc, 4 side loops, 4 sc, 9 fan dc)
Row 6 (Spread): Row start, ch 1, dc in first fan dc, (ch 1, dc in next dc) 8 times, ch 1, row end. (9 fan dc, 8 ch-1 sps)
Row 7 (Crown): Row start, ch 1, sc in first ch-1 sp, (ch 3, sc in next ch-1 sp) 7 times, ch 1, row end. (8 crown sc, 7 crown loops)
Row 8 (V-Row): Row start, ch 5, skip 3 crown loops, V-st in the 4th (center) crown loop, ch 5, skip 3 crown loops, row end. (2 edge dc, 4 side loops, 4 sc, 2 ch-5 connectors, 1 V-st) The skipped crown loops stay free and become the decorative crown at the top of each fan.
Rows 9–11: Repeat Rows 5–7.
Rows 12–131: Repeat Rows 8–11 thirty more times. Row 131 is a Crown row. The strip now has 32 fan tiers and measures 82 in (208.3 cm).
Top Rows
Row 132: Row start, ch 5, sc in the 4th (center) crown loop, ch 5, row end. (2 edge dc, 6 ch-5 loops, 5 sc)
Row 133: Ch 1, sc in first dc, 4 sc in each ch-5 loop (skip the sc between loops), sc in 3rd ch of tch. (1 + 24 + 1 = 26 sc)
Fasten off. The strip measures 5 in x 83 in (12.7 cm x 210.8 cm).
Make All Pieces
- One panel: 6 strips
- A pair: 12 strips, all in golden apricot
Weave in the ends on every strip before joining, and keep the ends inside the dc edges. Line up strips that were made at the same time so their lengths match.
Layout (one panel, RS facing, bottom tips down):
| S1 | S2 | S3 | S4 | S5 | S6 |
Joining
Method: a flat zigzag join along the long dc edges, which leaves no ridge.
Lay Strip 1 and Strip 2 side by side with RS up and the bottom tips level. Rows 1–3 stay unjoined, which leaves a V-notch between the scalloped tips.
- Join yarn with sc in the Row 4 row-end of Strip 1.
- Ch 1, then sc in the Row 4 row-end of Strip 2.
- Ch 1, then sc in the Row 5 row-end of Strip 1.
- Keep going, so each row-end gets one sc and you alternate between the two strips. Finish with sc in the Row 133 row-end of Strip 2. (260 sc per seam: 130 per strip)
The stitches pair up exactly: each row on one strip meets the same row on the other strip, so the fans stay level across the panel. Keep the ch-1 bridges snug but not tight, so the seam lies flat without puckering. Join the strips in order, S1 to S6, for 5 seams per panel.
Size checkpoint: the joined panel measures 30 in x 83 in (76.2 cm x 210.8 cm), and the top edge is a continuous line of 156 sc.
Border
Border gauge: the same as the strip, 5.2 sc per inch.
Top Band, Row 1 (RS): Join yarn in the first sc at the top right corner. Ch 1, sc in each sc across. (6 strips x 26 sc = 156 sc)
Top Band, Rows 2–5: Ch 1, turn, sc in each sc across. (156 sc per row) The band measures 1 in (2.5 cm).
Side Edging, first side: Do not fasten off. Ch 1 and rotate the panel to work down the long side:
– 1 sc in each of the 5 band row-ends.
– 1 sc in the Row 133 row-end.
– 3 sc in each dc row-end from Row 132 down to Row 4 (129 rows x 3 = 387 sc).
The side edging has (5 + 1 + 387 = 393 sc). Fasten off at the top of the bottom tip.
Side Edging, second side: Join yarn at the Row 4 row-end on the opposite long side. Work the same counts in reverse order, up to the top corner. (393 sc) Fasten off.
Why the math works: each strip’s top row is exactly 26 sc. The zigzag joins use only row-ends, so they add no stitches to the top edge, and 6 x 26 = 156 sc. At 5.2 sc per inch, 156 sc = 30 in (76.2 cm). On the sides, 3 sc per dc row-end is slightly fewer than the sc gauge. This keeps the long edges from rippling and helps balance the stretch the lace gets from its own hanging weight. The side edging adds 0.25 in (0.6 cm) per side, so the finished width is 30.5 in (77.5 cm). The top band adds 1 in (2.5 cm), so the finished length is 84 in (213.4 cm).
Final Blocking
- Soak the panel in cool water for 15 minutes, then press the water out gently. Do not wring it.
- Roll the panel in towels to remove extra moisture.
- Lay it flat and smooth it to 30.5 in x 84 in (77.5 cm x 213.4 cm).
- Pin the top band straight and pin each side edge in a straight line.
- Pin every bottom tip to a point and spread the Row 3 scallop loops evenly.
- Open each fan with your fingers and center its crown loops.
- Leave the panel to dry completely, then unpin it.
- Hang the panel for 24 hours before you clip it at its final height.
Final Quality-Control Checklist
- Every strip has 32 fan tiers and 133 rows.
- Every top row has 26 sc, and the band has 156 sc.
- The fans line up straight across all 6 strips.
- Each seam has 260 sc, and no seam puckers.
- Each side edging has 393 sc.
- The panel blocks to 30.5 in x 84 in (77.5 cm x 213.4 cm).
- Both panels in the pair match in length to within 0.5 in (1.3 cm).
- All ends are woven securely into the solid stitches.
Troubleshooting
- The fans lean to one side: you worked into a connector. Count side loops: there should be exactly two per side.
- The mesh sags: your chains are too loose. Tighten your chain tension or go down 0.25 mm in hook size.
- The strips are different lengths: count tiers, not inches. Block both strips together.
- The seam puckers: loosen the ch-1 bridges or add a ch 2 bridge in every 4th gap.
- The side edges ripple: reduce to 2 sc in every 3rd row-end.
- The top band flares: work the band with a hook 0.5 mm smaller.
Care
Hand wash in cool water with a mild detergent, then lay flat to dry or dry on the rod while slightly damp. Steam lightly to refresh the fans. Do not hang the panels in direct heat.
Final Notes
The measurement chain is simple. Each 4-row tier measures 2.5 in (6.4 cm), and each strip is 26 sc across, which is 5 in (12.7 cm). Each strip is 83 in (210.8 cm) long. Six joined strips make 30 in x 83 in (76.2 cm x 210.8 cm). After the border, the panel is 30.5 in x 84 in (77.5 cm x 213.4 cm). Check each link in the chain as you go, and the full pair will hang evenly.
Happy crocheting!