

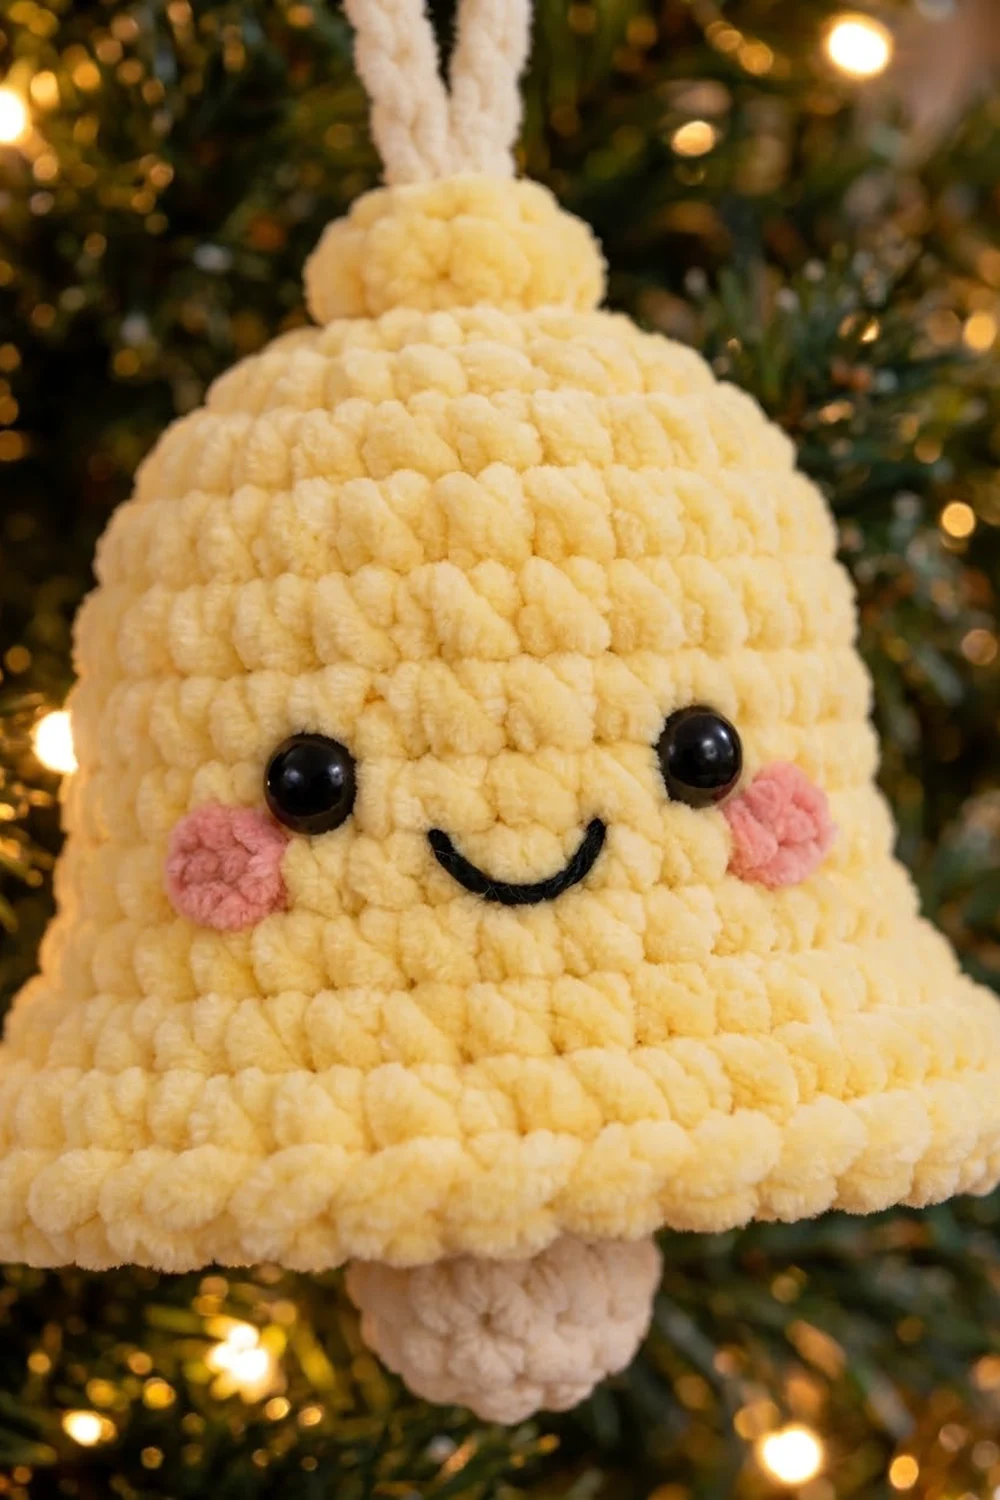
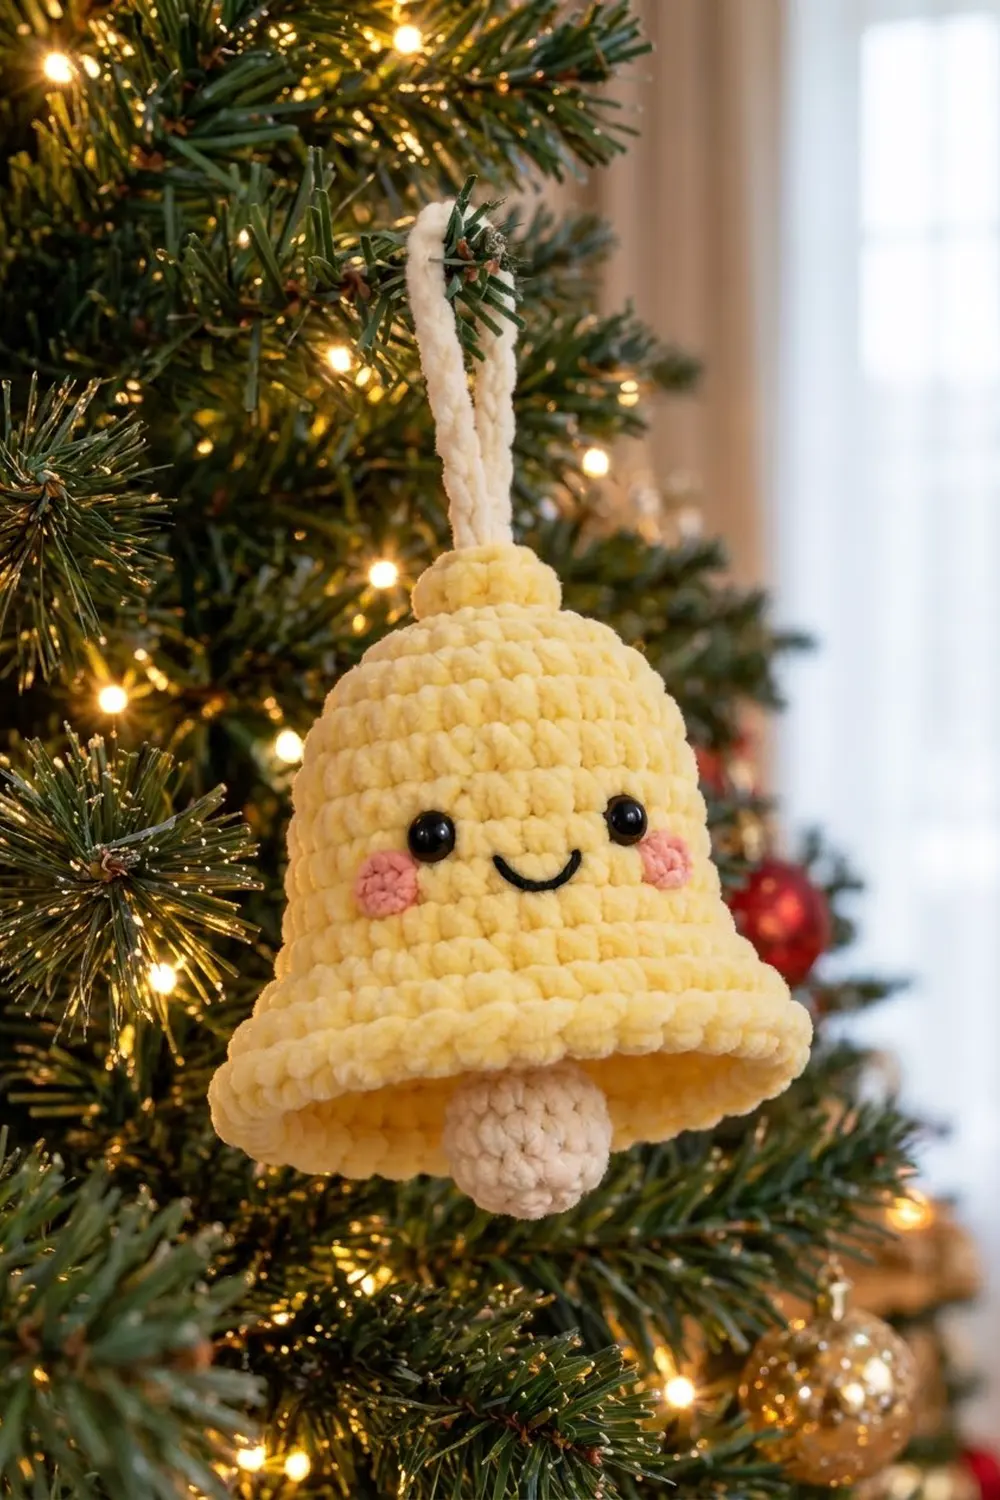
This happy little bell is a soft, squishy ornament with a sweet face. It is crocheted in pale butter-yellow plush yarn, has a cream clapper ball swinging under the rim, and hangs from a cream loop. It looks cheerful on a tree, tied to a gift, or hung in a window.
The style is simple amigurumi. You only use single crochet in continuous rounds, plus a few increases and one front-loop round that makes the rim flare out. The face uses 6 mm safety eyes and a little embroidery in black and pink.
This pattern uses US crochet terms. The finished bell is about 4 in (10.2 cm) wide at the rim and 3.5 in (8.9 cm) tall including the top knob. The hanging loop adds about 2 in (5.1 cm).
Here is how it is built. You crochet the bell from the top down as one hollow piece, then make a small yellow knob, a cream clapper ball and a cream chain cord. The cord goes through the knob and the top of the bell, and the clapper hangs from the knot inside.
Finished Size and Construction
- Finished size: about 4 in (10.2 cm) wide at the rim × 3.5 in (8.9 cm) tall; the loop adds about 2 in (5.1 cm)
- Skill level: Easy
- Terminology: US crochet terms
- Yarn weight: Bulky (#5) plush or chenille yarn
- Hook: 4.0 mm (US G-6)
- Number of pieces: 1 ornament (bell body, knob, clapper and cord, sewn together)
- Layout: One single ornament, not a set of joined pieces
- Piece size: bell body 36 sts around before the rim, flattened width 4 in (10.2 cm)
- Size before rim (“border”): 15 rounds, about 3 in (7.6 cm) measured down the side from the center top
- Rim depth: 4 rounds that flare about 0.75 in (1.9 cm) out past the body on each side
Materials
Plush yarn shows the stitches less than smooth yarn, so pick a soft bulky chenille with a short pile. Choose one that does not shed much. A slightly heavier plush yarn is fine as long as you match the gauge below.
- Pale yellow: 25 g / about 30 m (bell body, rim, knob)
- Cream: 8 g / about 10 m (clapper ball, hanging cord)
- Black: 1 g / about 1 m of fingering yarn or embroidery floss (smile)
- Soft pink: 1 g / about 1 m of fingering yarn or embroidery floss (cheeks)
These amounts include a margin for swatching and tails.
Tools:
- 4.0 mm (US G-6) crochet hook
- Two 6 mm black safety eyes
- A small handful of polyester fiberfill (for the clapper only)
- Tapestry needle with a large eye
- Sharp embroidery needle
- Stitch marker
- Scissors
- Ruler or tape measure
Abbreviations (US Terms)
- MR: magic ring
- ch: chain
- sc: single crochet
- inc: 2 sc in the same stitch
- dec: single crochet two together (invisible decrease recommended)
- sl st: slip stitch
- FLO: front loop only
- st(s): stitch(es)
- rnd(s): round(s)
- ( ) x6: repeat what is inside the parentheses the number of times shown
Special stitch: back-bump slip stitch. Turn the chain over so the bumps on its back face you. Insert the hook under one back bump, yarn over, and pull through the bump and the loop on your hook. This makes a round, rope-like cord.
Gauge and Checkpoints
Gauge: 9 sc × 10 rnds = 2 in (5.1 cm) in continuous single crochet rounds. That is 4.5 sts and 5 rnds per inch.
Plush yarn is hard to swatch flat, so let the first rounds of the bell be your test piece:
- After Rnd 4 (24 sts): the flat circle measures about 1.6 in (4.1 cm) across.
- After Rnd 15 (36 sts): the tube flattens to 4 in (10.2 cm) wide, which is a circumference of 8 in (20.3 cm). The side measures about 3 in (7.6 cm) from the center top.
- After Rnd 19: the rim is about 4 in (10.2 cm) across, and the bell stands about 3.25 in (8.3 cm) tall without the knob.
If your piece is too big: go down to a 3.5 mm hook.
If your piece is too small: go up to a 4.5 mm hook.
Rip back and restart. The checkpoints are spaced so you will never lose more than a few rounds.
Work tightly enough that no fiberfill or light shows between stitches. Tight fabric also helps the bell hold its shape without stuffing.
Bell Body
Use pale yellow. Work in continuous rounds without joining, and move the stitch marker up to the first stitch of each round.
The domed top
- Rnd 1: 6 sc in MR. (6)
- Rnd 2: inc x6. (12)
- Rnd 3: (sc, inc) x6. (18)
- Rnd 4: (2 sc, inc) x6. (24)
Checkpoint: the circle measures about 1.6 in (4.1 cm) across. Pull the magic ring tight, but leave a pinhole you can open again with a needle tip so the cord can pass through later.
The upper bell
- Rnds 5–7: sc in each st around. (24)
The piece now curves down into a short dome.
- Rnd 8: (3 sc, inc) x6. (30)
- Rnds 9–12: sc in each st around. (30)
The lower bell
- Rnd 13: (4 sc, inc) x6. (36)
- Rnds 14–15: sc in each st around. (36)
Checkpoint: the bell flattens to 4 in (10.2 cm) wide and measures about 3 in (7.6 cm) down the side from the center top. The sides should slope gently outward like a bell.
The flared rim
The rim is described in the Rim section below, because it works like a border. Do not fasten off yet.
Top Knob
Use pale yellow.
- Rnd 1: 6 sc in MR. (6)
- Rnd 2: sc in each st around. (6)
Sl st to the next st and fasten off. Leave a 6 in (15.2 cm) tail.
The knob is a tiny cylinder about 0.5 in (1.3 cm) wide and 0.4 in (1.0 cm) tall. Leave its magic ring a little open, like the bell top.
Clapper Ball
Use cream.
- Rnd 1: 6 sc in MR. (6)
- Rnd 2: inc x6. (12)
- Rnds 3–4: sc in each st around. (12)
Stuff firmly with fiberfill.
- Rnd 5: dec x6. (6)
Fasten off. Leave a 10 in (25.4 cm) tail, weave it through the front loops of the last 6 sts, and pull tight.
Do not cut this tail. You will use it to hang the ball. The ball should measure about 0.9 in (2.3 cm) across.
Hanging Cord
Use cream.
- Foundation: ch 26.
- Row 1: starting in the 2nd ch from the hook, back-bump sl st in each ch across. (25 sl sts)
Fasten off. Leave short tails at both ends. The cord measures about 5 in (12.7 cm).
Rim (Border)
Go back to the live loop on the bell body. These four rounds make the flared lip.
Rim gauge: same as the body, 4.5 sts per inch. Rnd 18 has 56 sts, so the outer edge measures 56 ÷ 4.5 = 12.4 in (31.5 cm) around. Divide that by pi (about 3.14) and you get a diameter of about 4 in (10.2 cm).
- Rnd 16 (FLO): working in FLO only, (2 sc, inc) x12. (48)
- Each repeat uses 3 sts from the last round: 12 × 3 = 36. ✓
- Each repeat makes 4 sts: 12 × 4 = 48.
- The unused back loops leave a ridge inside the bell, and the fabric turns outward here. This is the start of the flare.
- Rnd 17: (5 sc, inc) x8. (56)
- Each repeat uses 6 sts: 8 × 6 = 48. ✓
- Each repeat makes 7 sts: 8 × 7 = 56.
- Rnd 18: sc in each st around. (56)
- Rnd 19 (trim): sl st in each st around. (56 sl sts = 56 worked 1 per st + 0 added)
Fasten off and weave in the tail invisibly along the inside of the rim.
Why the math works:
- Rnd 16 adds 12 sts, a 33% increase. Together with the front-loop fold, this makes the lip bend outward.
- Rnd 17 adds 8 more sts, a 17% increase. This keeps the lip flaring without ruffling.
- Rnds 18 and 19 add nothing. They thicken the edge so it rolls slightly and holds its curve.
- If you add more increases, the rim will ripple. If you leave increases out, it will cup back inward.
Checkpoint: set the bell on the table. The rim should sit level and measure about 4 in (10.2 cm) across. The body should stand about 3.25 in (8.3 cm) tall.
Face and Assembly
1. Eyes
- Insert the safety eyes between Rnds 9 and 10, with 6 sts between them, centered on the front of the bell.
- Hide the round’s starting point at the back.
- Push the washers on firmly from the inside.
2. Smile
- With black, embroider a small “V” or curved smile across 3 sts, centered between the eyes, between Rnds 10 and 11.
- Use two short straight stitches angled toward each other, or one long stitch couched into a curve.
3. Cheeks
- With pink, work 3 to 4 satin stitches over 1 st on each side, 1 st outside each eye, between Rnds 10 and 11.
- Tie off and hide the ends inside the bell.
4. Knob
- Center the knob on the magic ring of the bell top.
- Sew around its base with the yellow tail, then hide the end inside.
5. Cord
- Fold the cord in half.
- Thread both ends onto the tapestry needle, or use the hook, and pull them down through the center of the knob and the bell’s magic ring to the inside.
- Adjust until about 2 in (5.1 cm) of loop stands above the knob.
- Tie the two ends together in a firm overhand knot inside the bell, so the knot is too big to slip back through.
6. Clapper
- Tie the clapper tail around the cord knot inside the bell.
- Adjust the strand so the top of the ball hangs about 2.75 in (7.0 cm) below the inside top. The lower half of the ball should show below the rim.
- Double-knot it, put a dab of fabric glue on the knot if you like, and trim the end to 0.5 in (1.3 cm).
Final Blocking
Plush yarn should not be steamed or pressed, so use gentle shaping:
- Lightly mist the bell with cool water. Avoid the eyes.
- Stuff the bell loosely with a crumpled tissue or a small paper cone, so the body sits upright and slopes outward.
- Use your fingers to roll the rim lip outward evenly all the way around.
- Set the bell upright on a towel with the rim level. Check that it is 4 in (10.2 cm) across.
- Let it dry completely, usually several hours.
- Remove the tissue and fluff the plush with your fingertips if any area looks flattened.
Final Quality-Control Checklist
- Rim measures about 4 in (10.2 cm) across and lies level
- Body stands about 3.25 in (8.3 cm) tall, or 3.5 in (8.9 cm) with the knob
- Stitch counts were 24, 30, 36, 48 and 56 at the key rounds
- Eyes are level, 6 sts apart, and locked tight
- Smile is centered, and both cheeks are the same size
- Knob is centered, with no gaps around its base
- Loop stands about 2 in (5.1 cm) high and the knot cannot pull through
- Clapper shows half below the rim and swings freely
- No visible tails or fiberfill
Troubleshooting
Rim ruffles or waves: You may have added extra increases, or your tension loosened on the rim. Recount Rnd 17 (56 sts), or redo the rim with a hook one size smaller.
Rim curls inward instead of flaring: You probably worked Rnd 16 through both loops. Redo Rnd 16 in FLO only.
Bell leans or looks lopsided: In plush yarn the increases stack more noticeably. Offset them by working half of the first sc before each repeat on alternating rounds.
Can’t see the stitches to count: Plush hides stitches. Run your finger over the tops of the stitches, use a stitch marker every 6 sts, and work in good light.
Gaps showing in the fabric: Go down half a hook size, and pull each stitch snug.
Clapper hangs crooked: Retie it directly under the cord knot, not to the side of it.
Cord won’t pass through the top: Open the magic ring a little with a needle tip before threading, then close it with a yellow stitch afterward if needed.
Care
Spot clean or hand wash gently in cool water, squeeze out the water in a towel, and air dry upright. Do not put plush yarn in the dryer or iron it. These ornaments contain safety eyes and small parts, so keep them away from young children.
Final Notes
Everything in this bell comes back to gauge. At 9 sc × 10 rnds = 2 in (5.1 cm):
- The 24-st top is 1.6 in (4.1 cm) across.
- The 36-st body flattens to 4 in (10.2 cm) wide and is 3 in (7.6 cm) down the side.
- The 56-st rim is 12.4 in (31.5 cm) around, which gives a flared lip about 4 in (10.2 cm) across.
Check each stage and the finished bell will be 3.5 in (8.9 cm) tall with a 2 in (5.1 cm) loop on top. Once one bell matches, the rest will match too, so you can make as many as your tree needs.
Happy crocheting!