

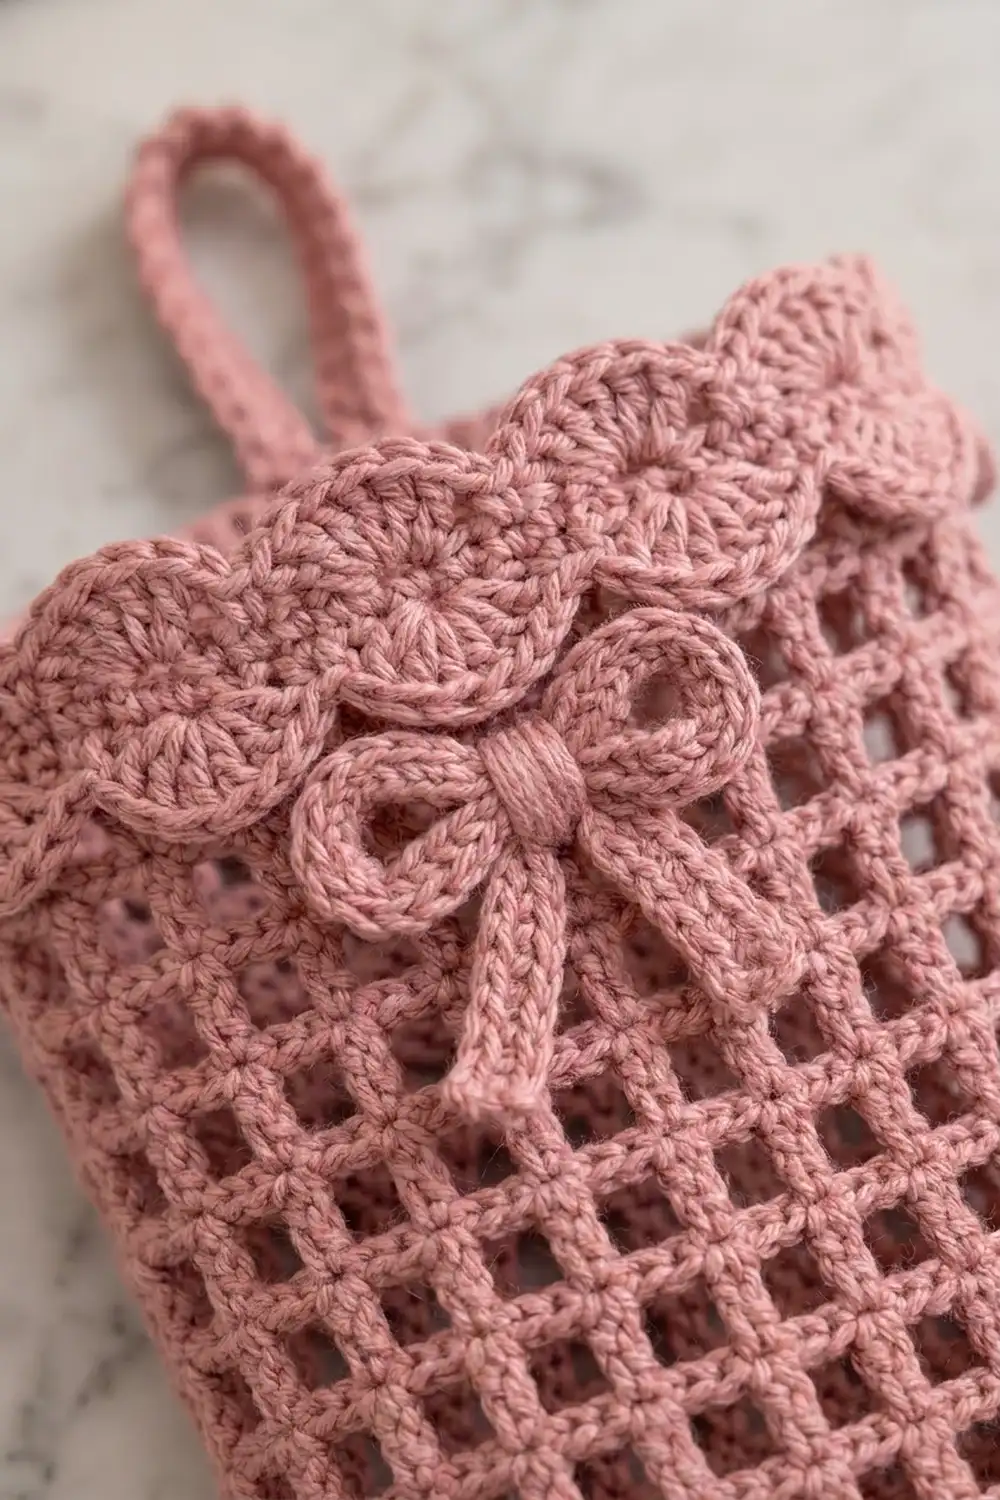
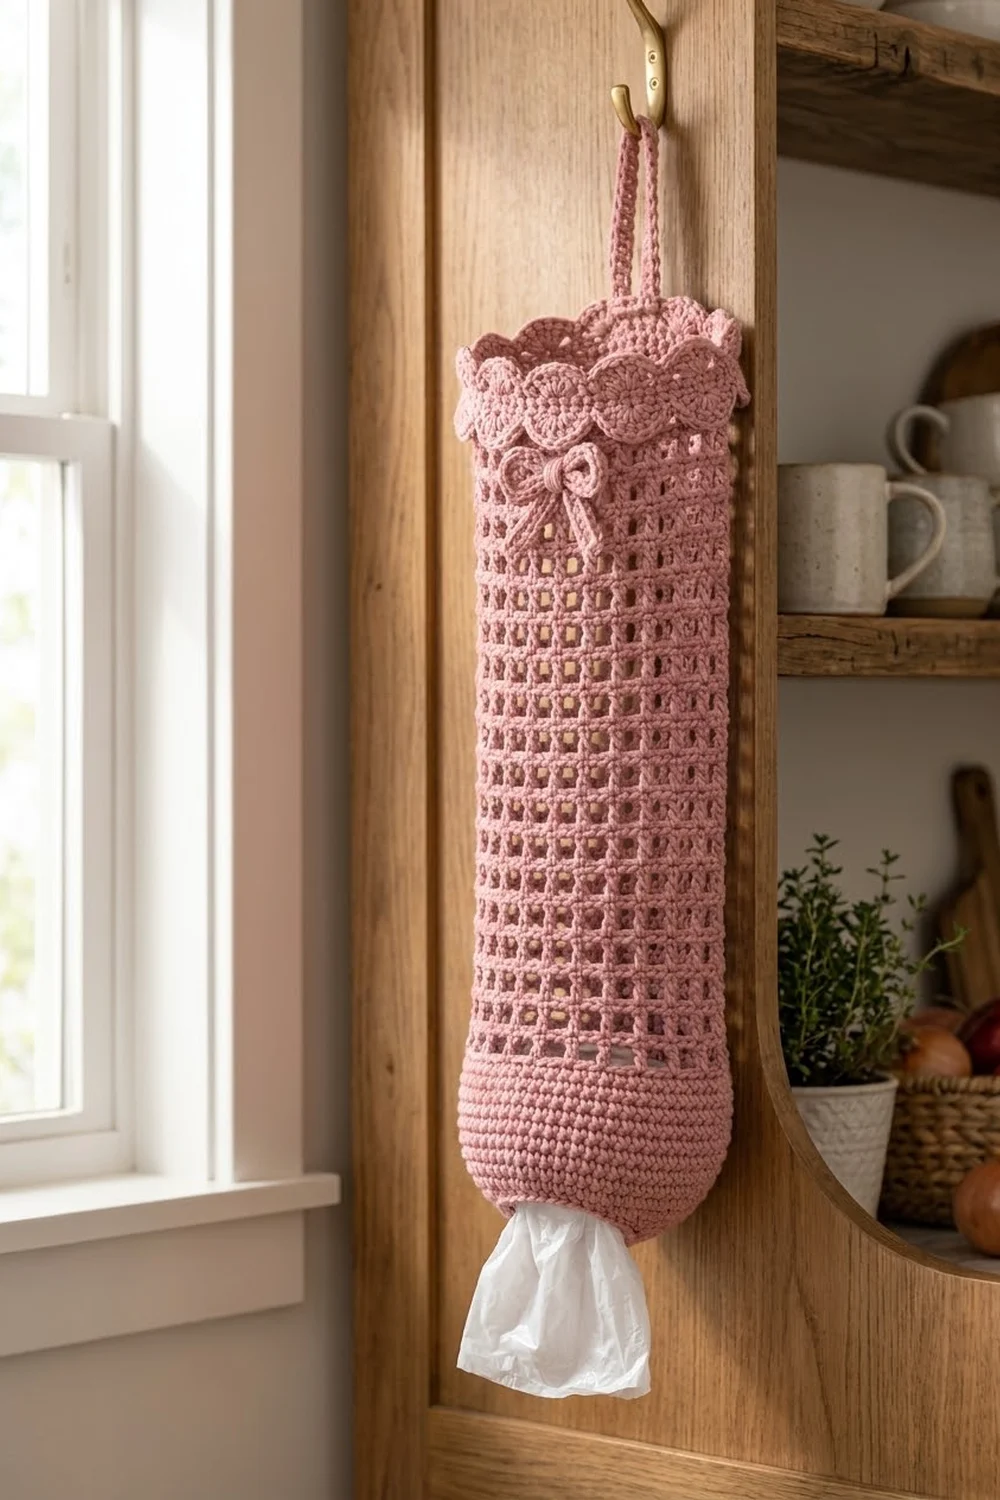
This plastic bag holder is pretty enough to leave on the wall all the time. It is a slim tube with an open filet-mesh body, a solid rounded base, and a soft scalloped top finished with a small bow. You stuff bags in at the top and pull them out, one at a time, through the small ring at the bottom.
The sample is one color, a warm dusty rose, which suits a cozy holiday kitchen or a neutral pantry. The square mesh lets you see how many bags are left, and the solid base keeps the holder in shape when it is full.
The pattern uses US crochet terms. The finished holder is about 6 in (15.2 cm) wide laid flat, 12 in (30.5 cm) around, and 20 in (50.8 cm) tall, not counting the hanging loop.
You work the holder in one piece from the bottom up, in joined rounds. You start at the dispensing ring, shape the domed base in single crochet, switch to filet mesh for the body, and finish with a solid band and two scalloped edges. The bow and hanging loop are made separately and sewn on.
Finished Size and Construction
- Finished size: 6 in (15.2 cm) wide flat × 20 in (50.8 cm) tall
- Circumference: 12 in (30.5 cm)
- Skill level: Easy / advanced beginner
- Terminology: US
- Yarn weight: Worsted (#4), cotton or cotton blend
- Hook: 5.0 mm (US H-8)
- Number of pieces: 1 main body, plus 1 bow and 1 hanging loop sewn on
- Layout: Single tube, worked bottom-up in joined rounds
- Base section: 4 in (10.2 cm) tall
- Size before border: 18 in (45.7 cm) tall (base plus mesh)
- Border depth: 2 in (5.1 cm) (band plus top scallops)
Materials
Choose a smooth worsted-weight cotton or cotton blend. Cotton holds its shape, shows the mesh clearly, and doesn’t stretch much when the holder is full. Avoid very fuzzy yarns, which blur the square openings.
- Dusty Rose: 120 g, about 230 m (252 yd)
These amounts include a margin of roughly 15% for your gauge swatch and weaving in ends.
Tools:
– 5.0 mm (US H-8) crochet hook
– Tapestry needle
– 4 stitch markers
– Scissors
– Measuring tape
– Rust-proof pins and a blocking surface
– Optional: a rolled towel or a tall plastic tub to block the tube over
Abbreviations (US Terms)
- ch – chain
- sl st – slip stitch
- sc – single crochet
- dc – double crochet
- sp – space
- sk – skip
- inc – 2 sc in the same stitch
- BLO – back loop only
- FLO – front loop only
- st(s) – stitch(es)
- rnd(s) – round(s)
- RS – right side
Special stitch: Scallop. Work 5 dc in the same stitch. Each scallop sits between two slip stitches and uses 4 stitches of the round below: sl st, sk 1, scallop, sk 1.
Mesh square: 1 dc and 1 ch-1 space. Each mesh square uses 2 stitches of width.
Gauge and Checkpoints
Single crochet gauge: 16 sts × 18 rnds = 4 in (10.2 cm).
Mesh gauge: 8 mesh squares (16 sts) × 8 rnds = 4 in (10.2 cm).
The two gauges are matched on purpose. Each mesh square is 0.5 in (1.3 cm) wide and 0.5 in (1.3 cm) tall, so the openings come out square and the mesh body is the same width as the base.
Test first. Work Rnds 1–9 of the base. This is your swatch, and you can keep it as the start of the holder if it measures correctly.
Checkpoints:
– After Rnd 1: the ring is 6 in (15.2 cm) around, about 1.9 in (4.8 cm) across.
– After Rnd 9: 12 in (30.5 cm) around, 6 in (15.2 cm) wide flat.
– After Rnd 18: the base is 4 in (10.2 cm) tall.
– After Rnd 46: 18 in (45.7 cm) tall overall.
– After Rnd 53: about 19.5 in (49.5 cm) tall.
– Finished: 20 in (50.8 cm) tall.
If your piece is too big, go down half a hook size. If it is too small, go up half a hook size. Don’t change the stitch counts. The scallop repeat needs a multiple of 4, and the mesh needs an even number.
Pattern
Base (Solid Rounded Bottom)
Work in joined rounds with the RS facing out. Don’t turn. Keep the joins lined up at the center back.
Foundation: Ch 24 and join with a sl st to the first ch to form a ring. Make sure the chain isn’t twisted.
Rnd 1: Ch 1, sc in each ch around, then join with a sl st to the first sc. (24 sc)
Rnd 2: Ch 1, sc in each st around, then join. (24 sc)
Rnd 3: Ch 1, sc in next 3 sts, inc in next st 6 times, then join. (30 sc)
Rnd 4: Ch 1, sc in each st around, then join. (30 sc)
Rnd 5: Ch 1, sc in next 4 sts, inc in next st 6 times, then join. (36 sc)
Rnd 6: Ch 1, sc in each st around, then join. (36 sc)
Rnd 7: Ch 1, sc in next 5 sts, inc in next st 6 times, then join. (42 sc)
Rnd 8: Ch 1, sc in each st around, then join. (42 sc)
Rnd 9: Ch 1, sc in next 6 sts, inc in next st 6 times, then join. (48 sc)
Because you increase only on every other round, the base curves inward gently into a dome instead of lying flat like a coaster.
Rnds 10–18: Ch 1, sc in each st around, then join. (48 sc in each rnd)
Checkpoint: the base is 4 in (10.2 cm) tall and 12 in (30.5 cm) around.
Mesh Body
Rnd 19 (conversion round): Ch 4 (counts as dc + ch 1), sk next st, dc in next st, ch 1, sk next st 23 times, then join with a sl st to the 3rd ch of the beginning ch-4.
Count: 24 dc (1 per pair of stitches) + 24 ch-1 sps = 48 sts, which makes 24 mesh squares.
The beginning ch-4 uses the 1st sc and skips the 2nd. The 23 repeats use sc 3–48 in pairs (46 sts). So all 48 stitches are used exactly once.
Rnds 20–46: Ch 4 (counts as dc + ch 1), dc in next dc, ch 1 23 times, then join to the 3rd ch of the beginning ch-4. (24 mesh squares, 48 sts in each rnd)
That makes 28 mesh rounds, so the mesh is 14 in (35.6 cm) tall. Stack each dc directly on the dc below so the posts form straight vertical lines.
Checkpoint: the piece is 18 in (45.7 cm) tall, and the mesh is still 6 in (15.2 cm) wide flat. If the mesh is noticeably narrower than the base, your ch-1 spaces are too tight. Loosen them slightly or use a larger hook for the mesh only.
Border: Top Band and Scallops
Border gauge: same as the base, 16 sc × 18 rnds = 4 in (10.2 cm).
When the holder is laid flat, each side (front and back) shows 24 sts of every round. Neither side has corner stitches, because a tube has none: the 48 sts divide evenly into 24 front + 24 back.
Rnd 47 (conversion round): Ch 1, sc in the same st as the join (the top of the ch-4), sc in next ch-1 sp, sc in next dc, sc in next ch-1 sp 23 times, then join.
Count: 24 sc (1 per dc) + 24 sc (1 per ch-1 sp) = 48 sc, which is 24 per flat side.
Rnd 48: Ch 1, sc BLO in each st around, then join. (48 sc)
This leaves the front loops of Rnd 47 free on the outside for the lower scallop row.
Rnds 49–53: Ch 1, sc in each st around, then join. (48 sc in each rnd)
The band is 7 rnds, about 1.5 in (3.8 cm) deep. Checkpoint: about 19.5 in (49.5 cm) tall.
Rnd 54 (top scallops): Ch 1, sl st in next st, sk 1, 5 dc in next st, sk 1 12 times, then join to the first sl st. Fasten off.
Count: 12 scallops, 6 per flat side. Each repeat uses 4 sts: 12 × 4 = 48.
The scallops add about 0.5 in (1.3 cm), so the finished height is 20 in (50.8 cm).
Rnd 55 (lower scallops): Turn the holder upside down so the band points toward you. Join yarn with a sl st in a free front loop of Rnd 47 at the center back. Working in the free front loops only, sk 1, 5 dc in next loop, sk 1, sl st in next loop 12 times, ending with the last sl st in the joining loop. Fasten off. (12 scallops)
Turn the holder upright. The second scallop row now hangs down over the top mesh round.
Why the math works: The body stays at 48 sts from Rnd 9 up. The mesh round uses 24 dc + 24 ch-1 sps, and Rnd 47 turns each of those back into exactly 1 sc, for 48 again. 48 is divisible by 4, so both scallop rows close evenly with 12 repeats and no half-scallop at the join.
Hanging Loop
Ch 41.
Row 1: Sc in 2nd ch from hook and in each ch across. (40 sc)
The strip is 10 in (25.4 cm) long. Fasten off and leave a 12 in (30.5 cm) tail.
Fold the strip in half. Sew both ends to the inside of the band at the center back, overlapping the band by 1 in (2.5 cm). Stitch through Rnds 49–53 only. That leaves a loop about 4 in (10.2 cm) tall above the rim.
Bow
Bow body: Ch 21.
– Row 1: Sc in 2nd ch from hook and in each ch across. (20 sc)
– Rows 2–4: Ch 1, turn, sc in each st across. (20 sc)
Fasten off. Sew the short ends together to form a ring. Flatten the ring with the seam at the center back. It measures 2.5 in (6.4 cm) wide × 0.9 in (2.3 cm) tall.
Tails: Ch 13. Sl st in 2nd ch from hook and in each ch across (12 sl sts), then fasten off. This strip is 3 in (7.6 cm) long.
Assembly: Fold the tail strip into a V and place it behind the bow at the center. Wrap yarn tightly around the center of both pieces 6 times to pinch the bow, then knot it at the back.
Sew the bow to the center front on mesh Rnds 44–46, just below the lower scallops. Stitch through the dc posts so no stitches show inside the mesh openings.
Final Blocking
- Weave in all ends inside the solid base or band, where they can’t be seen through the mesh.
- Soak the holder in cool water for 10 minutes, then press out the water. Don’t wring it.
- Roll it in a towel to remove extra moisture.
- Slide the holder over a rolled towel or a tall tub about 12 in (30.5 cm) around.
- Straighten the mesh posts so the columns run vertically and the squares open evenly to 0.5 in (1.3 cm).
- Shape the base into a smooth dome and keep the ring open at about 1.9 in (4.8 cm).
- Pin each scallop of both rows into an even fan.
- Shape the bow loops and lay the tails flat at matching angles.
- Let it dry completely before hanging, usually 24 hours.
Final Quality-Control Checklist
- Finished height is 20 in (50.8 cm), and flat width is 6 in (15.2 cm).
- The bottom ring is open, smooth, and about 1.9 in (4.8 cm) across.
- The base has 48 sts from Rnd 9 on and no puckers at the increases.
- The mesh has 24 squares per round and 28 rounds.
- The dc posts line up vertically from bottom to top.
- The band has 48 sts in every round.
- Each scallop row has 12 scallops, 6 on each side.
- The joins line up at the center back.
- The hanging loop is centered at the back and firmly sewn.
- The bow is centered at the front and level.
- All ends are hidden in the solid sections.
Troubleshooting
The base is flat instead of domed. You probably increased on every round. Increase only on Rnds 3, 5, 7, and 9.
The base ruffles. You have too many stitches. Count to 48 at Rnd 9.
The mesh squares are rectangles. If they are tall and narrow, loosen your ch-1. If they are short and wide, pull your dc up slightly taller, or check your mesh gauge.
The mesh slants in a spiral. Make sure each round starts in the same dc as the join, directly above the previous ch-4.
The scallops don’t fit evenly. The round must have exactly 48 sts. Recount Rnd 47.
The bottom ring is too tight to pull bags out. Rework the foundation chain more loosely, or use a hook one size larger for the chain only.
The holder stretches when full. Cotton blends with acrylic can stretch. Switch to 100% cotton.
Care
Hand wash in cool water with mild soap, press out the water, and dry flat or over a form. Reshape the scallops and bow while the holder is damp.
Final Notes
The measurement chain is simple. A 24-st ring 6 in (15.2 cm) around grows to 48 sts and 12 in (30.5 cm) around by Rnd 9. The 4 in (10.2 cm) base and 14 in (35.6 cm) of mesh make 18 in (45.7 cm). The band and scallops add 2 in (5.1 cm), for a finished height of 20 in (50.8 cm).
The holder keeps 48 stitches from Rnd 9 to the top, so if your gauge matches at Rnd 9, everything above it falls into place. Check that early, keep your posts lined up, and you will have a tidy, useful holder for your kitchen wall.
Happy crocheting!