

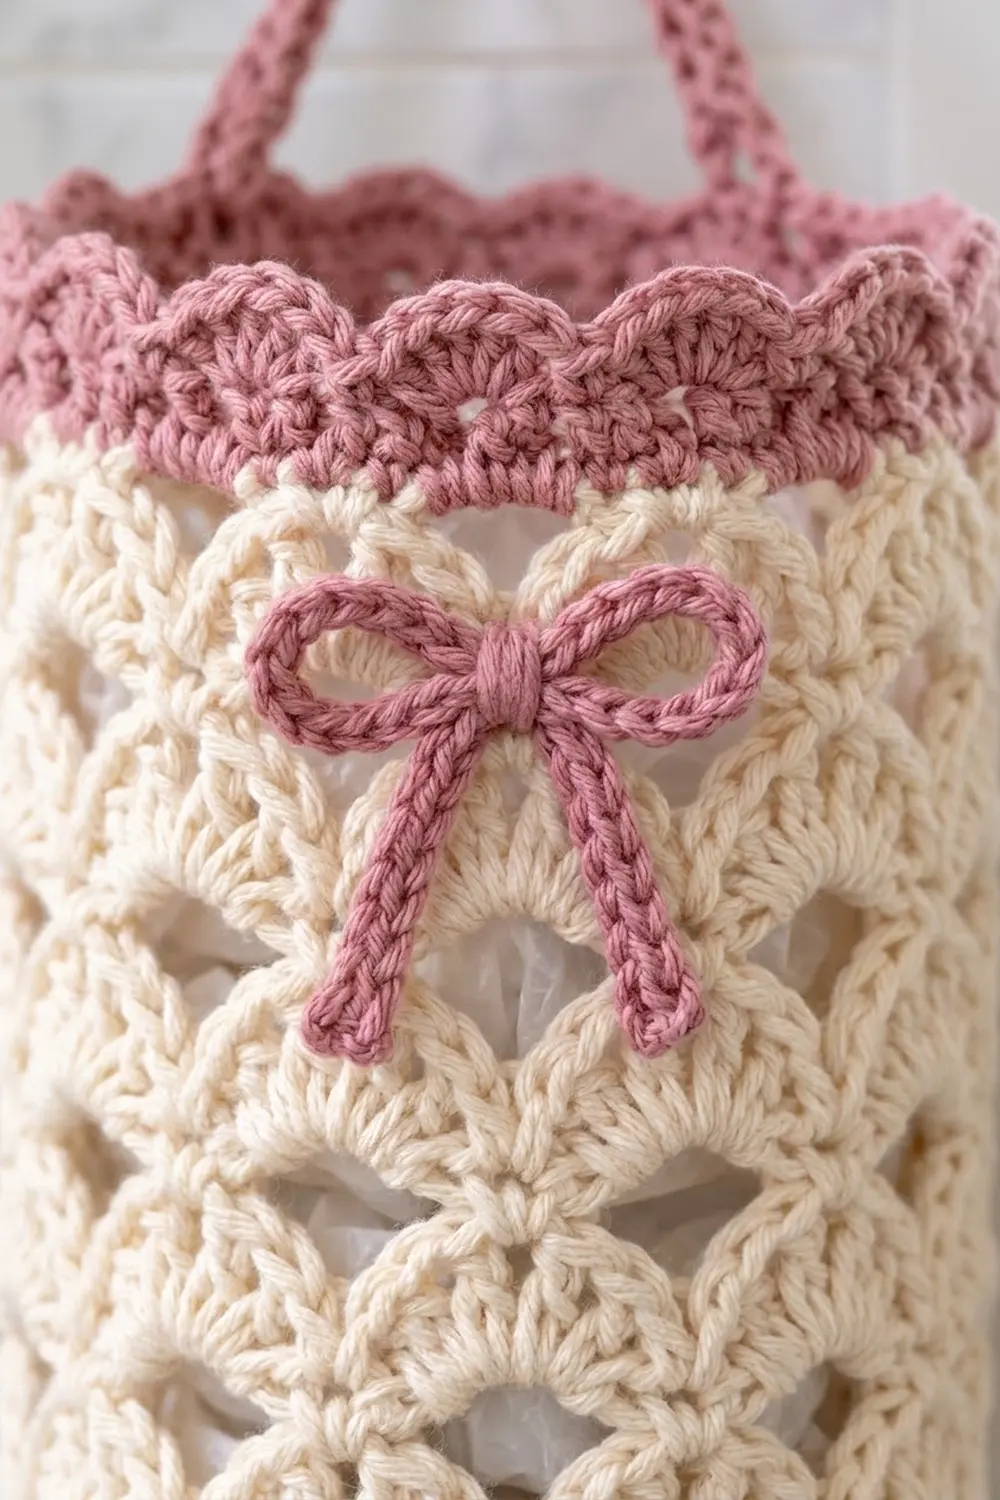
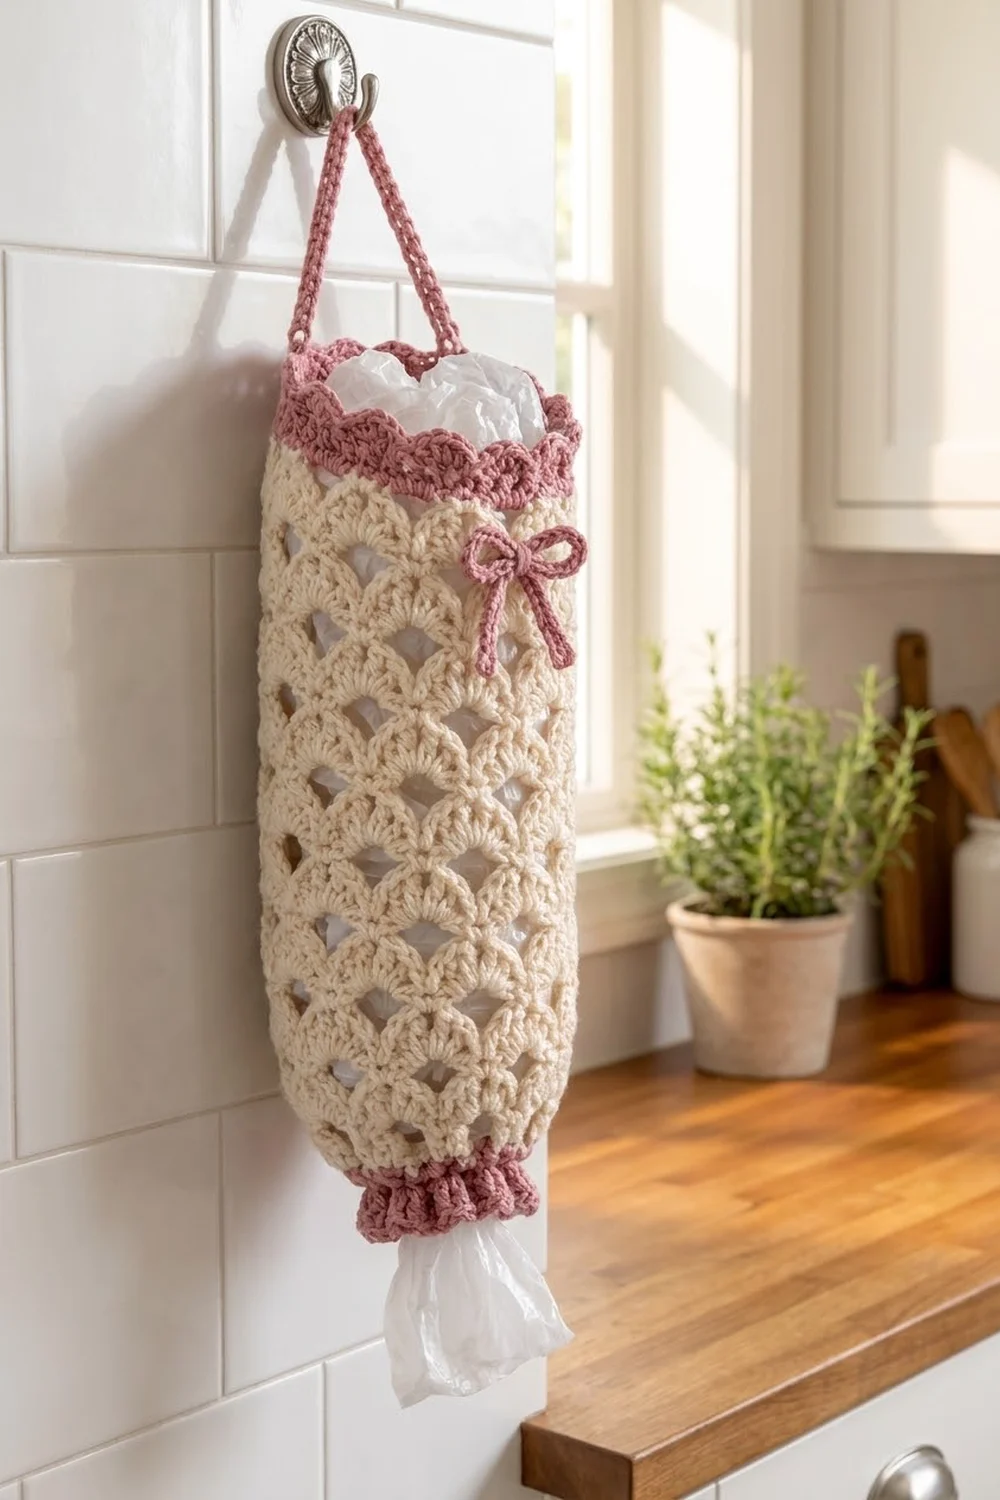
This plastic bag holder is one long tube of lacy cream shells with dusty rose trim. Stuff bags in at the top and pull them out one at a time through the narrow ruffled cuff at the bottom. A rose hanging strap and a small tied bow finish it off.
The fan shells are offset in every round, so the diamond-shaped holes let you see how many bags are left. The rose top band has a small scalloped edge, and the bottom cuff ends in a curly ruffle. Together they give a soft cottage-kitchen look that still works hard every day.
The pattern uses US crochet terms. The finished holder measures about 6 in (15.2 cm) wide when flat and 18.5 in (47.0 cm) long, not counting the strap.
You work it from the bottom up in joined rounds and never turn. Start with the rose cuff, increase into the cream body, and work 20 rounds of shells. Then add the rose top band and scallops, the bottom ruffle, the strap and the bow.
Finished Size and Construction
- Finished size: 6 in (15.2 cm) wide flat × 18.5 in (47.0 cm) long, without the strap
- Circumference: 12 in (30.5 cm)
- Skill level: Easy–Intermediate
- Terminology: US
- Yarn weight: Worsted (#4) cotton
- Hook: US H-8 (5.0 mm)
- Number of pieces: 1 body tube, plus 1 strap cord and 1 bow cord sewn on
- Layout: a single vertical tube, with no assembly grid
- Body tube size before trims: 6 in (15.2 cm) flat × 16.25 in (41.3 cm) tall (Rnds 1–25)
- Top band depth: 1.5 in (3.8 cm), including the scallops
- Bottom ruffle depth: 0.75 in (1.9 cm)
- Strap drop: about 5 in (12.7 cm) above the rim when hanging
Materials
Use a smooth worsted-weight cotton or cotton blend. Cotton keeps the shells crisp, does not stretch much under the weight of the bags, and survives washing. Avoid fuzzy yarns, which hide the lace.
- Cream (main color): 90 g, about 155 m
- Dusty rose (contrast color): 40 g, about 70 m
Both quantities include a margin of about 15% for your gauge swatch and tension differences.
Tools:
– US H-8 (5.0 mm) crochet hook
– Tapestry needle
– 2 stitch markers
– Scissors
– Measuring tape
– Rust-proof pins and a spray bottle for blocking
Abbreviations (US Terms)
- ch – chain
- sl st – slip stitch
- sc – single crochet
- dc – double crochet
- st(s) – stitch(es)
- sp – space
- rnd(s) – round(s)
- rep – repeat
- Shell – 5 dc worked into the same stitch. The 3rd dc of a shell is its center dc.
- Back-bump sl st – a sl st worked into the bump on the back of a chain. This makes a firm, rounded cord.
Gauge and Checkpoints
Single crochet gauge: 16 sc × 16 rnds = 4 in (10.2 cm)
Shell gauge: 2 pattern repeats = 3 in (7.6 cm) wide, and 4 shell rnds = 3 in (7.6 cm) tall
Before you start the tube, make a test piece. Work Rnds 1–9 and measure. If it matches the checkpoints, keep going. If it doesn’t, rip it out, change hooks and start again.
Checkpoints:
– After Rnd 4 (rose cuff): 3 in (7.6 cm) flat, 1 in (2.5 cm) tall
– After Rnd 5: 6 in (15.2 cm) flat, 1.25 in (3.2 cm) tall from the start
– After Rnd 15 (10 shell rnds): 8.75 in (22.2 cm) tall
– After Rnd 25: 16.25 in (41.3 cm) tall
– After Rnd 30: 17.75 in (45.1 cm) tall
– After the ruffle: 18.5 in (47.0 cm) total
If your piece is too big: go down to a 4.5 mm hook. If it is too small: go up to a 5.5 mm hook.
Measure height with the tube hanging, not lying flat. Shells stretch a little lengthwise under their own weight.
Bottom Cuff (Rose)
Foundation: With rose, ch 24 and join with a sl st to the first ch to form a ring. Don’t twist the chain.
Rnd 1: Ch 1, sc in each ch around. Join with a sl st to the first sc. (24 sc)
Rnds 2–4: Ch 1, sc in each st around, join. (24 sc each round)
Fasten off rose. The cuff should be 3 in (7.6 cm) wide flat and 1 in (2.5 cm) tall.
Body (Cream)
Rnd 5 (increase): Join cream in any st. Ch 1, work 2 sc in each st around, join. (48 sc)
This round doubles the stitch count all at once, so the body flares out sharply above the narrow cuff. That gives the gathered, tapered bottom.
Rnd 6 (shell set-up): Ch 1, sc in the first st. Ch 2, skip 2 sts, shell in the next st, ch 2, skip 2 sts, sc in the next st. Rep from * around. In the last repeat, leave out the final sc and join with a sl st to the first sc.
Count: 8 shells (40 dc), 8 sc and 16 ch-2 sps. Each repeat uses 6 sts, and 8 × 6 = 48.
Rnd 7 (shell round): Sl st into the next ch-2 sp, then sl st in the next 3 dc. You are now at the center dc of the first shell. Ch 1, sc in the same dc. Ch 2, shell in the next sc, ch 2, sc in the center dc of the next shell. Rep from * around. In the last repeat, leave out the final sc and join to the first sc.
Count: 8 shells, 8 sc and 16 ch-2 sps. Each new shell sits on the sc between two shells of the round below. That offset is what makes the diamond-shaped openings.
Rnds 8–25: Rep Rnd 7. (8 shells, 8 sc and 16 ch-2 sps in every round)
You now have 20 shell rounds (Rnds 6–25), which add 15 in (38.1 cm) of height. The piece should measure 16.25 in (41.3 cm) from the foundation. Fasten off cream.
Border: Top Band and Bottom Ruffle (Rose)
Border gauge: 16 sc = 4 in (10.2 cm). The band needs exactly 48 sc to match the body’s 12 in (30.5 cm) circumference, which is 24 sc on each flat half (front and back).
Rnd 26 (conversion): Join rose with a sl st in the center dc of any shell. Ch 1, sc in the same dc. 2 sc in the next ch-2 sp, sc in the next sc, 2 sc in the next ch-2 sp, sc in the center dc of the next shell. Rep from * around. In the last repeat, leave out the final sc and join.
Count: 8 sc in center dcs + 8 sc in sc + 32 sc in the 16 ch-2 sps (2 in each) = 48 sc. That’s 24 per flat half.
The 4 outer dc of each shell are skipped. This turns the open lace into a solid band without flaring or puckering.
Rnds 27–29: Ch 1, sc in each st around, join. (48 sc each round; 24 per half)
Rnd 30 (scallops): Ch 1, sc in the first st. Skip 1 st, 5 dc in the next st, skip 1 st, sc in the next st. Rep from * around. In the last repeat, leave out the final sc and join to the first sc.
Count: 12 scallops and 12 sc, which is 6 scallops per flat half. Fasten off.
Why the math works: each scallop repeat uses 4 sts, and 48 ÷ 4 = 12. The band is 1.5 in (3.8 cm) deep: 1 in (2.5 cm) of sc plus 0.5 in (1.3 cm) of scallops.
Bottom ruffle, Rnd R1 (growth): Turn the piece upside down. Join rose in any free loop of the foundation chain. Ch 3 (counts as dc) and work 1 dc in the same loop. Work 2 dc in each remaining loop around, then join to the top of the ch-3. (48 dc)
Rnd R2: Ch 1. (Sc, ch 3) in the next dc. Rep from * around, then join to the first sc. (48 sc and 48 ch-3 loops)
Fasten off. The ruffle has twice as many stitches as the 24-st cuff edge, so it has nowhere to go but to ruffle and curl. It’s about 0.75 in (1.9 cm) deep.
Hanging Strap and Bow (Rose)
Strap: Ch 41. Work a back-bump sl st in the 2nd ch from the hook and in each ch across. (40 sl sts, about 10 in / 25.4 cm long) Fasten off and leave 8 in (20.3 cm) tails.
Lay the holder flat so stitch 1 of Rnd 29 sits at one side fold. Sew one strap end inside the band at st 1, covering Rnds 27–29. Sew the other end at st 25, on the opposite fold. The loop will rise about 5 in (12.7 cm) above the rim.
Bow: Ch 51. Work a back-bump sl st in the 2nd ch from the hook and in each ch across. (50 sl sts, about 10 in / 25.4 cm long)
Tie it into a bow with loops of about 0.75 in (1.9 cm) and tails of about 1.25 in (3.2 cm). The finished bow is about 2 in (5.1 cm) wide.
Center the bow on the front, halfway between the two strap ends, over Rnds 24–25, just below the rose band. Stitch through the knot so it stays put, then weave in all ends.
Final Blocking
- Weave in all ends inside the tube, working along stitch posts so nothing shows through the lace.
- Wet the holder or spray it until it is damp all the way through.
- Roll a towel into a tube about 12 in (30.5 cm) around and slide it inside the body.
- Pin the shells straight up and down. The piece should be 6 in (15.2 cm) wide flat, and Rnds 1–25 should measure 16.25 in (41.3 cm).
- Pull each scallop and ruffle loop into shape with your fingers.
- Shape the bow loops and pin the tails at a slight angle.
- Let it dry completely, then remove the towel.
Final Quality-Control Checklist
- The cuff has 24 sc and measures 3 in (7.6 cm) flat.
- Every shell round has 8 shells, and the shells are offset round to round.
- There are 20 shell rounds in total.
- The top band has 48 sc, and Rnd 30 has 12 scallops.
- The ruffle has 48 ch-3 loops.
- The strap ends are exactly opposite each other, at sts 1 and 25.
- The bow sits centered between the strap ends.
- Total length is 18.5 in (47.0 cm) and flat width is 6 in (15.2 cm).
Troubleshooting
The shells stack instead of offsetting: you skipped the repositioning sl sts. Every round must start at a center dc.
The band ruffles: you worked into all 5 dc of each shell. Recheck Rnd 26; you should have exactly 48 sc.
The band pulls in: your sc tension is tight. Work Rnds 26–30 one hook size larger.
The bottom opening is too tight for bags: chain 28 instead of 24. In Rnd 5, work 2 sc in 20 sts and 1 sc in 8 sts to get back to 48. (Note that this changes the cuff checkpoints and the Rnd R1 count.)
The tube twists: a slanting join line is normal. Block it straight, and join neatly at the same spot every round.
The strap stretches: sew it down over all 3 band rounds, not just the top one.
Care
Machine wash cold on a gentle cycle in a laundry bag, then reshape and lay flat to dry. Don’t hang it while it’s wet; the weight will stretch the lace.
Final Notes
Here is the measurement chain:
– A 24-st cuff measures 3 in (7.6 cm) flat.
– Doubling to 48 sts gives 8 shell repeats and a 12 in (30.5 cm) circumference.
– Twenty shell rounds add 15 in (38.1 cm).
– The 48-sc band divides evenly into 12 scallops.
– The 48-loop ruffle finishes the holder at 18.5 in (47.0 cm).
If your test piece hits the gauge, every later stage will fall into place. Happy crocheting!