

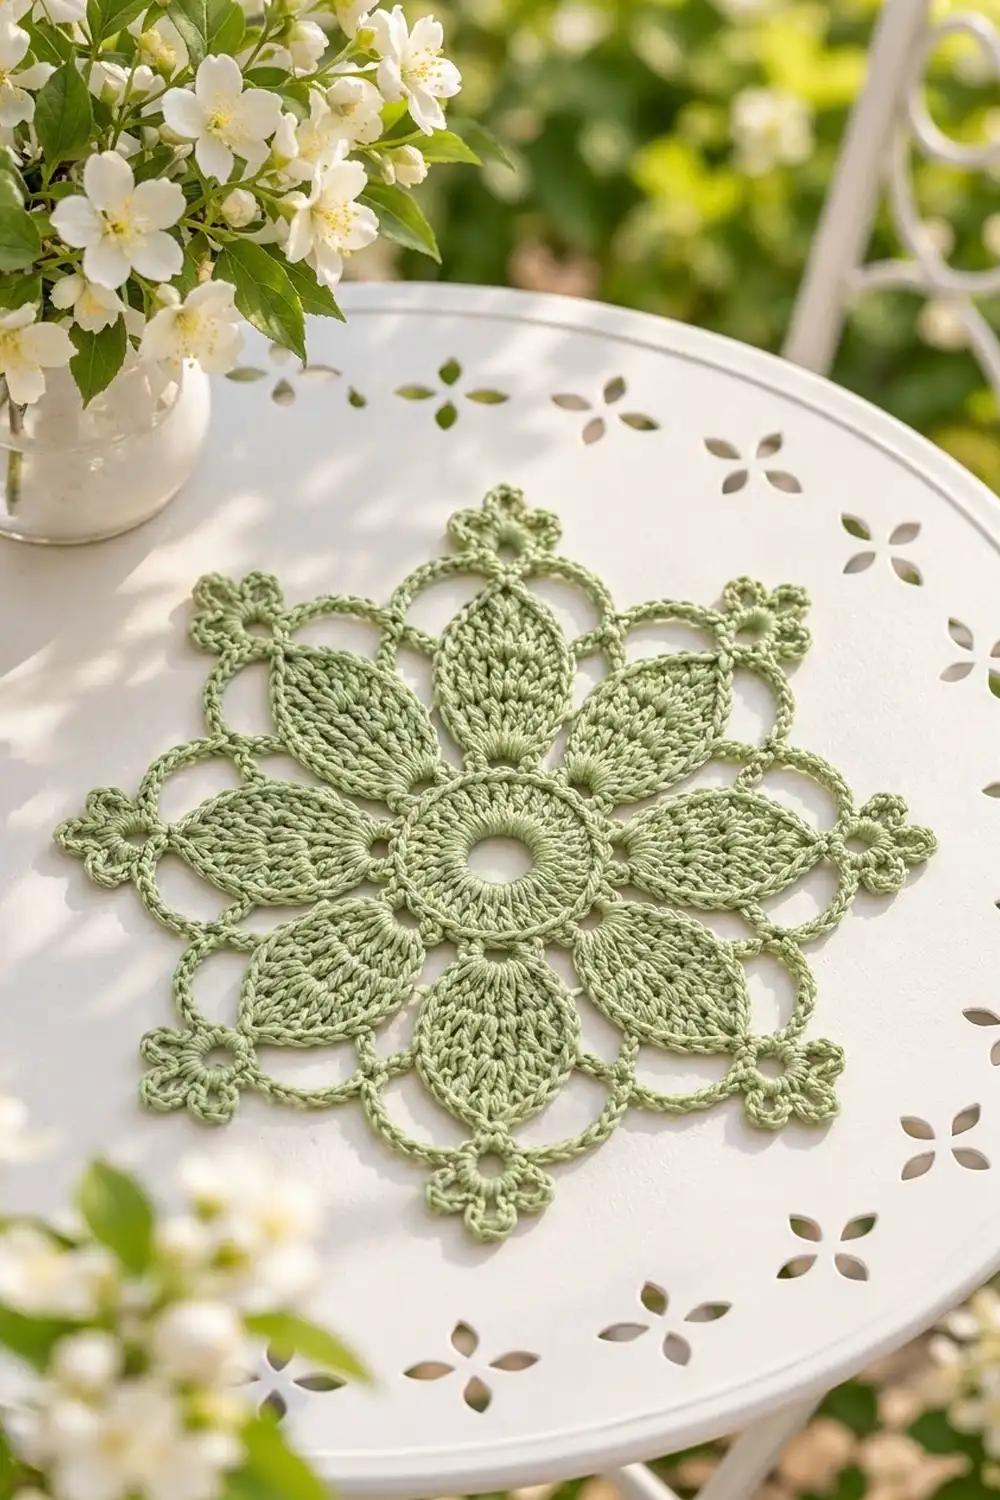
The Sage Petal Star Doily is a light, airy motif with eight pointed petals around a solid center. Open chain arches circle the petals, and a scalloped edge with small trefoil points finishes it. It looks delicate but uses only basic stitches, so it is very satisfying to make.
The sample is worked in one color, a soft sage green mercerized cotton. On a white table, with a few spring blossoms nearby, it has a calm garden-party look. It also works well as a centerpiece, under a vase, or framed as wall art.
This pattern uses US crochet terms. The finished doily measures about 9 in (22.9 cm) from trefoil point to trefoil point after blocking. Across the flat scallop edges it measures about 8.5 in (21.6 cm).
You will work a dc center ring and then eight petals in short rows, joined continuously. Next comes an sc outline round, then tip-to-tip chain arches covered in sc. The last two rounds make the scalloped border with trefoil points.
Finished Size and Construction
- Finished size: 9 in (22.9 cm) point to point; 8.5 in (21.6 cm) across scallops
- Skill level: Intermediate
- Terminology: US crochet terms
- Yarn weight: Super fine (#1), fingering-weight mercerized cotton
- Hook: 2.5 mm
- Number of pieces: 1 (single motif)
- Layout: Single round motif with 8-fold symmetry; no joining
- Piece size before border (after Rnd 6): 7.4 in (18.8 cm) across petal tips
- Border depth: 0.8 in (2.0 cm) on each side, including the trefoils
Materials
Yarn: Use a smooth, mercerized cotton in fingering weight. Mercerized cotton gives the crisp stitch definition you see on the petal ridges, and it blocks flat and stays flat. Avoid fuzzy or very stretchy fibers, because the open arches will sag.
- Sage green: 25 g, about 105 m (115 yd)
The quantity includes a safety margin of about 30%. The doily itself uses about 18–19 g.
Tools:
- 2.5 mm crochet hook
- Tapestry needle
- Scissors
- 1 stitch marker
- Rust-proof blocking pins
- Blocking mat or folded towel
- Spray bottle with water
- Ruler or tape measure
Abbreviations (US Terms)
- ch – chain
- sl st – slip stitch
- sc – single crochet
- dc – double crochet
- dc2tog – double crochet 2 together
- dc3tog – double crochet 3 together
- sk – skip
- sp – space
- st(s) – stitch(es)
- RS – right side
Special stitch: Trefoil (tref)
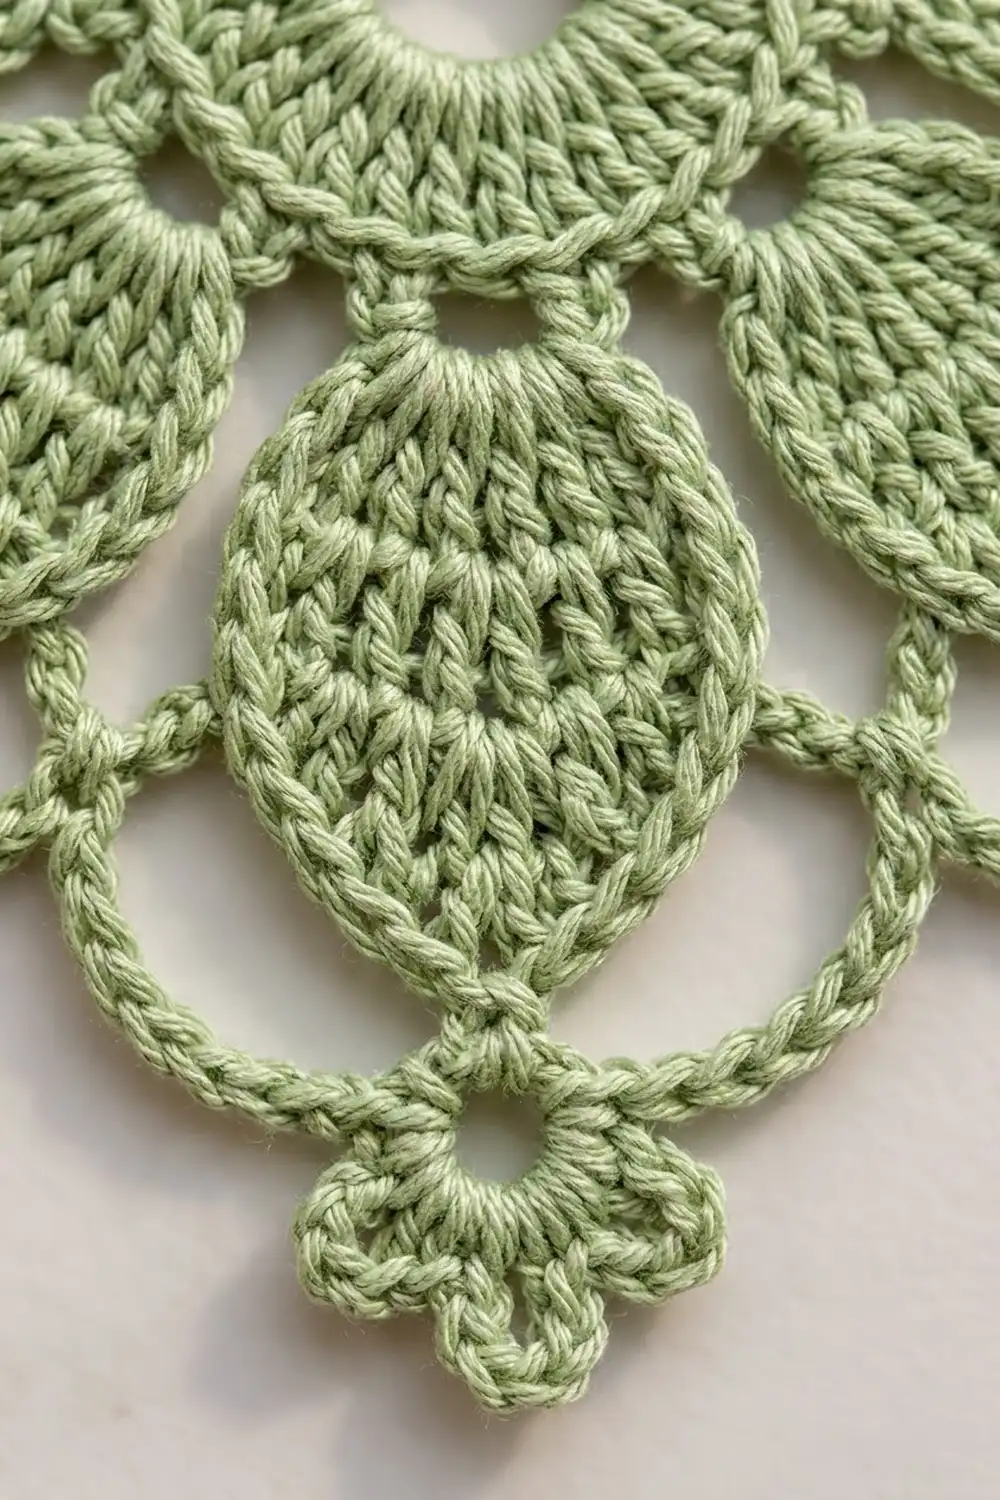
Ch 7, sl st in 4th ch from hook (first ring made). [Ch 4, sl st in the same ch] twice (second and third rings made). Sl st in each of the next 2 ch down the stem, then sl st in the base sc. This gives a stem of 3 ch with three ch-4 rings clustered at its tip.
Gauge and Checkpoints
Gauge isn’t critical for a doily, but it decides the final size and how flat the piece lies. Work Rnds 1–2 first, measure, and adjust before you go on.
Base gauge: Rnds 1–2 = 1.75 in (4.4 cm) diameter.
Measurement checkpoints:
- After Rnd 1: 1.25 in (3.2 cm) diameter, with a center hole of about 0.5 in (1.3 cm)
- After Rnd 2: 1.75 in (4.4 cm)
- One finished petal: 2.4 in (6.1 cm) long, 1.4 in (3.6 cm) at its widest
- After Rnd 3 (all petals): about 6.5 in (16.5 cm) across opposite tips
- After Rnd 4: 6.9 in (17.5 cm)
- After Rnd 6: 7.4 in (18.8 cm)
- After Rnd 8 (blocked): 9 in (22.9 cm) point to point
If your piece is too big, try a 2.25 mm hook. If it is too small, try a 2.75 mm hook. If Rnd 2 ruffles, your dc are taller than mine, so go down a hook size. If it cups, go up a size.
Pattern
Center
Rnd 1: Ch 8, sl st in first ch to form a ring. Ch 3 (counts as dc), work 23 dc in the ring. Join with sl st to the top of the beginning ch-3. (24 dc)
The ch-8 ring leaves the open center hole. Don’t pull it closed.
Rnd 2: Ch 1, sc in the same st as the join, sc in the next st, 2 sc in the next st, sc in each of the next 2 sts, 2 sc in the next st; repeat from * 6 more times. Join with sl st to the first sc. (32 sc)
Each 3-st repeat becomes 4 sts, and 8 repeats give 32 sc. Place a marker in the first sc.
Petals (Rnd 3)
Each petal is worked in rows on 3 sts of Rnd 2, and 1 st is skipped between petals. That gives 4 sts per petal × 8 petals = 32 sts, which uses all of Rnd 2. The skipped st leaves the small gap visible at each petal base.
Petal Row 1 (RS): Ch 3 (counts as dc), dc in each of the next 2 sts. Turn. (3 dc)
Row 2: Ch 3 (counts as dc), dc in the same st, dc in the next st, 2 dc in the top of the turning ch. Turn. (5 dc)
Row 3: Ch 3, dc in the same st, dc in each of the next 3 sts, 2 dc in the top of the turning ch. Turn. (7 dc)
Row 4: Ch 3, dc in each st across. Turn. (7 dc)
Row 5: Ch 2 (does not count as a st), dc2tog, dc in each of the next 3 sts, dc2tog. Turn. (5 sts)
Row 6: Ch 2 (does not count), dc2tog, dc in the next st, dc2tog. Turn. (3 sts)
Row 7: Ch 2 (does not count), dc3tog. (1 st – petal tip)
This shape makes the pointed oval: it grows over Rows 1–3, holds the width in Row 4, then narrows to a point in Rows 5–7.
Travel down: Work down the petal edge on the side where Row 1 ended, making 1 sl st in the side of each row-end from Row 6 down to Row 1 (6 sl sts). Then sl st in the next unused st of Rnd 2 (this is the skipped st), and sl st in the following st.
Next petals: Starting in the st where you just slip stitched, repeat Petal Rows 1–7 and the travel down 7 more times. On the 8th petal, finish the travel down with the sl st in the skipped st (the 32nd st of Rnd 2). Don’t fasten off. (8 petals)
Petal Outline
Rnd 4: Ch 1, sc in the same skipped st (this is a valley sc). Work 12 sc evenly up the right side of the next petal (2 sc in each row-end of Rows 1–6), (sc, ch 2, sc) in the top of the dc3tog tip, work 12 sc evenly down the left side (2 sc in each row-end of Rows 6–1, working over the sl sts), sc in the next skipped Rnd 2 st (valley sc). Repeat from * around, leaving out the last valley sc on the final repeat. Join with sl st to the first sc.
Count per repeat: 1 valley sc + 12 + 2 tip sc + 12 = 27 sc. (216 sc and 8 ch-2 tip sps)
This round gives the raised, chain-like outline around every petal.
Tip-to-Tip Arches
Rnd 5: Sl st in each st up to the first tip ch-2 sp, then sl st in the sp. Ch 1, sc in the same sp, ch 14, sc in the next tip ch-2 sp; repeat from * 6 more times, ch 14. Join with sl st to the first sc. (8 sc, 8 ch-14 arches)
Each chain drops into the valley between two petals. Together with the petal sides, it frames the round openings.
Rnd 6: Sl st in the first ch-14 arch. Ch 1, work 16 sc in the same arch, then 16 sc in each remaining arch. Join with sl st to the first sc. (128 sc: 16 sc × 8 arches)
The tip sc from Rnd 5 are covered and don’t count as sts. Checkpoint: 7.4 in (18.8 cm) across.
Border
The border makes a scalloped edge that bulges over each petal tip, with a trefoil point at each of the 8 valleys.
Border gauge: 13 sc over a chain arch = 2 in (5.1 cm). Each finished 20-sc scallop should measure about 3 in (7.6 cm) along its curve.
Rnd 7: Sl st in each of the next 7 sc, so you are in the 8th sc of the first arch, which is its midpoint over a valley. Ch 1, sc in the same st, ch 16, sk the next 15 sc, sc in the next sc; repeat from * 6 more times, ch 16. Join with sl st to the first sc. (8 sc, 8 ch-16 arches)
Why the math works: Each Rnd 6 arch has 16 sc. From the 8th sc of one arch, skipping 15 sc means passing sc 9–16 of that arch (8 sc) plus sc 1–7 of the next arch (7 sc). That puts you exactly on the 8th sc of the next arch. Over 8 repeats this uses 8 × 16 = 128 sc, which matches Rnd 6. Every new arch spans one petal tip, and every anchor sc sits over a valley.
Rnd 8: Work tref from the next sc (ending with a sl st in that sc), work 20 sc in the next ch-16 arch; repeat from * 7 more times. Join with sl st to the base of the first tref. Fasten off. (160 sc and 8 trefoils = 24 picot rings)
Per repeat (one eighth): 1 trefoil + 20 sc. Working 20 sc over 16 chains packs in 4 extra sts, and that pushes each scallop outward into its rounded shape. The border adds 0.8 in (2.0 cm) on each side, so 7.4 in + 0.8 in + 0.8 in = 9 in (18.8 cm + 2.0 cm + 2.0 cm ≈ 22.9 cm).
Weave in all ends securely along the backs of the sc rounds.
Final Blocking
- Soak the doily in cool water for 10 minutes, then press out the water in a towel. Don’t wring it.
- Lay it RS up on the blocking mat.
- Pin the center flat. Gently open the center hole to 0.5 in (1.3 cm).
- Pin each petal tip so that opposite tips are 6.9 in (17.5 cm) apart.
- Pin the middle of each scallop outward, measuring from the center.
- Pin the 8 trefoil stems straight out so that opposite points are 9 in (22.9 cm) apart. Open each of the three rings with a pin.
- Check that all 8 sections match, then let the doily dry completely, for at least 12 hours.
- Unpin. If you’d like crisp edges, mist with spray starch, re-pin, and let it dry again.
Final Quality-Control Checklist
- Center hole is open and round, about 0.5 in (1.3 cm)
- All 8 petals are the same length (2.4 in / 6.1 cm) and come to a clean point
- A small gap shows at the base between each pair of petals
- Rnd 4 outline is even, with no puckering along the petal sides
- 8 round openings sit between the petals
- 8 scallops, each with 20 sc, curve outward evenly
- 8 trefoils, each with 3 open rings on a straight stem
- Point-to-point size is 9 in (22.9 cm) and the doily lies flat
- All ends are woven in invisibly
Troubleshooting
Center cups or ruffles: Re-check Rnd 2 (32 sc). If the count is right, change your hook size as described in the gauge section.
Petals lean or twist: Make sure each one starts in the correct st, with exactly 1 skipped st between petals, and that you turn after every row.
Petal tips are blunt: Pull the dc3tog snug and check that Row 6 has exactly 3 sts.
Rnd 4 puckers: Work 2 sc per row-end without squeezing them. If it still puckers, use 13 sc per side instead, but use the same count on every petal.
Arches sag below the petals: Your chains are loose. Work the ch-14 more firmly, or use ch 13 and 15 sc throughout Rnd 6. If you do, change Rnd 7 to sk 14 sc, land on the midpoint sc, and still cover 8 × 15 = 120 sc.
Scallops ruffle: Use 18 sc per arch in Rnd 8 instead of 20.
Trefoil rings close up: Work each ch-4 loosely and pin the rings open during blocking.
Care
Hand wash in cool water with mild soap, roll it in a towel to remove the water, and dry it flat, pinned to shape if needed. If you starch it, re-starch after each wash.
Final Notes
The measurement chain is simple. The 1.75 in (4.4 cm) center sets the base. Eight 2.4 in (6.1 cm) petals take it to 6.5 in (16.5 cm), the outline brings it to 6.9 in (17.5 cm), and the arches reach 7.4 in (18.8 cm). The 0.8 in (2.0 cm) border finishes at 9 in (22.9 cm). The stitch counts follow the same order: 24, 32, 216, 128, then 160 sc with 8 trefoils. Check each count as you go and every eighth of the doily will match.
Happy crocheting!