

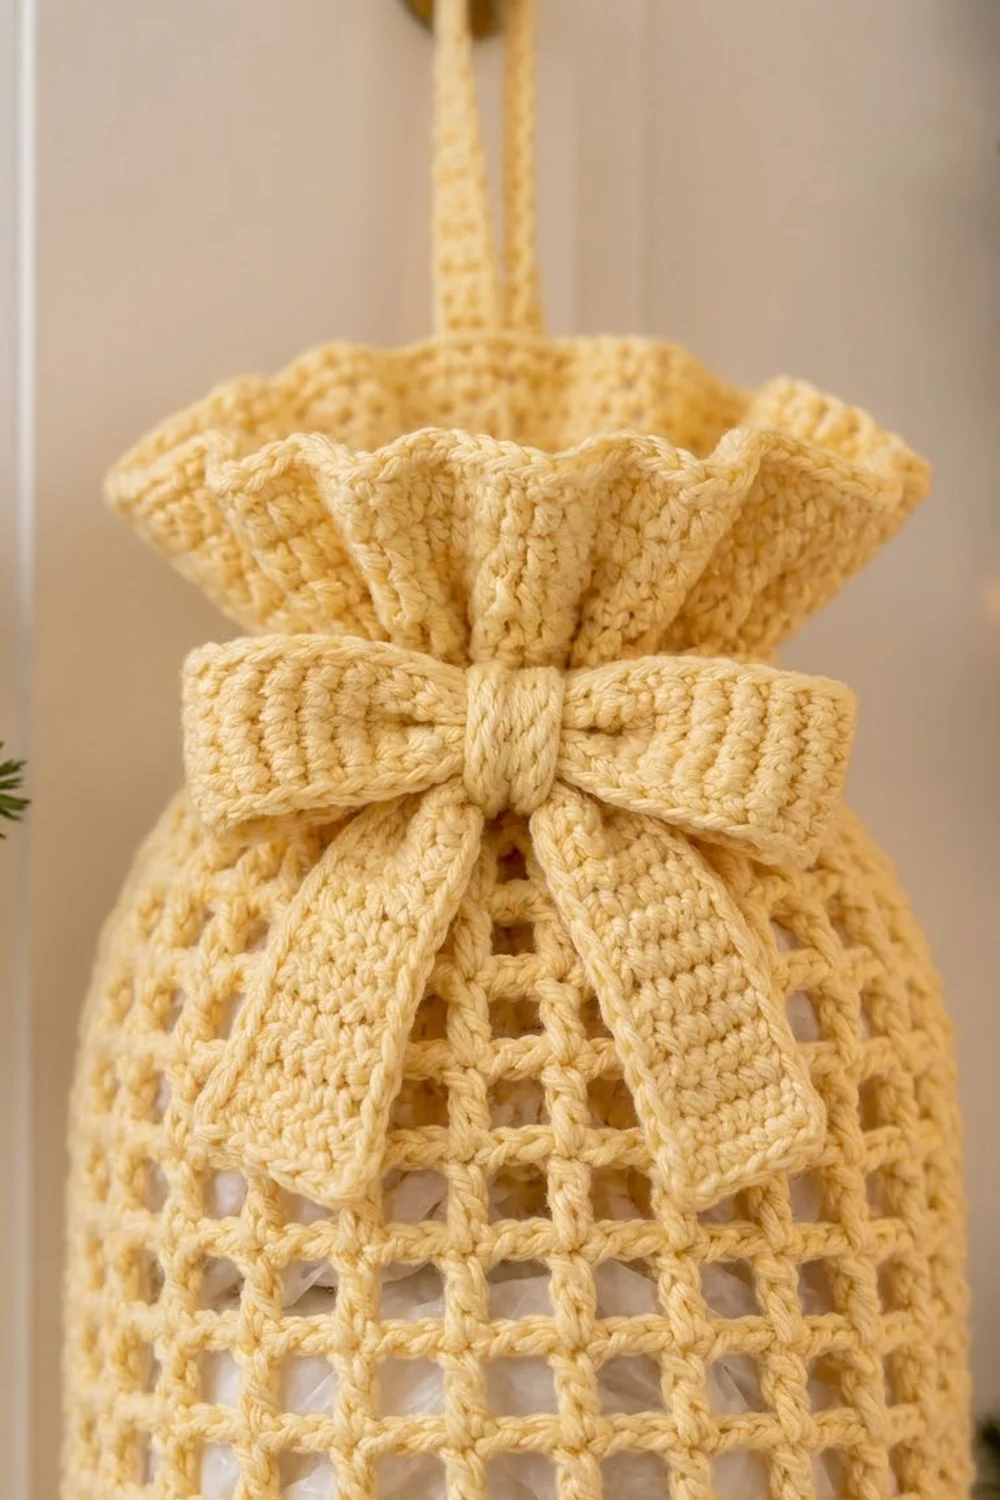
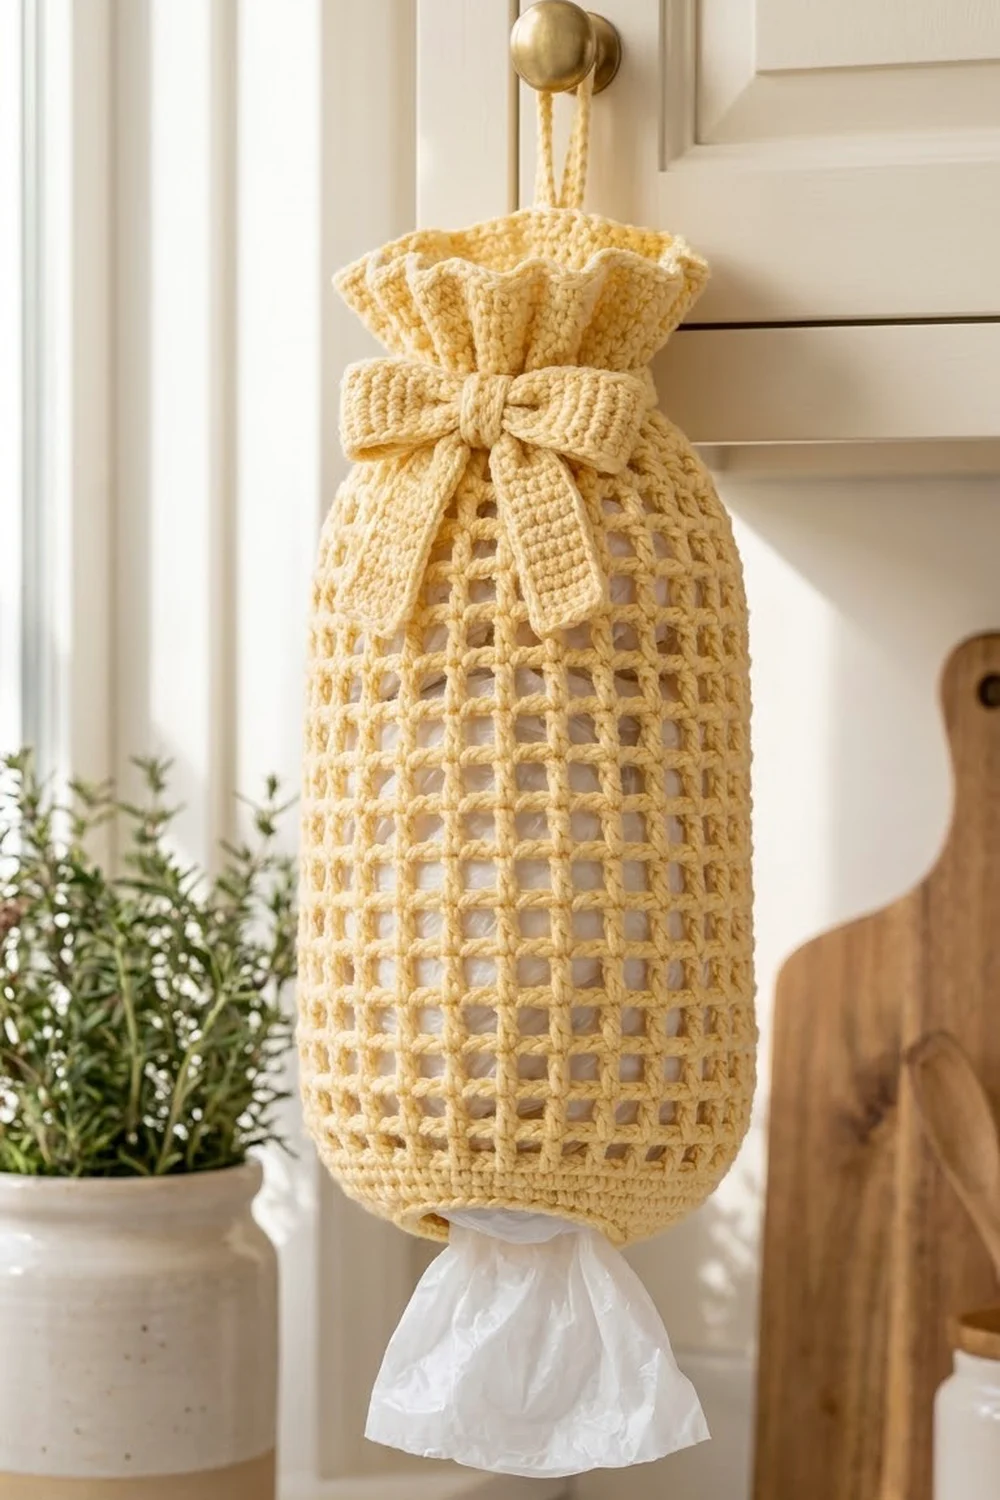
This bag holder is a soft, butter-yellow tube that turns a pile of plastic grocery bags into something nice to look at. The body is open filet mesh, so you can see how many bags are left. A solid rounded base, a ruffled collar and a little bow make it look finished.
The design is worked in one color of worsted-weight cotton for a warm, cottage-kitchen look. It suits a pantry door, a laundry room hook or a holiday kitchen. This pattern uses US crochet terms throughout.
The finished holder measures about 8 in (20.3 cm) wide when laid flat and 16.5 in (41.9 cm) tall, not counting the hanging loop. The loop adds about 3 in (7.6 cm) above the ruffle.
You work the holder in one piece from the bottom up. Start at the bottom opening with solid single-crochet rounds that increase into the base. Then work 16 rounds of filet mesh, decrease into a solid neck, and finish with a ruffle. A separate bow and a hanging loop are sewn on at the end.
Finished Size and Construction
- Finished size: 8 in (20.3 cm) wide flat × 16.5 in (41.9 cm) tall
- Skill level: Easy / advanced beginner
- Terminology: US crochet terms
- Yarn weight: Worsted (#4), cotton or cotton blend
- Hook: 5.0 mm (H-8)
- Number of pieces: 1 holder body, plus 1 bow (band, knot, 2 tails) and 1 hanging loop
- Layout: Single tube, worked in joined rounds
- Piece size: circumference 16 in (40.6 cm) at the mesh body
- Size before border: 8 in (20.3 cm) × 15.5 in (39.4 cm) after Rnd 28
- Border depth: ruffle adds 1.0 in (2.5 cm) at the top; the bottom edge round adds no measurable height
Materials
Yarn: Use a smooth, mercerized or matte worsted cotton. Cotton holds the mesh squares crisp and won’t stretch as much as acrylic when the holder is full of bags. Avoid fuzzy yarns, because they blur the mesh.
- Butter yellow: 150 g, about 285 m (312 yd)
Tools:
- 5.0 mm (H-8) crochet hook
- Tapestry needle
- Stitch marker
- Scissors
- Measuring tape
- Pins and a spray bottle for blocking
- An empty paper-towel tube or rolled towel (optional, for blocking)
The yarn quantity includes a margin of about 15% for your gauge swatch and for differences in tension.
Abbreviations (US Terms)
- ch – chain
- sl st – slip stitch
- sc – single crochet
- dc – double crochet
- sc2tog – single crochet 2 together
- sp – space
- st(s) – stitch(es)
- rep – repeat
- Rnd – round
Special stitch – mesh square: One mesh square is (dc, ch 2), worked over 3 stitches of the round below. In later mesh rounds, you place the dc into the dc below and chain 2 over the ch-2 space.
Gauge and Checkpoints
Single crochet gauge: 16 sts and 18 rnds = 4 in (10.2 cm)
Mesh gauge: 5 mesh squares and 5 mesh rnds = 4 in (10.2 cm); each square is about 0.8 in (2.0 cm)
Test first: Work Rnds 1–12 below, then stop and measure before going on. It takes about 30 minutes and saves you from ripping back a whole tube.
Checkpoints:
- After Rnd 1: the ring lies flat without twisting and measures about 10 in (25.4 cm) around.
- After Rnd 8: the base band is 1.8 in (4.6 cm) tall and 15 in (38.1 cm) around.
- After Rnd 12: four mesh rounds measure 3.2 in (8.1 cm) tall, and the tube measures 16 in (40.6 cm) around.
- After Rnd 24: the mesh section measures 12.8 in (32.5 cm) tall.
- After Rnd 28: the holder measures 15.5 in (39.4 cm) tall.
If your piece is too big: go down half a hook size, to 4.5 mm (7).
If your piece is too small: go up to 5.5 mm (I-9).
If only the mesh is too tall, your dc stitches are loose. Pull each loop snug before you yarn over. Height can also be adjusted by adding or removing mesh rounds, at about 0.8 in (2.0 cm) per round.
Holder Body
Base Band
Rnd 1: Ch 40. Without twisting the chain, sl st to the first ch to form a ring. Ch 1, sc in each ch around, sl st to first sc. (40 sc)
Rnd 2: Ch 1, sc in each st around, sl st to first sc. (40 sc)
Rnd 3: Ch 1, sc in next 3 sts, 2 sc in next st; rep from * 9 more times, sl st to first sc. (50 sc)
Rnd 4: Ch 1, sc in each st around, sl st to first sc. (50 sc)
Rnd 5: Ch 1, sc in next 4 sts, 2 sc in next st; rep from * 9 more times, sl st to first sc. (60 sc)
Rnds 6–8: Ch 1, sc in each st around, sl st to first sc. (60 sc)
The increases are spread over two rounds, so the base curves gently inward toward the opening. The 40-st opening is about 3.2 in (8.1 cm) across, which is wide enough to pull bags through. It is also snug enough to keep them from falling out.
Mesh Body
Rnd 9 (mesh setup): Ch 5 (counts as dc + ch 2), skip next 2 sts, dc in next st, ch 2, skip next 2 sts; rep from * 18 more times, sl st to 3rd ch of beginning ch-5. (20 dc and 20 ch-2 sps, 60 sts in total)
Check: 20 squares × 3 sts = 60 sts, which matches Rnd 8 exactly.
Rnds 10–24: Ch 5 (counts as dc + ch 2), dc in next dc, ch 2; rep from * 18 more times, sl st to 3rd ch of beginning ch-5. (20 squares)
That gives 16 mesh rounds in total (Rnds 9–24). Each beginning ch-5 lands right on top of the joined dc below, so the vertical posts stack in straight columns. Don’t turn between rounds. If the columns start to lean, it means your beginning chain is too loose. Chain more firmly.
Neck
Rnd 25 (conversion round): Ch 1, sc in same st, 2 sc in next ch-2 sp, sc in next dc, 2 sc in next ch-2 sp; rep from * 18 more times, sl st to first sc. (20 sc in posts + 40 sc in spaces = 60 sc)
Rnd 26: Ch 1, sc in next st, sc2tog; rep from * 19 more times, sl st to first sc. (40 sc)
Rnds 27–28: Ch 1, sc in each st around, sl st to first sc. (40 sc)
The drop from 60 to 40 stitches pulls the top in. This gives the gathered, cinched look under the ruffle. Place your stitch marker at the round join. This is the back of the holder, where the loop goes.
Border
The holder’s “border” is the ruffled collar at the top plus one firming round at the bottom opening. Work both at the same gauge as the body: 16 sc = 4 in (10.2 cm).
Top Ruffle
Rnd 29 (trim round): Ch 3 (counts as dc), dc in same st, 2 dc in each of the next 39 sts, sl st to top of ch-3. (40 dc worked 1 per existing st + 40 extra dc = 80 dc)
Rnd 30: Ch 1, sc in each st around, sl st to first sc. (80 sc) Fasten off and weave in the end.
Why the math works: The neck has 40 stitches, about 10 in (25.4 cm) around. The ruffle edge has 80 stitches, about 20 in (50.8 cm) around. That doubled length has nowhere to go, so it folds into the soft, even pleats you see at the top of the holder. Because each neck stitch gets exactly 2 dc, the pleats come out evenly spaced all the way around. The ruffle adds 1.0 in (2.5 cm) of height, which brings the holder to its finished 16.5 in (41.9 cm).
Bottom Edge
Turn the holder upside down. Join yarn at the back of the foundation ring. Work a sl st into the free loop of each foundation ch around (40 sl sts), then join and fasten off.
This round keeps the opening from stretching out after hundreds of bag pulls. It doesn’t change the opening’s size, because the count stays at 40.
Hanging Loop
Row 1: Ch 31, sc in 2nd ch from hook and in each ch across. (30 sc)
Row 2: Ch 1, turn, sc in each st across. (30 sc) Fasten off and leave a 10 in (25.4 cm) tail.
The strip measures about 7.5 in (19.1 cm) × 0.5 in (1.3 cm). Fold it in half. Sew both ends to the inside back of the neck, over Rnds 27–28 at the marker. The loop then stands about 3 in (7.6 cm) above the ruffle.
Bow
Band:
Row 1: Ch 21, sc in 2nd ch from hook and in each ch across. (20 sc)
Rows 2–6: Ch 1, turn, sc in each st across. (20 sc)
Fasten off. The band measures 5 in (12.7 cm) × 1.3 in (3.3 cm). Fold both short ends to the center, overlapping them by 0.25 in (0.6 cm), and tack them with a few stitches. This forms the two bow loops, about 2.5 in (6.4 cm) wide.
Tails (make 2):
Row 1: Ch 5, sc in 2nd ch from hook and in each ch across. (4 sc)
Rows 2–14: Ch 1, turn, sc in each st across. (4 sc)
Row 15: Ch 1, turn, sc2tog, sc in next 2 sts. (3 sts)
Fasten off. Each tail measures about 3.3 in (8.4 cm) × 1 in (2.5 cm). The shortened last row gives the angled end.
Knot:
Row 1: Ch 7, sc in 2nd ch from hook and in each ch across. (6 sc)
Rows 2–5: Ch 1, turn, sc in each st across. (6 sc)
Fasten off and leave a 12 in (30.5 cm) tail. The knot piece measures 1.5 in (3.8 cm) × 1.1 in (2.8 cm).
Assembly:
- Lay the straight tops of both tails behind the center of the bow band, angled outward in a V.
- Wrap the knot piece around the center of the band and over the tops of the tails. Sew its short edges together at the back.
- Center the bow on the front of the neck, opposite the hanging loop, so the knot sits over Rnds 26–27.
- Sew around the knot and at each loop tip. Tack the tails down lightly so they lie over the top mesh rounds.
Final Blocking
- Weave in all ends inside the solid sections, never across mesh openings.
- Mist the whole holder until it is damp but not dripping.
- Slide a paper-towel tube or a rolled towel inside the body to hold it round.
- Lay the holder flat and gently pull each mesh column straight. Check the width at 8 in (20.3 cm).
- Pull lightly down the length until the holder measures 16.5 in (41.9 cm).
- Finger-press the ruffle into even pleats, and pin the bow loops open.
- Let it dry completely, then remove the pins and the form.
Final Quality-Control Checklist
- Base band: 40 sc at the opening and 60 sc after Rnd 5.
- Mesh: 20 squares in every round, 16 rounds in total.
- Mesh columns run straight up with no spiral.
- Neck: 40 sc and evenly gathered.
- Ruffle: 80 dc and 80 sc, with even pleats.
- Width 8 in (20.3 cm) and height 16.5 in (41.9 cm).
- Hanging loop is securely sewn at the back, and the bow is centered at the front.
- The bottom opening has no stretched spots.
Troubleshooting
Mesh columns spiral around the tube: Your beginning ch-5 is landing beside the join instead of on top of it. Sl st into the 3rd ch exactly, and start the next round right there.
Squares look like tall rectangles: Your dc stitches are too tall. Try a tighter yarn over, or chain 2 more loosely so the spaces get wider.
Ruffle flips upward instead of pleating: Your sc round is too tight. Redo Rnd 30 with a looser tension, or use a hook one size larger for that round only.
Bags slide out on their own: The opening has stretched. Add a second sl-st round at the bottom edge, or work it with a smaller hook.
Holder is too short: Add mesh rounds. Each one adds about 0.8 in (2.0 cm).
Care
Hand wash in cool water with mild soap, then reshape the holder and dry it flat over a rolled towel. Don’t tumble dry, because cotton mesh can shrink and lose its square shape.
Final Notes
Every measurement builds on the one before. A 40-st ring opens to 60 sc, giving a base 1.8 in (4.6 cm) tall. Twenty mesh squares make a 16 in (40.6 cm) tube, and 16 rounds add 12.8 in (32.5 cm). Four neck rounds add 0.9 in (2.3 cm), bringing the holder to 15.5 in (39.4 cm). The doubled 80-stitch ruffle adds the last 1.0 in (2.5 cm), for a finished size of 8 in (20.3 cm) × 16.5 in (41.9 cm). Check your gauge at Rnd 12 and the rest will follow.
Happy crocheting!