

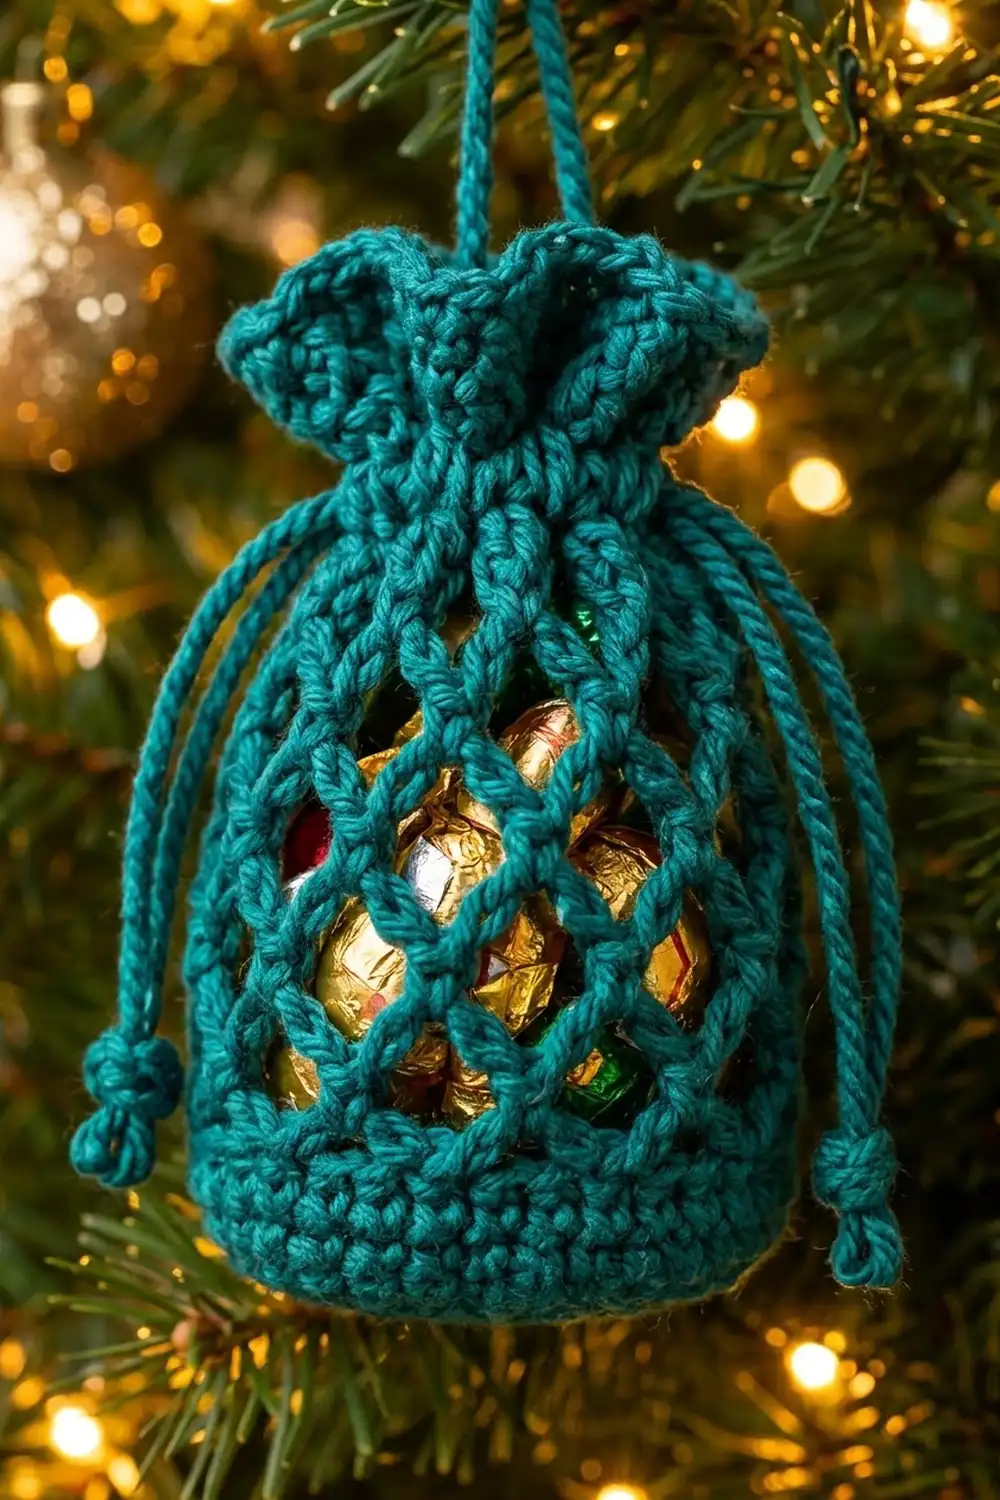
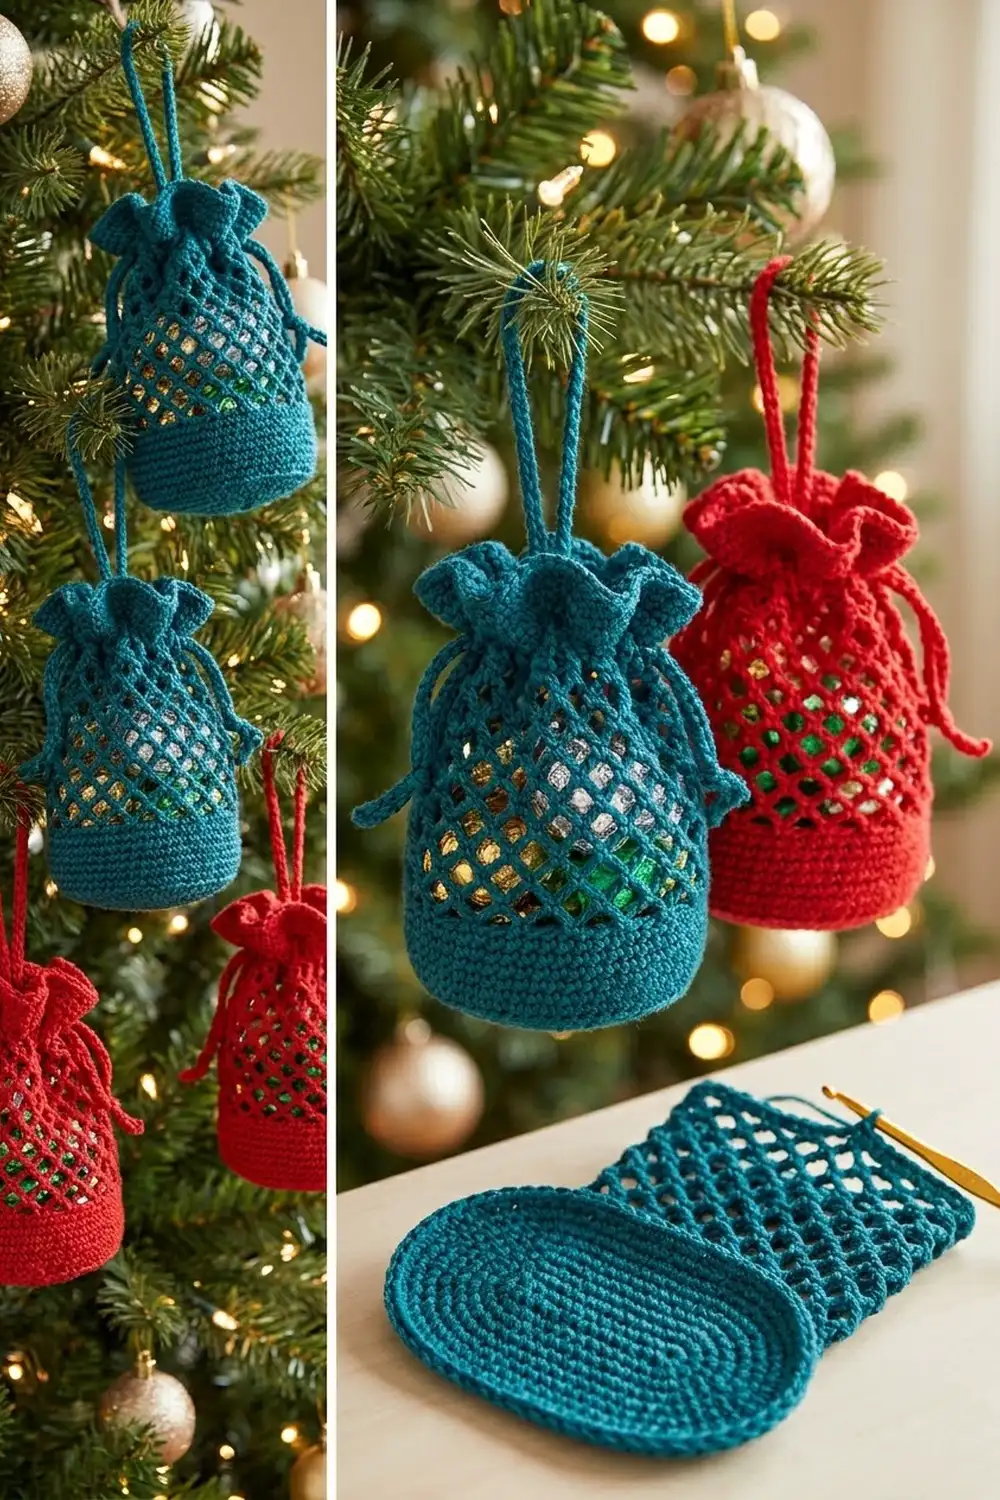
The Twinkle Net Treat Bag is a small drawstring pouch for tucking foil-wrapped chocolates onto the Christmas tree. A solid oval base holds its shape. Above it, an open diamond net lets the shiny wrappers show through, and a ruffled top gathers into a frill when you pull the cords.
The samples are made in deep teal and bright red. Each bag uses one color only, so it’s a good way to use up leftover cotton. Two knotted cords hang down at the sides, and a loop at the top hangs the bag from a branch.
This pattern uses US crochet terms. Laid flat and unfilled, the finished bag measures 3.6 in (9.1 cm) wide and 4.75 in (12.1 cm) tall including the ruffle.
You crochet the bag in one piece from the bottom up. First you work an oval base, then turn up a solid band, then work six rounds of chain-loop mesh. After that come two solid rounds, an eyelet round, a ruffle edge, and finally the cords.
Finished Size and Construction
- Finished size: 3.6 in (9.1 cm) wide x 4.75 in (12.1 cm) tall, laid flat
- Skill level: Easy / advanced beginner
- Terminology: US
- Yarn weight: DK (#3), cotton or cotton blend
- Hook: 3.5 mm (E-4)
- Number of pieces: 1 bag, plus 2 drawstring cords and 1 hanging loop
- Layout: Single piece worked in joined rounds
- Base size: about 3 in x 1.5 in (7.6 x 3.8 cm)
- Size before ruffle (through Rnd 19): 3.6 in (9.1 cm) wide x 4 in (10.2 cm) tall
- Ruffle depth: 0.75 in (1.9 cm)
Materials
Choose a smooth, mercerized DK cotton. It shows the mesh clearly, holds its shape when filled, and doesn’t fuzz on the tree. Acrylic works too, but the bag will be softer and slouchier.
- Main color (teal or red): 15 g / 35 m (38 yd) per bag
- 3.5 mm (E-4) crochet hook
- Tapestry needle
- Scissors
- Stitch marker
- Wrapped candies for filling (optional)
The quantity includes a margin of about 20% for the gauge swatch, the cords and weaving in. If you make several bags, plan on roughly 12 g per bag after the first one.
Abbreviations (US Terms)
- ch – chain
- sl st – slip stitch
- sc – single crochet
- dc – double crochet
- BLO – back loop only
- sk – skip
- sp – space
- st(s) – stitch(es)
- rnd – round
Special stitch – Shell: work 5 dc in the same stitch.
Round notes: Join every round with a sl st to the first stitch. Ch 1 at the start of a sc round doesn’t count as a stitch. Ch 3 at the start of a dc round counts as the first dc.
Gauge and Checkpoints
Gauge: 20 sc x 22 rnds = 4 in (10.2 cm) in sc worked in the round.
Make one bag before you start a batch. The checkpoints below tell you early whether your bag will finish at the right size.
- After Rnd 4 (base): 36 sts. The oval measures about 3 in x 1.5 in (7.6 x 3.8 cm).
- After Rnd 9 (solid band): the tube measures 7.2 in (18.3 cm) around, or 3.6 in (9.1 cm) wide laid flat. It stands 0.9 in (2.3 cm) above the base edge.
- After Rnd 15 (mesh): the mesh section is about 2.25 in (5.7 cm) tall. The total height above the base edge is about 3.15 in (8.0 cm).
- After Rnd 19: the body is 4 in (10.2 cm) tall from the base fold.
- After Rnd 21: 4.75 in (12.1 cm) total height.
If your bag is too big, go down to a 3.25 mm (D-3) hook. If it’s too small, go up to a 3.75 mm (F-5) hook. Mesh loops that look stretched and floppy usually mean your chains are loose. Tighten them before you change hooks.
Pattern
Oval Base
Ch 9.
Rnd 1: Sc in 2nd ch from hook, sc in next 6 ch, 3 sc in last ch. Working along the other side of the foundation chain, sc in next 6 ch, 2 sc in the same ch as the first sc. Join. (18 sts)
Rnd 2: Ch 1, 2 sc in first st, sc in next 6 sts, 2 sc in each of next 3 sts, sc in next 6 sts, 2 sc in each of last 2 sts. Join. (24 sts)
Rnd 3: Ch 1, sc in first st, 2 sc in next st, sc in next 6 sts, [sc in next st, 2 sc in next st] 3 times, sc in next 6 sts, [sc in next st, 2 sc in next st] 2 times. Join. (30 sts)
Rnd 4: Ch 1, sc in next 2 sts, 2 sc in next st, sc in next 6 sts, [sc in next 2 sts, 2 sc in next st] 3 times, sc in next 6 sts, [sc in next 2 sts, 2 sc in next st] 2 times. Join. (36 sts)
Check the base against the first checkpoint. It should lie flat with no ruffling or cupping.
Solid Band
Rnd 5: Ch 1, sc in BLO of each st around. Join. (36 sts)
The unworked front loops form a neat ridge, and the work starts to turn upward into a wall.
Rnds 6–9: Ch 1, sc in each st around. Join. (36 sts)
You now have a firm cup 0.9 in (2.3 cm) tall. Place a marker at each narrow end of the oval. This splits the bag into a front half and a back half of 18 sts each. You’ll use these markers later for the cords and the hanging loop.
Diamond Mesh
Rnd 10 (set-up): Ch 1, sc in first st, ch 5, sk 2 sts, sc in next st. Repeat from * 10 more times (11 repeats in total). Ch 5, sk 2 sts, sl st to the first sc. (12 ch-5 loops)
Check the math: 1 + (11 x 3) + 2 = 36 sts used.
Rnd 11: Sl st in each of the next 3 ch to reach the center of the first loop. Ch 1, sc in the same ch-5 sp, ch 5, sc in next ch-5 sp. Repeat from * 10 more times. Ch 5, sl st to the first sc. (12 ch-5 loops)
Rnds 12–15: Repeat Rnd 11. (12 ch-5 loops each round)
Each sc sits in the center of a loop from the round below. This is what forms the diamonds. Six mesh rounds give five full rows of diamonds plus half-diamonds at the top and bottom edges.
Solid Neck
Rnd 16 (conversion): Ch 1, sc in first sc, 2 sc in next ch-5 sp, sc in next sc, 2 sc in next ch-5 sp. Repeat from * 10 more times. Join. (12 sc + 24 sc = 36 sts)
This round puts one sc on top of each existing sc and adds 2 sc in each of the 12 spaces. That brings you back to exactly 36 sts.
Rnd 17: Ch 1, sc in each st around. Join. (36 sts)
Rnd 18 (eyelets): Ch 4 (counts as dc + ch 1), sk next st, dc in next st, ch 1, sk next st. Repeat from * 16 more times. Sl st to the 3rd ch of the beginning ch-4. (18 dc + 18 ch-1 sps = 36 sts)
Rnd 19 (conversion): Ch 1, sc in each dc and in each ch-1 sp around. Join. (18 sc + 18 sc = 36 sts)
This round puts one sc on each existing dc and one in each ch-1 space. Check the “before ruffle” size now: 3.6 in (9.1 cm) wide x 4 in (10.2 cm) tall.
Border: Ruffled Top
The ruffle is the bag’s border. It flares out above the eyelet round and gathers into the frill when you pull the cords tight.
Border gauge: 2 dc rounds plus 1 shell round add 0.75 in (1.9 cm) of height. Each of the 18 shells is about 0.4 in (1.0 cm) wide when the edge lies relaxed.
Rnd 20 (growth): Ch 3 (counts as dc), dc in the same st, 2 dc in each remaining st around. Join to the top of the ch-3. (72 dc)
– Per side: 36 dc on the front, 36 dc on the back
Rnd 21 (shells): Ch 1, sc in first st, sk 1 st, shell in next st, sk 1 st, sc in next st. Repeat from * 16 more times. Sk 1 st, shell in next st, sk 1 st, sl st to the first sc. (18 shells + 18 sc)
– Per side: 9 shells and 9 sc on the front, 9 shells and 9 sc on the back
Fasten off and weave in the ends.
Why the math works: Each shell repeat (sc, skip, shell, skip) uses 4 sts, and 72 ÷ 4 = 18 repeats exactly. Doubling 36 to 72 in Rnd 20 gives the shells room to flare. Without that increase, the top would only make 9 flat scallops instead of a full ruffle. Since 18 sts per side doubles to 36, each half of the bag gets exactly 9 shells, so the frill stays balanced on both sides.
Drawstring Cords (make 2)
Ch 66. Sl st in the back bump of the 2nd ch from hook and in each ch across. (65 sl sts)
Fasten off and leave a short tail. Each cord is about 13 in (33.0 cm) long.
Hanging Loop (make 1)
Ch 41. Sl st in the back bump of the 2nd ch from hook and in each ch across. (40 sl sts)
Fasten off and leave a 6 in (15.2 cm) tail at each end. The loop is about 8 in (20.3 cm) long.
Finishing the Cords
- Cord A: Start at the left end marker. Weave the cord in and out of the ch-1 spaces of Rnd 18 all the way around the bag, and bring it back out next to where it went in.
- Cord B: Start at the right end marker and weave it around the same way, so its tails come out on the right side.
- Tie the two tails of each cord together with an overhand knot about 2.5 in (6.4 cm) from the bag. Then tie a small knot at each cord end so it doesn’t unravel.
- Sew one end of the hanging loop to the inside of Rnd 19 at the center front. Sew the other end at the center back. When you pull the bag shut, the loop stands straight up from the middle of the ruffle.
Final Blocking
- Wet the bag in cool water, then gently squeeze it out in a towel. Don’t wring it.
- Stuff the bag with a rolled washcloth or a small plastic bag of rice so the body fills out into its oval shape.
- Pull the mesh lightly up and down so the diamonds open evenly.
- Leave the cords untied. Spread the ruffle out flat and pinch each shell into shape.
- Let it dry completely. Then take out the filler, add candies, and pull the cords tight.
Final Quality-Control Checklist
- The base lies flat and the BLO ridge goes evenly around the bottom.
- The stitch count is 36 at Rnds 4, 9, 16, 17 and 19.
- Every mesh round has exactly 12 loops, and the diamonds line up vertically.
- The eyelet round has 18 even openings.
- The ruffle has 18 shells, 9 on each side.
- The bag measures 3.6 in (9.1 cm) wide x 4.75 in (12.1 cm) tall laid flat.
- The cords come out at opposite ends, and all knots are secure.
- The hanging loop is centered and firmly sewn.
Troubleshooting
Base cups or ruffles: Your increases are drifting. Recount Rnds 2–4 against the brackets, and keep the increases at the two narrow ends.
Mesh leans in a spiral: You’re starting rounds in different places. Always sl st to the center of the first loop before you start a new round.
Mesh looks saggy: Your chains are too loose. Keep the ch-5 loops snug, or use ch 4 with the same counts for a tighter net.
Rnd 16 puckers: Your sc are too tight over the spaces. Work them a little looser. The count should still be 36.
Ruffle is flat: You missed the Rnd 20 increase. You need 72 dc before you work the shells.
Bag won’t close: Your cords are too thick or too short. Make them with a smaller hook, or add 5 ch.
Care
Hand wash in cool water and lay flat to dry. Take out any candies first, and store the bags flat between holiday seasons.
Final Notes
Here’s how the measurements build on each other. A 36-stitch oval base of about 3 in x 1.5 in (7.6 x 3.8 cm) turns up into a tube 7.2 in (18.3 cm) around and 3.6 in (9.1 cm) wide laid flat. Twelve mesh loops hold that same width for six rounds. Conversion rounds bring the count back to exactly 36, the eyelet round adds 18 openings for the cords, and the bag reaches 4 in (10.2 cm) tall. Doubling to 72 dc makes room for 18 shells, which adds 0.75 in (1.9 cm) and brings the finished height to 4.75 in (12.1 cm). If your bag matches each checkpoint, it will finish at the right size. Fill it, pull the cords tight, and hang it on the tree.
Happy crocheting!