

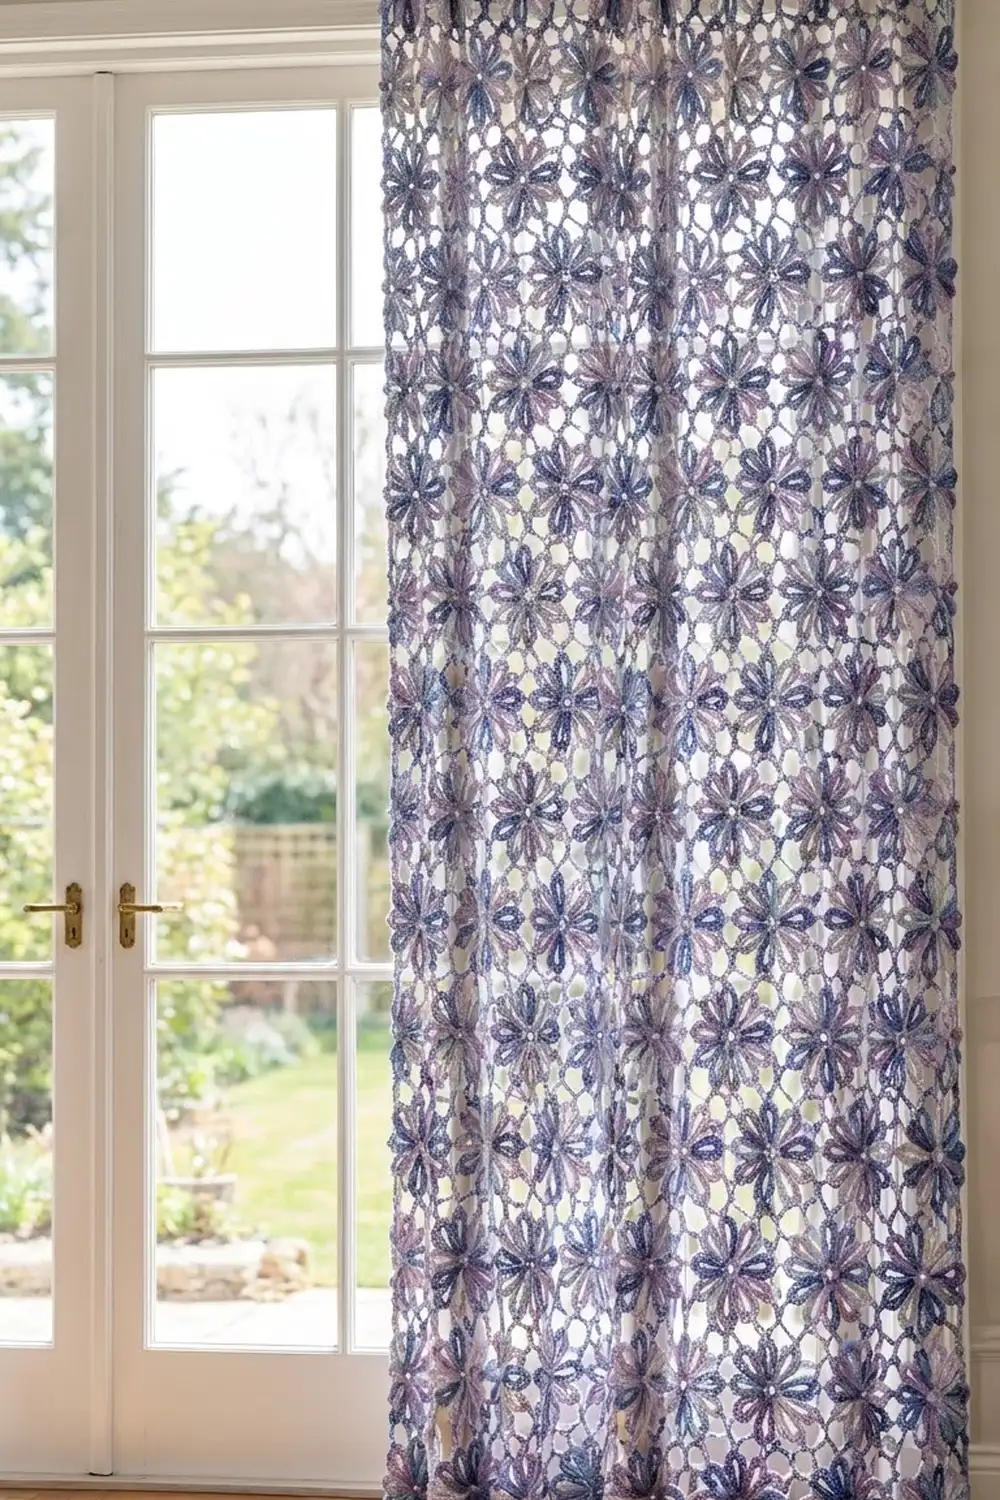
This curtain panel is a field of open ten-petal flowers. Each petal is a chain loop outlined in single crochet, so light passes through the middle of every petal as well as through the mesh between the flowers. The panel lets in plenty of light while still giving a room some softness and privacy.
The color comes from two yarns. A solid lilac forms each flower’s center ring. A variegated yarn in denim, navy, periwinkle, lavender and silver forms the petals, the mesh and the border. Because the variegated yarn changes color as you work, no two flowers look exactly alike.
The pattern uses US crochet terms. One finished panel measures 44 × 83 in (111.8 × 210.8 cm) after the border is added. Make two panels for a pair.
Each flower is worked in the round, starting with a center ring followed by petal loops and a covering round. The last round adds a ring of chain arches, and you join each flower to its neighbors through those arches as you go. When all 72 flowers are joined, a three-round border straightens the edges.
Finished Size and Construction
- Finished size (one panel): 44 × 83 in (111.8 × 210.8 cm)
- Skill level: Intermediate
- Terminology: US
- Yarn weight: Worsted (#4)
- Hook: H-8 (5.0 mm)
- Number of pieces: 72 flower motifs per panel (144 for a pair)
- Layout: 6 motifs across × 12 motifs down
- Motif size: 6 in (15.2 cm) tip to tip after Rnd 3, and 7 in (17.8 cm) arch to arch after Rnd 4
- Motif spacing: 7 in (17.8 cm) center to center across, 6.75 in (17.1 cm) center to center down
- Size before border: 42 × 81 in (106.7 × 205.7 cm)
- Border depth: 1 in (2.5 cm) on each side
Materials
Use a smooth worsted-weight cotton or cotton blend with about 180 m per 100 g (197 yd per 3.5 oz). Cotton keeps the petals crisp and drapes well in a window. Acrylic also works, but it may need firmer blocking.
Per panel:
– Color A, Lilac (solid): 60 g, 108 m (118 yd)
– Color B, Variegated Denim/Lavender/Silver: 500 g, 900 m (984 yd)
For a pair, double these amounts. All quantities include a margin of about 15% for gauge differences and for swatching.
Tools:
– H-8 (5.0 mm) crochet hook
– Tapestry needle
– Stitch markers
– Rust-proof pins and a large blocking surface (foam mats or a carpeted floor with a sheet over it)
– Spray bottle
– Measuring tape
– 10–12 clip curtain rings for hanging
Abbreviations (US Terms)
- ch: chain
- sl st: slip stitch
- sc: single crochet
- tr: treble crochet (yarn over twice)
- sp: space
- st(s): stitch(es)
- Rnd: round
- RS: right side
Special technique: Arch Join. Ch 4, remove the loop from your hook, insert the hook from front to back through the center (5th) ch of the neighbor’s ch-9 arch, pick up the dropped loop and pull it through, then ch 4. This replaces one ch-9 arch: 4 ch + 1 sl st + 4 ch fill the same 9 positions, so a joined arch is exactly as long as a free one.
Gauge and Checkpoints
Make one complete motif (Rnds 1–4) before starting the panel and check it against these measurements:
- After Rnd 1: the ring measures 1.25 in (3.2 cm) across.
- After Rnd 3: the flower measures 6 in (15.2 cm) from one petal tip to the opposite tip.
- After Rnd 4: the motif measures 7 in (17.8 cm) from the center of Arch 1 to the center of Arch 6, lightly stretched.
- Border gauge: 15 sc = 4 in (10.2 cm).
If your motif is too big, go down to a G-6 (4.0 mm) hook. If it is too small, go up to an I-9 (5.5 mm) hook. A difference of only 0.25 in (0.6 cm) per motif adds up to 1.5 in (3.8 cm) across the panel and 3 in (7.6 cm) down its length, so it is worth getting the test motif right.
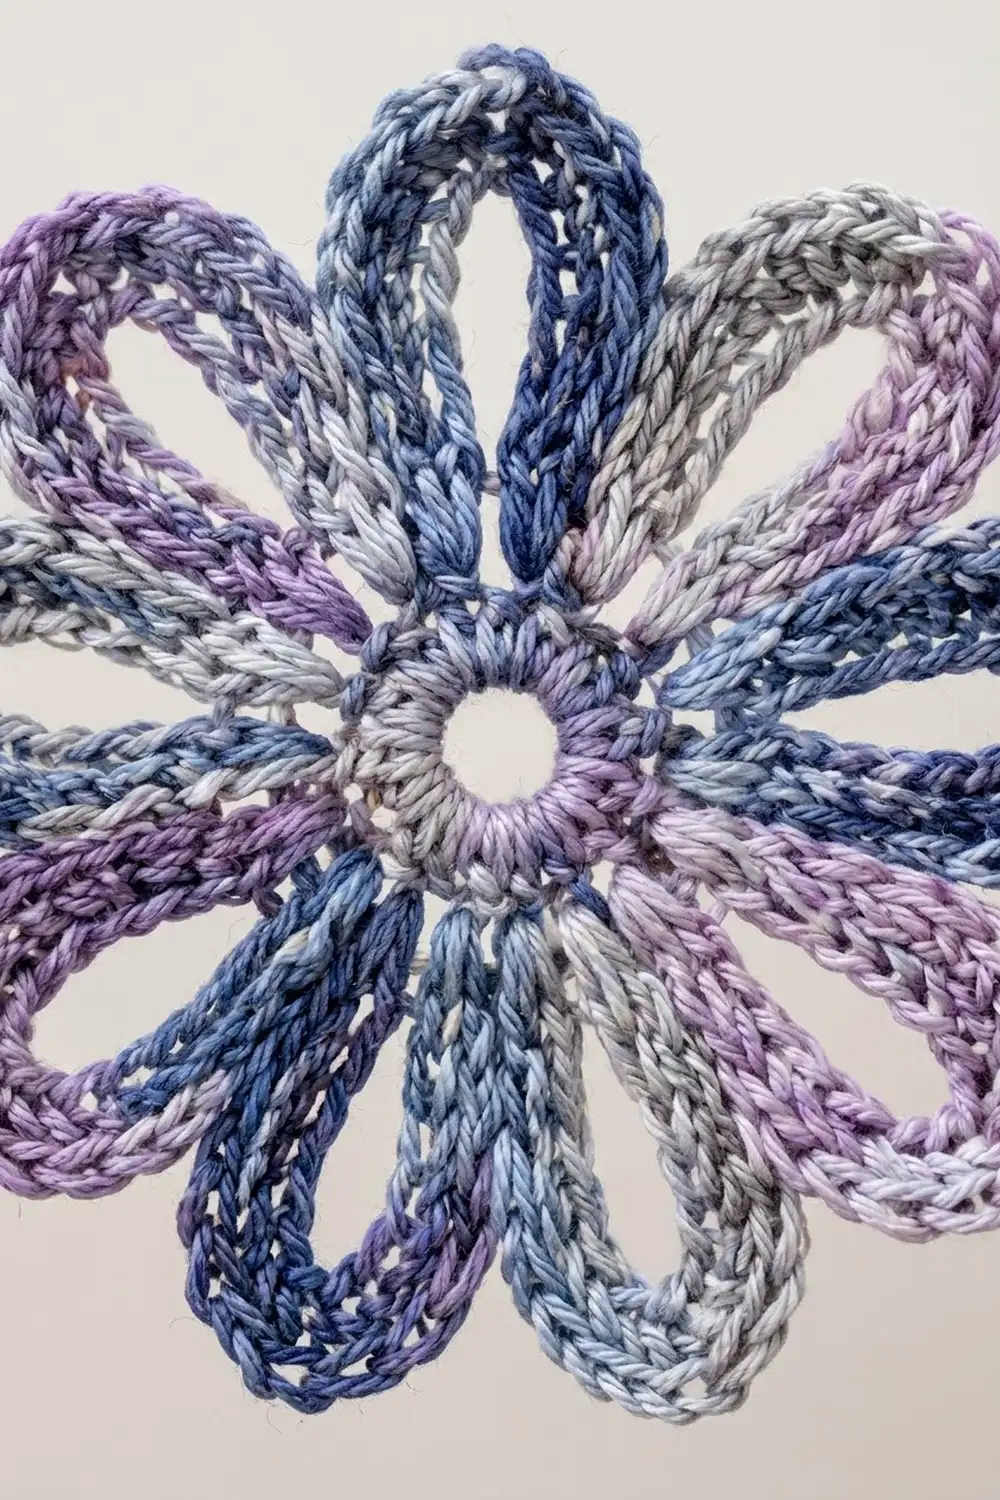
Flower Motif
The petals have to lie flat, so work Rnd 3 snugly but not tight.
Rnd 1 (Color A): Ch 8 and sl st into the first ch to form a ring. Ch 1, then work 20 sc into the ring. Join with a sl st in the first sc. (20 sc) Fasten off Color A.
Rnd 2 (Color B), petal loops: Join Color B with a sl st in any sc. Ch 1, then sc in next sc, ch 13, sc in next sc; repeat from * 9 more times. Join with a sl st in the first sc. (20 sc, 10 ch-13 loops)
Each loop is anchored on two neighboring sc, which leaves a narrow base at the center ring.
Rnd 3 (Color B), covering round: Work [8 sc, ch 3, 8 sc] into the next ch-13 loop, then sl st in each of the next 2 sc of Rnd 2; repeat from * 9 more times. The last sl st lands on the first sc of Rnd 2. (160 sc, 10 ch-3 tips, 20 sl st)
Working the sc into the loop rather than into the chains packs them along the outer edge. That gives each petal its thick outline and open middle, and the ch-3 forms the pointed tip.
Checkpoint: 6 in (15.2 cm) tip to tip.
Rnd 4 (Color B), mesh arches: Sl st in each of the next 8 sc up the side of the first petal, then sl st into its ch-3 tip sp. Ch 1 and sc in the same tip sp. Ch 9, sc in the next tip sp; repeat from * 8 more times. Ch 9 and join with a sl st in the first sc. (10 sc, 10 ch-9 arches = 100 sts)
Arch numbering: The arch you make right after the first sc is Arch 1. The others follow in working order through Arch 10. Turn the motif RS up with Arch 1 pointing to the right. Then:
– Arch 1 points right and Arch 6 points left.
– Arches 3 and 4 point up, and Arches 8 and 9 point down.
– Arches 2, 5, 7 and 10 point diagonally. They stay free, and they form the open diamond-shaped gaps between groups of four flowers.
Make All Pieces
Each panel needs 72 motifs. Every motif uses Color A for Rnd 1 and Color B for Rnds 2–4. Work Rnds 1–3 for all 72 flowers ahead of time if you like, and add Rnd 4 as you join.
Layout grid (one panel, 6 × 12):
Row 1:   M1  M2  M3  M4  M5  M6
Row 2:   M7  M8  M9  M10 M11 M12
Row 3:   M13 ... (continue)    M18
...
Row 12:  M67 M68 M69 M70 M71 M72
Row 1 is the top of the curtain.
Joining
Use the join-as-you-go method in Rnd 4.
M1: Work Rnd 4 in full with no joins.
Rest of Row 1: Lay the new motif to the right of the finished one. In Rnd 4, work Arch 6 as an Arch Join into the left neighbor’s Arch 1. All other arches are a plain ch 9.
Rows 2–12:
– Work Arch 3 as an Arch Join into Arch 9 of the motif directly above.
– Work Arch 4 as an Arch Join into Arch 8 of the motif directly above.
– For every motif except the first in the row, also work Arch 6 as an Arch Join into Arch 1 of the left neighbor.
Stitch logic: Every join replaces a ch-9 with ch 4, sl st, ch 4, so each motif still has 100 sts in Rnd 4. Joins add no stitches and remove none.
Tension: Keep the chains at the same tension as on the free arches. If you pull the chains tight while joining, the mesh puckers and the panel comes out shorter.
Size checkpoints:
– After Row 1: the row measures 42 in (106.7 cm) from the left edge of Arch 6 on M1 to the right edge of Arch 1 on M6.
– After Row 5: the distance from the center of a Row 1 flower to the center of the Row 5 flower below it is 4 × 6.75 = 27 in (68.6 cm).
– After all 12 rows: the panel measures 42 × 81 in (106.7 × 205.7 cm).
Border
Border gauge: 15 sc = 4 in (10.2 cm), or 3.75 sts per inch.
Every border st is worked into the center (5th) ch of a free arch. On the edge motifs, the free arches are:
– Top row: Arches 2, 3, 4 and 5
– Left column: Arches 5, 6 and 7
– Bottom row: Arches 7, 8, 9 and 10
– Right column: Arches 10, 1 and 2
Each corner motif shares one diagonal arch between two sides. These corner arches are Arch 2 of M6, Arch 5 of M1, Arch 7 of M67 and Arch 10 of M72.
Rnd 1 (Color B), straightening round:
Top edge: Join yarn in the center of Arch 2 of M6. Ch 4 (counts as tr).
– Finish M6: ch 6, sc in Arch 3, ch 6, sc in Arch 4, ch 6, tr in Arch 5.
– For each of the next 5 motifs: ch 5, then [tr in Arch 2, ch 6, sc in Arch 3, ch 6, sc in Arch 4, ch 6, tr in Arch 5].
– Top total: each motif section has 4 sts + 18 ch = 22, plus 5 bridges of ch 5 between motifs. 6 × 22 + 5 × 5 = 157 sts.
Top-left corner: ch 3, tr in the same Arch 5 of M1.
Left edge: working downward through each motif in the left column:
– Work [tr in Arch 5, ch 6, sc in Arch 6, ch 6, tr in Arch 7], with ch 11 between motifs. For M1, the tr in Arch 5 is the one you just worked at the corner.
– Left total: each motif section has 15 sts, plus 11 bridges of ch 11. 12 × 15 + 11 × 11 = 301 sts.
Bottom-left corner: ch 3, tr in the same Arch 7 of M67.
Bottom edge: mirror the top edge, working [tr in Arch 7, ch 6, sc in Arch 8, ch 6, sc in Arch 9, ch 6, tr in Arch 10] for each motif with ch 5 between motifs. Total: 157 sts.
Bottom-right corner: ch 3, tr in the same Arch 10 of M72.
Right edge: working upward, repeat [tr in Arch 10, ch 6, sc in Arch 1, ch 6, tr in Arch 2] for each motif with ch 11 between motifs. Total: 301 sts. The last tr goes into Arch 2 of M6.
Top-right corner: ch 3 and join with a sl st to the top of the starting ch 4.
Rnd 1 total: 2 × 157 + 2 × 301 = 916 sts, plus 4 corner ch-3 sps.
Rnd 2 (conversion round): Ch 1. Work 1 sc in every tr, sc and ch along each side: 157 sc along the top and bottom, and 301 sc along each side. In each corner ch-3 sp, work 1 sc in the first ch, 3 sc in the center ch and 1 sc in the third ch, for 5 sc per corner. Join.
– Total: 916 (1 sc per existing st) + 20 (corner sc) = 936 sc.
– Between corner center sts: 161 sc along the top and bottom, and 305 sc along each side.
Rnd 3 (trim round): Ch 1. Sc in each sc, working 3 sc in each corner center st. Join and fasten off.
– Total: 936 (1 sc per existing st) + 8 (2 extra sc at each corner) = 944 sc.
– Between corner center sts: 163 sc along the top and bottom, and 307 sc along each side.
Why the math works: Before the border, the top edge is 42 in (106.7 cm) and holds 157 sts. That is 3.74 sts per inch. Each side is 81 in (205.7 cm) and holds 301 sts, or 3.72 sts per inch. Both rates match the border gauge of 3.75 sts per inch, so the edges lie flat without ruffling or pulling in. Rnds 2 and 3 add depth, and the extra corner stitches let the corners turn cleanly.
Final Blocking
- Weave in all ends along petal outlines or mesh chains, where they won’t show against the light.
- Lay the panel RS up on the blocking surface.
- Pin the four corners first, so the panel measures 44 × 83 in (111.8 × 210.8 cm).
- Pin the border straight between the corners every 4 in (10.2 cm).
- Pin the center of each petal tip and each joined arch so the motifs sit 7 in (17.8 cm) apart across and 6.75 in (17.1 cm) apart down.
- Mist the panel until it is evenly damp, but not soaked.
- Leave it pinned until completely dry, which usually takes 24 hours.
- Unpin the panel and attach the clip rings evenly along the top border, about every 4–5 in (10.2–12.7 cm).
Final Quality-Control Checklist
- [ ] All 72 motifs have 10 petals, with 16 sc per petal.
- [ ] Every joined arch is ch 4, sl st, ch 4, and no arch is skipped.
- [ ] The diagonal arches (2, 5, 7 and 10) are free and open.
- [ ] The panel measures 42 × 81 in (106.7 × 205.7 cm) before the border.
- [ ] Border Rnd 1 has 157 / 301 / 157 / 301 sts.
- [ ] Border Rnd 3 totals 944 sc.
- [ ] All ends are secure.
- [ ] The finished panel measures 44 × 83 in (111.8 × 210.8 cm).
Troubleshooting
- Petals cup or ruffle: Your Rnd 3 tension is uneven. Keep it relaxed. If the petals still ruffle, try 7 sc on each side of the tip.
- The center hole closes up: Your starting chain is too tight. Work the ch 8 with a hook one size larger.
- The mesh puckers at the joins: You are pulling the chains tight during the Arch Join. Loosen your tension there.
- The panel is too short: Your Rnd 4 chains are tight. Go up one hook size for Rnd 4 only.
- The border waves: Your border gauge is too loose. Use a G-6 (4.0 mm) hook for Rnds 2–3.
- The border pulls in: Your border gauge is too tight. Go up one hook size.
Care
Hand wash in cool water with mild soap, press out the water in a towel, and dry the panel flat. Re-pin it while damp to restore the petal shapes.
Final Notes
Every measurement in this pattern builds on the one before it:
– 20 sc make a 1.25 in (3.2 cm) ring.
– The ring grows to a 6 in (15.2 cm) flower and then a 7 in (17.8 cm) motif.
– 6 × 12 motifs make a 42 × 81 in (106.7 × 205.7 cm) mesh.
– 157 and 301 border sts match the 3.75-per-inch border gauge.
– The finished panel measures 44 × 83 in (111.8 × 210.8 cm).
If you check each stage as you reach it, the panel will hang straight.
Happy crocheting!