

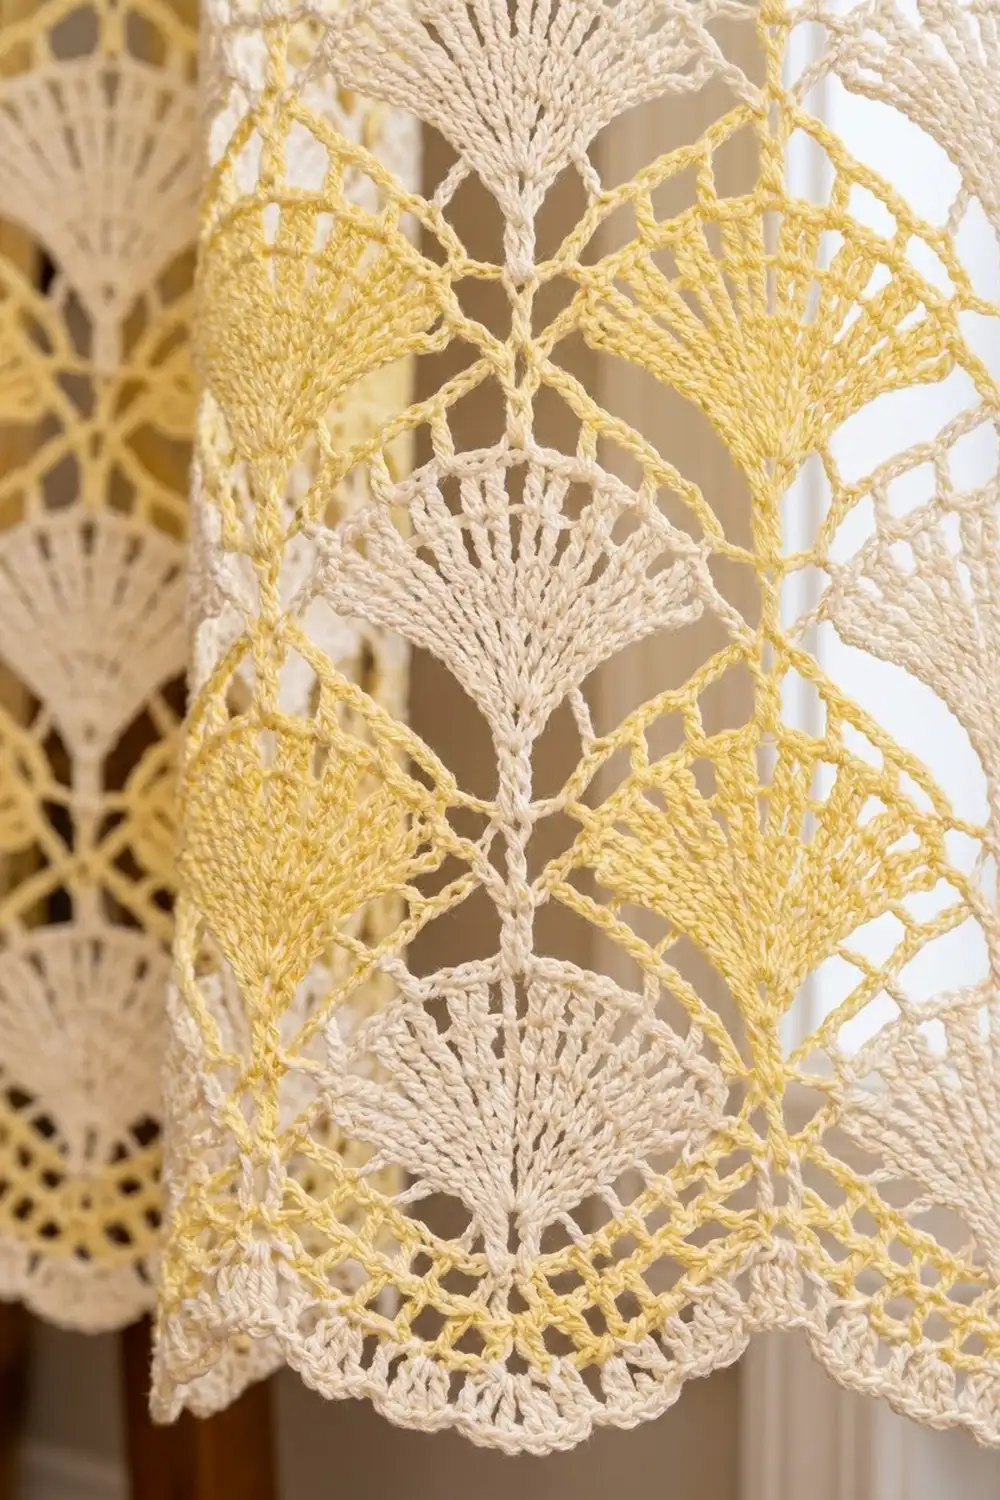
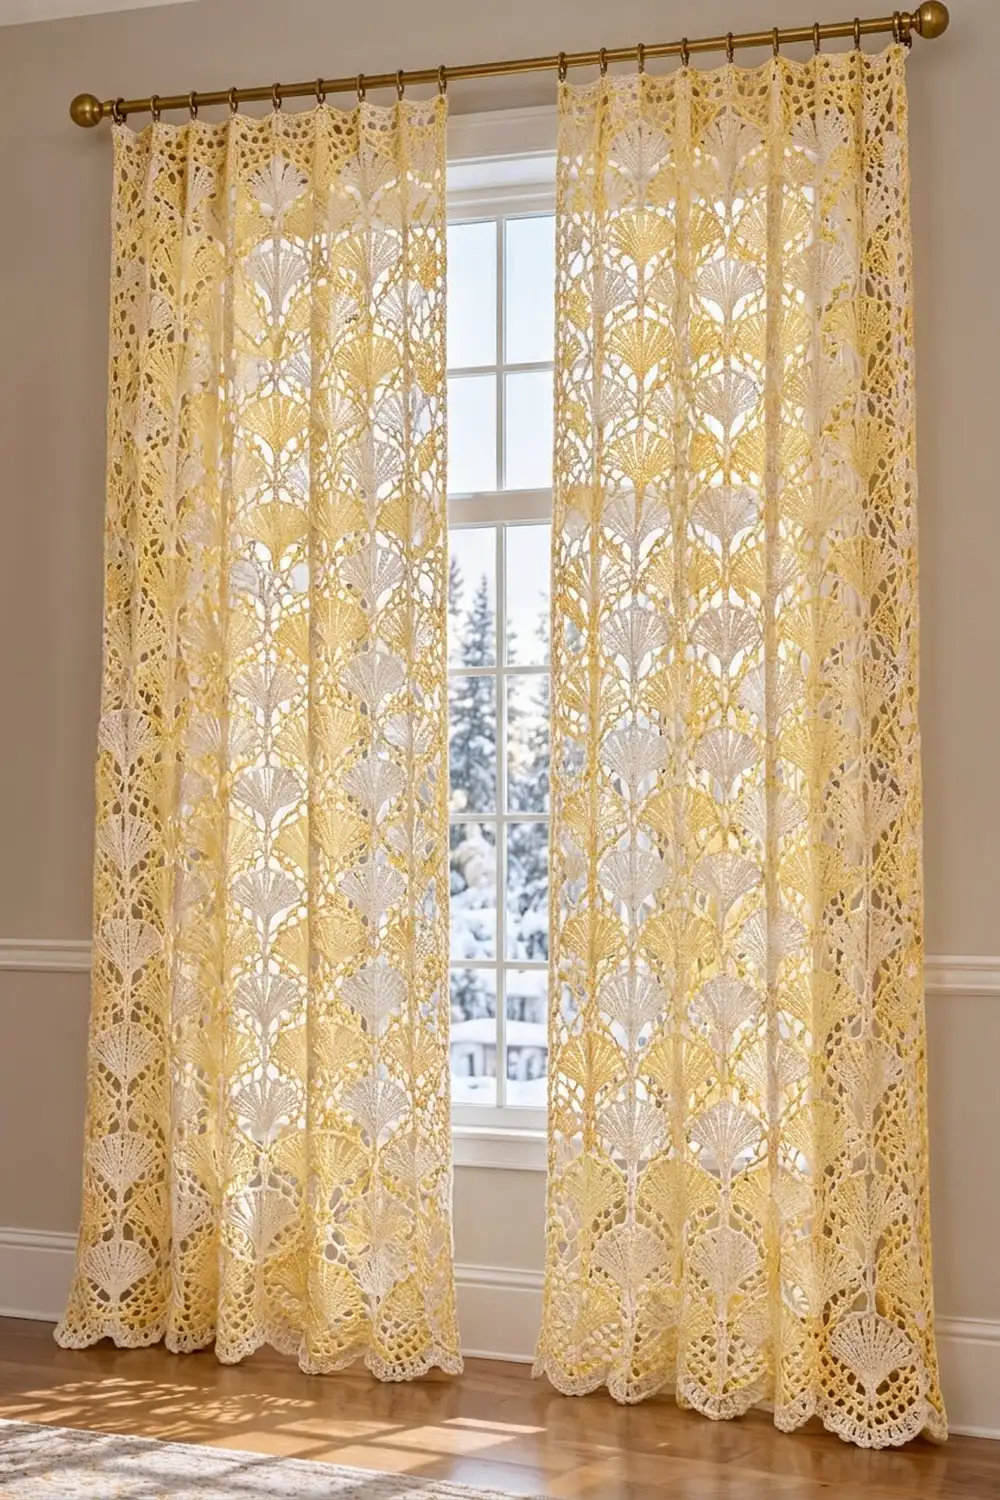
These curtain panels are filled with columns of ginkgo leaves that let soft light through. Each leaf is a half-circle fan with radiating ribs, a notched top edge and a slender raised stem that grows out of the notch of the leaf below. The leaves sit in an open mesh, so the panels look light even though they cover a full window.
The palette is pale butter yellow and cream. The leaves alternate color up each column and across the panel, which makes a calm checkerboard. Cream frames the panel and finishes the scalloped hem. The pattern uses US crochet terms throughout.
Each finished panel measures 42.8 in × 81 in (108.7 cm × 205.7 cm), and the pattern makes a pair. Each panel is built from 7 long strips worked in rows. Every strip is 16 ginkgo repeats tall. The strips are joined with a flat slip-stitch seam, and then a two-round border adds a straight top and sides and a shell-scalloped bottom edge.
Each strip has straight mesh edges, so the joining and border math stays exact and the panel hangs square.
Finished Size and Construction
- Finished size (each panel): 42.8 in × 81 in (108.7 cm × 205.7 cm)
- Skill level: Intermediate
- Terminology: US
- Yarn weight: #2 fine (sport) mercerized cotton
- Hook: 3.5 mm (E-4)
- Number of pieces: 14 strips (7 per panel), joined into 2 panels
- Layout: 7 strips side by side; each strip is 16 ginkgo repeats tall
- Strip size: 6 in × 80 in (15.2 cm × 203.2 cm)
- Panel size before border: 42 in × 80 in (106.7 cm × 203.2 cm)
- Border depth: 0.4 in (1.0 cm) at top and sides; 0.6 in (1.5 cm) at the scalloped bottom
Materials
Choose a smooth mercerized cotton of about 155 m per 50 g. Mercerized cotton shows the leaf ribs crisply and resists sagging when it hangs. Avoid fuzzy blends, which blur the mesh.
- Color A, Pale Yellow: 400 g, approx. 1,240 m
- Color B, Cream: 450 g, approx. 1,395 m
These amounts are for both panels. They include a margin of about 15–20% for gauge swatches, weaving in ends and small differences in tension.
Tools:
– 3.5 mm (E-4) crochet hook
– Tapestry needle
– Locking stitch markers
– Tape measure
– Rust-proof pins, plus blocking mats or a clean sheet on a large floor area
– Spray bottle
– 24 curtain clip rings (12 per panel) and a curtain rod
Abbreviations (US Terms)
- ch: chain
- sl st: slip stitch
- sc: single crochet
- dc: double crochet
- FPdc: front post double crochet
- BPdc: back post double crochet
- sk: skip
- sp(s): space(s)
- st(s): stitch(es)
- RS / WS: right side / wrong side
Special stitches:
– FPdc: Yarn over, insert the hook from front to back to front around the post of the stitch below, then complete a dc.
– BPdc: Yarn over, insert the hook from back to front to back around the post, then complete a dc.
– Stem stitch: The center (7th) dc of a mesh row. Working it as FPdc on RS rows and BPdc on WS rows makes a raised stem on the RS.
– Color change: Work the last stitch of the old row until 2 loops remain, then yarn over with the new color and pull through.
Gauge and Checkpoints
Gauge (blocked): 37 sts (one strip-wide mesh row) = 6 in (15.2 cm). 10 rows (one ginkgo repeat) = 5 in (12.7 cm). One row is about 0.5 in (1.3 cm).
Work one full strip repeat (Rows 1–10) as your test piece, then wet block it and measure it.
Checkpoints:
– After Row 1: 6 in (15.2 cm) wide.
– After Row 10: 5 in (12.7 cm) tall. The fan should be about 4.5 in (11.4 cm) wide and about 2.5 in (6.4 cm) tall, not counting the stem.
– After 4 repeats: 20 in (50.8 cm).
– After 8 repeats: 40 in (101.6 cm).
– Finished strip: 80 in (203.2 cm).
If your piece is too big, go down to a 3.25 mm hook. If it is too small, go up to a 3.75 mm hook. Keep the width within 0.25 in (0.6 cm) of 6 in. Across 7 strips, a small error grows to nearly 2 in (5.1 cm).
Strip Pattern
Each strip is 13 dc posts with 12 ch-2 sps between them, for 37 sts per mesh row. The 7th dc is always the stem. RS rows are odd and WS rows are even. Count each turning ch-5 as 1 dc + ch 2, and work the last dc of every row into the 3rd ch of the turning chain.
Repeat 1, Rows 1–3 (stem rows)
Row 1 (RS, foundation): Ch 41. Dc in the 8th ch from the hook, ch 2, sk 2 ch, dc in next ch 11 times. Turn. [13 dc, 12 ch-2 sps; 37 sts]
Row 2 (WS): Ch 5, dc in next dc, ch 2 5 times, BPdc around the center dc, ch 2, dc in next dc 5 times, ch 2, dc in 3rd ch of turning ch. Turn. [37 sts]
Row 3 (RS): Repeat Row 2, but work FPdc around the center stitch. [37 sts]
In repeats 2–16, Row 1 is worked like Row 3: a mesh row with FPdc at the center. It is not a chain foundation.
Rows 4–9 (the ginkgo fan)
Row 4 (WS, fan base): Ch 5, dc in next dc, ch 2 4 times, dc in next dc. Ch 2, sk next ch-2 sp, 5 dc in the stem st, ch 2, sk next ch-2 sp. Dc in next dc, ch 2, dc in next dc 4 times, ch 2, dc in 3rd ch. Turn. [12 mesh dc + 5 fan dc + 12 ch-2 sps; 41 sts]
Row 5 (RS): Ch 5, dc in next dc, ch 2 3 times, dc in next dc. Ch 3, sk (ch-2 sp, dc, ch-2 sp), 2 dc in each of the 5 fan dc, ch 3, sk (ch-2 sp, dc, ch-2 sp). Dc in next dc, ch 2, dc in next dc 3 times, ch 2, dc in 3rd ch. Turn. [10 mesh dc, 8 ch-2 sps, 2 ch-3 sps, 10 fan dc; 42 sts]
Row 6 (WS): Ch 5, dc in next dc, ch 2 2 times, dc in next dc. Ch 3, sk (ch-2 sp, dc, ch-3 sp), dc in first fan dc, ch 1, dc in next fan dc 9 times, ch 3, sk (ch-3 sp, dc, ch-2 sp). Dc in next dc, ch 2, dc in next dc twice, ch 2, dc in 3rd ch. Turn. [8 mesh dc, 6 ch-2 sps, 2 ch-3 sps, 10 fan dc, 9 ch-1 sps; 45 sts]
Row 7 (RS, ribs open): Ch 5, dc in next dc, ch 2, dc in next dc. Ch 3, sk (ch-2 sp, dc, ch-3 sp), dc in first fan dc, ch 2, dc in next fan dc 9 times, ch 3, sk (ch-3 sp, dc, ch-2 sp). Dc in next dc, ch 2, dc in next dc, ch 2, dc in 3rd ch. Turn. [6 mesh dc, 4 ch-2 mesh sps, 2 ch-3 sps, 10 fan dc, 9 ch-2 fan sps; 48 sts]
Row 8 (WS, fan fills): Ch 5, dc in next dc. Ch 3, sk (ch-2 sp, dc, ch-3 sp), dc in first fan dc, 2 dc in next ch-2 sp, dc in next dc 9 times, ch 3, sk (ch-3 sp, dc, ch-2 sp). Dc in next dc, ch 2, dc in 3rd ch. Turn. [4 mesh dc, 2 ch-2 sps, 2 ch-3 sps, 28 fan dc; 42 sts]
Row 9 (RS, scalloped leaf edge with notch): Ch 5, dc in next dc, ch 3, sk ch-3 sp. Sc in fan dc 1, ch 3, sk 1 dc, sc in next dc 6 times; you are now at fan dc 13. Ch 2. Push the hook down between fan dc 14 and 15 and sl st into the center ch-2 sp of Row 7. This pulls in the ginkgo notch. Ch 2, sc in fan dc 16, ch 3, sk 1 dc, sc in next dc 6 times, ending in fan dc 28. Ch 3, sk ch-3 sp, dc in next dc, ch 2, dc in 3rd ch. Turn. [4 mesh dc, 14 sc, 12 ch-3 loops, notch (ch 2, sl st, ch 2); 69 sts]
Row 10 (closing mesh, new stem)
Change color at the end of Row 9 (see Color Plan below).
Row 10 (WS): Ch 5, dc in next dc, ch 2, dc in ch-3 sp. Ch 2, dc in the next loop in the 2nd, 4th and 6th loops of the first fan half. Ch 2, dc in the notch sl st; this is the new stem st. Then ch 2, dc in the 1st, 3rd and 5th loops of the second half, counting from the notch. Ch 2, dc in ch-3 sp, ch 2, dc in next dc, ch 2, dc in 3rd ch. Turn. [13 dc, 12 ch-2 sps; 37 sts]
The row is back to 37 sts, and the 7th dc sits in the notch. In the next repeat, the Row 1 FPdc continues the stem straight up out of the leaf below.
Strip total: Work Rows 1–10 once, then work Rows 1–10 15 more times, with Row 1 as a mesh row each time. That is 16 repeats and 160 rows. Fasten off and weave in ends along the dc posts.
Color Plan
Each color block is Rows 1–9 of a repeat. Switch colors at the end of each Row 9, so that Row 10 and the following Rows 1–9 match. This keeps every stem the same color as the leaf it carries.
- Odd strips (1, 3, 5, 7): Start with A.
- Even strips (2, 4, 6): Start with B.
- Final Row 10 of every strip: Work it in B so the top edge is cream all the way across.
Make All Pieces
For both panels, make 14 strips:
– 8 strips starting with A (4 per panel)
– 6 strips starting with B (3 per panel)
Each strip has 8 A leaves and 8 B leaves. Each panel has 56 A leaves and 56 B leaves, so the pair has 112 of each.
Panel layout (repeat numbers run up the curtain):
Repeat     S1  S2  S3  S4  S5  S6  S7
16 (top)   B   A   B   A   B   A   B
15         A   B   A   B   A   B   A
 ...       (alternate every repeat)
 2         B   A   B   A   B   A   B
 1 (hem)   A   B   A   B   A   B   A
Block every strip to 6 in × 80 in (15.2 cm × 203.2 cm) before joining.
Joining
Use B. Hold Strip 1 and Strip 2 RS together, with the Row 1 edges matched at the bottom. Join with a sl st through both edge posts at the bottom corner.
Stitch-to-stitch logic: Each row ends in a dc post on both strips, so the row ends match one to one: row 1 to row 1, and so on up to row 160. Work 2 sl st around each matched pair of row-end posts, for 320 sl st per seam. Do not add any chains between them.
Add Strip 3 to Strip 2, and continue in order until all 7 strips are joined. That makes 6 seams per panel.
Tension: Make the sl sts no tighter than your mesh dc. Every 20 rows, stretch the seam lengthwise. It should stretch as much as the strip. If it pulls, rip back and go up a hook size for joining.
Size checkpoint: The joined panel measures 42 in × 80 in (106.7 cm × 203.2 cm). The seams sit inside the edge dc posts and add no stitches or width.
Border
Border gauge: About 6 sc per inch (2.5 cm) in both directions, which matches the strip gauge.
Rnd 1 (RS, B): Join B in the top right corner dc.
- Top: Work 3 sc in the corner st. Across Row 10 of each strip, work 1 sc in each dc and 2 sc in each ch-2 sp. That is 37 sts per strip, or 7 × 37 = 259 sts. Work 3 sc in the top left corner dc instead of 1.
- Long side: Work 3 sc in each row end, 160 × 3 = 480 sc.
- Bottom: Work 3 sc in the corner. Along the foundation chain, work 1 sc at the base of each dc and 2 sc in each ch-2 sp, for 259 sts with 3 sc in the far corner.
- Second long side: Work 480 sc, then sl st to the first sc.
Rnd 1 counts per side (each includes its 2 corner middle sc): top 261, bottom 261, each long side 484. The round total is 1,486 sts.
Rnd 2 (RS): Ch 1.
– Top: Sc in each sc, with 3 sc in the middle sc of each top corner.
– Long sides: Sc in each sc down to the bottom corner middle sc.
– Bottom scallops: Sc in the bottom corner middle sc. Sk 4 sc, 9 dc in next sc, sk 4 sc, sc in next sc 26 times. The last sc lands in the opposite corner middle sc.
– Finish: Sc up the remaining long side and sl st to join.
Rnd 2 counts per side: top 263; each long side 485, counting the top corner middle sc and the bottom corner sc; bottom 27 sc and 26 nine-dc shells. Fasten off.
Why the math works: The seams add nothing, so the top and bottom each start with 7 × 37 = 259 sts. The two corner extras make 261. Since 261 = 26 × 10 + 1, the 10-st scallop repeat begins and ends exactly on the corners. Along the long sides, 480 sc over 80 in (203.2 cm) is 6 per inch, which matches the strip gauge of about 6.2 sts per inch, so the edges stay flat.
Final Blocking
- Soak the panel in cool water for 15 minutes. Press out the water; do not wring.
- Roll it in towels to remove more moisture.
- Lay it RS up on mats or on a clean sheet on the floor.
- Pin the corners to 42.8 in × 81 in (108.7 cm × 205.7 cm).
- Pin along each seam line every 10 in (25.4 cm) to keep the strip columns straight.
- Pin each scallop at its center dc to open the shells.
- Ease each leaf into a smooth half circle and center its notch.
- Leave it to dry completely before removing the pins.
Final Quality-Control Checklist
- Each strip has 16 repeats and 160 rows, and the colors alternate correctly.
- Every stem is raised on the RS and lines up with the notch below it.
- Every leaf has 12 edge loops and a centered notch.
- The seams are flat, with 320 sl st each and no puckering.
- Border Rnd 1 has 261 / 484 / 261 / 484 sts per side.
- There are 26 scallops along the bottom, ending exactly at both corners.
- Each panel measures 42.8 in × 81 in (108.7 cm × 205.7 cm).
- All ends are woven into dc posts, not left in open chain spaces.
Troubleshooting
- The strip narrows at the leaf rows: Your ch-3 skips are too tight. Loosen them, or work them as ch 4 and check the width again.
- The fan cups: Your Row 8 fill is tight. Go up half a hook size for Rows 8–9 only.
- The stem leans: You worked the post stitch around the wrong dc. Count to the 7th dc on every row.
- The notch isn’t centered: Recount the fan dc in Row 8. There must be 28.
- The scallops ruffle: Check that you skipped 4 sc on both sides of each shell.
- The sides are wavy: Rework Rnd 1 with exactly 3 sc per row end.
Care
Hand wash in cool water with a mild soap, then dry flat and re-pin the corners. Hang the panels away from strong, constant sunlight to protect the pale yellow.
Final Notes
Here is the measurement chain:
1. One mesh row of 37 sts is 6 in (15.2 cm) wide, and one 10-row repeat is 5 in (12.7 cm) tall.
2. Sixteen repeats make a 6 in × 80 in (15.2 cm × 203.2 cm) strip.
3. Seven strips joined with flat seams make a 42 in × 80 in (106.7 cm × 203.2 cm) panel.
4. The border adds 0.4 in (1.0 cm) at the top and sides and 0.6 in (1.5 cm) at the hem, for a finished panel of 42.8 in × 81 in (108.7 cm × 205.7 cm).
Measure at each stage, and the pair will hang straight and square. Clip 12 rings evenly across the top edge of each panel, about 3.9 in (9.9 cm) apart, and hang them.
Happy crocheting!