

These curtain panels are made from eight-petal flowers joined by an airy chain lattice. Each flower has an open cream center, a teardrop eyelet in every petal, and a fine picot edge. When the panels hang in a window, light comes through the eyelets and the diamond mesh, and the lace looks soft and warm.
The palette has three parts: a cream center, a variegated petal yarn in raspberry, rose, peach, blush, and mauve, and a light peach edging and mesh. The variegated yarn changes from flower to flower, so the finished panel has a natural, patchwork-garden look without any color planning.
This pattern uses US crochet terms. Each finished panel measures 37.5 in (95.3 cm) wide by 85.5 in (217.2 cm) long, and the pattern makes two panels.
Each panel is 84 motifs, 6 across and 14 down. The first motif is worked on its own. Every motif after that is joined as you go on its last round, the chain-loop frame. A two-round scalloped border finishes the edges.
Finished Size and Construction
- Finished panel size: 37.5 in x 85.5 in (95.3 cm x 217.2 cm)
- Skill level: Intermediate
- Terminology: US crochet terms
- Yarn weight: DK (#3), mercerized or matte cotton
- Hook: 4.0 mm (G-6)
- Number of pieces: 84 motifs per panel, 168 motifs for the pair
- Layout: 6 motifs wide x 14 motifs tall per panel
- Piece size: 6 in (15.2 cm) square including the lattice frame; the flower alone is 5 in (12.7 cm) across
- Size before border: 36 in x 84 in (91.4 cm x 213.4 cm)
- Border depth: 0.75 in (1.9 cm) on every side
Materials
Use a smooth DK cotton or cotton blend so the eyelets and picots stay crisp. Cotton also hangs well and doesn’t stretch much under its own weight. For Color B, pick a variegated yarn with short color runs so each petal shows several shades. The amounts below assume about 120 m per 50 g ball (2.4 m per gram).
Yarn (for two panels):
– Color A, cream (centers): 200 g / 480 m (100 g / 240 m per panel)
– Color B, variegated rose-peach-mauve (petals): 600 g / 1,440 m (300 g / 720 m per panel)
– Color C, light peach (edging, lattice, border): 1,100 g / 2,640 m (550 g / 1,320 m per panel)
These amounts include a margin of about 15–20% for swatching, joins, and dye-lot safety.
Tools:
– 4.0 mm (G-6) crochet hook
– Tapestry needle
– Rust-proof pins and blocking mats
– Spray bottle
– Measuring tape
– Stitch markers
– 26 curtain clip rings (13 per panel)
Abbreviations (US Terms)
- ch – chain
- sl st – slip stitch
- sc – single crochet
- hdc – half double crochet
- dc – double crochet
- tr – treble crochet
- sp(s) – space(s)
- sk – skip
- st(s) – stitch(es)
- rep – repeat
Special stitches:
– Standing sc: With the slip knot on your hook, insert the hook into the stitch, yarn over, pull up a loop, yarn over, and draw through both loops.
– Picot pair: (sc, ch 3, sc) in the same stitch. Its ch-3 loop is the “picot.”
– Shell: 5 dc in the same stitch.
Gauge and Checkpoints
Make one complete motif and block it before you start the rest. Every later measurement depends on this one piece.
Checkpoints for one motif:
– After Round 1: the cream ring measures 1.5 in (3.8 cm) across.
– After Round 3: the flower measures 4.5 in (11.4 cm) from petal tip to opposite petal tip.
– After Round 4: the flower measures 5 in (12.7 cm) across.
– After Round 6, blocked: the motif measures 6 in (15.2 cm) square.
Solid gauge reference: 18 sc x 20 rows = 4 in (10.2 cm).
If your motif is too big: go down to a 3.75 mm hook. If it’s still large, tighten the chain loops in Rounds 5 and 6.
If your motif is too small: go up to a 4.5 mm hook. Don’t add chains to the loops, because that would change the border math.
Every 6 in (15.2 cm) of difference matters across 14 rows, so get the motif right before you go on.
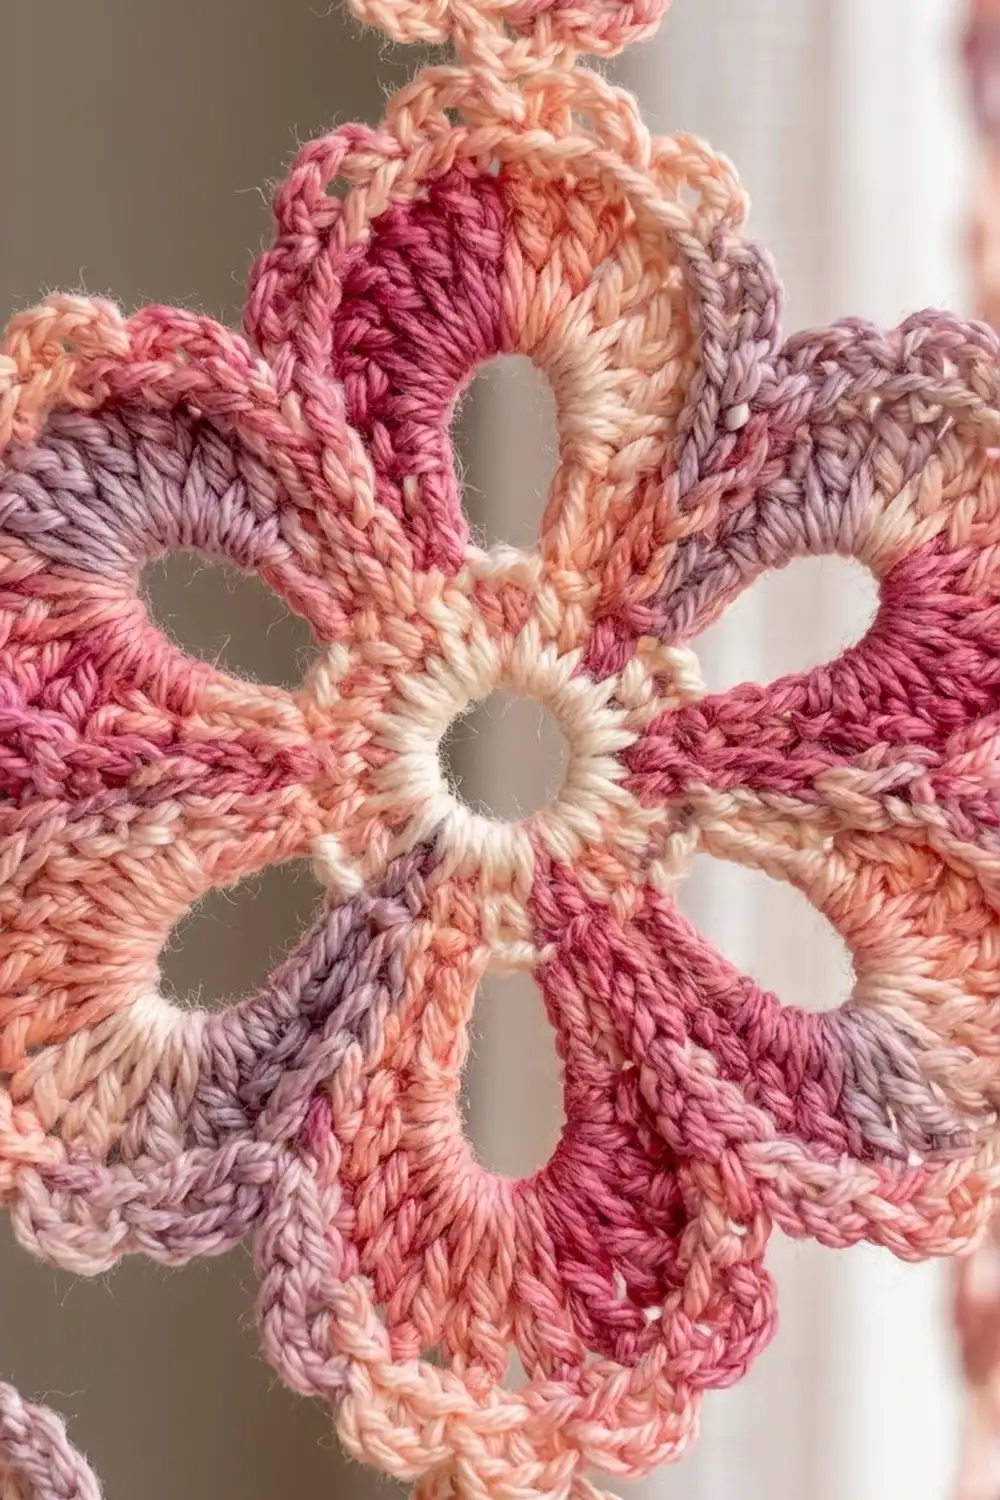
Flower Motif
Round 1 (Color A): Ch 6 and sl st to the first ch to form a ring. Ch 3 (counts as dc), work 23 dc into the ring, and sl st to the top of the ch-3. (24 dc) Fasten off.
Round 2 (Color B): Join B with a standing sc in any dc. Ch 6, sk 2 dc, sc in next dc; rep from * 6 more times, ch 6, sk 2 dc, and sl st to the first sc. (8 sc, 8 ch-6 sps)*
Each ch-6 loop arches over 2 skipped stitches. That gap becomes the teardrop eyelet at the base of each petal.
Round 3 (Color B): Sl st into the first ch-6 sp. Ch 1. In the same sp work (sc, hdc, 2 dc, 3 tr, 2 dc, hdc, sc), then sl st in the next sc. Rep in each ch-6 sp around. (88 sts: 11 per petal, plus 8 sl sts) Fasten off.
The 3 tr give each petal its rounded, full tip. The petals stay solid around the open eyelet.
Round 4 (Color C), picot edge: Join C with a standing sc in the first sc of any petal. Work each petal as follows:
– sc in hdc
– picot pair in each of the next 7 sts (2 dc, 3 tr, 2 dc)
– sc in hdc
– sc in sc
Skip the sl st, then begin the next petal with sc in its first sc. Rep around and sl st to the first sc.
Count: 88 sc (1 in each existing st) + 56 extra sc (the second sc of each picot pair) = 144 sc, plus 56 ch-3 picots (7 picots per petal). The 4th picot of each petal sits on the middle tr. That one is the center picot. Fasten off.
Round 5 (Color C), squaring frame: Join C with a standing sc in the center picot of any petal (a corner petal). Then:
1. Ch 5, sc in the same picot.
2. Ch 7, sc in the center picot of the next petal (a side petal), ch 7.
3. *(Sc, ch 5, sc) in the center picot of the next petal, ch 7, sc in the center picot of the next petal, ch 7; rep from * 2 more times.
4. Sl st to the first sc.
(12 sc, 4 corner ch-5 sps, 8 ch-7 sps)
Round 6 (Color C), lattice:
1. Sl st into the first corner ch-5 sp. Ch 1, and work (sc, ch 5, sc) in the same sp.
2. *Ch 5, sc in the next ch-7 sp, ch 5, sc in the side sc, ch 5, sc in the next ch-7 sp, ch 5. (Sc, ch 5, sc) in the next corner sp. Rep from * 2 more times.
3. Ch 5, sc in the next ch-7 sp, ch 5, sc in the side sc, ch 5, sc in the next ch-7 sp, ch 5, and sl st to the first sc.
(20 sc, 20 ch-5 loops: 4 corner loops + 16 side loops)
Each side now has 1 corner loop, 4 side loops, and 1 corner loop. These chains form the diamond mesh between flowers. Fasten off, weave in ends, and block the first motif to 6 in (15.2 cm) square.
Make All Pieces
Per panel: 84 motifs. For the pair: 168 motifs.
Work Rounds 1–5 for every motif ahead of time. Work Round 6 only as you join. Change balls of Color B in random places so no two neighboring flowers match.
Layout grid (one panel, M = motif):
Row  1: M M M M M M
Row  2: M M M M M M
Row  3: M M M M M M
...
Row 13: M M M M M M
Row 14: M M M M M M
Work across Row 1 from left to right. Then start each new row at the left and join each motif to the one above it and the one to its left.
Joining
Method: Join as you go on Round 6.
On every side that touches a finished motif, replace each “ch 5” with:
ch 2, sl st into the matching loop of the neighbor, ch 2
Stitch-to-stitch logic: Each side has 6 loops: corner, 4 side loops, corner. Match them one to one. Your first side loop joins the neighbor’s first side loop on the facing side, and so on. A joined corner looks like this: sc, ch 2, sl st into the neighbor’s corner loop, ch 2, sc.
Four-way corners: Where four motifs meet, sl st into the sl st of the earlier corner join instead of into another loop. This keeps the corner flat and centered.
Tension: Keep the ch-2 halves the same size as a normal ch-5 loop. If the joins are tight, the lattice puckers. If they’re loose, the motifs sag at the seams.
Size checkpoints:
– After Row 1: 36 in (91.4 cm) wide.
– After Row 4: 24 in (61.0 cm) long.
– After Row 14: 84 in (213.4 cm) long.
Lay the piece flat and measure without stretching.
Border
Border gauge: 24 sc = one 6 in (15.2 cm) motif side, or 4 sc per inch (2.5 cm) over the chain loops. This is looser than solid sc gauge because the stitches spread along the loops. That’s what keeps the edge from tightening.
Round 1 (Color C): Join C in any outer panel-corner loop.
Work each motif side as 24 sc:
– 2 sc in the corner loop
– 5 sc in each of the 4 side loops (20 sc)
– 2 sc in the next corner loop
At each seam, each motif’s corner loop gets its own 2 sc, so a seam has 4 sc in total, 2 per motif. Don’t add any extra stitches at seams.
At each of the 4 outer panel corners, work (2 sc, ch 2, 2 sc) in the corner loop. Those 2 sc on each side of the ch-2 already count toward each side’s 24.
Counts:
– Top and bottom: 6 motifs x 24 = 144 sc each
– Left and right: 14 motifs x 24 = 336 sc each
– Total: 960 sc, plus 4 ch-2 corner sps
Sl st to the first sc.
Round 2 (Color C), scallops:
1. Sl st into the corner ch-2 sp. Ch 1, and work (sc, ch 3, sc) in the same sp.
2. *[Sk 1, shell in next st, sk 1, sc in next st] across the side. (Sc, ch 3, sc) in the next corner sp. Rep from * around.
3. Sl st to the first sc and fasten off.
Counts:
– Top and bottom: 144 ÷ 4 = 36 shells and 36 sc each
– Left and right: 336 ÷ 4 = 84 shells and 84 sc each
– Total: 240 shells (1,200 dc), 248 sc including the 8 corner sc, and 4 ch-3 corners
Why the math works: Each motif side is 24 sts. Since 24 ÷ 4 = 6, every motif carries exactly 6 shells, and every seam falls between two shells. The scallops line up with the flowers and the edge lies flat.
Final Blocking
- Lay out a section of the panel, about 3 rows of motifs at a time, on blocking mats.
- Pin each motif’s four corners to a 6 in (15.2 cm) grid.
- Pin the 2 middle side loops on each side to straighten the lattice.
- Pin each scallop of the border so it points outward.
- Spray until damp but not dripping.
- Let it dry completely, then move to the next section.
- Check the full panel: 37.5 in x 85.5 in (95.3 cm x 217.2 cm).
Final Quality-Control Checklist
- Every flower has 8 petals, 8 eyelets, and 7 picots per petal.
- Every Round 6 has 20 loops, and joined loops still count as one loop.
- Four-way corners lie flat with no holes or lumps.
- Each motif side has 24 sc in Border Round 1.
- Every side has a whole number of shells: 36 on the top and bottom, 84 on each long side.
- Both panels are the same size to within 0.5 in (1.3 cm).
- All ends are woven in through solid stitches, not through the mesh.
Troubleshooting
Petals cup or ruffle: Round 3 is too tight around the ch-6 loops. Use a hook 0.25 mm larger for Rounds 2–3.
Eyelets close up: You may be working Round 2 into the wrong stitch. Make sure you skip exactly 2 dc under each ch-6.
Motif won’t square: Check that the corners of Round 5 sit on every other petal and that you worked exactly 7 chains between anchors.
Lattice puckers at joins: Your joining ch-2s are too tight. Loosen them, or make the sl st larger.
Border waves: You have too many stitches. Recount 24 per motif side.
Border pulls in: Go up a hook size for Border Round 1 only.
Panels hang unevenly: Block again and space the clip rings evenly.
Care
Hand wash cool or machine wash on a gentle cycle in a mesh bag, then lay flat to dry and reshape on the blocking grid. Don’t hang the panels while wet, because the weight of the water will stretch the lattice.
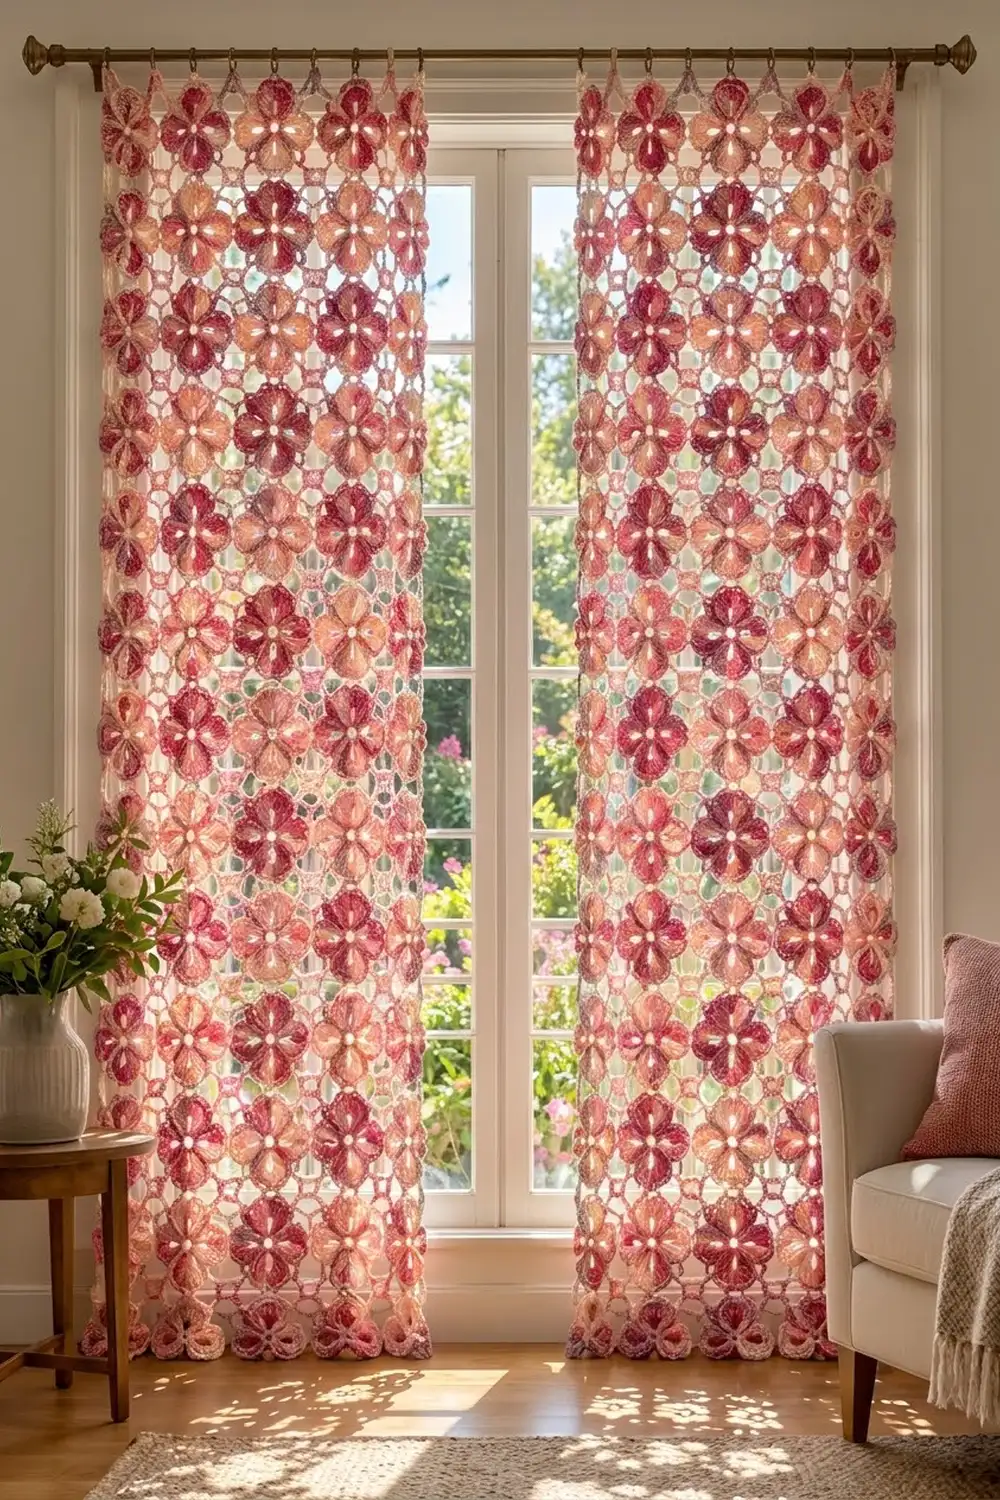
Final Notes
The measurement chain runs like this:
1. The 1.5 in (3.8 cm) center ring grows into a 5 in (12.7 cm) flower.
2. The lattice frames it into a 6 in (15.2 cm) square.
3. 6 x 14 squares make a 36 in x 84 in (91.4 cm x 213.4 cm) panel.
4. The 0.75 in (1.9 cm) border brings it to 37.5 in x 85.5 in (95.3 cm x 217.2 cm).
Check every stage before going on to the next. To hang each panel, clip 13 rings to the top border: one at each of the 7 seams and outer corners, and one at the center of each of the 6 top motifs.
Happy crocheting!