

This little tree is soft, plush, and calm in color. It is a single hanging ornament made in sage green chenille. It has three stacked tiers, and each one finishes in a rounded, rolled edge. A cream trunk peeks out below, and a cream bow and cord loop sit at the top.
The look is cozy and modern rather than bright. Sage green and cream keep it gentle, so it suits a natural, neutral, or Scandinavian-style tree. Chenille hides individual stitches and gives a velvety, squishy surface.
The pattern uses US crochet terms. The finished ornament is about 4.25 in (10.8 cm) wide at the bottom tier. It is 5.75 in (14.6 cm) tall from the tip of the cone to the bottom of the trunk, not counting the hanging loop, which adds about 3 in (7.6 cm).
You will crochet six small components: a closed top cone, two open tiers, a base disc, a trunk, and a bow with a cord. Each tier is worked top-down in the round and finished with a rolled edge. Then it is sewn stitch-to-stitch onto the tier above. The result is one finished ornament.
Finished Size and Construction
- Finished size: 4.25 in (10.8 cm) wide x 5.75 in (14.6 cm) tall, plus a 3 in (7.6 cm) loop
- Skill level: Easy-intermediate (simple amigurumi shaping and careful sewing)
- Terminology: US crochet terms
- Yarn weight: Bulky (#5) chenille
- Hook: 5.0 mm (H-8)
- Number of pieces: 1 finished ornament, built from 6 components
- Layout: Top cone, middle tier, and bottom tier stacked vertically; trunk centered below; bow and loop on top
- Piece size: Top cone 2.75 in (7.0 cm) wide; middle tier 3.25 in (8.3 cm) wide; bottom tier 4.25 in (10.8 cm) wide (all after trim)
- Size before edge trim: Top cone 2.5 in (6.4 cm); middle tier 3 in (7.6 cm); bottom tier 4 in (10.2 cm)
- Edge trim depth: About 0.2 in (0.5 cm) per tier
Materials
Choose a bulky (#5) chenille or velvet yarn with a smooth pile. A typical skein is about 100 g for 140 m. Avoid very loose, fluffy chenille, because it sheds and makes the rolled edges look messy.
- Color A, sage green: 25 g, about 35 m (top cone, both tiers, base disc)
- Color B, cream: 10 g, about 14 m (trunk, bow, hanging cord)
These quantities include a margin of about 20 percent for your gauge test and sewing tails.
Tools:
- 5.0 mm (H-8) crochet hook
- Locking stitch markers (at least 2)
- Large-eye blunt tapestry needle
- Polyester fiberfill, about 5 g
- Scissors
- Ruler or soft tape measure
- Pins
Abbreviations (US Terms)
- ch: chain
- sc: single crochet
- inc: 2 sc in the same stitch
- sl st: slip stitch
- st(s): stitch(es)
- MR: magic ring
- BLO: back loop only
- FLO: front loop only
- Rnd: round
- ( ) x N: repeat the stitches in parentheses N times
Special stitch, Rolled Edge: a two-round finish. Work one round of sc in FLO, then one round of loose sl st through both loops of those sc. The FLO round pushes the fabric outward, and the sl st round curls it into a soft, rounded lip. It also leaves the back loops of the previous round free for sewing.
Work all cone, tier, disc, and trunk rounds in a continuous spiral. Do not join or turn. Move a marker to the first st of each round.
Gauge and Checkpoints
Gauge: 10 sc and 10 rnds = 4 in (10.2 cm) in sc worked in the round. One stitch is 0.4 in (1.0 cm) wide and one round is 0.4 in (1.0 cm) tall.
Work tightly, as you would for amigurumi. Chenille stretches, so loose stitches will let stuffing show and make the tiers droop.
Make the top cone first as your test piece. It is small and quick, and it tells you everything you need to know.
Checkpoints:
- Top cone after Rnd 7 (20 sts): 4 in (10.2 cm) across when laid flat; about 2.5 in (6.4 cm) in diameter when opened into a round
- Middle tier after Rnd 4 (24 sts): 4.8 in (12.2 cm) across when laid flat
- Bottom tier after Rnd 4 (32 sts): 6.4 in (16.3 cm) across when laid flat
- Each tier after trim: about 0.25 in (0.6 cm) wider in diameter than before trim
If your cone is too big, go down to a 4.5 mm hook. If it is too small or very stiff, go up to a 5.5 mm hook. Keep the stitch counts the same and change only the hook. The sewing math depends on the counts, not on the size.
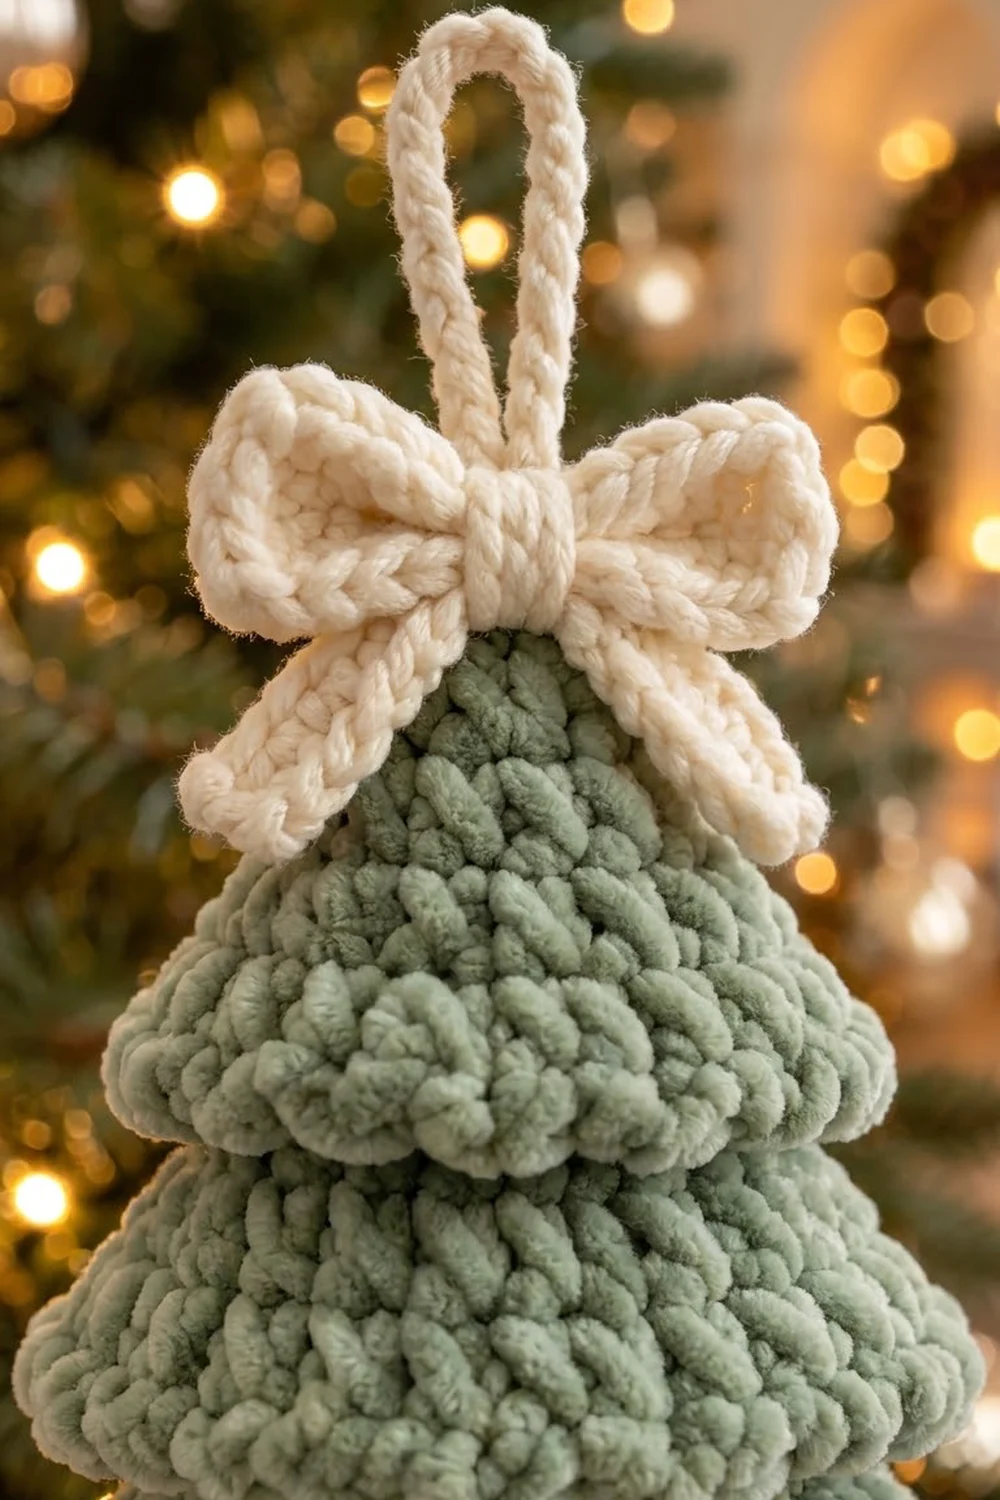
Top Cone
With Color A.
Rnd 1: 4 sc in MR. (4)
Rnd 2: (sc, inc) x 2. (6)
Rnd 3: (sc, inc) x 3. (9)
Rnd 4: (2 sc, inc) x 3. (12)
Rnd 5: (2 sc, inc) x 4. (16) Place a second marker in any stitch of this round. You will sew the middle tier here.
Rnd 6: (3 sc, inc) x 4. (20)
Rnd 7: Sc in each st around. (20)
Go straight into the Rolled Edge (see Edge Trim below). Fasten off with a 6 in (15.2 cm) tail and weave it in.
Before trim, the slanted side of the cone is about 2.8 in (7.1 cm) long. Stuff the tip and upper half firmly with a small pinch of fiberfill. Leave the lower part hollow for now.
Middle Tier
With Color A. This tier is an open-ended, flared tube.
Foundation: Ch 16 and sl st into the first ch to form a ring. Do not twist the chain.
Rnd 1: Sc in each ch around. (16)
Rnd 2: (3 sc, inc) x 4. (20) Place a marker in any stitch of this round. You will sew the bottom tier here.
Rnd 3: (4 sc, inc) x 4. (24)
Rnd 4: Sc in each st around. (24)
Work the Rolled Edge. Fasten off, leaving a 16 in (40.6 cm) tail for sewing. The tail comes off the bottom edge, so run it up to the foundation ring along the inside of the tier before you sew.
Bottom Tier
With Color A.
Foundation: Ch 20 and sl st into the first ch to form a ring.
Rnd 1: Sc in each ch around. (20)
Rnd 2: (4 sc, inc) x 4. (24)
Rnd 3: (5 sc, inc) x 4. (28)
Rnd 4: (6 sc, inc) x 4. (32)
Work the Rolled Edge. Fasten off with a 20 in (50.8 cm) tail and run it up to the foundation ring the same way.
Base Disc
With Color A. This flat disc closes the body and holds the trunk.
Rnd 1: 6 sc in MR. (6)
Rnd 2: Inc in each st around. (12)
Rnd 3: (sc, inc) x 6. (18)
Rnd 4: (2 sc, inc) x 6. (24)
Sl st into the next st and fasten off, leaving a 16 in (40.6 cm) tail. The disc should lie flat and measure about 3 in (7.6 cm) across.
Trunk
With Color B.
Rnd 1: 8 sc in MR. (8)
Rnd 2: Sc in BLO of each st around. (8) This gives the trunk a crisp, flat bottom.
Rnds 3 to 5: Sc in each st around. (8)
Fasten off with a 12 in (30.5 cm) tail. The trunk is a small cylinder about 1 in (2.5 cm) wide and 2 in (5.1 cm) long. Stuff it lightly.
Bow
With Color B.
Bow loops strip: Ch 15.
- Row 1: Sc in the 2nd ch from the hook and in each ch across. Ch 1, turn. (14)
- Rows 2 and 3: Sc in each st across. Ch 1, turn. (14)
Fasten off. The strip is about 5.6 in (14.2 cm) x 1.2 in (3.0 cm).
Tails strip: Ch 9. Sc in the 2nd ch from the hook and in each ch across. (8) Fasten off. The strip is about 3.2 in (8.1 cm) long.
Shape the bow: Fold both short ends of the loops strip to the center so they overlap slightly. Fold the tails strip into a shallow V and place it behind the center. Wrap Color B tightly around the center 6 to 8 times to pull everything into a bow. Knot at the back and keep both ends for sewing. The finished bow is about 2.8 in (7.1 cm) wide.
Hanging Cord
With Color B.
Ch 31. Sl st in the back bump of the 2nd ch from the hook and in each ch across. (30) Fasten off, leaving a short tail at each end.
This makes a firm, rope-like cord about 7 in (17.8 cm) long. Folded in half with the ends hidden, it forms a 3 in (7.6 cm) loop.
Assembly
- Attach the middle tier. Slide the middle tier up over the top cone, foundation ring first, until the ring sits on the marked Rnd 5. Both have 16 sts. Whipstitch each foundation st to one Rnd 5 st. The cone’s Rnds 6 and 7 and its rolled edge fall over the seam and hide it.
- Stuff the body. Add a little fiberfill inside the cone and the middle tier. Keep it light so the tiers stay crisp and do not bulge.
- Attach the bottom tier. Slide the bottom tier up over the middle tier until its foundation ring sits on the middle tier’s marked Rnd 2. Both have 20 sts. Sew 1 st to 1 st. The middle tier’s Rnds 3 and 4 and its trim cover this seam.
- Close the body. Hold the base disc inside the bottom tier, against the free back loops of the middle tier’s Rnd 4 (the FLO trim round left them free). Both have 24 sts. Whipstitch the disc to the back loops, 1 st to 1 st, and top up the stuffing before you sew the last 6 sts.
- Attach the trunk. Center the trunk on the disc’s MR and sew all 8 sts of its open edge to the disc. About 0.8 in (2.0 cm) of trunk stays hidden under the bottom tier, and about 0.75 in (1.9 cm) shows below it.
- Attach the cord. Fold the cord in half. Push both ends down through the very tip of the cone and knot them together inside. Or, sew them flat to the front of the cone just below the tip.
- Attach the bow. Use the wrapping tails to sew the bow center to the front of the cone, over the base of the cord. Tack each bow loop lightly so it does not flop forward.
Edge Trim
The Rolled Edge is this ornament’s border. Work it on the last round of each green piece, straight after that piece’s final round, without fastening off.
Trim gauge: Trim sts follow the body gauge, 10 sts = 4 in (10.2 cm). The trim adds about 0.2 in (0.5 cm) of depth and flares about 0.1 in (0.3 cm) outward on each side.
Trim Rnd A: Sc in FLO of each st around.
Trim Rnd B: Sl st loosely in each st around. Sl st into the next st to finish.
Counts per piece:
| Piece | Last body round | Trim Rnd A | Trim Rnd B |
|---|---|---|---|
| Top cone | 20 | 20 + 0 = 20 | 20 + 0 = 20 |
| Middle tier | 24 | 24 + 0 = 24 | 24 + 0 = 24 |
| Bottom tier | 32 | 32 + 0 = 32 | 32 + 0 = 32 |
Why the math works: Each trim round is a conversion round with 1 st worked into each existing st and 0 extra sts. The FLO round tips the fabric outward by itself, so you don’t need increases for the flare. Extra stitches would make the edge ruffle instead of roll.
The free back loops of the top cone’s Rnd 7 are not used. The free back loops of the middle tier’s Rnd 4 become the seam line for the base disc.
Final Blocking
Do not wet block or press chenille. Use gentle steam only.
- Stand the ornament upright on a flat surface.
- Shape each rolled edge with your fingers so it curls evenly all the way around.
- Hold a steam iron about 2 in (5.1 cm) above the ornament and let the steam drift over it for a few seconds. Never touch the yarn with the iron.
- While it is still warm, gently press the tiers into an even cone shape and fluff the bow loops.
- Let the ornament cool and dry completely, about 30 minutes, before you hang it.
- Measure it: the bottom tier should be 4.25 in (10.8 cm) wide and the total height 5.75 in (14.6 cm).
Final Quality-Control Checklist
- Top cone ends at 20 sts, middle tier at 24 sts, bottom tier at 32 sts
- Every seam is matched 1 st to 1 st: 16 to 16, 20 to 20, 24 to 24
- No seam shows below any rolled edge
- Rolled edges curl evenly, with no ruffles or flat spots
- Tiers step out evenly: 2.75 in (7.0 cm), 3.25 in (8.3 cm), 4.25 in (10.8 cm)
- Trunk is centered and shows about 0.75 in (1.9 cm)
- Bow sits straight and centered on the front
- Loop is secure and holds the ornament upright when hung
- All tails are woven in and hidden inside the body
Troubleshooting
Stuffing shows through the stitches. Your tension is loose. Go down a hook size or use less stuffing.
Rolled edge ruffles. You added stitches in the trim. Recount: each trim round must match the last body round exactly.
Rolled edge lies flat. You worked Trim Rnd A through both loops. Work it in FLO only.
A tier won’t slide over the piece above. Your foundation chain is too tight. Chain it again with a hook one size larger, then switch back for Rnd 1.
Tree leans. The trunk is off-center or the stuffing is uneven. Re-sew the trunk to the disc’s MR and spread the fiberfill evenly.
Ornament tips forward when hung. The cord is attached too far forward. Move it to the exact tip of the cone.
Chenille “worms” or pulls out. Try not to rip back the same stitches repeatedly. Knot tails securely and weave them through several stitches.
Care
Spot clean with cool water and mild soap, then air dry upright. Store the ornament flat in a box so the tiers and bow keep their shape.
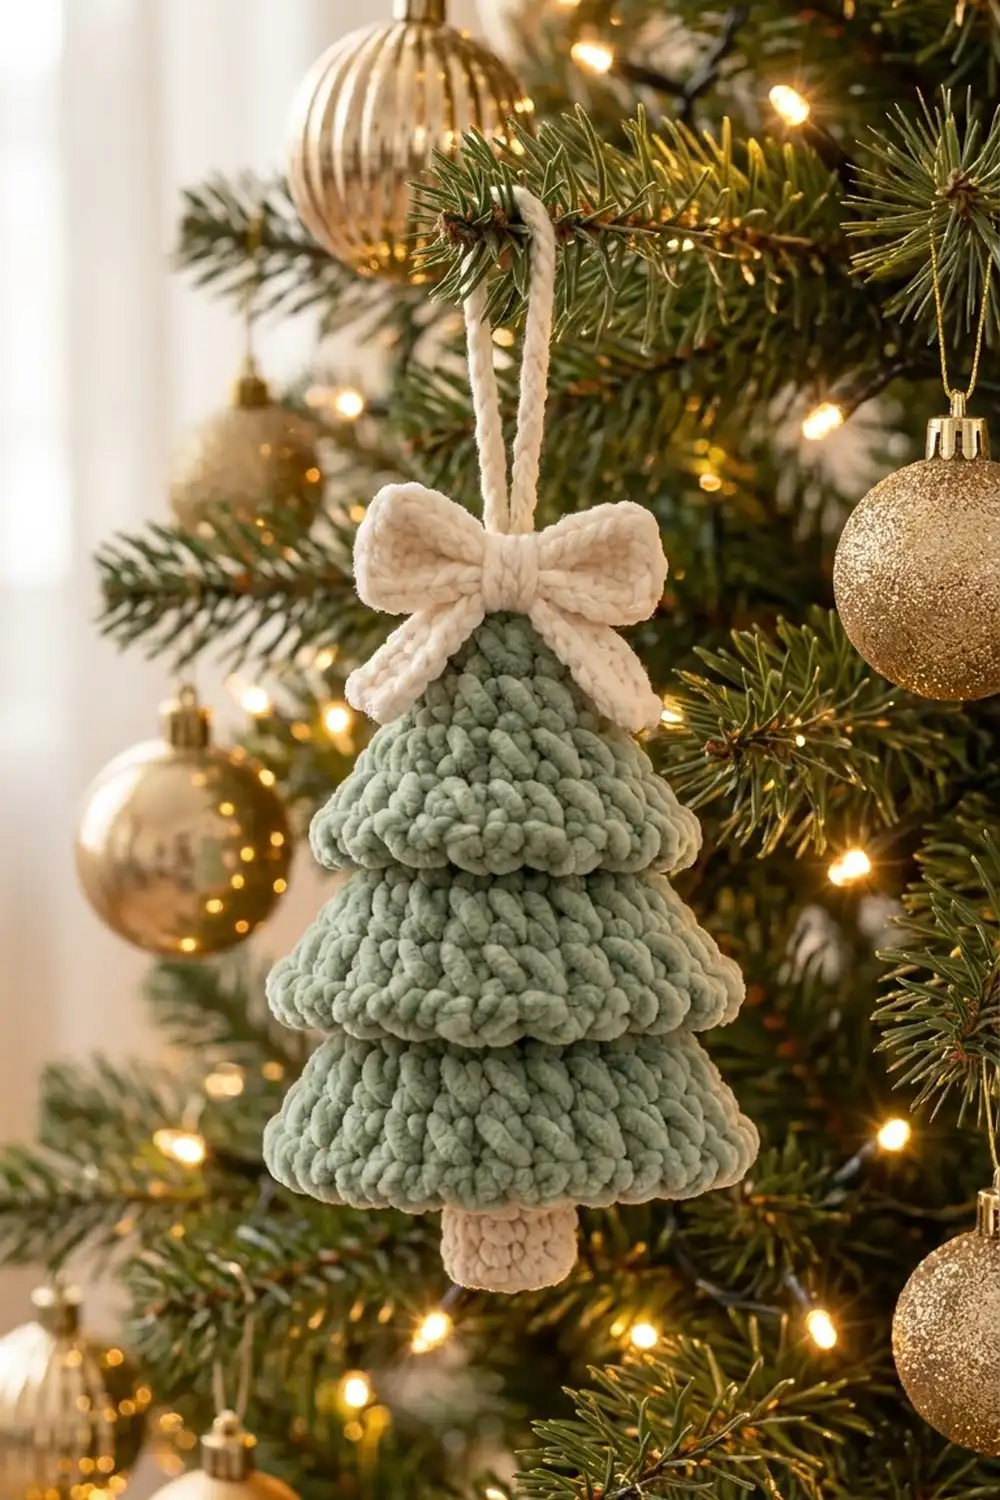
Final Notes
The whole ornament follows one measurement chain. At 10 sts = 4 in (10.2 cm), the top cone’s 20 sts give 2.5 in (6.4 cm), the middle tier’s 24 sts give 3 in (7.6 cm), and the bottom tier’s 32 sts give 4 in (10.2 cm). The rolled edges bring them to 2.75 in (7.0 cm), 3.25 in (8.3 cm), and 4.25 in (10.8 cm).
Every seam matches stitch for stitch: 16 to 16, 20 to 20, and 24 to 24. Check your gauge on the top cone and keep your counts exact, and the tiers will stack neatly every time.
Happy crocheting!