

This holder is shaped like a three-tier Christmas tree and stores plastic bags. Each panel is open filet mesh with square windows, so you can see the bags inside, and a solid band of filled blocks outlines the tree. Each tier flares into a crisp, pointed tip, and the bottom tier rounds into a short solid trunk. That trunk is also the dispensing opening.
The sample uses one dark forest green cotton. It suits a kitchen or pantry door at Christmas and is practical the rest of the year. The pattern uses US crochet terms throughout.
The finished holder measures 11.5 in (29.2 cm) wide and 16 in (40.6 cm) tall, not counting the hanging loop. The neck and trunk openings are each 3 in (7.6 cm) wide when laid flat.
You make two identical panels top-down in filet rows, shaping the tiers with block increases and step-in decreases. Each panel gets one round of single crochet edging. Then you place the panels wrong sides together and seam them down both sides, leaving the neck and trunk open. Last, you add two rim rounds at each opening and a hanging loop.
Finished Size and Construction
- Finished size: 11.5 in x 16 in (29.2 cm x 40.6 cm)
- Skill level: Intermediate (filet increases and decreases)
- Terminology: US crochet terms
- Yarn weight: DK (3), cotton
- Hook: 3.5 mm (E-4)
- Number of pieces: 2 identical tree panels, plus a small hanging strap
- Layout: Front panel stacked on back panel, wrong sides together
- Mesh panel size: 10.5 in x 14.5 in (26.7 cm x 36.8 cm)
- Panel size after edging (before seaming and rims): 11 in x 15 in (27.9 cm x 38.1 cm)
- Border depth: 0.5 in (1.3 cm) per side, from the edging plus the seam
Materials
Use a smooth, mercerized or combed DK cotton. Cotton holds the square mesh open and keeps the tier tips sharp. Acrylic will work, but its mesh tends to relax and sag under the weight of the bags.
- Forest Green: 100 g, about 230 m (about 250 yd)
This amount includes a margin of about 20 percent above what the sample used, so you have yarn for a gauge swatch and some re-work.
Tools:
– 3.5 mm (E-4) crochet hook
– Tapestry needle
– 4 locking stitch markers
– Rust-proof pins and a blocking board
– Measuring tape
– Spray bottle
Abbreviations (US Terms)
- ch: chain
- sl st: slip stitch
- sc: single crochet
- dc: double crochet
- edc: extended double crochet
- sk: skip
- sp: space
- st(s): stitch(es)
- blk(s): block(s)
- RS / WS: right side / wrong side
Filet basics:
– Each block is 3 sts wide, and the dc that closes one block also opens the next. A row of W blocks therefore has (3 x W) + 1 sts.
– Ch 3 at the start of a row counts as the first dc.
– Filled block (F): dc in each of the next 3 sts, or work 2 dc in the ch-2 sp and dc in the next dc.
– Open block (O): ch 2, sk the next 2 sts (or the ch-2 sp), then dc in the next dc.
Special techniques:
– Inc-Start (adds 1 filled block at the beginning of a row): Ch 5, turn. Dc in 4th ch from hook and in next ch, then dc in the edge dc at the base of the chain. This makes 4 sts.
– Edc: Yo, insert hook, yo and pull up a loop, yo and draw through 1 loop (this makes a base ch), [yo, draw through 2 loops] twice.
– Inc-End (adds 1 filled block at the end of a row): After the last dc, work 1 edc into the base of that dc. Work 1 edc into the base ch of the previous edc, twice more. This adds 3 sts.
– Dec-Start (removes 2 blocks at the beginning): Turn and sl st in each of the first 7 sts. Ch 3; this counts as the first dc in the 7th st.
– Dec-End (removes 2 blocks at the end): Work the last dc into the 7th st from the end and leave the final 6 sts unworked.
Gauge and Checkpoints
Filet gauge: 4 blocks x 4 rows = 2 in x 2 in (5.1 cm x 5.1 cm). That makes each block 0.5 in (1.3 cm) square.
Make one full panel before you start the second one. Measure it lying flat, without stretching, at each checkpoint:
- After Row 3 (neck): 2.5 in (6.4 cm) wide, 1.5 in (3.8 cm) tall
- After Row 7 (tier 1 tip): 6.5 in (16.5 cm) wide, 3.5 in (8.9 cm) tall
- After Row 12 (tier 2 tip): 8.5 in (21.6 cm) wide, 6 in (15.2 cm) tall
- After Row 17 (tier 3 widest): 10.5 in (26.7 cm) wide, 8.5 in (21.6 cm) tall
- After Row 29 (trunk): 14.5 in (36.8 cm) tall in total
- After edging: 11 in x 15 in (27.9 cm x 38.1 cm)
If the panel is too big: go down a hook size, or work the ch-2 spaces more snugly.
If the panel is too small: go up a hook size.
If the blocks come out as rectangles, pull up the dc loops slightly taller, or shorter, until the blocks are square.
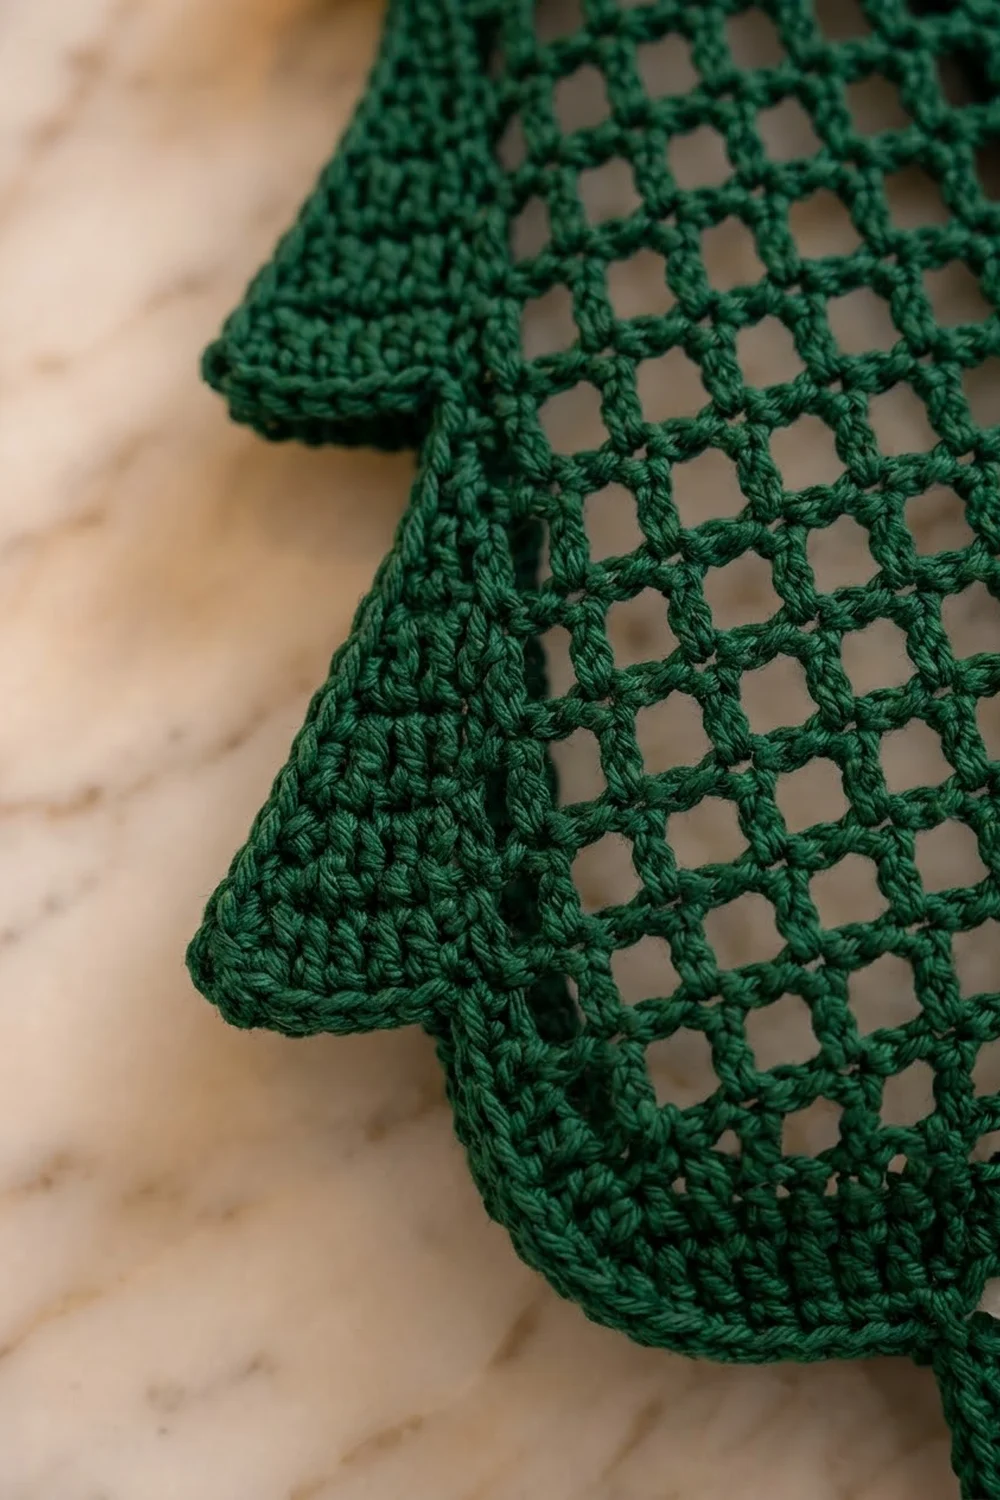
Tree Panel (Make 2)
The panel is worked top-down. All widths below are in blocks, followed by the total number of sts in the row.
Neck
Row 1 (RS): Ch 18. Dc in 4th ch from hook and in each ch across. Turn. (16 sts = 5 F)
Rows 2–3: Ch 3, dc in each st across, working the last dc in the top of the turning ch. Turn. (16 sts = 5 F)
Tier 1 (growth rows)
In each growth row you work Inc-Start, then one O over every block of the row below (filled or open), then Inc-End. This makes the old edge blocks open, adds new filled edge blocks, and keeps a solid outline.
Row 4: Inc-Start, O x 5, Inc-End. (7 blks: F, O x 5, F = 22 sts)
Row 5: Inc-Start, O x 7, Inc-End. (9 blks: F, O x 7, F = 28 sts)
Row 6: Inc-Start, O x 9, Inc-End. (11 blks: F, O x 9, F = 34 sts)
Row 7: Inc-Start, O x 11, Inc-End. (13 blks: F, O x 11, F = 40 sts)
Row 7 is the widest row of the first tier. Its two outer blocks on each side form the flared tier tip.
Tier 2
Row 8 (step-in): Dec-Start, F, O x 7, F, Dec-End. (9 blks = 28 sts)
Each new F sits over an open block, so work it as 2 dc in the ch-2 sp, then dc in the next dc.
Row 9: Inc-Start, O x 9, Inc-End. (11 blks = 34 sts)
Row 10: Inc-Start, O x 11, Inc-End. (13 blks = 40 sts)
Row 11: Inc-Start, O x 13, Inc-End. (15 blks = 46 sts)
Row 12: Inc-Start, O x 15, Inc-End. (17 blks: F, O x 15, F = 52 sts)
Tier 3
Row 13 (step-in): Dec-Start, F, O x 11, F, Dec-End. (13 blks = 40 sts)
Row 14: Inc-Start, O x 13, Inc-End. (15 blks = 46 sts)
Row 15: Inc-Start, O x 15, Inc-End. (17 blks = 52 sts)
Row 16: Inc-Start, O x 17, Inc-End. (19 blks = 58 sts)
Row 17: Inc-Start, O x 19, Inc-End. (21 blks: F, O x 19, F = 64 sts)
Rows 18–22: Ch 3, F, O x 19, F. Turn. (21 blks = 64 sts)
Work these rows filled over filled and open over open.
Rounded Base
Row 23: Dec-Start, F, O x 15, F, Dec-End. (17 blks = 52 sts)
Row 24: Dec-Start, F, O x 11, F, Dec-End. (13 blks = 40 sts)
Row 25: Dec-Start, F, O x 7, F, Dec-End. (9 blks = 28 sts)
Trunk
Row 26: Dec-Start, F x 5, Dec-End. (5 blks = 16 sts)
All five blocks sit over open blocks, so work each one as 2 dc in the sp, then dc in the next dc.
Rows 27–29: Ch 3, dc in each st across. Turn. (16 sts)
Do not fasten off.
Stitch check: Every row should equal (3 x blocks) + 1. Rows 1–29 total 14.5 in (36.8 cm) tall.
Panel Edging
You work this round around the stepped outline. Use these rules:
– 2 sc around each dc row-end.
– 3 sc across each exposed block edge, whether it is the top of a new increase block or the underside of a step-in ledge.
– No extra stitches at the tier tips.
Edging Rnd: Ch 1. Working along the top of Row 29, 2 sc in first st, sc in next 14 sts, 2 sc in last st. (Trunk edge: 18 sc)
Continue up the first side. Starting from the trunk, the counts are:
– Rows 29–26 row-ends: 8 sc
– Ledge under Row 25: 6
– Row 25 row-end: 2
– Ledge under Row 24: 6
– Row 24 row-end: 2
– Ledge under Row 23: 6
– Row 23 row-end: 2
– Ledge under Row 22: 6
– Rows 22–18 row-ends: 10
– Rows 17–14: 4 x (2 row-end + 3 ledge) = 20
– Row 13 row-end: 2
– Ledge under Row 12: 6
– Rows 12–9: 20
– Row 8 row-end: 2
– Ledge under Row 7: 6
– Rows 7–4: 20
– Rows 3–1 row-ends: 6
(Side total: 130 sc)
Working into the free loops of the foundation ch, 2 sc in first ch, sc in next 14 ch, 2 sc in last ch. (Neck edge: 18 sc)
Work the second side in the reverse order of the first. (130 sc)
Sl st to first sc and fasten off. (296 sc: 18 + 130 + 18 + 130)
Each 2-sc corner pair has one sc that faces the end edge and one that faces the side. Mark the 4 side-facing corner sc.
Make All Pieces
- Forest Green: 2 tree panels, 1 hanging strap
Layout (stacked, viewed from the front):
[ FRONT PANEL, RS facing you ]
[ BACK PANEL,  RS facing away ]
   WS against WS, outlines matched
Joining
Use a single crochet seam through both layers. It forms the raised outline you see around the tree.
Stitch logic: Each side has 130 edging sc, plus 1 marked side-facing corner sc at each end. That gives 132 sts per side, and the front and back match stitch for stitch.
- Hold the panels WS together. Pin the tier tips and the trunk corners first, then the ledges.
- Join the yarn through both marked top-left corner sc. Ch 1, then sc in the same st through both layers.
- Sc through both layers in each of the next 130 sts, and in the marked bottom corner sc. (132 sc)
- Fasten off. Repeat on the other side from the top-right corner. (132 sc)
Tension: Keep the seam stitches the same height as your edging. If you pull them tight, the ledges will pucker. If you work them loosely, the tips will droop.
Size checkpoint: 11.5 in x 15 in (29.2 cm x 38.1 cm). The neck and trunk should still be open, each 3 in (7.6 cm) wide when flat.
Border
Border gauge: about 6 sc per 1 in (2.5 cm) along the stitch tops. Two sc rounds add 0.5 in (1.3 cm) of depth.
Neck Rim
Each panel’s neck edge has 18 sc. Two of them are the marked corner sc, which are already in the seam, so 16 sts per panel are left free.
Rnd 1: Join the yarn in the first free st beside a seam. Sc in each of the 16 front sts, then in each of the 16 back sts. Sl st to first sc. (32 sc = 2 panels x 16)
Rnd 2: Ch 1, sc in each st around. Sl st to join. (32 sc)
Fasten off.
Trunk Rim
Rnds 1–2: Work the same as the neck rim. (32 sc each round)
Why the Math Works
- The seam uses only the marked corner sc. Each rim therefore starts with exactly 2 x 16 = 32 sts, with no stitches added or lost at the seams.
- On each panel, 16 top sts + 2 x 132 side sts + 16 bottom sts = 296. That is the edging total, so every stitch is used exactly once.
Hanging Strap
Row 1: Ch 28, sc in 2nd ch from hook and in each ch across. (27 sc, 6 in / 15.2 cm long)
Fasten off, leaving a 10 in (25.4 cm) tail.
Fold the strap into a loop. Sew both ends to the inside of the back neck rim, centered, overlapping each end by 1 in (2.5 cm). This leaves a loop about 2 in (5.1 cm) tall.
Final size: 11.5 in x 16 in (29.2 cm x 40.6 cm)
Final Blocking
- Weave in all ends along the solid edge blocks, not through the mesh.
- Mist the holder until it is evenly damp.
- Slide a piece of folded cardboard inside, 11 in (27.9 cm) wide, so the layers don’t stick together.
- Pin the outline to 11.5 in x 16 in (29.2 cm x 40.6 cm).
- Pin each of the six tier tips out to a sharp point.
- Square up the mesh windows with your fingers.
- Let it dry completely before removing the pins.
Final Quality-Control Checklist
- Both panels have 29 rows, and every row count equals (3 x blocks) + 1.
- The edging totals are 18 / 130 / 18 / 130 on both panels.
- Each side seam has 132 sc.
- The neck and trunk rims have 32 sc in each round.
- All six tier tips match from front to back.
- The neck and trunk are both open and 3 in (7.6 cm) wide.
- The strap is centered and sewn securely.
- The finished size is 11.5 in x 16 in (29.2 cm x 40.6 cm).
Troubleshooting
- The tier tips curl: The Inc-End edc stitches are too tight. Work them slightly taller, then block hard.
- The panel is too narrow at Row 17: Your blocks are under 0.5 in (1.3 cm). Go up a hook size.
- The stitch count is off after a step-in row: Dec-Start must end in the 7th st. Recount 1, 4, 7 along the block boundaries.
- The seam comes out uneven: The side counts differ between the panels. Re-work the edging on one side to exactly 130 sc.
- The rim flares: Go down a hook size for the rims only.
- Bags fall out of the trunk: Add a third rim round, or tighten Rnd 2.
Care
Hand wash cool and lay flat to dry, reshaping the tier tips. Avoid the dryer, because heat shrinks cotton unevenly.
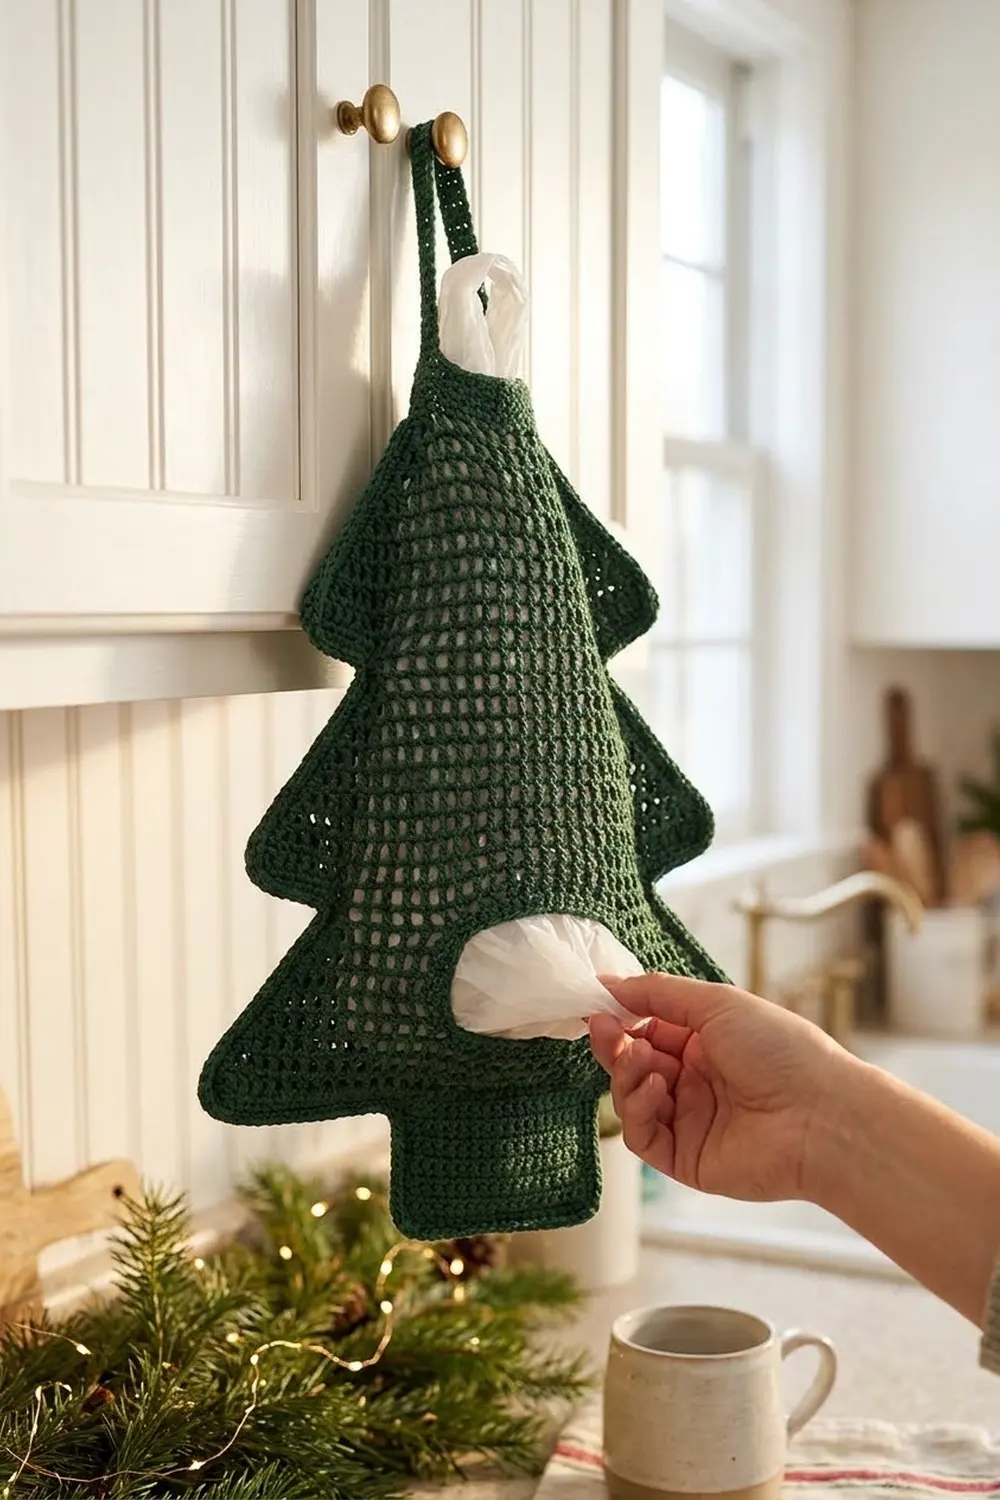
Final Notes
Your blocks are 0.5 in (1.3 cm) square, and the panel grows from a 5-block neck to a 21-block bottom tier. That gives a mesh panel of 10.5 in x 14.5 in (26.7 cm x 36.8 cm). The edging brings it to 11 in x 15 in (27.9 cm x 38.1 cm). The seam widens it to 11.5 in (29.2 cm), and the rims bring the height to 16 in (40.6 cm). If you check each stage against these numbers, the second panel will match the first.
Happy crocheting!