

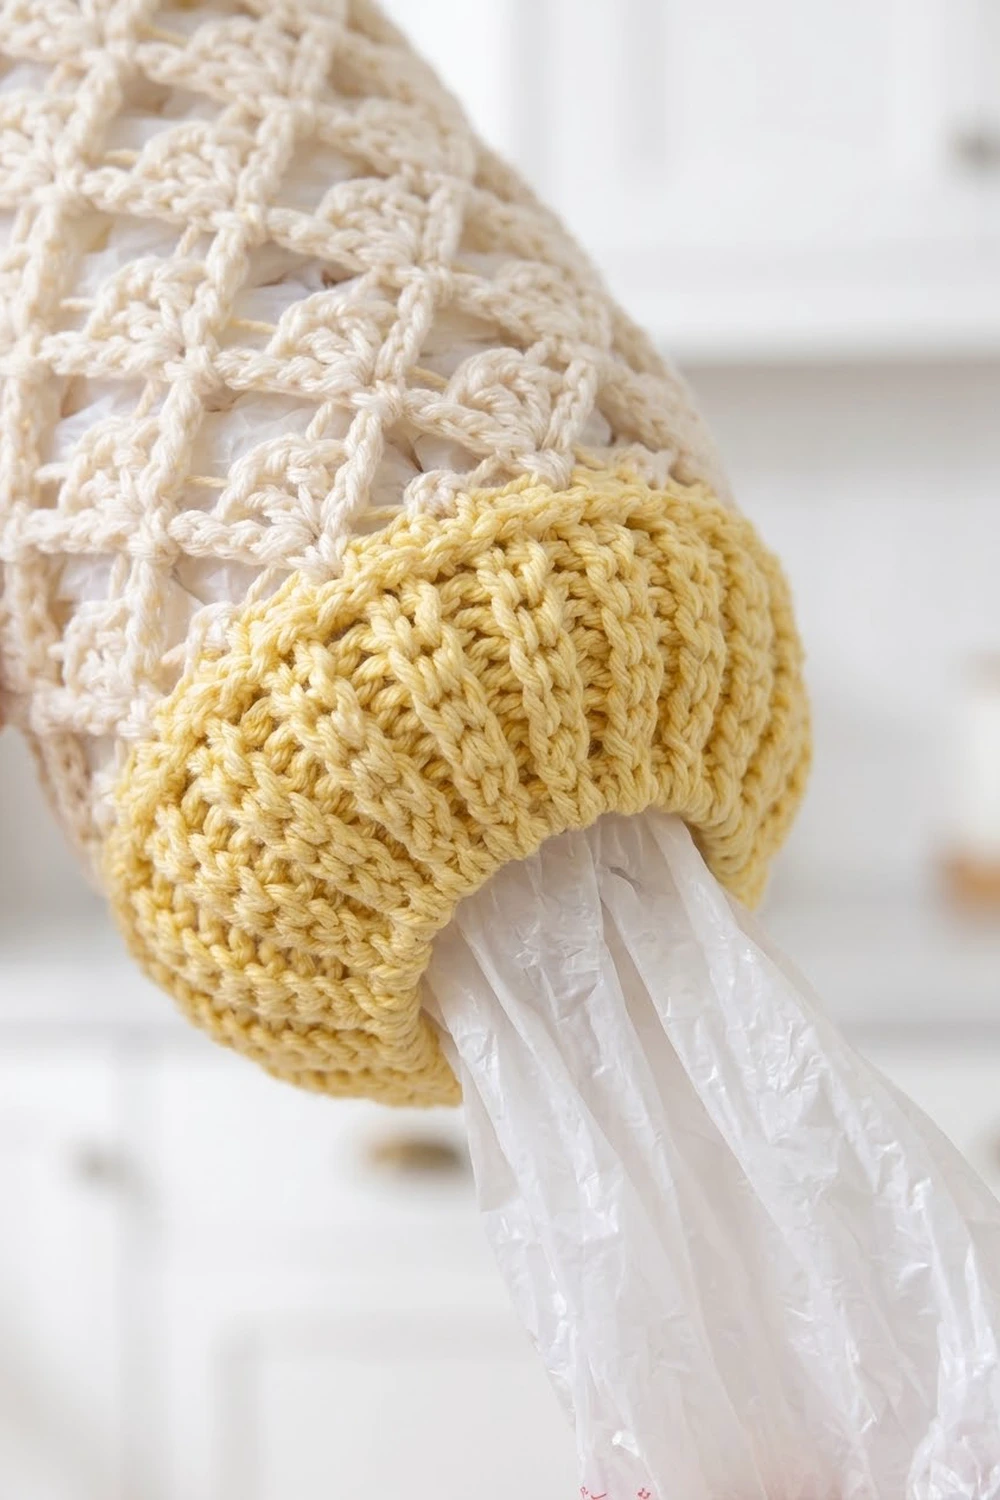
The Buttercup Lattice Bag Holder is a tall, open tube that hangs from a wall hook and keeps plastic grocery bags tidy. You stuff bags in through the top and pull them out one at a time through the snug ribbed opening at the bottom.
The body is worked in soft cream cotton in an openwork fan lattice. The seven-stitch fans shift by half a repeat on every fan round, so the fans and the chain mesh between them form a diagonal diamond grid. Pale buttercup yellow trims the piece with a scalloped band at the top, a ribbed cuff at the bottom, and a sturdy hanging strap.
This pattern uses US crochet terms. The finished holder measures 16 in (40.6 cm) around, which is 8 in (20.3 cm) wide when laid flat. It is 21 in (53.3 cm) long, not counting the strap, and the strap adds a 12 in (30.5 cm) loop.
Construction is seamless. You start with a chain ring at the top and work the cream lattice downward in joined rounds. Then you switch to yellow for the ribbed cuff and pull it in with decreases. Last, you work the scalloped edging into the foundation chain and build the strap straight off the top band, so the holder is one single piece.
Finished Size and Construction
- Finished size: 16 in (40.6 cm) circumference, 8 in (20.3 cm) flat width, 21 in (53.3 cm) long
- Skill level: Easy intermediate
- Terminology: US crochet terms
- Yarn weight: Worsted (#4) cotton
- Hook: 5.0 mm (H-8)
- Number of pieces: 1 (the strap is worked directly onto the top band)
- Layout: Single vertical tube, worked top down in joined rounds
- Piece size: 64 stitches around, 32 per flat side
- Size before trims: Cream body 17.5 in (44.5 cm) long
- Trim depth: Top edging 1 in (2.5 cm); bottom cuff 2.5 in (6.4 cm)
- Bottom opening: About 2.5 in (6.4 cm) across, relaxed
Materials
Use a smooth mercerized or combed cotton. Cotton holds its shape when the tube is full of bags, and it keeps the fans crisp. Acrylic also works, but the tube will stretch longer over time.
- Color A, cream: 140 g / 266 m
- Color B, buttercup yellow: 60 g / 114 m
These amounts include a margin of about 20 percent for a gauge check and small differences in tension.
Tools:
- 5.0 mm (H-8) crochet hook
- Locking stitch markers (at least 2)
- Tapestry needle
- Scissors
- Measuring tape
- Rust-proof pins and a blocking mat or towel
- Spray bottle of water
Abbreviations (US Terms)
- ch: chain
- sl st: slip stitch
- sc: single crochet
- sc2tog: single crochet 2 together
- hdc: half double crochet
- dc: double crochet
- FPdc: front post double crochet
- BPdc: back post double crochet
- BLO / FLO: back loop only / front loop only
- sk: skip
- sp: space
- st(s): stitch(es)
- rnd(s): round(s)
Special stitches
- Fan: 7 dc in the same stitch. The 4th dc is the center dc.
- Scallop: 5 dc in the same stitch.
- Ch-5 start (mesh rounds): Ch 5, which counts as 1 dc plus a ch-2 space.
Gauge and Checkpoints
Gauge: 16 sc = 4 in (10.2 cm). In pattern, one fan repeat (8 sts) is 2 in (5.1 cm) wide, and one 4-round pattern repeat (Rnds 3–6) is 2 in (5.1 cm) tall.
For a bag holder, circumference matters most. A tube that is too narrow makes bags jam, and one that is too wide lets the fans sag. Test on the piece itself: work the foundation and Rnds 1–6, then lay it flat and measure.
Checkpoints:
- After Rnd 1: the ring lies flat at 8 in (20.3 cm) wide, double layer.
- After Rnd 2: the piece is 0.75 in (1.9 cm) tall.
- After Rnd 6: it is 2.75 in (7.0 cm) tall, and four fans span 8 in (20.3 cm) across one flat side.
- After Rnd 18: 8.75 in (22.2 cm) tall.
- After Rnd 36: 17.5 in (44.5 cm) tall.
- After the cuff: 20 in (50.8 cm) tall.
- After the top edging: 21 in (53.3 cm) tall.
If your piece is too big, go down one hook size to 4.5 mm. If it is too small, go up one hook size to 5.5 mm. Do not change the stitch count, because 64 stitches is what makes the fan, rib, and scallop repeats line up.
Body (Color A, Cream)
Work the body from the top down in joined rounds, with the right side facing you the whole time. Do not turn.
Foundation: With A, ch 64. Sl st to the first ch to form a ring, taking care not to twist the chain.
Rnd 1: Ch 1, sc in each ch around, join with sl st to the first sc. (64 sc)
Rnd 2 (fan round, type 1): Ch 1, sc in the same st as the join, sk 3 sts, fan in the next st, sk 3 sts, sc in the next st; repeat from * 6 more times, sk 3 sts, fan in the next st, sk 3 sts, join with sl st to the first sc. (8 fans + 8 sc: 56 dc + 8 sc = 64 sts)
Each repeat uses 8 stitches of Rnd 1: 1 sc, 3 skipped, 1 fan base, and 3 skipped. Eight repeats use all 64.
Rnd 3 (mesh round, type 1): Ch-5 start (counts as dc and ch-2 sp), sc in the center dc of the next fan, ch 2, dc in the next sc, ch 2; repeat from * 6 more times, sc in the center dc of the last fan, ch 2, join with sl st to the 3rd ch of the beginning ch-5. (8 dc, 8 sc, 16 ch-2 sps = 48 sts)
The dc stitches sit above the valleys between fans, and the sc stitches anchor the top of each fan.
Rnd 4 (fan round, type 2): Ch 3 (counts as dc), 3 dc in the same st as the join, sc in the next sc, fan in the next dc; repeat from * 6 more times, sc in the next sc, 3 dc in the base of the beginning ch-3, join with sl st to the top of the ch-3. (7 full fans + 1 split fan of 4 + 3 sts = 8 fans; 56 fan sts + 8 sc = 64 sts)
Skip all ch-2 spaces. The new fans sit above the old valleys, which shifts the lattice by half a repeat and creates the diamonds.
Rnd 5 (mesh round, type 2): Ch 1, sc in the same st as the join (the top of the ch-3 is the center of the split fan), ch 2, dc in the next sc, ch 2, sc in the center dc of the next fan; repeat from * 6 more times, ch 2, dc in the next sc, ch 2, join with sl st to the first sc. (8 sc, 8 dc, 16 ch-2 sps = 48 sts)
Rnd 6 (fan round, type 1): Ch 1, sc in the same st as the join, fan in the next dc, sc in the next sc; repeat from * 6 more times, fan in the next dc, join with sl st to the first sc. (8 fans + 8 sc = 64 sts)
These fans sit directly above the fans of Rnd 2, which completes one diamond repeat.
Rnds 7–34: Repeat Rnds 3–6 seven more times. (8 pattern repeats in total; Rnd 34 has 64 sts)
Checkpoint: the body measures 16.75 in (42.5 cm) from the foundation.
Rnd 35: Repeat Rnd 3. (48 sts)
Rnd 36 (conversion round): Ch 1, sc in each dc and each sc (16 sts worked 1 per existing stitch), and work 3 sc in each ch-2 sp (16 sps x 3 = 48 sc added), join with sl st to the first sc. (16 + 48 = 64 sc)
This round turns the mesh back into a solid edge of exactly 64 stitches, ready for the cuff. Fasten off A.
Checkpoint: the body is 17.5 in (44.5 cm) long and 8 in (20.3 cm) wide flat.
Bottom Cuff (Color B, Yellow)
The cuff is post-stitch ribbing that hugs the bags. The final decrease round pulls it in to a small dispensing hole.
Rnd 37: Join B in any st of Rnd 36. Ch 2 (does not count as a st), hdc in each st around, join with sl st to the first hdc. (64 hdc)
Rnd 38: Ch 2 (does not count as a st), FPdc around the next st, BPdc around the next st; repeat from * 31 more times, join with sl st to the first FPdc. (32 FPdc + 32 BPdc = 64 sts)
Rnds 39–41: Repeat Rnd 38, working each FPdc around an FPdc and each BPdc around a BPdc. (64 sts each round)
Rnd 42 (decrease round): Ch 1, sc2tog around, join with sl st to the first sc2tog. (32 sts)
Fasten off, leaving a 6 in (15.2 cm) tail. Weave the tail in firmly around the opening so the edge can’t stretch out.
Checkpoint: the cuff is 2.5 in (6.4 cm) deep, and the opening is about 2.5 in (6.4 cm) across. At gauge, the 32 stitches make an 8 in (20.3 cm) edge, and the ribbing pulls it in even more.
Top Edging and Strap (Color B, Yellow)
Turn the tube upside down so the foundation chain is on top.
Edging gauge: The edging uses the same gauge of 16 sc = 4 in (10.2 cm). That gives 64 sts around, or 32 sts per flat side over 8 in (20.3 cm). Because it matches the body exactly, the edging won’t ruffle or pull in.
Rnd 1: Join B in the free loop of any foundation ch. Ch 1, sc in each free loop of the foundation ch around, join with sl st to the first sc. (64 sc: 32 per flat side)
Rnd 2: Ch 1, sc in each st around, join. (64 sc: 32 per flat side)
Place a marker in the 1st st of Rnd 2 and another in the 33rd st. The two markers sit on opposite sides of the tube and show where the strap goes.
Rnd 3 (scallop round, FLO): Working in front loops only, ch 1, sc in the first st, sk 1 st, scallop in the next st, sk 1 st, sc in the next st; repeat from * 14 more times, sk 1 st, scallop in the next st, sk 1 st, join with sl st to the first sc. (16 scallops + 16 sc: 80 dc + 16 sc = 96 sts; 8 scallops per flat side)
Why the math works: Each scallop repeat uses 4 stitches, and 64 ÷ 4 = 16 scallops. That puts exactly 8 scallops on each 32-stitch side, with no partial repeat. The ribbing uses a 2-stitch repeat (64 ÷ 2 = 32 pairs), and the fans use an 8-stitch repeat (64 ÷ 8 = 8 fans). All three repeats divide evenly into 64.
The back loops of Rnd 2 stay free behind the scallops, ready for the strap.
Strap:
Row 1: With the inside of the tube facing, join B in the free back loop of the 1st st of Rnd 2 (marked). Ch 1, sc in the back loop of this st and of the next 2 sts. (3 sc)
Rows 2–54: Ch 1, turn, sc in each st across. (3 sc)
Checkpoint: the strap is 12 in (30.5 cm) long and 0.75 in (1.9 cm) wide.
Check that the strap isn’t twisted. Line up the last row with the free back loops of the 33rd, 34th, and 35th sts of Rnd 2, then sl st through both layers across. (3 sl sts) Fasten off and weave in the ends.
Final Blocking
- Weave in any remaining ends along the wrong side of the solid rounds, not through the lace.
- Spray the holder lightly with water until it is damp but not dripping.
- Roll a towel into a cylinder about 5 in (12.7 cm) across and slide it inside the tube.
- Gently ease the body to 17.5 in (44.5 cm) long and 16 in (40.6 cm) around.
- Open each fan with your fingers so the diamonds are even. Pin the top scallops into neat arcs.
- Leave the ribbed cuff unpinned so it keeps its stretch.
- Lay the strap flat and straight beside the tube.
- Let everything dry completely, for at least 12 hours, before you hang the holder.
Final Quality-Control Checklist
- Circumference is 16 in (40.6 cm), and flat width is 8 in (20.3 cm).
- Total length is 21 in (53.3 cm), not counting the strap.
- Every fan round has 8 fans, and the fans alternate to form diamonds.
- The top has 16 scallops, with 8 on each flat side.
- The cuff has 32 clean vertical ribs.
- The bottom opening is about 2.5 in (6.4 cm) across and lets one bag through at a time.
- The strap is attached at two opposite points and is not twisted.
- All ends are hidden and secure.
Troubleshooting
The fans stack straight instead of making diamonds. On type 2 fan rounds, work the fans into the dc stitches of the mesh round, not the sc stitches. Check Rnd 4.
A mesh round has the wrong count. Count the dc, sc, and ch-2 spaces separately; you need 8, 8, and 16. Most often a ch-2 is missing at the join.
The join line slants. A slight slant is normal in joined rounds. Join into the exact stitch named, and don’t turn.
The bottom opening is too loose. Work a second sc2tog round (16 sts), or weave a strand of B through Rnd 42 and cinch it.
Bags won’t come out. Undo Rnd 42 and rework it as sc in the next st, sc2tog around, for about 43 sts.
The strap stretches. Work it with a hook one size smaller, or add a row of sl sts along each long edge.
The top flares. Your edging is looser than the body. Rework Rnds 1–3 of the edging with a smaller hook.
Care
Machine wash cold on a gentle cycle in a mesh bag, then reshape and dry flat. Don’t hang the holder while it’s wet, because the weight of the water will stretch the strap and the lattice.

Final Notes
Every measurement builds on one number: 64 stitches at 16 sc = 4 in (10.2 cm), which gives 16 in (40.6 cm) around. The foundation and Rnds 1–2 reach 0.75 in (1.9 cm). Eight 2 in (5.1 cm) pattern repeats bring the body to 16.75 in (42.5 cm), and the closing mesh and conversion rounds finish it at 17.5 in (44.5 cm). The cuff adds 2.5 in (6.4 cm), for 20 in (50.8 cm). The scalloped top adds 1 in (2.5 cm), for a total of 21 in (53.3 cm), and a 12 in (30.5 cm) strap completes the holder.
Check each measurement as you reach it, and your holder will match. Then fill it with bags, hang it by the door, and enjoy a tidier kitchen.
Happy crocheting!