

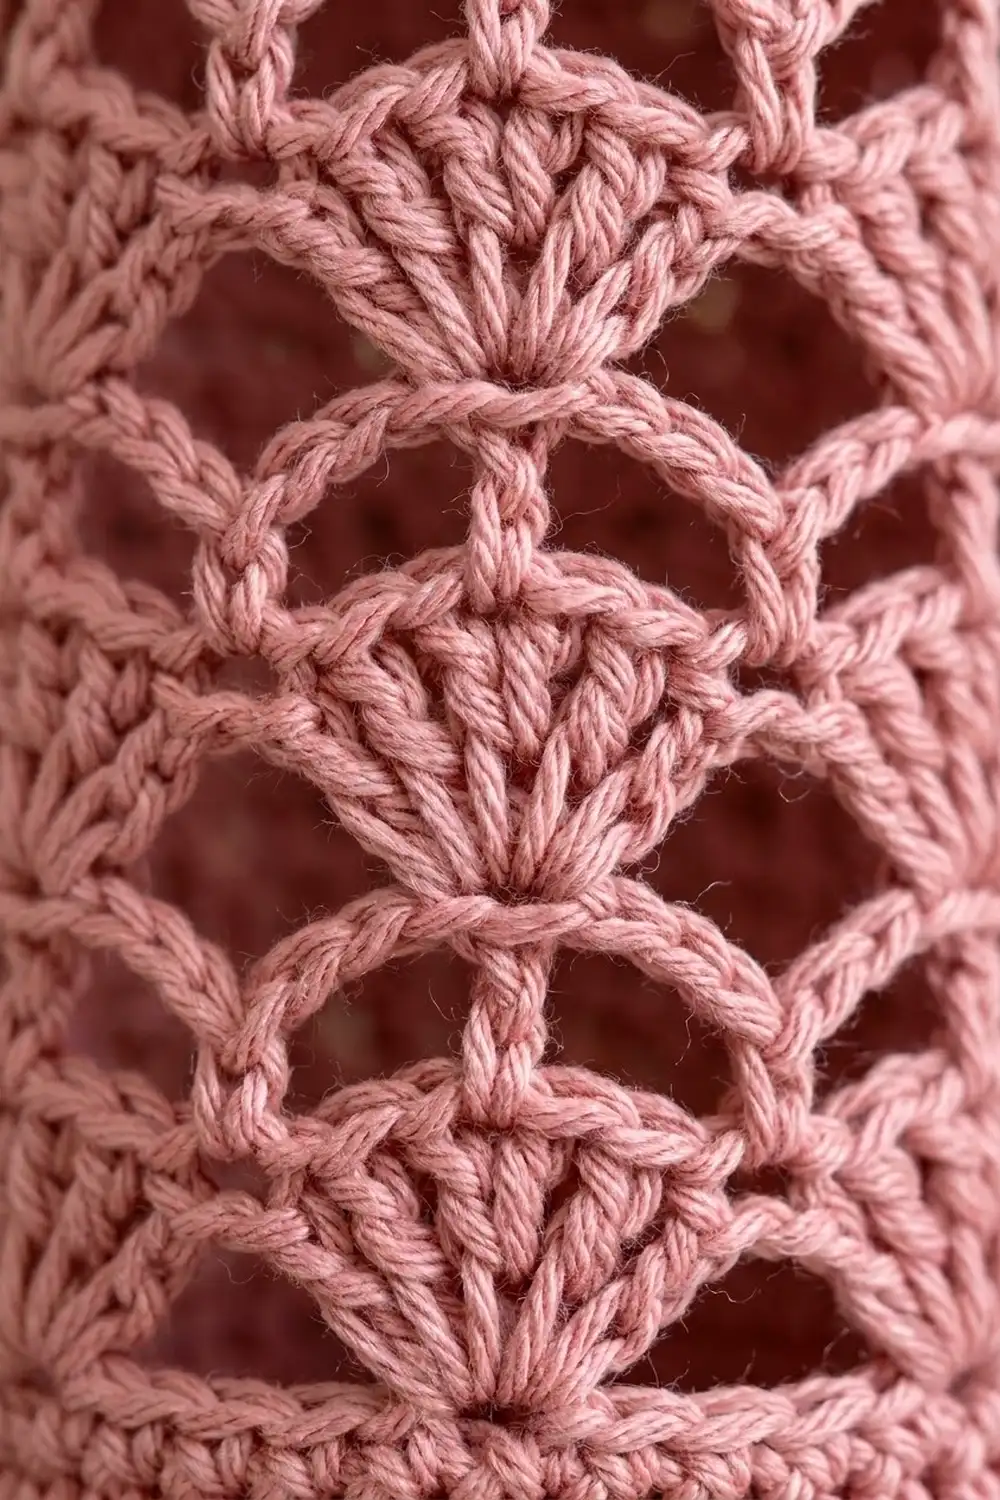
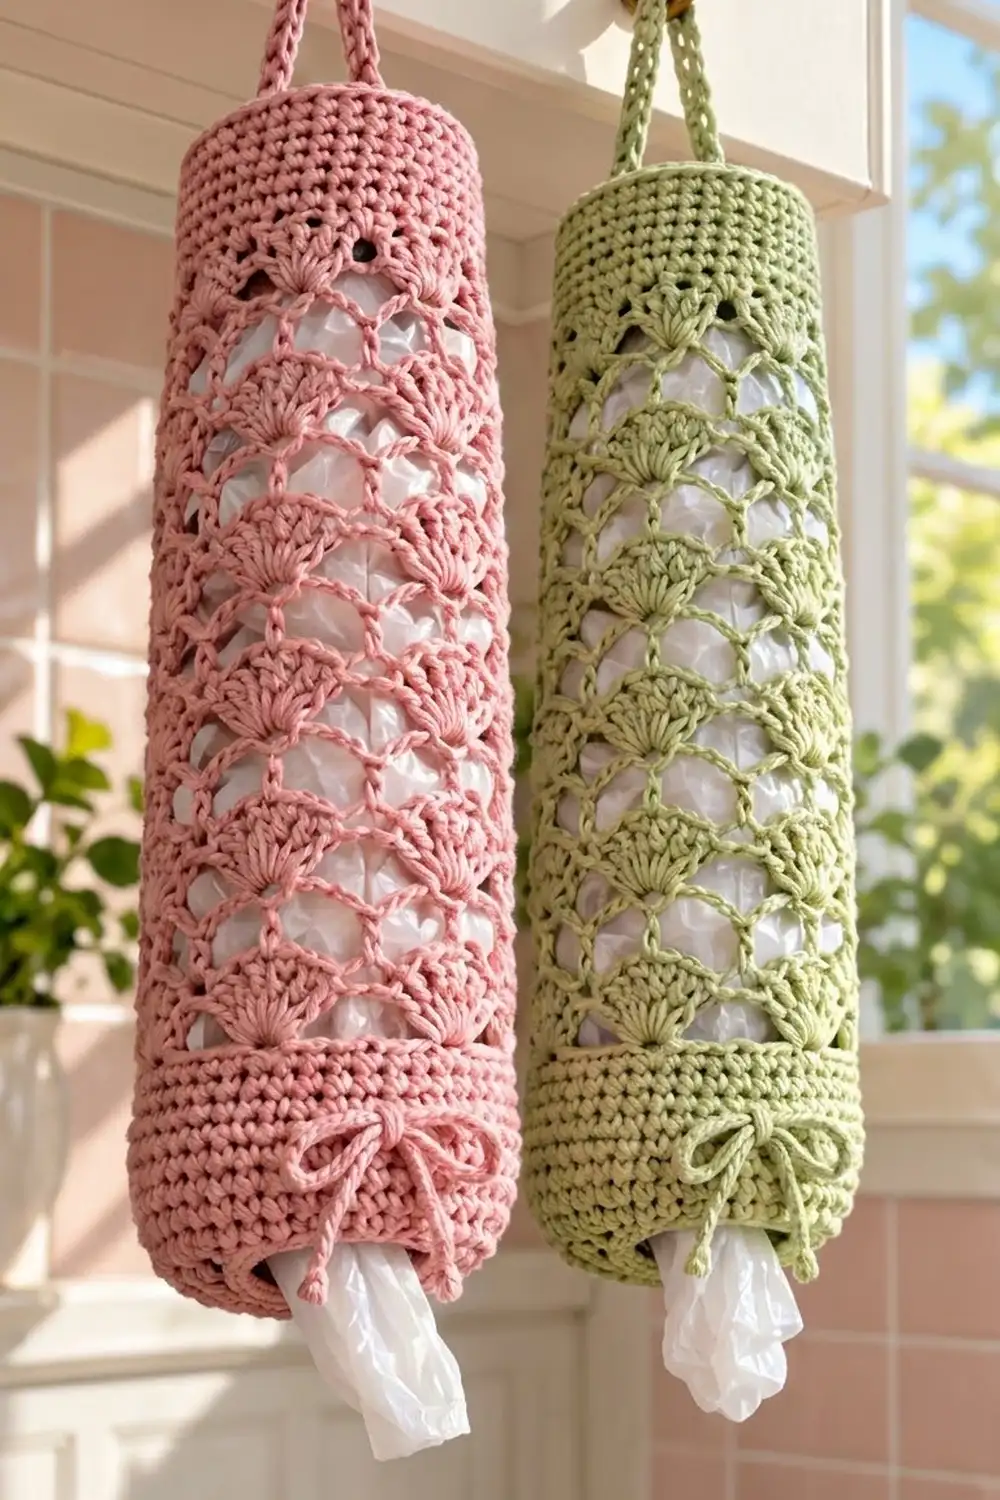
This plastic bag holder is a tall, slim tube with a lacy middle. Rows of small fans sit on chain arches, and each row of fans is offset from the one below, so the lace looks like overlapping seashells. Solid single crochet bands at the top and bottom keep the holder firm, and the bags show softly through the openwork.
The sample is worked in dusty rose cotton, and the same pattern looks just as fresh in sage green. Each holder uses one color only. A crocheted hanging loop at the top fits a cabinet hook. A chain drawstring threads through an eyelet round near the bottom and ties in a bow, gathering the lower opening so you can pull bags out one at a time. You fill it from the top and pull bags out from the bottom.
This pattern uses US crochet terms. The finished holder measures 6 in (15.2 cm) wide when flat, 12 in (30.5 cm) around, and 16 in (40.6 cm) long, not counting the hanging loop.
You make the holder as one piece, worked in joined rounds from the bottom up: a solid bottom band with an eyelet round, 19 rounds of shell lace, and a solid top band. Then you add a short strap for the hanging loop and a chain drawstring. You don’t need to join any pieces, and the whole project fits in one ball of yarn.
Finished Size and Construction
- Finished size: 6 in (15.2 cm) wide flat × 16 in (40.6 cm) long; 12 in (30.5 cm) around
- Hanging loop: rises about 4 in (10.2 cm) above the top edge
- Skill level: Easy-intermediate
- Terminology: US crochet terms
- Yarn weight: Worsted (#4), cotton or cotton blend
- Hook: 5.0 mm (US H-8)
- Number of pieces: 1 tube, plus strap and drawstring
- Layout: Single tube worked in joined rounds, no turning
- Piece size: 48 stitches around, 24 stitches per flat side
- Size before border: 6 in (15.2 cm) wide flat × 14.5 in (36.8 cm) long
- Border depth: 1.5 in (3.8 cm) top band
Materials
Choose a smooth, mercerized or matte cotton in worsted weight. Cotton keeps its shape well and shows the shell texture clearly. Acrylic also works, but it tends to stretch longer when the holder is full of bags. Pick a mid-tone color if you can. Very dark yarn hides the fans, and very pale yarn shows kitchen marks quickly.
- Main color (sample: dusty rose; alternate: sage green): 100 g / 170 m (186 yd)
These quantities include a margin of about 15%, so one 100 g ball is enough for the holder, strap, and drawstring. To make a matching pair in two colors, buy one ball of each.
Tools:
– 5.0 mm (US H-8) crochet hook
– Stitch marker
– Tapestry needle
– Scissors
– Measuring tape
– Blocking mat, rust-proof pins, and a spray bottle
– Optional: a rolled towel or a 4 in (10.2 cm) wide cardboard tube for blocking
Abbreviations (US Terms)
- ch – chain
- sl st – slip stitch
- sc – single crochet
- hdc – half double crochet
- dc – double crochet
- sk – skip
- sp – space
- st(s) – stitch(es)
- rnd(s) – round(s)
- rep – repeat
Special stitches:
– Shell: 7 dc worked into the same stitch or space.
– Arch: a ch-5 loop between two sc.
Gauge and Checkpoints
Gauge: 16 sc and 16 rnds = 4 in (10.2 cm) in sc worked in the round.
Lace gauge: One shell round is 0.75 in (1.9 cm) tall. One arch round is 0.5 in (1.3 cm) tall, so one pair of arch and shell rounds is 1.25 in (3.2 cm).
Before you start the full holder, make a test band. Chain 48, join, and work 6 rnds of sc. Lay it flat and measure it. It should be 6 in (15.2 cm) wide and 1.5 in (3.8 cm) tall. If it is, keep going, because this test band becomes the start of your bottom band.
Checkpoints:
1. After the bottom band (Rnd 9): 6 in (15.2 cm) wide flat, 2.5 in (6.4 cm) tall.
2. After Lace Rnd 3: 4.5 in (11.4 cm) total length.
3. After Lace Rnd 19: 14.5 in (36.8 cm) total length.
4. After the top band: 16 in (40.6 cm) total length.
If your piece is too big, go down one hook size (4.5 mm). If it is too small, go up one size (5.5 mm). Don’t add or remove stitches. The lace needs a multiple of 6 stitches, and 48 gives exactly 8 repeats. If the width is right but the lace is too long, chain the arches a little more tightly instead of changing the hook.
Bottom Band
Ch 48. Without twisting the chain, sl st into the first ch to form a ring. Place a marker in the first stitch of each round and move it up as you go. The joining seam marks the center back of the holder.
Rnd 1: Ch 1, sc in each ch around, join with sl st to first sc. (48 sc)
Rnds 2–3: Ch 1, sc in each st around, join. (48 sc)
Rnd 4 (eyelet round): Ch 4 (counts as dc + ch 1), sk next st, dc in next st, ch 1, sk next st; rep from * 22 more times, join with sl st to 3rd ch of beg ch-4. (24 dc + 24 ch-1 sps = 48 sts)
The drawstring will run through these 24 eyelets.
Rnd 5: Ch 1, sc in each dc and in each ch-1 sp around, join. (24 sc in dc + 24 sc in sps = 48 sc)
Rnds 6–9: Ch 1, sc in each st around, join. (48 sc)
Checkpoint: The band is 2.5 in (6.4 cm) tall. That’s 8 sc rnds at 0.25 in (0.6 cm) each, plus 0.5 in (1.3 cm) for the eyelet round. It should be 6 in (15.2 cm) wide when flat.
Shell Lace Section
Each shell is centered over an arch, and each arch connects the centers of two shells. Because of this, every new row of fans sits halfway between the fans below, which gives the staggered seashell look.
Lace Rnd 1 (shell round): Ch 1, sc in first st, sk 2 sts, 7 dc in next st, sk 2 sts, sc in next st; rep from * 6 more times, sk 2 sts, 7 dc in next st, sk 2 sts, join with sl st to first sc. (8 shells + 8 sc; uses all 48 base sts: 8 repeats × 6 sts)
Lace Rnd 2 (arch round): Sl st in next 4 dc (to the center dc of the first shell), ch 1, sc in same st, ch 5, sc in 4th dc of next shell; rep from * 6 more times, ch 5, join to first sc. (8 sc + 8 ch-5 arches)
Lace Rnd 3 (shell round): Ch 1, sc in same st as join, 7 dc in next ch-5 arch, sc in next sc; rep from * 6 more times, 7 dc in last arch, join to first sc. (8 shells + 8 sc)
Checkpoint: Total length is now 4.5 in (11.4 cm). The new shells should sit between the shells of Lace Rnd 1, not directly on top of them.
Lace Rnds 4–17: Rep Lace Rnds 2–3 seven more times. Each arch round has 8 sc + 8 arches. Each shell round has 8 shells + 8 sc.
After Lace Rnd 17, the lace is 10.75 in (27.3 cm) tall: 0.75 in (1.9 cm) for Rnd 1 plus 8 pairs at 1.25 in (3.2 cm) each.
Lace Rnd 18 (arch round): Work as Lace Rnd 2. (8 sc + 8 ch-5 arches) The lace is now 11.25 in (28.6 cm) tall.
Lace Rnd 19 (fill round): Ch 1, sc in same st as join, (hdc, 3 dc, hdc) in next ch-5 arch, sc in next sc; rep from * 6 more times, (hdc, 3 dc, hdc) in last arch, join to first sc. (8 sc worked 1 per sc + 40 sts worked into 8 arches = 48 sts)
The tall dc stitches go in the middle of each arch, where the edge dips lowest. The sc stitches go over the shell centers, where the edge is already high. Together they make a level edge for the top band.
Checkpoint: The lace is 12 in (30.5 cm) tall, and the total length is 14.5 in (36.8 cm). The piece should still be 6 in (15.2 cm) wide flat.
Border: Top Band and Edges
On this tube, the top band is the border. It uses the same gauge as the bottom band: 16 sc and 16 rnds = 4 in (10.2 cm). Flatten the tube with the seam at center back, and each flat side holds exactly 24 sts.
Top Rnd 1: Ch 1, sc in each st around, join. (48 sc: 24 per flat side)
Top Rnds 2–6: Ch 1, sc in each st around, join. (48 sc: 24 per flat side) Fasten off.
Why the math works: The fill round brings the count back to exactly 48 sts, the same as the bottom band. At 16 sts per 4 in (10.2 cm), 48 sts make 12 in (30.5 cm) around, or 24 sts and 6 in (15.2 cm) per flat side. Because the top band matches the bottom band exactly, the tube hangs straight instead of flaring or pulling in. Six rounds at 0.25 in (0.6 cm) each make a 1.5 in (3.8 cm) band.
Bottom edge finish: Turn the tube upside down. Join yarn at the back seam and work 1 sl st loosely into each free loop of the foundation chain around. Join and fasten off. (48 sl st: 24 per flat side) This firms up the lower edge without adding length.
Hanging Strap
Flatten the tube with the seam at center back. You’ll work the strap from the top edge, centered over the seam.
Row 1: With the outside facing, join yarn in st 46 of Top Rnd 6, sc in same st and in next 2 sts (sts 46–48), turn. (3 sc)
Rows 2–36: Ch 1, sc in each st across, turn. (3 sc)
The strap is 9 in (22.9 cm) long and 0.75 in (1.9 cm) wide. Fasten off and leave a 10 in (25.4 cm) tail. Skip sts 1–3 of Top Rnd 6. Fold the strap into a loop and sew Row 36 to the inside of sts 4–6. The loop rises about 4 in (10.2 cm) above the edge.
Drawstring
Ch 120, or chain until the cord is 30 in (76.2 cm) long. Fasten off and knot each end. Starting at the center front, weave the cord in and out through the 24 eyelets of Rnd 4 so both ends come out at the front, side by side. Pull the ends until the lower opening is about 2 in (5.1 cm) across, then tie a bow.
Final Blocking
- Weave in all ends along the solid bands, where they won’t show through the lace.
- Mist the whole holder until it is damp but not dripping.
- Slide the holder over a rolled towel or a tube about 4 in (10.2 cm) wide so it keeps its round shape.
- Ease it to 16 in (40.6 cm) long. Gently open each shell into a fan and each arch into a smooth curve.
- Check that the top and bottom bands are both 6 in (15.2 cm) wide when flat.
- Pin the strap flat on the mat at 9 in (22.9 cm) long.
- Let everything dry completely before you thread the drawstring or fill the holder.
Final Quality-Control Checklist
- The body is 6 in (15.2 cm) wide flat and 16 in (40.6 cm) long.
- Every solid round has 48 sts, and every lace round has 8 repeats.
- The shells are staggered from round to round, and no two sit directly on top of each other.
- The tube isn’t twisted, and the join line runs straight up the back.
- The strap is sewn on securely and centered on the back.
- The drawstring passes through all 24 eyelets and gathers evenly.
- All ends are hidden in the solid bands.
Troubleshooting
The tube is twisted: The foundation chain was twisted when you joined it. Rip back and rejoin, with all the chain bumps facing the same way.
The shells line up instead of staggering: You worked a shell into a sc. Shells always go into arches, and sc always go into sc.
The lace edge is wavy after Rnd 19: Your arches are too long. Chain more tightly or try ch-4 arches, then measure the length again.
The join line drifts sideways: Always work the first sc into the same stitch as the join, not the next one.
The holder stretches too long when full: Use a firmer cotton, or go down a hook size for the lace only.
Bags fall out: Pull the drawstring tighter, to an opening of about 1.5 in (3.8 cm).
The strap leans to one side: Count again from the seam. The strap should start in st 46 and be sewn to sts 4–6.
Care
Hand wash in cool water with mild soap, press out the water in a towel, and dry flat or on a tube. Reshape the shells while the holder is still damp.
Final Notes
The measurements build step by step. A gauge of 16 sts per 4 in (10.2 cm) gives 48 sts and 12 in (30.5 cm) around, or 6 in (15.2 cm) flat. The bottom band is 2.5 in (6.4 cm), the lace adds 12 in (30.5 cm), and the top band adds 1.5 in (3.8 cm), for a total of 16 in (40.6 cm). Check each stage as you go, and your holder will hang straight and neat.
Happy crocheting!