

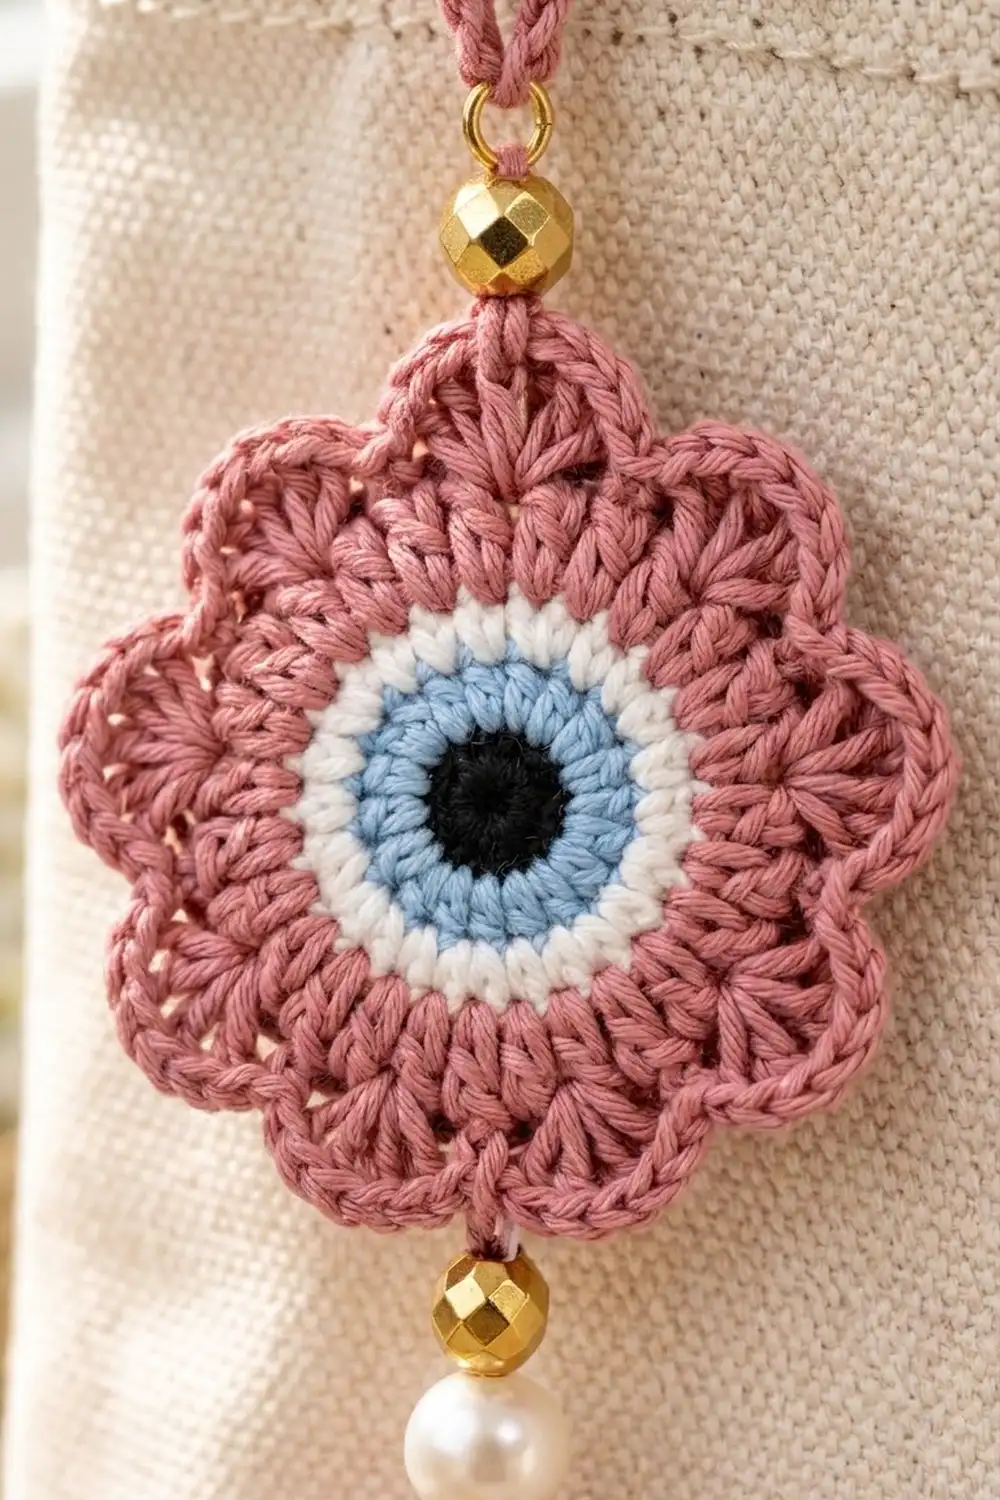
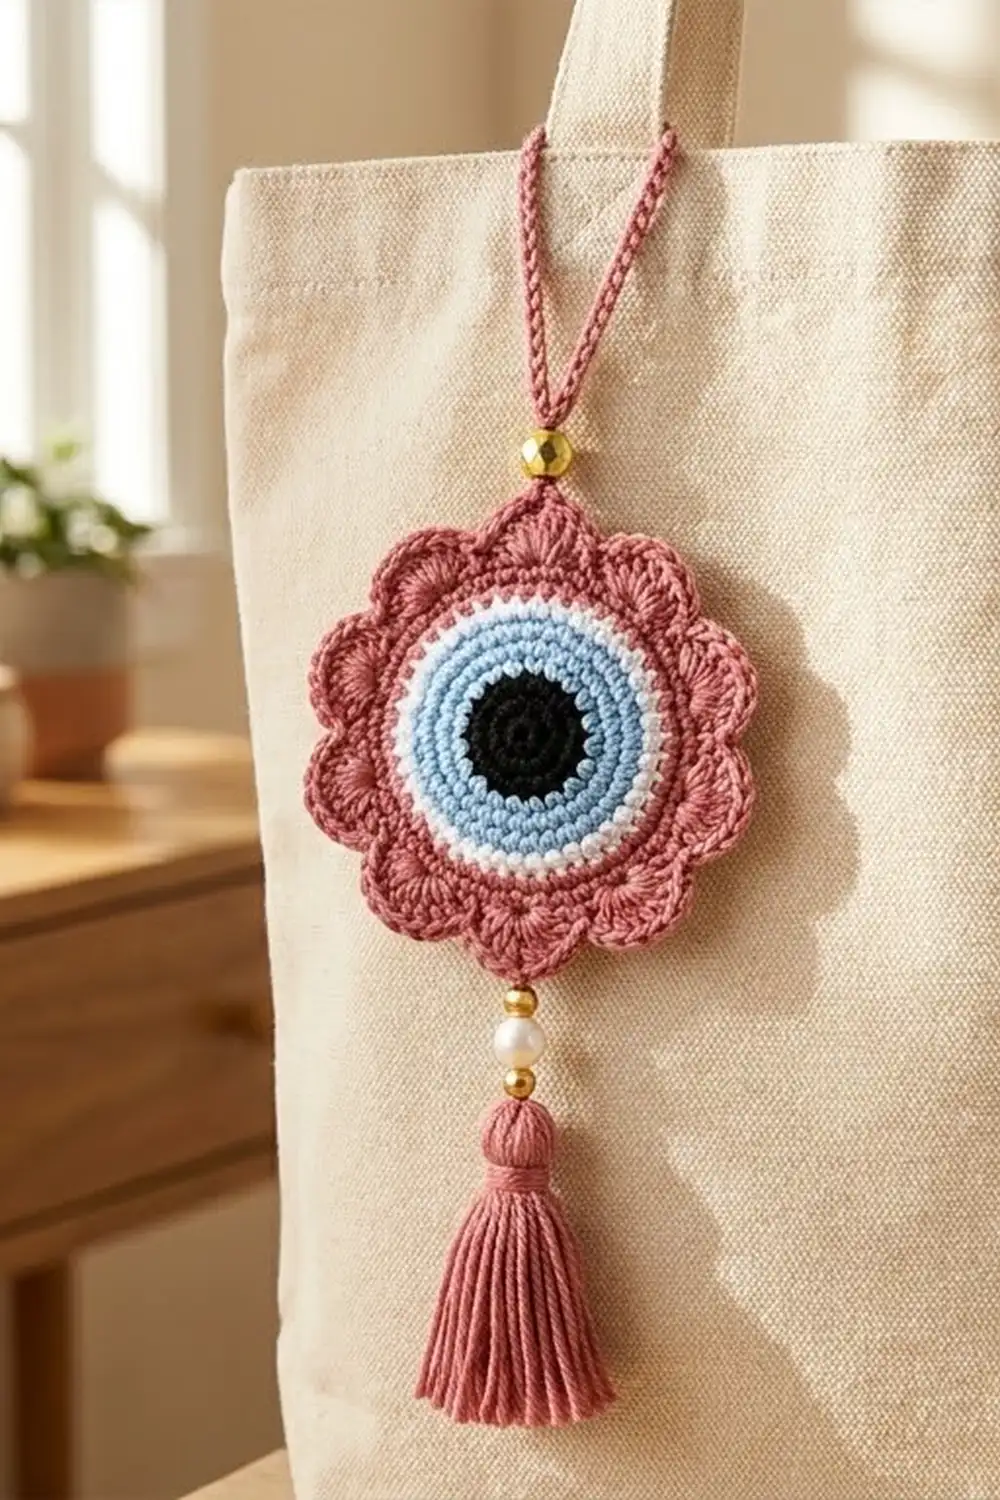
This little charm pairs a classic evil-eye center with a soft scalloped flower edge. A black pupil sits inside a sky-blue ring and a crisp white ring, and a dusty-rose petal round frames the whole eye like a bloom.
The style is calm and modern: matte cotton, clean blocks of color, and a few small accents. A faceted gold bead sits at the base of the hanging loop. A gold bead, a pearl, and a full rose tassel finish the bottom. It looks lovely clipped to a canvas tote, a backpack zipper, or a set of keys.
The pattern uses US crochet terms. The flower motif measures 2.75 in (7.0 cm) across from petal tip to petal tip. The full charm hangs about 7.25 in (18.4 cm) long, including the loop and tassel.
Construction is simple. You work one motif in joined rounds from the center out, changing color as you go. Then you add a chain loop with a bead at the top, and a bead stack and tassel at the bottom. You don’t sew any separate pieces together.
Finished Size and Construction
- Motif size: 2.75 in (7.0 cm) across, petal tip to petal tip
- Total charm length: about 7.25 in (18.4 cm)
- Skill level: Easy
- Terminology: US crochet terms
- Yarn weight: DK / light (#3) cotton
- Hook: 3.25 mm (US D-3)
- Number of pieces: 1 motif, plus 1 tassel
- Layout: single motif, loop at the top petal, tassel at the bottom petal
- Eye size (before rose edge): 1.5 in (3.8 cm)
- Rose edge depth: 0.625 in (1.6 cm) on each side
Materials
Choose a smooth DK cotton, either mercerized or matte. Cotton keeps the stitches crisp and helps the tassel hang straight. Avoid fuzzy yarns, because they blur the eye rings.
- Color A – Black: 2 g, about 5 m
- Color B – Light Blue: 2 g, about 5 m
- Color C – White: 2 g, about 4 m
- Color D – Dusty Rose: 8 g, about 18 m (motif, loop, tassel)
All quantities include a margin for joins, tails, and a test motif.
Tools and notions:
- 3.25 mm (US D-3) crochet hook
- Tapestry needle
- Big-eye beading needle (optional, helps thread beads)
- 2 faceted gold beads, 6 mm, with holes at least 1.5 mm wide
- 1 white pearl bead, 8 mm, with a hole at least 1.5 mm wide
- Stiff card, 2.75 in (7.0 cm) wide, for the tassel
- Small sharp scissors
- Stitch marker
- Lobster clasp or key ring (optional)
Abbreviations (US Terms)
- ch – chain
- sl st – slip stitch
- sc – single crochet
- hdc – half double crochet
- dc – double crochet
- sk – skip
- st(s) – stitch(es)
- MR – magic ring
- rep – repeat
Special stitch – Shell: 7 dc worked into the same stitch.
Color change: Work the last sl st of a round with the new color. Pull the new color through and keep going. Cut the old color, leaving a 4 in (10.2 cm) tail.
Gauge and Checkpoints
Exact gauge doesn’t matter much for a charm, but it does control how flat the motif lies. Make one motif as your test piece and measure it at each checkpoint below. Being off by up to 0.125 in (0.3 cm) either way is fine.
- After Round 2: 0.75 in (1.9 cm) across
- After Round 4: 1.25 in (3.2 cm) across
- After Round 5: 1.5 in (3.8 cm) across
- After Round 6: 1.75 in (4.4 cm) across
- After Round 7: 2.75 in (7.0 cm) across, petal tip to petal tip
If your motif is too big: go down to a 3.0 mm hook. If it is too small or cups: go up to a 3.5 mm hook.
If the center ruffles, the increases are too loose for your tension, so drop a hook size. If it cups like a bowl, go up a hook size. Fix this at the eye stage, before the rose edge, because the petals make any cupping more obvious.
Motif Pattern
Join every round with a sl st to the first stitch. The ch-1 at the start of a round does not count as a stitch. The ch-2 at the start of Round 6 does not count either.
Black Pupil
Round 1 (Color A): Make a MR. Ch 1, 8 sc in ring. Pull the ring tightly closed. Sl st to first sc. (8 sc)
Round 2 (Color A): Ch 1, 2 sc in each st around. Join with Color B. (16 sc)
Checkpoint: 0.75 in (1.9 cm) across. The pupil should be a smooth, solid black disc.
Blue Ring
Round 3 (Color B): Ch 1, sc in next st, 2 sc in next st; rep from * 7 more times. Sl st to first sc. (24 sc)*
Round 4 (Color B): Ch 1, sc in next 2 sts, 2 sc in next st; rep from * 7 more times. Join with Color C. (32 sc)*
Checkpoint: 1.25 in (3.2 cm) across.
White Ring
Round 5 (Color C): Ch 1, sc in next 3 sts, 2 sc in next st; rep from * 7 more times. Join with Color D. (40 sc)*
Checkpoint: 1.5 in (3.8 cm) across. This is the full eye, before the rose edge.
For a rounder circle, move the increases around. For example, in Round 5 work 2 sc in the first st, then sc in the next 3 sts. That way the increases don’t stack up into corners.
Rose Flower Edge (Border)
The rose edge is this motif’s border. It has two rounds: a solid hdc round that adds a little width, and a shell round that forms 8 petals.
Border gauge: Round 6 measures 1.75 in (4.4 cm) across. Along the outer edge, one shell petal spans about 1.1 in (2.8 cm), measured from the sc before it to the sc after it.
Round 6 (Color D): Ch 2 (does not count as a st), hdc in next 4 sts, 2 hdc in next st; rep from * 7 more times. Sl st to first hdc. (48 hdc)*
Count check: 8 repeats x (4 + 2) = 48.
Round 7 (Color D): Ch 1, sc in same st as join. Sk 2 sts, 7 dc in next st (shell), sk 2 sts, sc in next st; rep from * 6 more times, then rep from * to ** once. Sl st to first sc. (8 shells and 8 sc; 56 dc + 8 sc = 64 sts)*
Fasten off and weave in the end.
Why the Math Works
Round 6 has 48 stitches. Each petal repeat uses exactly 6 of them: 1 for the sc, 2 skipped, 1 for the shell, and 2 skipped. So 48 ÷ 6 = 8 petals, with nothing left over.
The 8 petals line up with the 8 increase points from the earlier rounds, so the scallops stay evenly spaced around the eye. Each shell has 7 dc, so the 4th dc is the center. That center dc is where you attach the loop and the tassel.
Round 6 adds 0.125 in (0.3 cm) on each side, and Round 7 adds 0.5 in (1.3 cm) on each side. Together that’s 0.625 in (1.6 cm) per side, so 1.5 in + 0.625 in + 0.625 in = 2.75 in (7.0 cm).
Hanging Loop
Choose one petal to be the top. The bottom petal is 4 petals away from it in either direction, directly opposite.
- Cut a 24 in (61.0 cm) length of Color D. Thread 1 gold bead onto it and slide the bead about 12 in (30.5 cm) along.
- Using the short end, join with a sl st into the center (4th) dc of the top shell.
- Ch 2. Slide the bead up against the hook. Ch 1 over the bead to lock it in place.
- Ch 18.
- Sl st into the ch that locked the bead. This closes the loop.
- Fasten off. Weave the tail back down through the bead and into the shell.
The loop should stand about 1.5 in (3.8 cm) tall above the bead. The bead adds about 0.25 in (0.6 cm).
Tassel and Bead Stack
Make the Tassel
- Wrap Color D around the 2.75 in (7.0 cm) card 30 times.
- Slide an 8 in (20.3 cm) strand of Color D under the wraps at the top. Tie it tightly with a square knot. Leave both ends long, because this is the tie cord.
- Cut the wraps open along the bottom edge.
- Take a 12 in (30.5 cm) strand of Color D. Wrap it firmly around the tassel 5 to 6 times, 0.375 in (1.0 cm) below the top. Knot it and bury both ends down inside the tassel.
- Trim the bottom evenly so the tassel measures 2.25 in (5.7 cm) from top to tip.
Attach the Beads and Tassel
- Thread both ends of the tie cord through the pearl bead, then through the second gold bead. A beading needle helps here.
- Push both ends through the center (4th) dc of the bottom shell, one end on each side of a strand.
- Pull up until the gold bead rests against the petal and the pearl rests on top of the tassel. The bead stack should span about 0.5 in (1.3 cm).
- Tie a tight square knot on the back of the motif. Add a drop of fabric glue if you like, then weave the ends into the rose stitches.
Final Blocking
- Weave in every remaining tail inside its own color, so nothing shows through the white ring.
- Lightly mist the motif with water until it is damp, not wet.
- Pin it flat on a blocking mat, face up. Pin the center of the rose edge first, then each of the 8 petals.
- Shape each shell into a rounded scallop with your fingers.
- Check the size: 2.75 in (7.0 cm) from petal tip to petal tip, both side to side and top to bottom.
- Let it dry completely.
- Mist the tassel, smooth the strands straight with your fingers, and let it hang to dry.
- If any strands stick out, trim the tassel back to 2.25 in (5.7 cm).
Final Quality-Control Checklist
- Black pupil is round, with the magic ring closed and no hole
- Round counts are 8, 16, 24, 32, 40, and 48 sts, then 8 shells and 8 sc
- Blue and white rings are an even width all the way around
- No color tails show through the white ring
- All 8 petals are the same size and evenly spaced
- Motif measures 2.75 in (7.0 cm) across and lies flat
- Loop is centered on the top petal and stands 1.5 in (3.8 cm) tall
- Gold bead at the loop is locked and does not slide
- Tassel hangs from the bottom petal, directly opposite the loop
- Tassel measures 2.25 in (5.7 cm) with an even bottom edge
- Full charm hangs about 7.25 in (18.4 cm) long
Troubleshooting
The center has a hole. Pull the magic ring tighter, then weave the tail around the ring once more before trimming.
The eye ruffles. Your increases are too loose. Drop to a 3.0 mm hook or tighten your tension.
The eye cups. Go up to a 3.5 mm hook, or block more firmly.
The petals don’t fit evenly. Recount Round 6. It must have exactly 48 hdc for 8 even petals.
The color joins show a jog. Work the joining sl st firmly with the new color, and start each round in a different spot.
The beads won’t fit on the yarn. Use beads with larger holes, or thread a single strand and tie it off twice.
The charm hangs crooked. Make sure the loop and the tassel are each on the center dc of opposite shells. Count 4 petals around from the top.
The tassel looks thin. Add 5 to 10 more wraps on the card.
Care
Hand wash in cool water with mild soap, press out the water in a towel, and lay flat to dry. Don’t leave the beads soaking for long.
Final Notes
Here is how the size builds. The black pupil reaches 0.75 in (1.9 cm). The blue ring brings it to 1.25 in (3.2 cm). The white ring makes the full eye 1.5 in (3.8 cm). The hdc round grows it to 1.75 in (4.4 cm), and the 8 shell petals finish the flower at 2.75 in (7.0 cm).
Then add a 1.5 in (3.8 cm) loop, a 0.25 in (0.6 cm) gold bead, a 0.5 in (1.3 cm) bead stack, and a 2.25 in (5.7 cm) tassel. The finished charm hangs about 7.25 in (18.4 cm) long.
If you check each stage as you go, the eye will stay round, flat, and centered. Make one for every bag, or try new petal colors for gifts.
Happy crocheting!