

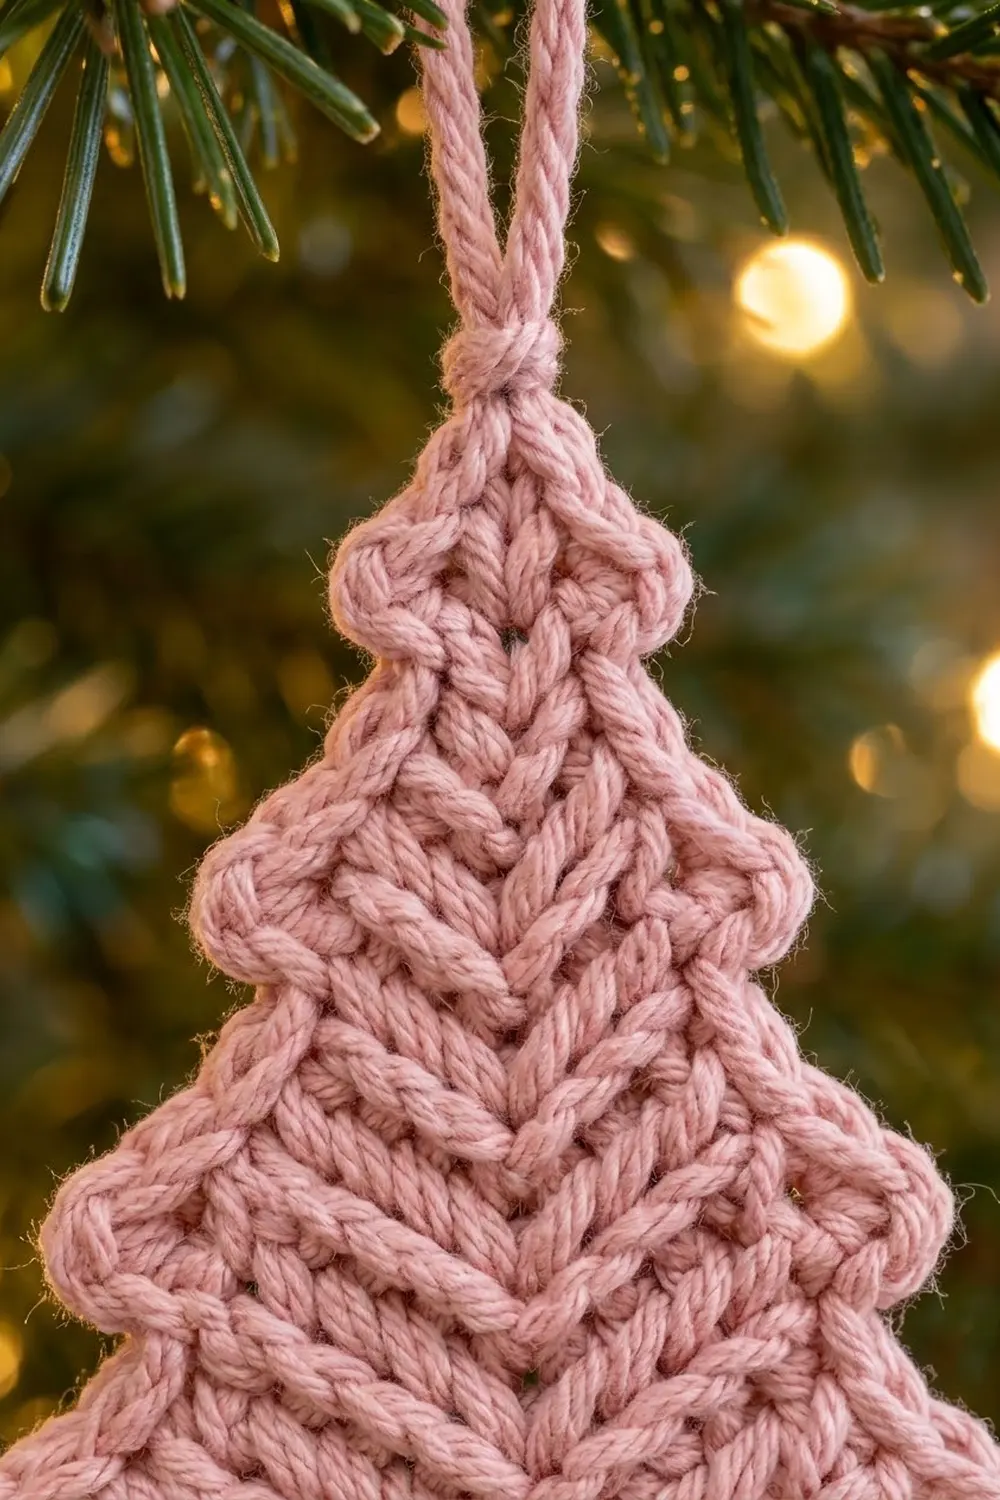
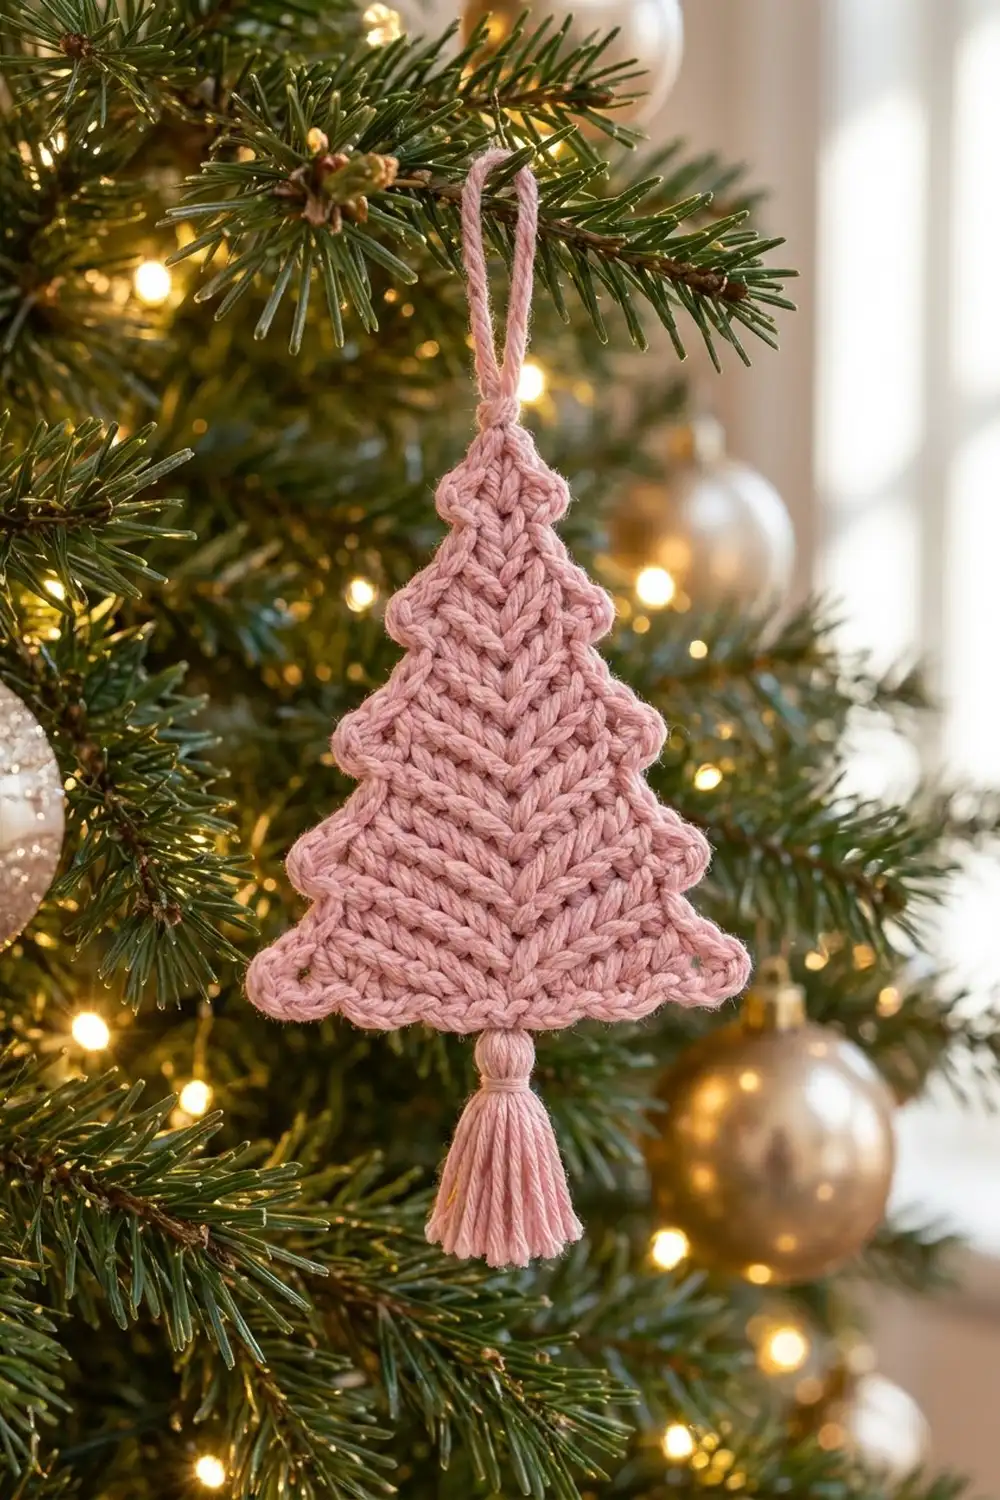
This little tree ornament is a soft, modern take on a classic holiday shape. It has three stepped tiers, a dense knit-look surface, a raised center spine, and a rope-textured edge. A chained loop at the top and a small matching tassel at the bottom finish it off.
The sample uses one dusty rose pink cotton. The single color keeps the texture in front, so the ornament looks calm and Scandinavian rather than busy. It works just as well in cream, sage, or classic green.
The pattern uses US crochet terms. The finished tree body measures about 4.25 in (10.8 cm) wide and 4.5 in (11.4 cm) tall. With the loop and tassel, it hangs about 7.75 in (19.7 cm) long.
You work the tree flat in rows from the top point down. Each tier grows by increasing at both edges. To start a new tier, you step in at both sides, which leaves a little overhang that forms the tier tip. Two border rounds trace the outline, and then you add the loop and tassel.
Finished Size and Construction
- Finished size (body): 4.25 in (10.8 cm) wide x 4.5 in (11.4 cm) tall
- Total hanging length: about 7.75 in (19.7 cm) including loop and tassel
- Skill level: Advanced beginner / easy intermediate
- Terminology: US crochet terms
- Yarn weight: DK / light worsted (CYC 3) cotton
- Hook: 4.0 mm (G-6)
- Number of pieces: 1 (single flat piece, plus a tassel tied on)
- Layout: One standalone ornament; no joining
- Size before border: 3.75 in (9.5 cm) wide x 4 in (10.2 cm) tall
- Border depth: about 0.25 in (0.6 cm) per edge, over 2 rounds
Materials
Yarn: Use a smooth, tightly plied DK or light worsted cotton or cotton blend. Cotton shows the V texture clearly and holds the stepped outline crisply. Fuzzy acrylic will blur the spine and the crab-stitch edge.
- Dusty Rose Pink: 15 g, about 35 m (38 yd). This covers the body, border, loop, and tassel.
Tools:
- 4.0 mm (G-6) crochet hook
- Tapestry needle
- Scissors
- A piece of stiff card 3.5 in (8.9 cm) tall, for the tassel
- Stitch marker (optional, for the center stitch)
- Blocking mat and rust-proof pins
- Spray bottle with water
The quantity includes a margin of about 25% for a gauge swatch and tassel trimming.
Abbreviations (US Terms)
- ch – chain
- sl st – slip stitch
- sc – single crochet
- hdc – half double crochet
- st(s) – stitch(es)
- RS / WS – right side / wrong side
- rev sc – reverse single crochet (crab stitch)
Special stitches:
- hdc3L (half double crochet in the third loop): Under the top two loops of each hdc sits a horizontal bar, called the third loop. Work the hdc into that bar only. The two top loops roll forward and form the knit-look V.
- fphdc (front post hdc): Yarn over, insert the hook from front to back to front around the post of the stitch, and complete as an hdc.
- bphdc (back post hdc): Yarn over, insert the hook from back to front to back around the post, and complete as an hdc.
- Center st: The middle stitch of every row. Every row has an odd count, so there is always exactly one. Work it as fphdc on RS rows and bphdc on WS rows. Both push the post toward the RS, which builds the raised spine.
- rev sc (crab stitch): Working from left to right (or right to left if you crochet left-handed), insert the hook into the next stitch, yarn over, pull up a loop, yarn over, and pull through both loops.
The turning ch-1 never counts as a stitch.
Gauge and Checkpoints
Gauge: 16 sts and 12 rows = 4 in (10.2 cm) in hdc3L.
That works out to 4 sts and 3 rows per 1 in (2.5 cm).
Test one piece first. The ornament is small, so it is the swatch. Make the full body (Rows 1–12) and measure before you start the border.
Checkpoints:
- After Row 3 (top tier): 7 sts, 1.75 in (4.4 cm) wide, 1 in (2.5 cm) tall.
- After Row 7 (middle tier): 11 sts, 2.75 in (7.0 cm) wide, about 2.33 in (5.9 cm) tall from the top.
- After Row 12 (body): 15 sts, 3.75 in (9.5 cm) wide, 4 in (10.2 cm) tall.
- After the border: 4.25 in (10.8 cm) wide x 4.5 in (11.4 cm) tall.
If the tree is too big: Go down to a 3.5 mm hook, or check whether you are working into all three loops instead of only the third loop.
If the tree is too small or stiff: Go up to a 4.5 mm hook. Third-loop hdc is naturally firm, so loosen the yarn-overs rather than the pull-through.
Tree Body
Work in rows from the top point downward. Odd rows are RS rows and even rows are WS rows. Turn at the end of every row.
Tier 1 (Top Tier)
Row 1 (RS): Ch 3. Work 3 hdc in the 3rd ch from the hook. Turn. (3 sts)
Place a marker in the middle hdc if you like, and move it up as you go.
Row 2 (WS): Ch 1. Work 2 hdc in the first st, bphdc around the center st, and 2 hdc in the last st. Turn. (5 sts)
Row 3 (RS): Ch 1. Work 2 hdc in the first st, hdc3L in the next st, fphdc around the center st, hdc3L in the next st, and 2 hdc in the last st. Turn. (7 sts)
The edge increases go into the full stitch, which keeps the edges neat. All other non-center stitches are hdc3L.
Tier 2 (Middle Tier)
Row 4 (WS, step row): Do not ch. Sl st in each of the first 2 sts. Ch 1, then 2 hdc in the next st, bphdc around the center st, and 2 hdc in the next st. Leave the last 2 sts unworked. Turn. (5 sts)
The 2 sl sts don’t count as stitches. The 2 skipped stitches on each side of Row 3 now form the overhang tips of Tier 1.
Row 5 (RS): Ch 1. Work 2 hdc in the first st, hdc3L in the next st, fphdc around the center st, hdc3L in the next st, and 2 hdc in the last st. Turn. (7 sts)
Row 6 (WS): Ch 1. Work 2 hdc in the first st, hdc3L in the next 2 sts, bphdc around the center st, hdc3L in the next 2 sts, and 2 hdc in the last st. Turn. (9 sts)
Row 7 (RS): Ch 1. Work 2 hdc in the first st, hdc3L in the next 3 sts, fphdc around the center st, hdc3L in the next 3 sts, and 2 hdc in the last st. Turn. (11 sts)
Check the width now: 2.75 in (7.0 cm).
Tier 3 (Bottom Tier)
Row 8 (WS, step row): Sl st in each of the first 2 sts. Ch 1, then 2 hdc in the next st, hdc3L in the next 2 sts, bphdc around the center st, hdc3L in the next 2 sts, and 2 hdc in the next st. Leave the last 2 sts unworked. Turn. (9 sts)
Check the math: of the 11 sts in Row 7, you skip 2 at each edge, which leaves 7 worked. The 2 end stitches each get 2 hdc, so 7 + 2 = 9.
Row 9 (RS): Ch 1. Work 2 hdc in the first st, hdc3L in the next 3 sts, fphdc around the center st, hdc3L in the next 3 sts, and 2 hdc in the last st. Turn. (11 sts)
Row 10 (WS): Ch 1. Work 2 hdc in the first st, hdc3L in the next 4 sts, bphdc around the center st, hdc3L in the next 4 sts, and 2 hdc in the last st. Turn. (13 sts)
Row 11 (RS): Ch 1. Work 2 hdc in the first st, hdc3L in the next 5 sts, fphdc around the center st, hdc3L in the next 5 sts, and 2 hdc in the last st. Turn. (15 sts)
Row 12 (WS, straight row): Ch 1. Work hdc3L in the next 7 sts, bphdc around the center st, and hdc3L in the last 7 sts. (15 sts)
This straight row gives the tree its flat base. Do not fasten off. Ch 1 and turn so the RS faces you.
Checkpoint: 3.75 in (9.5 cm) wide and 4 in (10.2 cm) tall.
Border
Border gauge: Along the flat edges, 1 sc per stitch. Along the row ends, 2 sc per hdc row end. Each hdc row is about 0.33 in (0.8 cm) tall, and 2 sc fill that height without rippling.
Round 1 (sc outline)
Work with the RS facing. Start at the right corner of the bottom edge.
Bottom edge: 3 sc in the first st, 1 sc in each of the next 13 sts, and 3 sc in the last st. (19 sc, corners included)
Side A (going up):
- 2 sc in the end of each of Rows 12, 11, 10, 9, and 8 (10 sc)
- Along the underside of the Tier 2 tip, work into the 2 skipped sts of Row 7: 1 sc in the inner st and 3 sc in the outer tip st (4 sc)
- 2 sc in the end of each of Rows 7, 6, 5, and 4 (8 sc)
- Along the underside of the Tier 1 tip, work into the 2 skipped sts of Row 3: 1 sc in the inner st and 3 sc in the outer tip st (4 sc)
- 2 sc in the end of each of Rows 3, 2, and 1 (6 sc)
Side A total: 32 sc
Top point: Work into the foundation of Row 1. Make 1 sc in the first ch-space area, 3 sc at the center point, and 1 sc in the last area. (5 sc)
Side B (going down): Mirror Side A:
- 6 sc over Rows 1–3
- 3 sc in the Tier 1 tip st, then 1 sc in the inner st (4 sc)
- 8 sc over Rows 4–7
- 3 sc in the Tier 2 tip st, then 1 sc in the inner st (4 sc)
- 10 sc over Rows 8–12
Side B total: 32 sc
On one side of each tip, the skipped stitches have sl sts on top of them. Work through both the sl st and the stitch below so both sides look the same.
Join with a sl st to the first sc.
Round 1 total: 19 + 32 + 5 + 32 = 88 sc.
Round 2 (crab stitch edge)
Ch 1. Work rev sc in each sc around. (88 rev sc)
Join with a sl st to the first st. Leave a 12 in (30.5 cm) tail for the hanging loop.
Why the math works
Each 3-sc group sits on a true outside point: the 2 bottom corners, the 4 tier tips, and the top point. Those groups give the crab-stitch round enough length to turn the point without pulling it in, and they make the fuller bumps you see at the tips.
The inner ledge stitches get only 1 sc. That keeps the notch between tiers crisp instead of filling it in.
Round 2 works exactly 1 stitch into each of the 88 stitches, so it adds texture but no length. The border adds about 0.25 in (0.6 cm) per edge, so 3.75 in + 0.5 in = 4.25 in (10.8 cm) wide and 4 in + 0.5 in = 4.5 in (11.4 cm) tall.
Hanging Loop
- Use the tail and the hook to move to the center sc of the 3-sc top point (sl st along the back if needed).
- Ch 20, which is about 3 in (7.6 cm).
- Sl st back into the same center top st to close the loop. The loop is about 1.5 in (3.8 cm) long.
- Tie the tail once around the base of the loop in a small overhand knot. This makes the neat knot seen at the top of the tree.
- Weave in the end along the back of the border.
Tassel
- Wrap the yarn 20 times around the 3.5 in (8.9 cm) card.
- Slide an 8 in (20.3 cm) strand under the wraps at one edge and tie it tightly. This is the tassel top.
- Cut through the wraps at the opposite edge. Your strands are now about 1.75 in (4.4 cm) long when folded.
- With a separate 12 in (30.5 cm) strand, wrap the bundle tightly 4–5 times, 0.5 in (1.3 cm) below the top, to form the tassel head. Knot it and hide the ends inside the tassel.
- Count the 19 bottom-edge sc in Round 1. The 10th one is the center. Thread the top tie strands through the border stitch directly below that center sc, and knot them on the back.
- Trim the tassel ends evenly to 1.75 in (4.4 cm) from the head top.
Final Blocking
- Lightly mist the ornament until it is damp but not dripping.
- Lay it RS up on the blocking mat.
- Pin the top point, the 4 tier tips, and the 2 bottom corners. Check the size: 4.25 in (10.8 cm) wide at the base and 4.5 in (11.4 cm) tall.
- Pin the bottom edge straight between the corners.
- Press the notches between tiers inward with your finger so each tip stands out clearly.
- Run a fingertip down the center spine so it sits straight and vertical.
- Leave the loop and tassel free. Smooth the tassel strands downward.
- Let it dry completely, at least 6 hours.
- Unpin, then mist the tassel alone and comb it straight with your fingers if it has kinked.
Final Quality-Control Checklist
- Body is 15 sts wide at the base, with 12 rows.
- The step rows (Rows 4 and 8) each left 2 sts unworked on both sides.
- The raised center spine runs in one unbroken line from the top point to the bottom edge.
- All non-center, non-edge stitches show the knit-look V from hdc3L.
- Border Round 1 has 88 sc: 19 on the bottom, 32 on each side, and 5 at the top.
- Border Round 2 has 88 rev sc.
- Final body measures 4.25 in (10.8 cm) x 4.5 in (11.4 cm).
- The hanging loop is about 1.5 in (3.8 cm), centered, and knotted at the base.
- The tassel is centered on the bottom edge and about 1.75 in (4.4 cm) long.
- All ends are woven in invisibly on the WS.
Troubleshooting
The spine wanders or looks sunken. You probably mixed up front and back post. Use fphdc on RS rows and bphdc on WS rows. Recount so the post stitch sits exactly in the middle stitch.
The tiers don’t overhang. Check that you used sl sts to step in at the start of Rows 4 and 8 and left 2 sts unworked at the end. If you worked into all the stitches, the tips disappear.
The edges curl. Third-loop hdc pulls slightly toward the WS. Block firmly, and check that the edge increases went into the full stitch, not the third loop.
The border ruffles. You have too many sc along the row ends. Stay at exactly 2 sc per row end and recount to 88.
The border cups or pulls in at the tips. Make sure each tip and corner has 3 sc in Round 1.
The tassel looks thin. Add 5 more wraps, up to 25 total, and trim again.
Care
Hand wash in cool water with a mild soap. Press out the water in a towel and dry flat, re-pinning the tips if needed. Store flat between seasons so the loop and tassel keep their shape.
Final Notes
The measurement chain is simple to track:
- Tier 1 ends at 7 sts, 1.75 in (4.4 cm) wide.
- Tier 2 ends at 11 sts, 2.75 in (7.0 cm) wide.
- Tier 3 and the straight row end at 15 sts, 3.75 in (9.5 cm) wide and 4 in (10.2 cm) tall.
- Two border rounds of 88 stitches add 0.25 in (0.6 cm) per edge, for a finished body of 4.25 in (10.8 cm) x 4.5 in (11.4 cm).
- The loop and tassel bring the hanging length to about 7.75 in (19.7 cm).
If your checkpoints match at each stage, the finished tree will match too. Make one, hang it, and you’ll likely want a whole pink forest on your branches.
Happy crocheting!