

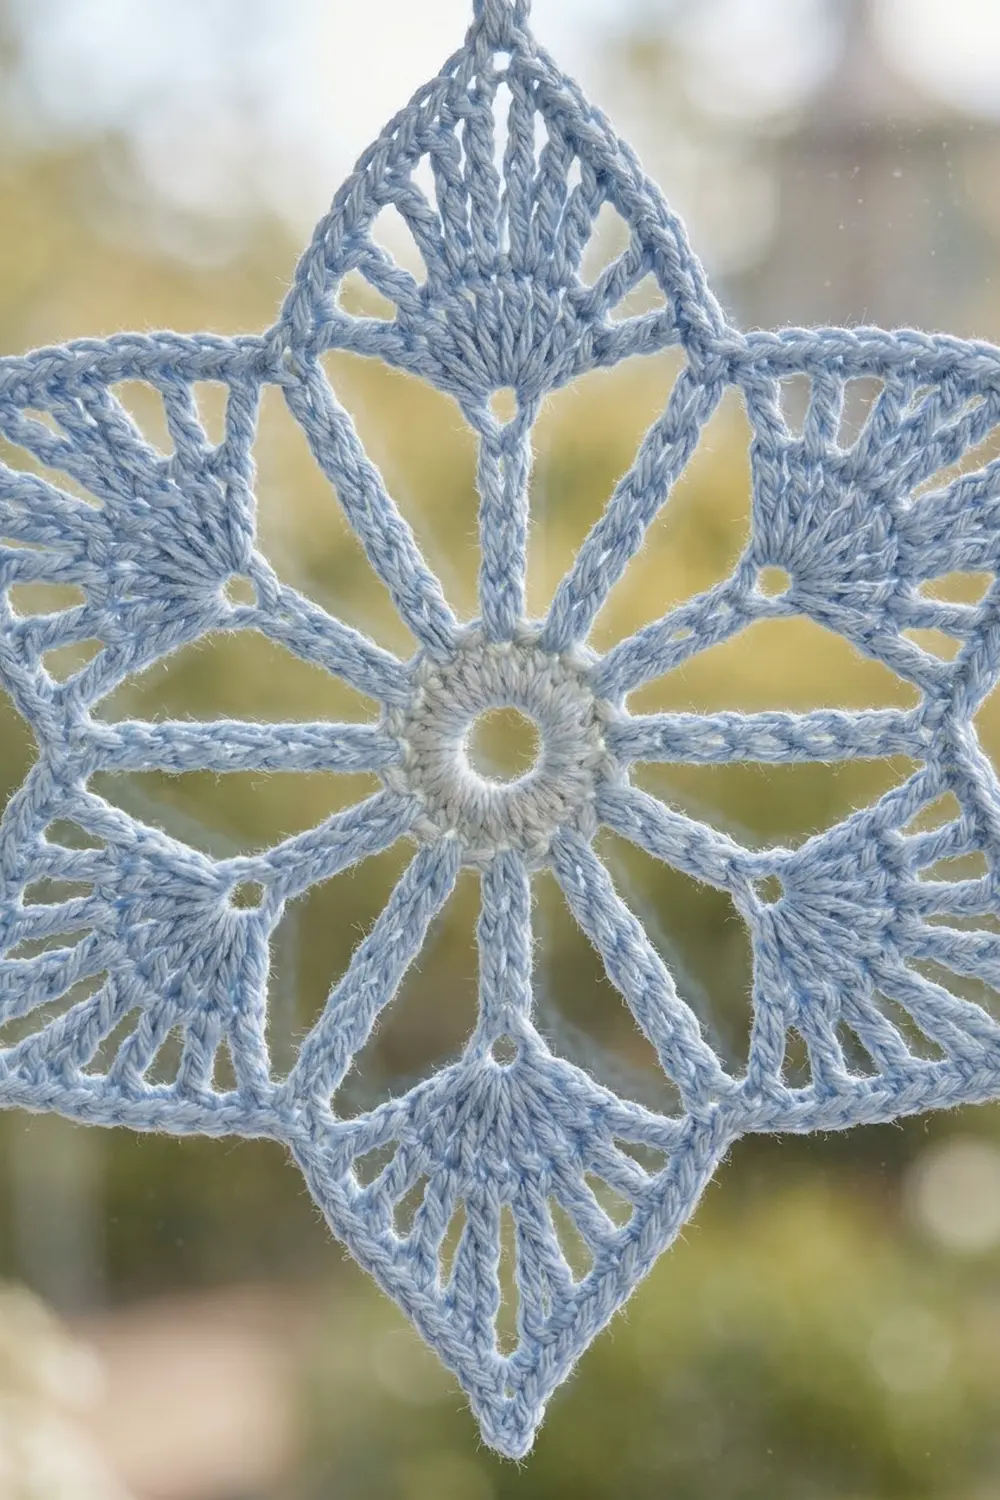
This six-pointed lace star is light and airy, and it looks lovely against a sunny window. It is worked in one shade of soft powder-blue cotton. The lace comes from simple elements: a small single crochet ring, six slim chain spokes, a chain hexagon, and six graduated fans that form the points.
The style is calm and wintry without being heavy. Each point is an open fan of tall stitches, so light passes through it easily. A neat single crochet edge and a tiny picot at each tip give the star a crisp outline once it’s blocked.
This pattern uses US crochet terms throughout. The finished star measures 5 in (12.7 cm) from point to point and 2.5 in (6.4 cm) across the center hexagon.
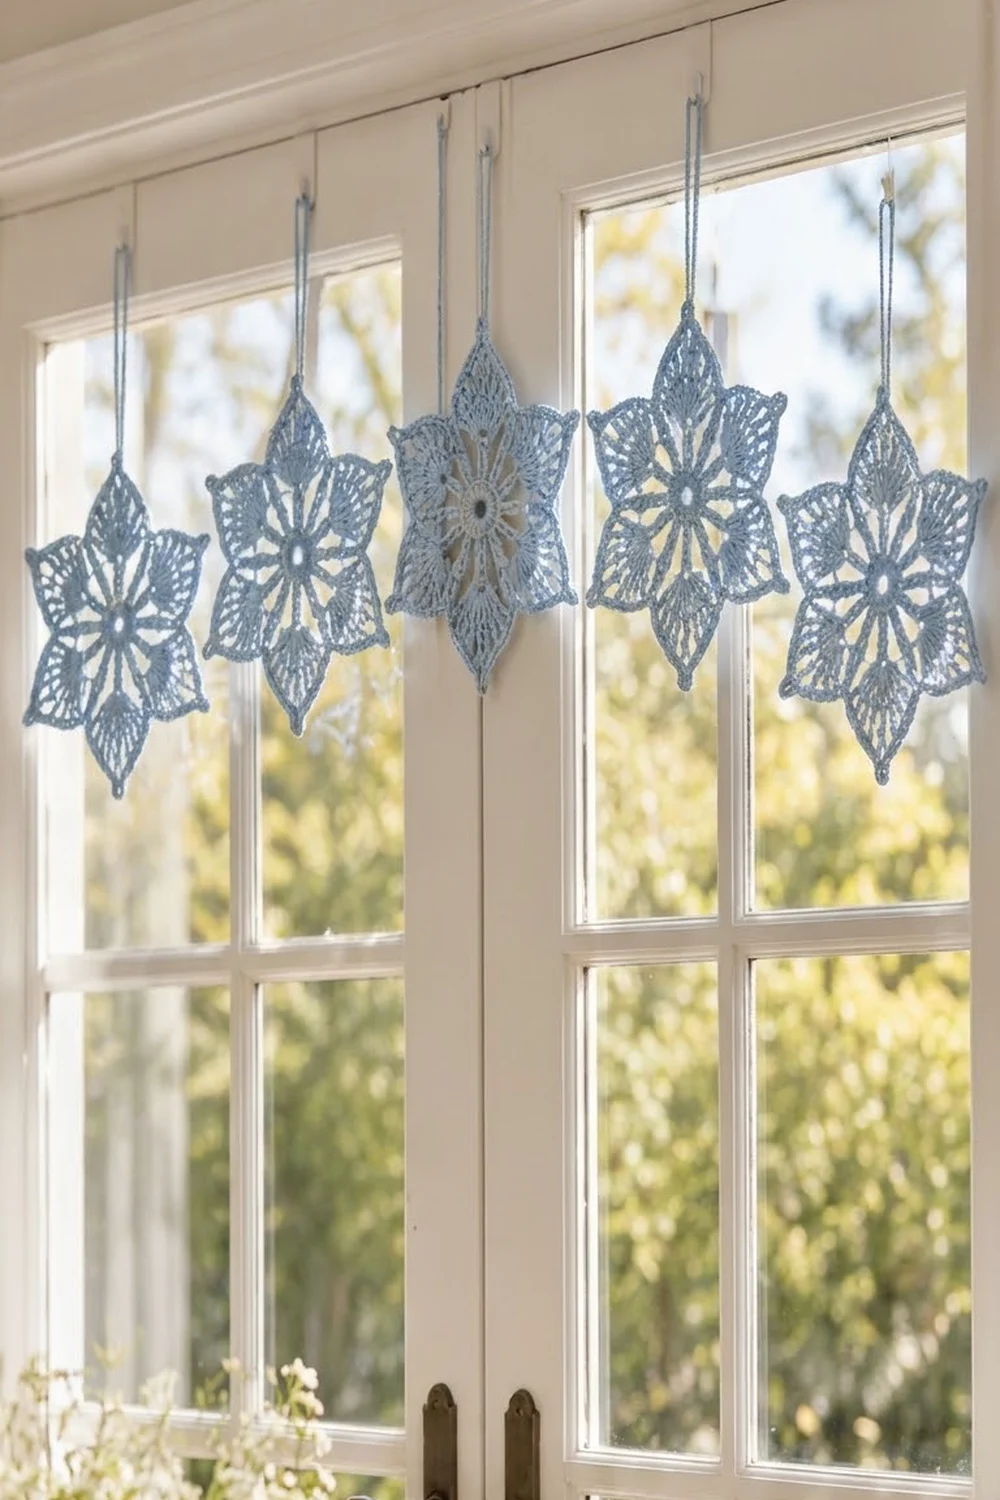
The star is worked in the round in 5 rounds, with no turning. Round 1 is the center ring, Round 2 makes the spokes, Round 3 links them into a hexagon, Round 4 adds the six fan points, and Round 5 is the edging border. You can add a hanging loop at the end. The photo shows five stars hung side by side, but each one is a separate ornament, and this pattern makes one star.
Finished Size and Construction
- Finished size: 5 in (12.7 cm) point to point, measured to the base of the picots
- Skill level: Easy-intermediate
- Terminology: US crochet terms
- Yarn weight: Sport weight (#2) mercerized cotton
- Hook: 2.75 mm (US C-2)
- Number of pieces: 1
- Layout: Single motif, six points, worked in the round
- Piece size: 5 in (12.7 cm) point to point
- Size before border (after Round 4): 4.5 in (11.4 cm) point to point
- Border depth: 0.25 in (0.6 cm) at each tip, adding 0.5 in (1.3 cm) to the total width
Materials
Yarn advice: Use a smooth, mercerized cotton in sport weight. Cotton holds the pointed shape well after blocking and doesn’t fuzz, so the spokes and fan ribs stay clearly defined. Avoid fuzzy or very stretchy yarns, because the lace will blur and sag when hung.
- Powder blue: 10 g (about 31 m / 34 yd) for one star, including the hanging loop
The quantity includes a safety margin of about 30 to 40 percent. One star actually uses about 7 g, so a single 50 g ball makes five to six stars with yarn to spare.
Tools:
– 2.75 mm (US C-2) crochet hook
– Tapestry needle
– Scissors
– Stitch marker
– Rust-proof pins and a foam blocking mat
– Spray bottle with water (optional: spray starch for extra stiffness)
– Ruler or tape measure
Abbreviations (US Terms)
- MR – magic ring
- ch – chain
- sl st – slip stitch
- sc – single crochet
- dc – double crochet
- tr – treble crochet (yarn over twice)
- dtr – double treble crochet (yarn over 3 times, then work off the loops in pairs 4 times)
- sk – skip
- sp – space
- st(s) – stitch(es)
Special stitches:
Fan: Work all of the following into one ch-9 space: dc, ch 1, tr, ch 1, tr, ch 1, dtr, ch 3, dtr, ch 1, tr, ch 1, tr, ch 1, dc. That makes 8 stitches, six ch-1 spaces, and one ch-3 tip space. The stitches rise from short to tall and back again, which shapes the point.
Picot: Ch 3, sl st in the 3rd ch from the hook.
Gauge and Checkpoints
Gauge isn’t critical for an ornament, but it decides whether the star comes out at 5 in (12.7 cm). Make one star first and check each stage before making more.
- Chain gauge: 7 ch = 1 in (2.5 cm), chained loosely and evenly
- After Round 1: the ring measures 0.75 in (1.9 cm) across
- After Round 2: spoke tip to opposite spoke tip measures 2.5 in (6.4 cm) when laid flat
- After Round 3: the hexagon measures 2.5 in (6.4 cm) from corner to opposite corner, and each side is about 1.25 in (3.2 cm) long
- After Round 4: 4.5 in (11.4 cm) from point to opposite point
- After Round 5 and blocking: 5 in (12.7 cm) from point to opposite point
If your star is too big: Go down to a 2.5 mm hook, or tighten your chains. Loose chains in Rounds 2 and 3 are the most common cause of oversizing.
If your star is too small: Go up to a 3 mm hook. Also check that you’re yarning over the correct number of times for each tr and dtr, because short tall stitches make stubby points.
Pattern
Round 1: Center Ring
Make a MR. Ch 1 (doesn’t count as a stitch). Work 18 sc into the ring. Pull the tail to close the ring, leaving a small open hole about 0.25 in (0.6 cm) wide. Join with a sl st to the first sc.
Stitch count: 18 sc.
Check that the ring lies flat and measures 0.75 in (1.9 cm) across.
Round 2: Spokes
Ch 1. Sc in the next sc, ch 12, sk the next 2 sc. Repeat from * 5 more times. Join with a sl st to the first sc.
Stitch count: 6 sc and 6 ch-12 loops.
Each ch-12 loop folds in half to form a slim spoke made of two parallel chain strands. The first 6 chains run out and the last 6 run back, so the fold (the spoke tip) sits between the 6th and 7th chains. The 6 sc are spaced evenly around the ring, one every 3 stitches (6 x 3 = 18), so the spokes come out at equal angles.
Lay the piece flat and let the loops fall straight out from the center. Tip to opposite tip should measure about 2.5 in (6.4 cm).
Round 3: Hexagon Frame
Sl st in each of the first 6 ch of the first loop, so you’re at the spoke tip. Ch 1, then sc in the same (6th) ch.
Ch 9. Skip the remaining 6 ch of this loop, the next sc of Round 2, and the first 5 ch of the next loop. Sc in the 6th ch of the next loop. Repeat from * 4 more times. Ch 9, then join with a sl st to the first sc.
Stitch count: 6 sc and 6 ch-9 spaces.
The 6 sc sit exactly at the spoke tips, and the ch-9 strands connect them into a hexagon. Mark the first sc with a stitch marker.
Checkpoint: Each hexagon side should pull straight between spoke tips, with no sag. Corner to opposite corner should measure 2.5 in (6.4 cm), and each side about 1.25 in (3.2 cm).
Round 4: Fan Points
Sl st into the next ch-9 space. Ch 3 (counts as the first dc). In the same space, finish the Fan: ch 1, tr, ch 1, tr, ch 1, dtr, ch 3, dtr, ch 1, tr, ch 1, tr, ch 1, dc.
Sc in the next sc (at a spoke tip). Work a Fan in the next ch-9 space. Repeat from * 4 more times. Sc in the last sc, then join with a sl st to the top of the beginning ch-3.
Stitch count: 54 stitches (6 Fans x 8 stitches = 48, plus 6 valley sc), with 36 ch-1 spaces and 6 ch-3 tip spaces.
Each Fan sits on one hexagon side and rises to a point, and the dtr pair forms the tip. The sc between Fans pins each valley to a spoke tip. That’s why the spokes in the photo run into the notches between the points.
Checkpoint: 4.5 in (11.4 cm) from point to opposite point. The fan ribs should look like open, separate strands. If they’re bunched, your ch-1 spaces are too tight.
Border
Border Gauge
The border is one round of sc with 2 tip sc on each side of a picot. Expect about 7 sc per 1 in (2.5 cm) along each fan edge. The round adds about 0.25 in (0.6 cm) at each tip, measured to the picot base.
Round 5: Edging
Ch 1. Then work each point as follows.
First side of the point (7 sc): sc in the same st (the beginning ch-3 or the dc), sc in the ch-1 sp, sc in the tr, sc in the ch-1 sp, sc in the tr, sc in the ch-1 sp, sc in the dtr.
Tip: In the ch-3 space, work 2 sc, picot, 2 sc.
Second side of the point (7 sc): sc in the dtr, sc in the ch-1 sp, sc in the tr, sc in the ch-1 sp, sc in the tr, sc in the ch-1 sp, sc in the dc.
Valley: Sl st in the valley sc.
Repeat this sequence for the remaining 5 points, starting each one with sc in the next dc. Join with a sl st to the first sc and fasten off.
Count per point: 9 sc per side (7 worked along the side plus 2 tip sc), so 18 sc per point, plus 1 picot. The picot isn’t counted as a side stitch, and there are no separate corner stitches. The 2 tip sc on each side are already included in the 9.
Total round count: 108 sc, plus 6 picots and 6 valley sl sts. As a conversion round, that’s 84 sc worked 1 per existing stitch or ch-1 space (48 Fan stitches + 36 ch-1 spaces), plus 24 sc added in the 6 tip spaces (4 per tip). The 6 valley sc are each covered with a sl st rather than an sc.
Why the Math Works
Along each side of a point, working 1 sc per stitch and 1 sc per ch-1 space matches the edge length almost exactly, so the side stays flat. The ch-3 tip has to turn a sharp 60° corner, and 4 sc plus a picot gives it just enough extra length without ruffling. In the valleys, a sl st adds no height, so each notch stays tight and deep. That keeps the star’s silhouette crisp.
Hanging Loop (Optional)
Join the yarn in any picot. Ch 30 (about 4 in / 10.2 cm), sl st in the same picot, and fasten off. Weave the end in through the sc along the edge of the point.
Final Blocking
- Weave in all ends along solid stitches, such as the center ring and the sc edge, not through the open fan ribs.
- Soak the star in cool water for 5 minutes, then gently press out the water in a towel. Don’t wring it.
- On your blocking mat, draw or mark a 5 in (12.7 cm) circle.
- Pin the center hole flat. Then pin each picot base onto the circle, 60° apart, so the points are evenly spaced.
- Pin each valley in toward the center so the hexagon measures 2.5 in (6.4 cm) from corner to opposite corner.
- Straighten the spokes and fan ribs with a pin tip so each strand lies separate and straight.
- For window ornaments, mist with spray starch for extra stiffness.
- Let it dry completely, usually 6 to 12 hours, before unpinning.
Final Quality-Control Checklist
- [ ] Center ring is closed to a small, neat hole
- [ ] 6 spokes, evenly spaced, with no twisted loops
- [ ] Hexagon sides pull straight with no sag
- [ ] 6 Fans, each with 8 stitches and a ch-3 tip
- [ ] Border: 108 sc total, 18 per point, 6 picots
- [ ] Valleys are sharp and points are symmetrical
- [ ] Blocked size is 5 in (12.7 cm) point to point
- [ ] All ends are woven in securely and invisibly
- [ ] Hanging loop (if added) is secure and the star hangs straight
Troubleshooting
Spokes are wavy or uneven lengths: Chain more evenly in Round 2, and count to exactly 12 each time. Uneven chains move the hexagon corners.
Hexagon sags between spokes: Your ch-9 strands are too loose. Redo Round 3 with tighter chains, or chain 8 instead (and work Round 4 the same way).
Points curl or cup: Your tall stitches are tighter than your chains. Loosen your yarn-overs on the tr and dtr, or go up a hook size for Round 4 only.
Border ruffles at the tips: Use 1 sc on each side of the picot instead of 2. Blocking usually fixes mild ruffling.
Star hangs crooked: Move the hanging loop to the picot directly opposite a straight point line, and re-block the star symmetrically.
Care
Hand wash in cool water with a mild soap, press dry in a towel, and re-block flat. Re-starch the star after washing if you want it to stay stiff.
Final Notes
Here’s the measurement chain at a glance. The ring measures 0.75 in (1.9 cm). The spokes and hexagon measure 2.5 in (6.4 cm) across, with sides of about 1.25 in (3.2 cm). The fan points bring the star to 4.5 in (11.4 cm), and the border adds 0.25 in (0.6 cm) at each tip, for a blocked size of 5 in (12.7 cm). The stitch counts run 18, then 6 spokes, then 6 frame sc, then 54, then 108 sc with 6 picots. Check each number as you go and each star will match the last. Make as many as you like and hang them separately in a sunny window.
Happy crocheting!