

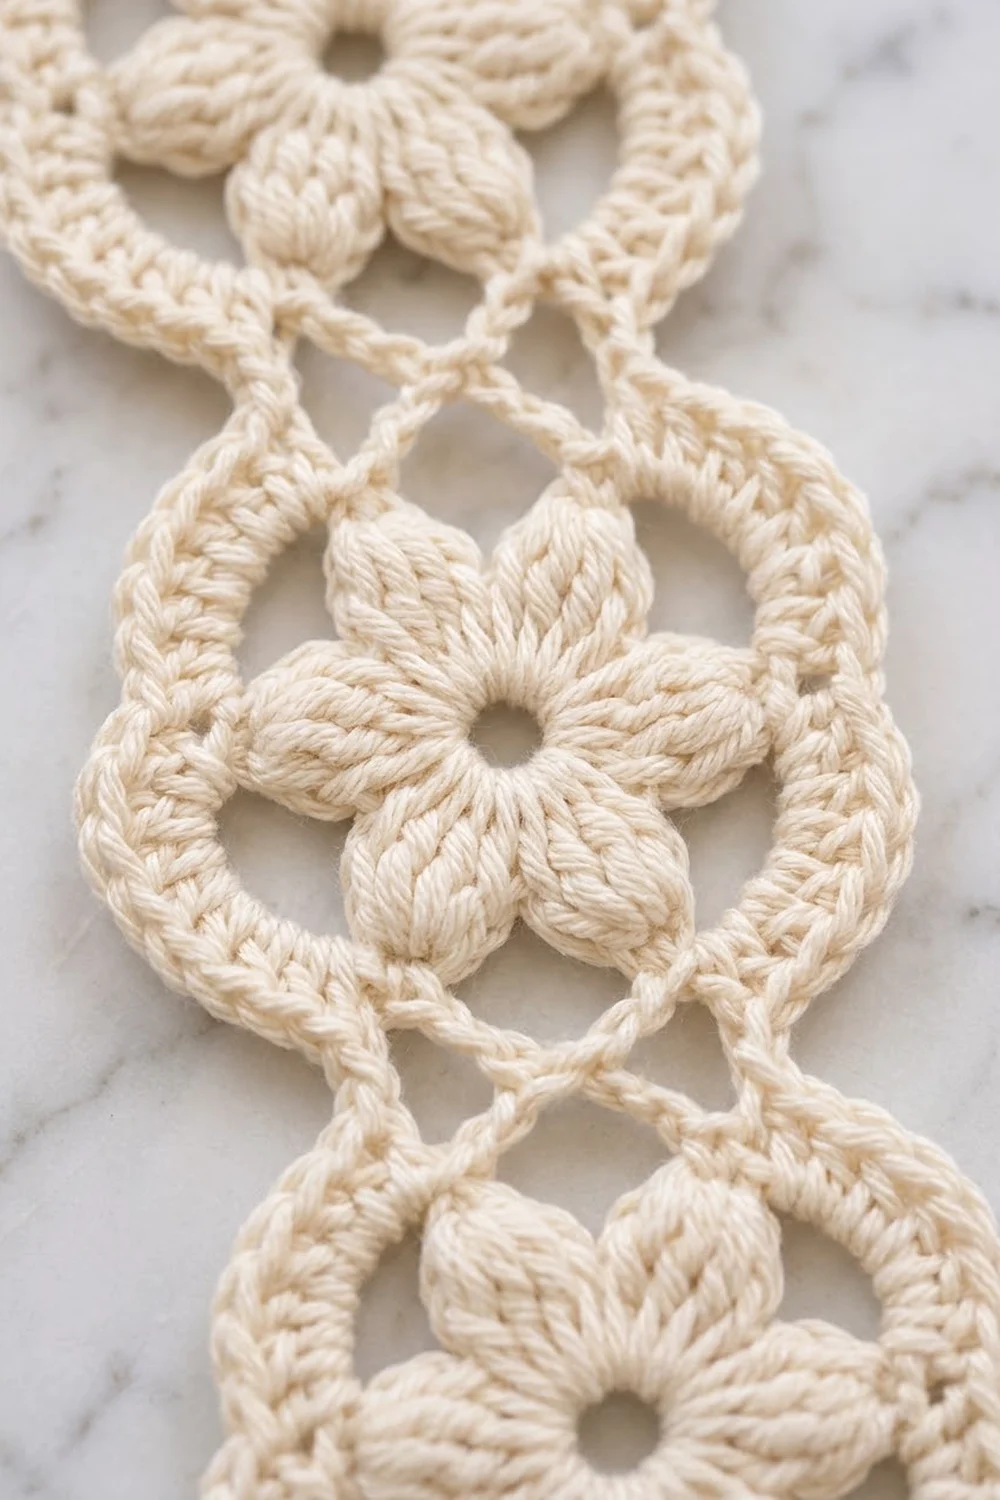
The Seaside Bloom Lace Curtain Strip is one long column of small flower motifs, joined as you go, finished with a picot edging and a full tassel at the bottom. Each motif has an open center, six puffy cluster petals, a ring of chain loops, and a scalloped edge of tiny points. Hung in a row, the strips filter light like a breezy coastal curtain.
The sample strips are worked in cream, dusty blue, and sage green cotton, one solid color per strip. Each strip is a separate piece, so you can mix colors in any order when you hang them.
This pattern uses US crochet terms. One finished strip measures 3.5 in (8.9 cm) wide and 54.5 in (138.4 cm) long after blocking, not counting the hanging loop and tassel. With a 1.5 in (3.8 cm) hanging loop and a 6 in (15.2 cm) tassel, the total drop is 62 in (157.5 cm).
Construction is simple. Crochet Motif 1, then work each new motif’s last round so it joins to the previous one at two points. After 18 motifs, one edging round goes around the whole strip. A hanging loop goes at the top and a tassel at the bottom point.
Finished Size and Construction
- Finished strip size: 3.5 in x 54.5 in (8.9 cm x 138.4 cm)
- Total drop with loop and tassel: 62 in (157.5 cm)
- Skill level: Intermediate (clusters, join-as-you-go)
- Terminology: US crochet terms
- Yarn weight: DK (#3) cotton or cotton blend
- Hook: 4.0 mm (US G-6)
- Number of pieces: 18 motifs per strip, plus 1 tassel
- Layout: 1 motif wide x 18 motifs long
- Motif size: 3 in (7.6 cm) across, point to point
- Size before border: 3 in x 54 in (7.6 cm x 137.2 cm)
- Border depth: 0.25 in (0.6 cm) on every edge
Materials
Choose a smooth, mercerized or combed DK cotton. Cotton shows the petal texture clearly and hangs straight without stretching much. Avoid fuzzy or very splitty yarns, because the clusters and tassel look best with crisp plies.
Yarn per strip (one color): 80 g / 184 m.
For the three sample strips shown laid flat:
- Cream: 80 g / 184 m
- Dusty blue: 80 g / 184 m
- Sage green: 80 g / 184 m
Each strip uses about 54 g for the motifs, 6 g for the border, 1 g for the hanging loop, and 5 g for the tassel. The quantities above include a margin of about 14 g per strip for gauge differences and a test motif. If you plan to hang several strips, multiply the per-strip amount by the number of strips in each color.
Tools:
- 4.0 mm (US G-6) crochet hook
- Tapestry needle
- Scissors
- Stiff card, 7 in (17.8 cm) tall, for the tassel
- Rust-proof pins and a long blocking surface
- Measuring tape
- Spray bottle
Abbreviations (US Terms)
- ch – chain
- sl st – slip stitch
- sc – single crochet
- dc – double crochet
- sp – space
- sk – skip
- MR – magic ring
- rep – repeat
- beg – beginning
- cl – cluster
Special stitches:
- Beg cl (beginning 3-dc cluster): Ch 2, *yarn over, insert hook in same st, pull up a loop, yarn over and pull through 2 loops; rep from * once more, yarn over and pull through all 3 loops on hook. The ch 2 counts as the first “dc” of the cluster.
- 3-dc cl (3-double-crochet cluster): *Yarn over, insert hook in st, pull up a loop, yarn over and pull through 2 loops; rep from * 2 more times in the same st, yarn over and pull through all 4 loops on hook.
- Point: The ch-3 sp in the middle of each Round 4 loop. Each motif has 12 points, numbered 1 to 12 in the order you work them.
- Joined point: Ch 1, sl st into the matching point of the previous motif, ch 1. This replaces the ch 3 of a point and still counts as one point.
Gauge and Checkpoints
Make one complete test motif first and block it lightly. Do not start the strip until it measures correctly, because 18 motifs multiply any small error.
Motif checkpoints:
- After Round 1: 0.75 in (1.9 cm) across
- After Round 2: 1.75 in (4.4 cm) across
- After Round 3: 2.5 in (6.4 cm) across
- After Round 4: 3 in (7.6 cm) across, point to point
Strip checkpoints (before border):
- After 6 motifs: 18 in (45.7 cm)
- After 9 motifs: 27 in (68.6 cm)
- After 18 motifs: 54 in (137.2 cm)
If your motif is too big: go down to a 3.5 mm hook, or keep the ch-5 loops in Round 3 snug.
If your motif is too small: go up to a 4.5 mm hook. Check that your clusters are not pulled tight at the top.
Motif Pattern
Work in joined rounds with the right side facing. Do not turn.
Round 1: MR, ch 1, 12 sc in ring, sl st to first sc. Pull the ring closed, leaving a small center hole. (12 sc)
Round 2: Beg cl in same st as join, ch 3, sk 1 sc, 3-dc cl in next sc, ch 3, sk 1 sc; rep from * 4 more times, sl st to top of beg cl. (6 clusters, 6 ch-3 sps)*
These six clusters are the flower petals. Each cluster sits on one sc, and each skipped sc sits under a ch-3 sp, so all 12 sc from Round 1 are used.
Round 3: Ch 1, sc in top of same cl, ch 5, sc in next ch-3 sp, ch 5, sc in top of next cl, ch 5, sc in next ch-3 sp, ch 5; rep from * 4 more times, sl st to first sc. (12 sc, 12 ch-5 loops)*
This forms the open ring of chain loops around the flower.
Round 4 (Motif 1 only, no joins): Sl st in first ch-5 loop, ch 1, (2 sc, ch 3, 2 sc) in same ch-5 loop, then move to next loop; rep from * in all 12 loops, sl st to first sc. Fasten off and weave in ends. (48 sc, 12 points)*
Each loop holds 4 sc plus 1 point, so 12 loops x 4 sc = 48 sc, and 12 loops x 1 point = 12 points.
Joining Motifs as You Go
Every motif after the first is worked exactly like Motif 1 through Round 3. Round 4 joins it to the previous motif at two points.
Point positions: On every motif, points 1 and 2 are the top of the strip, and points 7 and 8 are the bottom. Points 3 to 6 form one long side and points 9 to 12 form the other. Points 7 and 8 sit directly opposite points 1 and 2, six points away.
Round 4 (Motifs 2 to 18, joining):
- Sl st in first ch-5 loop, ch 1, 2 sc in loop.
- Hold the new motif below the previous motif, right sides facing you.
- Work a joined point into point 8 of the previous motif, then 2 sc in the same loop. This is new point 1.
- In the next loop, work 2 sc, a joined point into point 7 of the previous motif, then 2 sc. This is new point 2.
- Work (2 sc, ch 3, 2 sc) in each of the remaining 10 loops as usual.
- Sl st to first sc. Fasten off. (48 sc, 12 points, 2 of them joined)
Join point 1 to point 8 and point 2 to point 7, not the reverse. Both motifs face the same way, so the join mirrors across the seam and lies flat without twisting.
Tension advice: Keep the ch 1 on each side of the joining sl st relaxed. A tight join pulls the two motifs together and shortens the strip. The joined point should be the same height as a free ch-3 point.
Size checkpoint: Lay the strip flat after every 3 motifs. Each group of 3 motifs should add 9 in (22.9 cm). Measure along the center line, from the top of Motif 1 to the bottom of the newest motif.
Make All Pieces
For each strip, make 18 motifs in a single color: 1 unjoined motif (Motif 1) and 17 joined motifs (Motifs 2 to 18). For the three-strip sample set, that is 18 cream, 18 dusty blue, and 18 sage green motifs, with each color in its own strip.
Layout grid (one strip, top to bottom):
[ 1]  top: points 1-2 free
[ 2]
[ 3]
[ 4]
[ 5]
[ 6]
[ 7]
[ 8]
[ 9]
[10]
[11]
[12]
[13]
[14]
[15]
[16]
[17]
[18]  bottom: points 7-8 free (tassel)
Each bracket is one 3 in (7.6 cm) motif, joined to the motif above at its points 1 and 2.
Border
The border is one round of picots that outlines the strip and sharpens the scallops.
Border gauge: The edging adds 0.25 in (0.6 cm) on every edge. That brings the strip from 3 in x 54 in (7.6 cm x 137.2 cm) to 3.5 in x 54.5 in (8.9 cm x 138.4 cm).
Counting free points:
- Top end: Motif 1, points 1 and 2 = 2 free points
- Long side A: points 3 to 6 on each motif = 4 x 18 motifs = 72 free points
- Bottom end: Motif 18, points 7 and 8 = 2 free points
- Long side B: points 9 to 12 on each motif = 4 x 18 motifs = 72 free points
- Total free points: 2 + 72 + 2 + 72 = 148
Valleys: Where two motifs meet, a joined pair of points sits in the gap. There are 17 valleys on each long side, one for each seam.
Border Round: Join yarn with a sl st in point 1 of Motif 1.
- Ch 1, (sc, ch 3, sc) in point 1. (1 picot)
- Between two free points on the same motif: ch 2.
- In each free point: (sc, ch 3, sc).
- At each valley: ch 1, sc around the joining sl st of the joined points, ch 1, then continue in the next motif’s first free point.
- Work down side A, across the 2 bottom points of Motif 18, up side B, and finish with ch 2 after point 12 of Motif 1.
- Sl st to first sc. Do not fasten off.
Border round count: 148 picots, 34 valley sc (17 per long side), and a ch-2 sp between every two free points on the same motif.
Picots per side: Top end 2, side A 72, bottom end 2, side B 72.
Why the math works: Each motif gives exactly 4 free points to each long side, and joined points are never counted as free. Valleys get a single sc instead of a picot, so the seams add no picots. Side A therefore has 18 x 4 = 72 picots, the same as side B. The ends each have 2 picots, matching the 2 free points at the top and bottom. Because every free point is worked once, the border keeps the motif spacing exactly, and the length grows only by the border depth, 0.25 in (0.6 cm) at each end.
Hanging loop: From the join, sl st across to the ch-2 sp between the picots of points 1 and 2. Ch 15, sl st in the same ch-2 sp. Ch 1, work 20 sc into the ch-15 loop, sl st to the base. Fasten off and weave in ends. The loop measures about 1.5 in (3.8 cm) tall.
Tassel:
- Wrap yarn 30 times around the 7 in (17.8 cm) card.
- Thread a 12 in (30.5 cm) tie under all strands at the top edge and knot it tightly. Leave both tails long.
- Cut the strands along the bottom edge and slide them off the card.
- Wrap a separate strand firmly around the bundle 0.75 in (1.9 cm) below the top, about 8 times. Knot it and hide the ends inside the tassel.
- Trim the bottom evenly to 6 in (15.2 cm) from top to tip.
- Thread the top tie tails through the ch-2 sp between the two bottom picots of Motif 18. Snug them so the two picots draw in slightly to make the bottom point, then knot. Hide the tails inside the tassel.
Final Blocking
- Weave in all remaining ends.
- Soak the strip in cool water for 10 minutes. Press out the water gently in a towel. Do not wring.
- Lay the strip flat on a long blocking surface. If you have no long surface, block it in two halves.
- Pin the strip to 3.5 in (8.9 cm) wide and 54.5 in (138.4 cm) long.
- Pin out every picot on both long sides so the scallops are even.
- Open each motif’s center hole and fan the six petals evenly.
- Let the strip dry completely, at least 24 hours.
- Spray the tassel lightly, comb the strands straight with your fingers, and retrim the ends to 6 in (15.2 cm).
Final Quality-Control Checklist
- 18 motifs, each 3 in (7.6 cm) across
- Every motif has 6 petals, 12 loops, 48 sc, and 12 points
- Each seam is joined at exactly 2 points, with no twisting
- Strip measures 3 in x 54 in (7.6 cm x 137.2 cm) before border
- Border has 148 picots: 72 per long side and 2 at each end
- Finished strip is 3.5 in x 54.5 in (8.9 cm x 138.4 cm)
- Hanging loop is 1.5 in (3.8 cm) and secure
- Tassel is 6 in (15.2 cm), tightly wrapped, and centered on the bottom point
- All ends are woven in and hidden
Troubleshooting
The motif cups or ruffles. If it cups, the Round 3 loops are too short, so try ch 6. If it ruffles, they are too long, so try ch 4. Keep the count of 12 loops either way.
The strip curves to one side. You joined at the wrong points. Check that each new motif joins to points 7 and 8, opposite the previous motif’s top join.
The strip twisted. Point 1 was joined to point 7 instead of point 8. Undo Round 4 of that motif and rejoin.
The strip is too short. Your joins are too tight, or your motifs are small. Loosen the ch 1 at each join, or go up a hook size.
The border puckers. Loosen your valley sc and ch 1s, or change the ch 2 between points to ch 3.
The tassel looks thin. Add 5 to 10 more wraps on the card. Each extra wrap uses about 14 in (35.6 cm) of yarn.
Care
Hand wash in cool water with a mild detergent, then dry flat, reshaping the picots and tassel. Do not tumble dry, because heat can shrink cotton and tangle the tassel.

Final Notes
The measurement chain is short and easy to check. One motif is 3 in (7.6 cm) across. Eighteen joined motifs make 54 in (137.2 cm). The border adds 0.25 in (0.6 cm) per edge, for a finished strip of 3.5 in x 54.5 in (8.9 cm x 138.4 cm). Add the 1.5 in (3.8 cm) hanging loop and the 6 in (15.2 cm) tassel, and the total drop is 62 in (157.5 cm).
Check your test motif, measure after every 3 motifs, and count your border picots. Each strip will then hang straight and even.
Happy crocheting!