

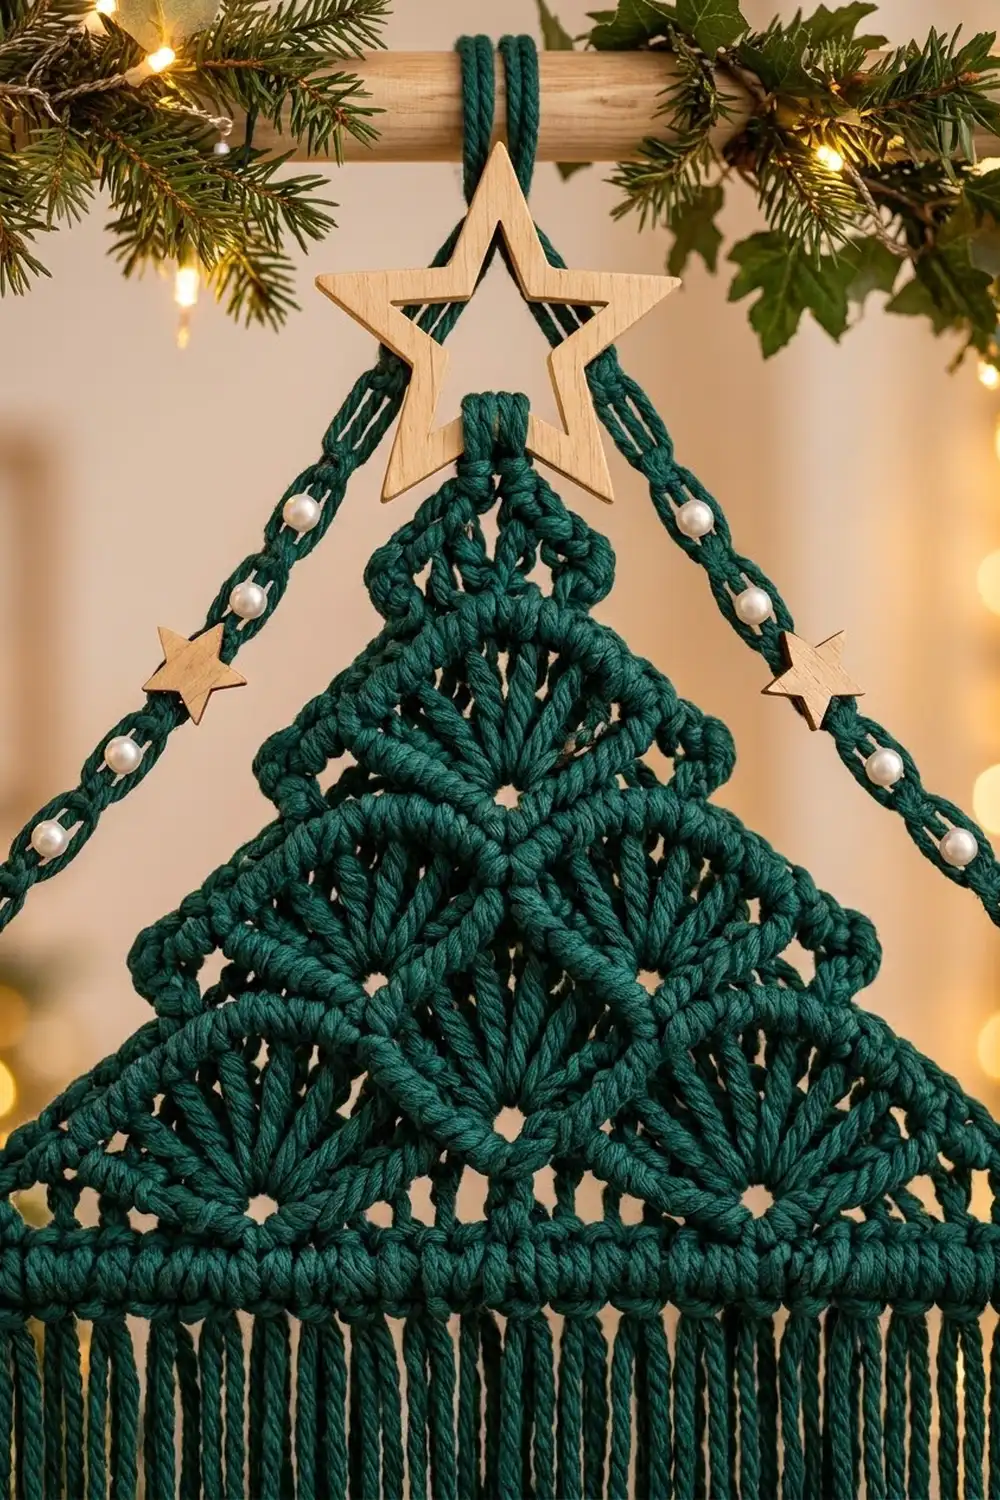
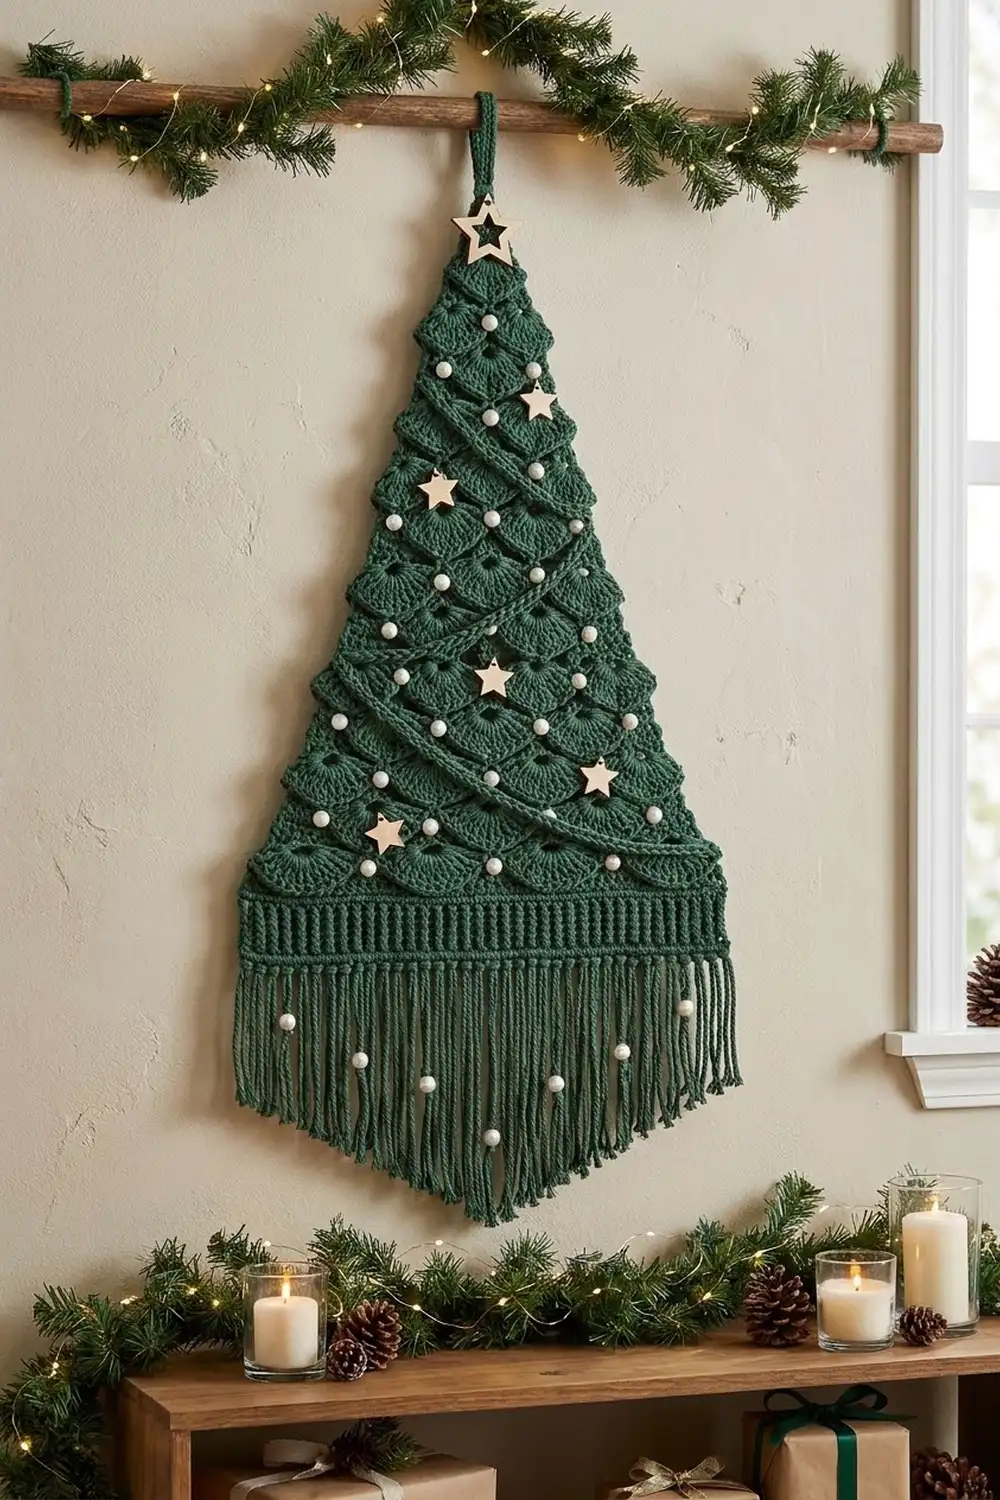
This tree wall hanging looks like macramé, but it’s all crochet. Rows of fan-shaped shells stack into a tall triangle with scalloped, tiered sides. Two chain garlands cross down the center, and a ribbed band at the base holds a long fringe that is trimmed to a point.
The pattern uses one color, a deep pine green, so the texture and the trims do the decorating. Natural wooden stars, white pearl beads and a larger star at the tip give it a soft Scandinavian holiday look. It goes well over a mantel, on a door or in a narrow wall space.
All instructions use US crochet terms. The tree measures 10 in (25.4 cm) wide at the base and 16.6 in (42.2 cm) tall from the bottom of the band to the tip. With a 10 in (25.4 cm) fringe, the full length is 26.6 in (67.6 cm), not counting the hanging loop.
You’ll work a foundation row, then 12 shell rows grouped into 6 tiers that narrow toward the top. Next comes a ribbed band worked into the underside of the foundation chain. Finally you’ll add fringe, garlands, stars and pearls.
Finished Size and Construction
- Finished size: 10 in (25.4 cm) wide × 16.6 in (42.2 cm) tall without fringe; 26.6 in (67.6 cm) with fringe
- Skill level: Easy-intermediate
- Terminology: US
- Yarn weight: Bulky (#5) twisted cotton cord, about 3 mm
- Hook: 6 mm (J-10)
- Number of pieces: 1 tree body, plus 2 short chain garlands tacked onto the surface
- Layout: Single triangle, worked flat from the bottom up
- Piece size before border: 10 in (25.4 cm) wide × 15.4 in (39.1 cm) tall
- Border depth: 1.2 in (3.0 cm) ribbed band, plus 10 in (25.4 cm) fringe at the center point
Materials
Yarn: Use a soft, twisted cotton cord about 3 mm thick, sold as bulky (#5) or as macramé cord. Choose a cord that holds its twist and doesn’t split. Single-strand cord makes fringe that brushes out nicely, and twisted cord gives the rope-like look shown.
- Pine Green: about 440 g / 110 m (120 yd). This covers the body (about 60 m), the band (about 5 m), the fringe (30.5 m) and the garlands (about 4 m).
These quantities include a margin of about 10% for the gauge swatch, trimming and weaving in ends.
Tools and notions:
- 6 mm (J-10) crochet hook
- Sharp fabric scissors
- Large-eye tapestry needle
- Sewing needle and green or clear thread
- 1 wooden star, 2 in (5.1 cm), for the tip
- 7 wooden stars, 1 in (2.5 cm), natural or gold-washed
- 18 pearl beads, 8 mm, for the tree
- 24 large-hole pearl beads, 12 mm with a 4 mm hole, for the fringe
- Fabric glue (optional, for the stars)
- Ruler or tape measure, and blocking pins
Abbreviations (US Terms)
- ch – chain
- sl st – slip stitch
- sc – single crochet
- dc – double crochet
- BLO – back loop only
- st(s) – stitch(es)
- sk – skip
- RS – right side
Special stitches:
- Shell: 5 dc in the same stitch. The center stitch of a shell is its 3rd dc.
- Half shell: at the start of a row, ch 3 (counts as 1 dc) and 2 dc in the same stitch, for 3 sts. At the end of a row, 3 dc in the last stitch.
- Lark’s head knot: fold the fringe strands in half, pull the fold through a stitch with the hook, then pull the cut ends through the loop and tighten.
Gauge and Checkpoints
Sc gauge: 10 sc and 10 rows = 4 in (10.2 cm).
Shell gauge: 4 shell rows (2 tiers) = 5 in (12.7 cm) tall, so each shell row is 1.25 in (3.2 cm).
Before you start the tree, make a test swatch. Chain 11, work 10 rows of sc on 10 sts, then work 4 rows of the shell pattern. Measure it after a light steam.
Check these measurements as you go:
- Foundation row: 25 sc = 10 in (25.4 cm) wide, 0.4 in (1.0 cm) tall
- After Row 4: 5.4 in (13.7 cm) tall
- After Row 8: 10.4 in (26.4 cm) tall
- After Row 12: 15.4 in (39.1 cm) tall
- After the band: 16.6 in (42.2 cm) tall
If your piece is too big, go down one hook size, to 5.5 mm (I-9). If it’s too small, go up to 6.5 mm (K-10.5). Don’t change any stitch counts. Every row depends on the 25-stitch foundation.
Tree Body
Work flat in rows and turn at the end of every row. Turning chains don’t count as stitches except for the ch 3 in a half shell. Slip stitches used to move along the row don’t count either.
Each tier has two rows. The first row has full shells only, with sc at both ends. The second row is offset: it starts and ends with half shells, so the tier flares out at the sides. The next tier then starts half a shell in from each edge, and this makes the stepped, bough-like silhouette.
Foundation: Ch 26. Sc in the 2nd ch from the hook and in each ch across. (25 sc)
Check that the piece is 10 in (25.4 cm) wide. Leave the underside of the foundation chain free. You’ll work the band into those loops later.
Tier 1
Row 1 (RS): Ch 1, turn. Sc in the first st, sk 1, shell in the next st, sk 1, sc in the next st. Repeat from * 5 more times. (6 shells, 7 sc = 37 sts)
Row 2: Turn. Ch 3 (counts as dc), 2 dc in the first sc. Sc in the center dc of the next shell, shell in the next sc, sc in the center dc of the next shell. Repeat from * 4 more times. Work 3 dc in the last sc. (2 half shells of 3 sts + 5 shells + 6 sc = 37 sts)
Tier 2
Row 3: Turn. Sl st in each of the first 3 dc to move across the half shell. Ch 1, sc in the next sc. Shell in the center dc of the next shell, sc in the next sc. Repeat from * 4 more times. Leave the final half shell unworked. (5 shells, 6 sc = 31 sts)
Row 4: Turn. Ch 3, 2 dc in the first sc. Sc in the center dc of the next shell, shell in the next sc, sc in the center dc of the next shell. Repeat from * 3 more times. Work 3 dc in the last sc. (2 half shells + 4 shells + 5 sc = 31 sts)
Checkpoint: 5.4 in (13.7 cm) tall.
Tiers 3 to 6
Each odd row repeats Row 3 and each even row repeats Row 4, with one fewer shell per tier.
Row 5: Work like Row 3, repeating 3 more times. (4 shells, 5 sc = 25 sts)
Row 6: Work like Row 4, repeating 2 more times. (2 half shells + 3 shells + 4 sc = 25 sts)
Row 7: Work like Row 3, repeating 2 more times. (3 shells, 4 sc = 19 sts)
Row 8: Work like Row 4, repeating 1 more time. (2 half shells + 2 shells + 3 sc = 19 sts)
Checkpoint: 10.4 in (26.4 cm) tall.
Row 9: Work like Row 3, repeating 1 more time. (2 shells, 3 sc = 13 sts)
Row 10: Turn. Ch 3, 2 dc in the first sc, sc in the center dc of the next shell, shell in the next sc, sc in the center dc of the next shell, 3 dc in the last sc. (2 half shells + 1 shell + 2 sc = 13 sts)
Row 11: Turn. Sl st in each of the first 3 dc. Ch 1, sc in the next sc, shell in the center dc of the next shell, sc in the next sc. (1 shell, 2 sc = 7 sts)
Row 12: Turn. Ch 3, 2 dc in the first sc, sc in the center dc of the shell, 3 dc in the last sc. (2 half shells + 1 sc = 7 sts)
Row 13 (tip and hanging loop): Turn. Sl st in each of the first 3 dc, then sl st in the center sc. Ch 10, sl st in the same sc to form a loop about 2 in (5.1 cm) long. Fasten off.
Checkpoint: the body is 15.4 in (39.1 cm) tall from the foundation edge to the tip sc. Roughly, the tiers measure 10 in (25.4 cm), 8.4 in (21.3 cm), 6.8 in (17.3 cm), 5.2 in (13.2 cm), 3.6 in (9.1 cm) and 2 in (5.1 cm) wide. Each tier steps in about 0.8 in (2.0 cm) per side.
Chain Garlands (Make 2)
Ch 40, leaving a 12 in (30.5 cm) tail at each end. Fasten off. Each garland should measure about 16 in (40.6 cm).
You’ll sew the garlands on after blocking, as described in the Final Blocking section.
Border: Ribbed Base Band and Fringe
Border gauge: same as the sc gauge, 10 sc = 4 in (10.2 cm) and 10 rows = 4 in (10.2 cm). The band is worked only along the bottom edge. The sloped sides get no border, so the scalloped tiers stay visible.
Band Row 1: Turn the tree upside down so the foundation chain is on top. Join the cord in the first free loop at the right-hand corner. Ch 1, then sc in each free loop across. (25 sc on the bottom edge)
Band Row 2: Ch 1, turn. Sc BLO in each st across. (25 sc)
Band Row 3: Ch 1, turn. Sc BLO in each st across. (25 sc) Fasten off.
The BLO rows make the raised horizontal ridges that look like a wrapped bar.
Why the math works: The foundation was ch 26 with 25 sc, so there are exactly 25 free loops underneath. Working one sc into each loop keeps the band at 25 sts, the same 10 in (25.4 cm) as the tree base. The band adds 3 rows, or 1.2 in (3.0 cm). That brings the total from 15.4 in (39.1 cm) to 16.6 in (42.2 cm). The 25 corner-to-corner stitches already include both end stitches, so nothing is added at the corners.
Fringe
Cut 50 strands of cord, each 24 in (61.0 cm) long. Hold 2 strands together and fold them in half. Attach them with a lark’s head knot through each of the 25 sts of Band Row 3. (25 bundles, 100 ends)
Each end hangs about 12 in (30.5 cm) at first. Wait until after blocking to trim them.
Final Blocking
- Wet the tree body and band in cool water, then press out the water with a towel. Keep the fringe dry if you can.
- Lay the piece flat on a blocking mat with the RS up.
- Pin the base to 10 in (25.4 cm) wide and the height to 16.6 in (42.2 cm) from the band edge to the tip.
- Pin the outer point of each half shell so the six tiers flare evenly on both sides.
- Open every shell into a neat fan with your fingertips.
- Let it dry completely, which usually takes 24 hours.
- Comb the fringe straight, then lay a ruler on it. Trim the center bundle to 10 in (25.4 cm) and the two outer bundles to 6 in (15.2 cm). Trim the bundles in between in a straight diagonal line to make the V point.
- Lay the garlands on the tree. Start both at the tip and cross them over each other about every 2 in (5.1 cm) so they make S-curves down the center to the band. Use the tails to sew them down from the back.
- Sew or glue on the 7 small stars, then sew on the 18 small pearls, scattering them over the tiers. Thread the large star onto the hanging loop.
- Thread the 24 large pearls onto single fringe strands at different heights. Tie an overhand knot under each one.
Final Quality-Control Checklist
- The foundation and every band row have 25 sts.
- The rows have these counts: 37, 37, 31, 31, 25, 25, 19, 19, 13, 13, 7, 7.
- The tiers step in evenly on both sides.
- The body is 15.4 in (39.1 cm) tall, and the whole piece is 16.6 in (42.2 cm) without fringe.
- There are 25 fringe bundles, trimmed to a centered V point.
- The garlands cross symmetrically, and all ends are woven in.
- The stars and pearls are secure and evenly spread.
- The hanging loop holds the weight without stretching.
Troubleshooting
One side of the tree slants more than the other: You probably skipped the sl sts at the start of a decrease row or worked into the last half shell. Count each row against the list above.
Shells ruffle: Your tension is loose, or you didn’t skip a stitch on each side of a shell. Go down a hook size.
The band pulls in narrower than the tree: Work the band one hook size larger, or check that you worked into all 25 free loops.
The fringe looks uneven after a few days: Steam it lightly, comb it, then trim again.
The tip leans: Re-block with a pin at the tip and two pins at the top tier.
Care
Spot clean only, or hand wash in cool water and dry flat. Remove the wooden stars first if they’re glued, and never tumble dry.
Final Notes
The whole design depends on one measurement chain. The 25-stitch foundation is 10 in (25.4 cm) wide. Twelve shell rows at 1.25 in (3.2 cm) each bring the body to 15.4 in (39.1 cm). The 3-row band adds 1.2 in (3.0 cm), for 16.6 in (42.2 cm). A 10 in (25.4 cm) fringe brings the full length to 26.6 in (67.6 cm). If your foundation and first two tiers measure correctly, the rest will follow.
Happy crocheting!