

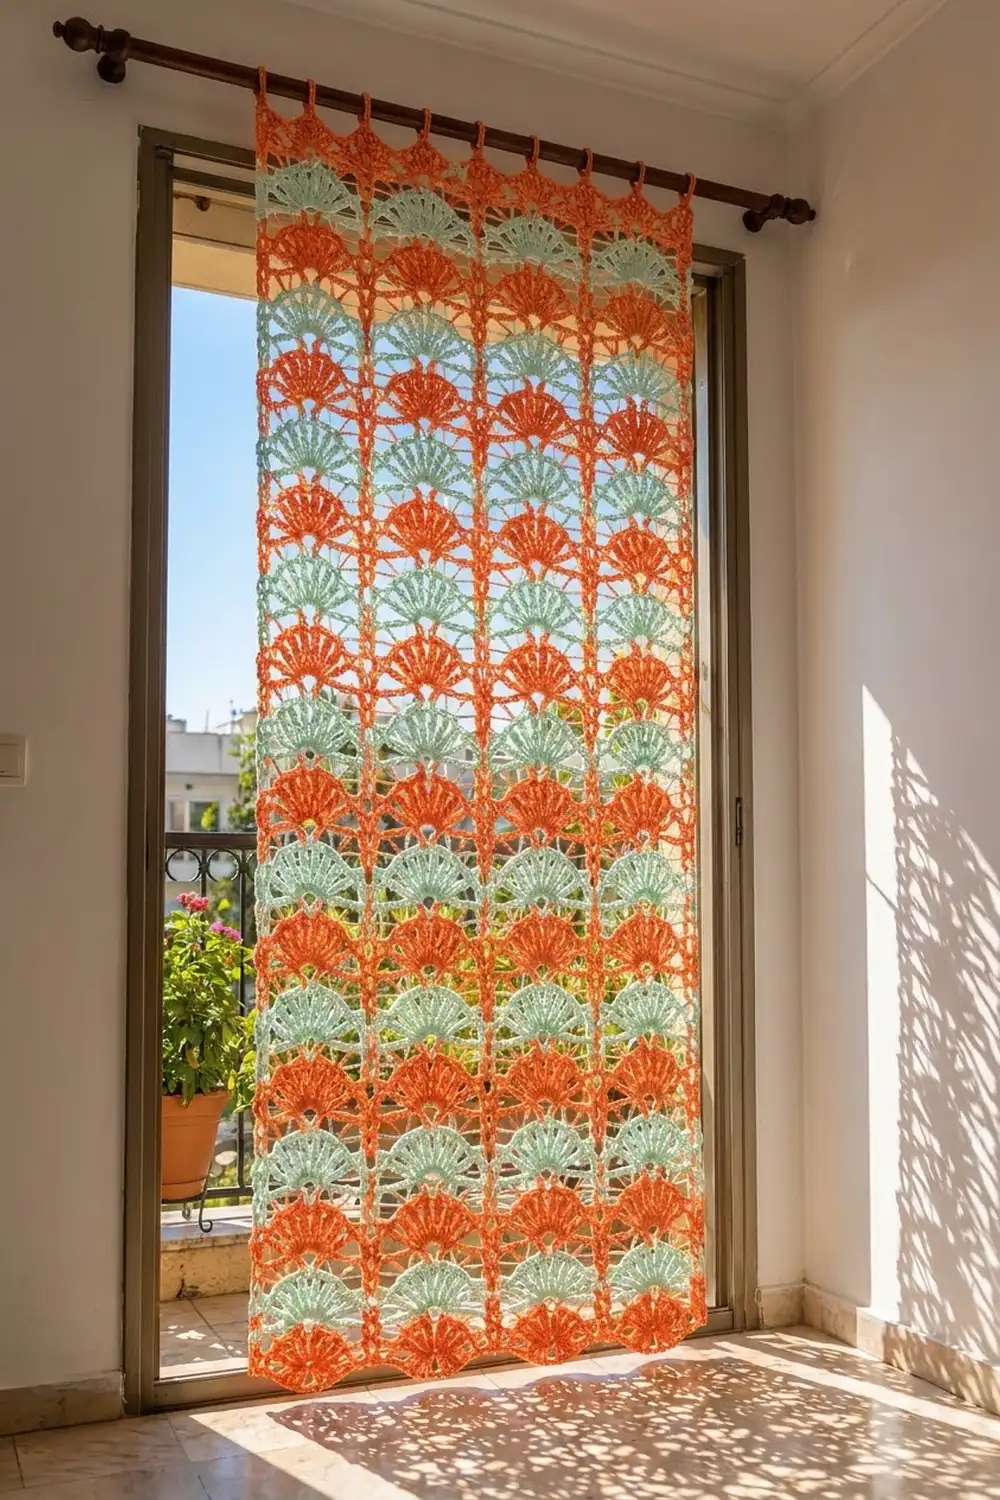
The Tangerine Breeze curtain is a single lace panel made to hang in a sunny doorway or tall window. Rows of open fans line up in vertical columns, separated by bars of stacked V-stitches. Light falls through the lace in a soft, even pattern.
Two colors alternate in two-row stripes: bright tangerine orange and cool mint green. Each new stripe starts with a row of chain arches that curve over the fans below it. As a result, every mint fan has an orange arch above it and every orange fan has a mint one. The look is cheerful, airy, and a little retro.
The pattern uses US crochet terms. The finished curtain measures 25.5 in × 51 in (64.8 cm × 129.5 cm). That doesn’t include the hanging loops, which add about 1.5 in (3.8 cm) above the top edge.
You make the curtain in one piece, working in rows from the bottom up. First you crochet the lace body of 21 stripes. Then you add a solid top band with seven hanging loops. Last comes one pass of edging: single crochet down each side and a row of fan scallops along the foundation edge.
Finished Size and Construction
- Finished size: 25.5 in × 51 in (64.8 cm × 129.5 cm), loops excluded
- Skill level: Intermediate
- Terminology: US
- Yarn weight: Worsted (#4) cotton or cotton blend
- Hook: 5.0 mm (H-8)
- Number of pieces: 1
- Layout: One panel, 6 fan columns across × 21 stripes high
- Piece size (lace body): 25 in × 49 in (63.5 cm × 124.5 cm)
- Size before border: 25 in × 49 in (63.5 cm × 124.5 cm)
- Border depth: Sides 0.25 in (0.6 cm) each; top band 1 in (2.5 cm); bottom scallops 1 in (2.5 cm)
Materials
Cotton or a cotton-linen blend is the best choice for a curtain. It holds the fan shapes crisply and doesn’t stretch much while hanging. It also stands up to sunlight and washing better than most acrylics. Choose a smooth yarn, either mercerized or lightly twisted, so the stitches stay clearly defined.
The amounts below assume worsted cotton at about 85 yd (78 m) per 50 g ball.
- Color A, Tangerine Orange: 250 g, about 390 m (425 yd)
- Color B, Mint Green: 200 g, about 312 m (340 yd)
Color A covers 11 stripes plus the top band, loops, and edging. Color B covers 10 stripes. Both amounts include a margin of about 25% for your gauge swatch and small differences in tension.
Tools:
- 5.0 mm (H-8) crochet hook
- Tapestry needle
- Scissors
- 4 stitch markers
- Tape measure
- Blocking mats or a clean carpeted floor, plus rust-proof pins
- Spray bottle
- Curtain rod up to 1 in (2.5 cm) in diameter
Abbreviations (US Terms)
- ch: chain
- sc: single crochet
- dc: double crochet
- sl st: slip stitch
- st(s): stitch(es)
- sp(s): space(s)
- rep: repeat
- RS: right side
Special stitches:
- V-st (V-stitch): (Dc, ch 2, dc) in the same stitch or space. The ch-2 in the middle is the “V-sp.”
- Fan: 9 dc in the same stitch.
Gauge and Checkpoints
Pattern gauge: One pattern repeat is 4 in (10.2 cm) wide, measured from the center of one V-st to the center of the next. Two stripes (4 rows) are 4⅔ in (11.9 cm) tall, so one stripe is 2⅓ in (5.9 cm).
Border gauge: 12 sc = 4 in (10.2 cm), or 3 sc per inch. Four rows of sc = 1 in (2.5 cm).
Make a test swatch first. Ch 28 and work Rows 1–4 of the pattern below with 2 repeats instead of 6. Each row will have 3 V-sts and 2 fans. Block the swatch lightly. It should measure about 9 in (22.9 cm) wide and 4⅔ in (11.9 cm) tall.
- Too big: go down to a 4.5 mm hook.
- Too small: go up to a 5.5 mm hook.
- Width correct but height off: check your turning chains and the height of your dc. Pull each dc up to its full height instead of changing hooks.
Checkpoints during the project:
- After Row 2: the body is 25 in (63.5 cm) wide.
- After Row 20 (10 stripes): the body is 23⅓ in (59.3 cm) tall.
- After Row 42 (21 stripes): the body is 25 in × 49 in (63.5 cm × 124.5 cm).
- After the top band: the panel is 50 in (127.0 cm) tall.
- After edging and blocking: 25.5 in × 51 in (64.8 cm × 129.5 cm).
Lay the work flat and measure it without stretching. If you’re off by more than 0.5 in (1.3 cm) at Checkpoint 1, pull out the rows and change your hook right away.
Lace Body
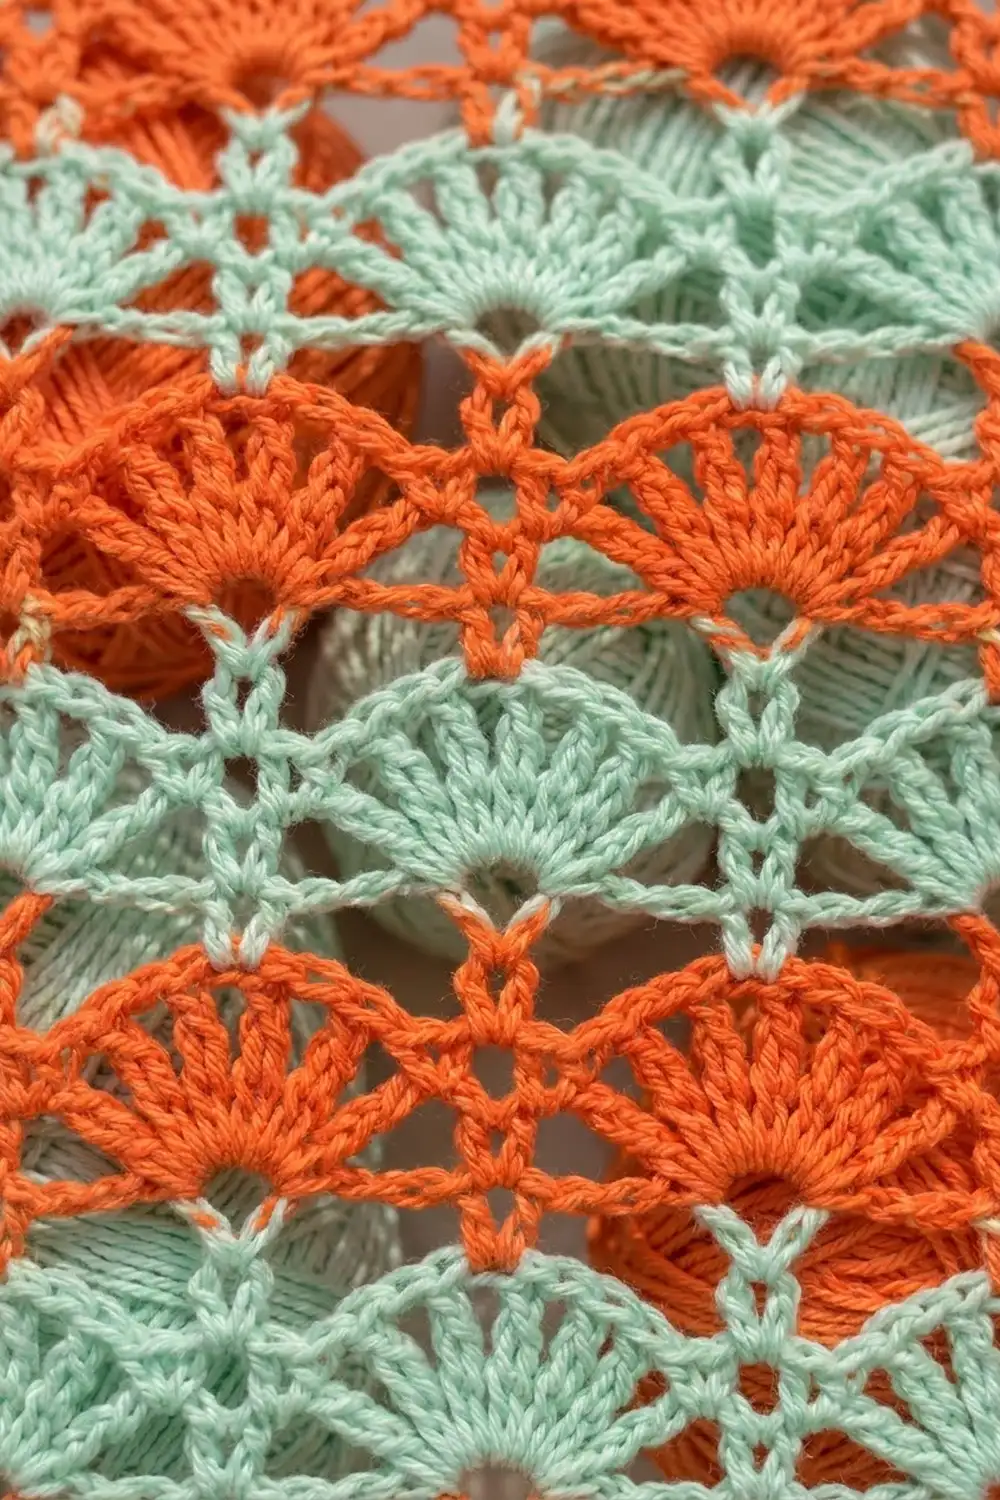
The body is a 2-row pattern worked over a multiple of 12 chains + 1, plus 3 turning chains. Every stripe has one base row of chain arches and one fan row, both in the same color.
How the shape forms: Each fan is 9 dc worked into one sc. It starts from a point at the bottom and opens upward into a half circle. In the next stripe, the base row places ch-4 arches over that fan and anchors them in its center dc. The V-sts always stack into the V-sts below. This builds the straight vertical bars between the fan columns and keeps the sides of the panel straight.
Color changes: Every stripe starts at the same edge, so you can carry the unused color loosely up the side instead of cutting it. To change color, work the last dc of a fan row until 2 loops remain on the hook. Then yarn over with the new color and pull through. The side edging will cover the carried strands later.
Foundation: With A, ch 76 (73 base chains + 3 turning chains).
Row 1 (RS, A): (Dc, ch 2, dc) in 4th ch from hook. This makes the first V-st; the skipped 3 ch do not count as a st. Ch 4, skip 5 ch, sc in next ch, ch 4, skip 5 ch, V-st in next ch; rep from * 5 more times. Turn.
[7 V-sts, 6 sc, 12 ch-4 sps]*
Row 2 (A): Ch 3 (does not count as a st), V-st in first V-sp, ch 1, skip ch-4 sp, fan in next sc, ch 1, skip ch-4 sp, V-st in next V-sp; rep from * 5 more times, changing to B in the last dc. Turn.
[7 V-sts, 6 fans (54 dc in fans), 12 ch-1 sps]*
Stripe 1 is now complete. Check that the body is 25 in (63.5 cm) wide.
Row 3 (B, base row): Ch 3 (does not count as a st), V-st in first V-sp, ch 4, sc in 5th (center) dc of next fan, ch 4, V-st in next V-sp; rep from * 5 more times. Turn.
[7 V-sts, 6 sc, 12 ch-4 sps]*
The first ch-4 of each repeat skips the ch-1 sp and the first 4 dc of the fan. The second ch-4 skips the last 4 dc and the next ch-1 sp. This is what makes the arches sit over the fans.
Row 4 (B, fan row): Work as Row 2, changing to A in the last dc. Turn.
[7 V-sts, 6 fans (54 dc in fans), 12 ch-1 sps]
Rows 5–42: Repeat Rows 3 and 4, alternating colors every 2 rows:
- Color A stripes: 1, 3, 5, 7, 9, 11, 13, 15, 17, 19, 21 (11 stripes)
- Color B stripes: 2, 4, 6, 8, 10, 12, 14, 16, 18, 20 (10 stripes)
Every base row has 7 V-sts, 6 sc, and 12 ch-4 sps. Every fan row has 7 V-sts, 6 fans, and 12 ch-1 sps. At the end of Row 42 (stripe 21, Color A), don’t change color. Cut B, leaving a 6 in (15.2 cm) tail.
Place a marker every 10 stripes (after Rows 20 and 40) to make counting easier. After Row 42, the body should measure 25 in × 49 in (63.5 cm × 124.5 cm).
Border
The border has two parts. First is a solid top band with hanging loops. Second is one continuous pass of edging down one side, across the bottom, and up the other side. Use Color A throughout.
Border gauge: 3 sc per inch (12 sc = 4 in / 10.2 cm) along the top and sides; 4 sc rows per inch.
Part 1: Top Band and Loops
Row 43: Ch 1, sc in first dc, sc in V-sp, sc in next dc, skip ch-1 sp, sc in each of next 9 dc, skip ch-1 sp, sc in next dc, sc in V-sp, sc in next dc; rep from * 5 more times. Turn.
[75 sc: 7 V-sts × 3 sc + 6 fans × 9 sc = 21 + 54]*
Rows 44–45: Ch 1, sc in each sc across. Turn. [75 sc]
Row 46 (loop row): Ch 1, sc in first 2 sc, ch 12, sl st in top of last sc made (loop made), sc in each of next 12 sc, ch 12, sl st in top of last sc made; rep from * 5 more times, sc in last sc. Do not turn.
[75 sc, 7 loops]*
The loops sit on sc 2, 14, 26, 38, 50, 62, and 74, directly above the 7 V-st columns. The band is 4 rows tall, so it adds 1 in (2.5 cm) of height.
Part 2: Side and Scallop Edging
Keep the RS facing and don’t fasten off. Work over any carried strands as you go so they’re hidden inside the stitches.
Side 1 (down): Turn the work so you can crochet along the side. Work 1 sc in each row end of Rows 46–43 (4 sc). Then, for each stripe from Row 42 down to Row 1, work 4 sc around the edge of the fan row and 3 sc around the edge of the base row.
[4 + (21 × 7) = 4 + 147 = 151 sc]
Bottom (scallops): Work into the free loops of the foundation chain. Sc in the ch at the base of the first V-st, skip 5 ch, fan in the ch at the base of the next sc, skip 5 ch, sc in the ch at the base of the next V-st; rep from * 5 more times.
[6 fans × 9 dc + 7 sc = 54 + 7 = 61 sts]*
These fans point downward and sit centered under each lace column, forming the scalloped hem.
Side 2 (up): From Row 1 up to Row 42, work 3 sc around each base-row edge and 4 sc around each fan-row edge. Then work 1 sc in each row end of Rows 43–46.
[147 + 4 = 151 sc]
Sl st in the first sc of Row 46. Fasten off.
[Edging total: 151 + 61 + 151 = 363 sts]
There are no extra corner stitches. The first and last sc of each side already sit in the corner row ends. At the bottom corners, the end fans of the scallop row flare out enough to turn the corner smoothly.
Why the math works:
- Top: 75 sc ÷ 3 sc per inch = 25 in. That’s the exact body width, so the band neither pulls in nor ruffles.
- Sides: 7 sc per stripe ÷ 3 sc per inch = 2⅓ in, the exact stripe height. 21 stripes × 7 sc = 147 sc = 49 in.
- Band edges: 4 sc rows = 1 in, so 1 sc per row end fits that edge exactly.
- Bottom: Each scallop uses the same 12 foundation chains as one lace repeat, so 6 scallops span the full 25 in.
Final Blocking
- Weave in all ends before blocking, hiding them in the side edging or inside the V-st bars.
- Soak the curtain in cool water for 15 minutes. Press the water out gently without wringing.
- Roll the curtain in a large towel to remove extra water.
- Lay it flat on mats or a clean carpet. Pin it out to a 25.5 in × 51 in (64.8 cm × 129.5 cm) rectangle, not counting the loops.
- Pin the side edges straight first, then the top band.
- Pin the tip of each bottom scallop so all 6 hang evenly.
- Use your fingers to open each fan so the spokes spread evenly and the arch above sits centered.
- Let the curtain dry completely, at least 24 hours, before unpinning.
Final Quality-Control Checklist
- Every base row has 7 V-sts and 6 sc. Every fan row has 7 V-sts and 6 fans of 9 dc.
- The V-st bars run in straight vertical lines from bottom to top.
- The colors alternate cleanly: 11 orange stripes and 10 mint stripes, with orange at both the top and bottom.
- Each arch is anchored in the 5th (center) dc of the fan below it.
- The top band has 75 sc per row and 7 evenly spaced loops.
- Each side has 151 sc, and the bottom has 6 scallops.
- Carried strands are fully hidden under the side edging.
- The blocked panel measures 25.5 in × 51 in (64.8 cm × 129.5 cm).
Troubleshooting
The fans cup or ripple. Your dc are too tight for the 9-stitch fan. Loosen your tension, or go up a hook size for the fan rows only.
The V-st bars lean or wander. You may have missed a V-sp or worked into a ch-1 sp by mistake. Count 7 V-sts on every row.
The side edges pucker. The carried yarn is too tight. Leave the unused strand slack so it follows the full length of the edge.
The sides flare or wave. You have too many sc per stripe. Work exactly 4 sc per fan row and 3 per base row.
The top band pulls in. Check Row 43: skip only the ch-1 sps and make sure you have 75 sc.
The scallops twist. Always work into the same free loops of the foundation chain, and pin each scallop firmly during blocking.
The curtain gets longer after hanging. Cotton relaxes over time. Re-block it, or let it hang for a few days before you set the final rod height.
Care
Hand wash, or machine wash in a mesh bag on a gentle cool cycle, then reshape and dry flat. Don’t tumble dry, because heat and weight can stretch the lace.
Final Notes
All the measurements in this curtain build on each other:
- A 4 in (10.2 cm) repeat, worked 6 times, gives a 25 in (63.5 cm) body.
- A 2⅓ in (5.9 cm) stripe, repeated 21 times, gives 49 in (124.5 cm).
- The 1 in (2.5 cm) top band and the 1 in (2.5 cm) scallops bring the length to 51 in (129.5 cm).
- The side edging brings the width to 25.5 in (64.8 cm).
If your swatch and the first two checkpoints are on target, the rest of the sizes will follow.
Happy crocheting!