

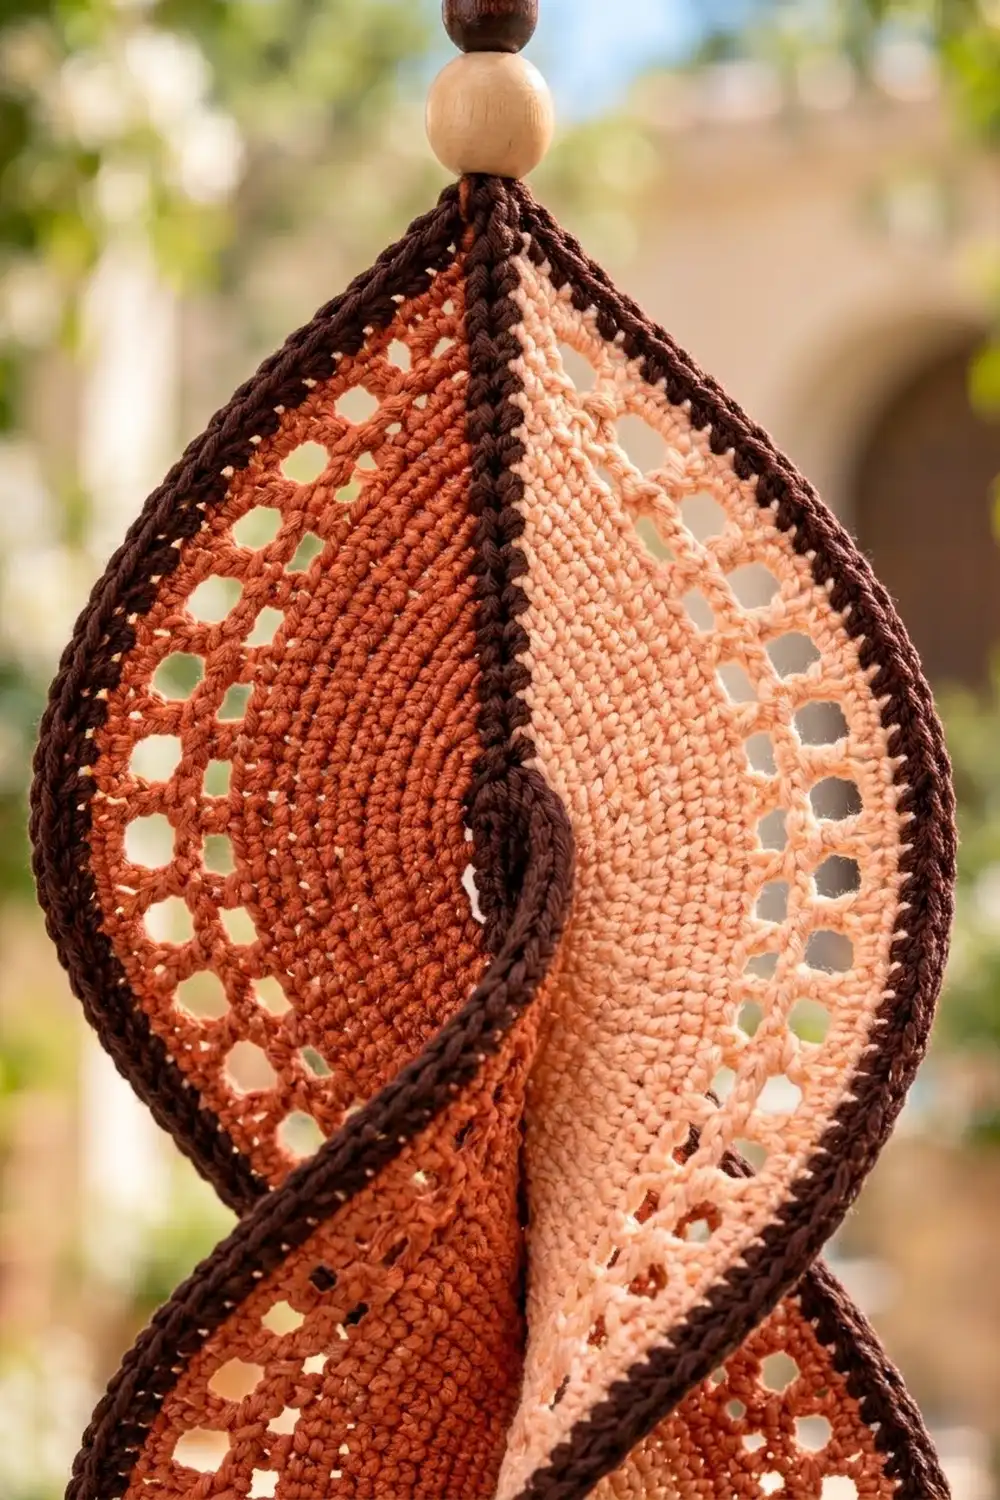
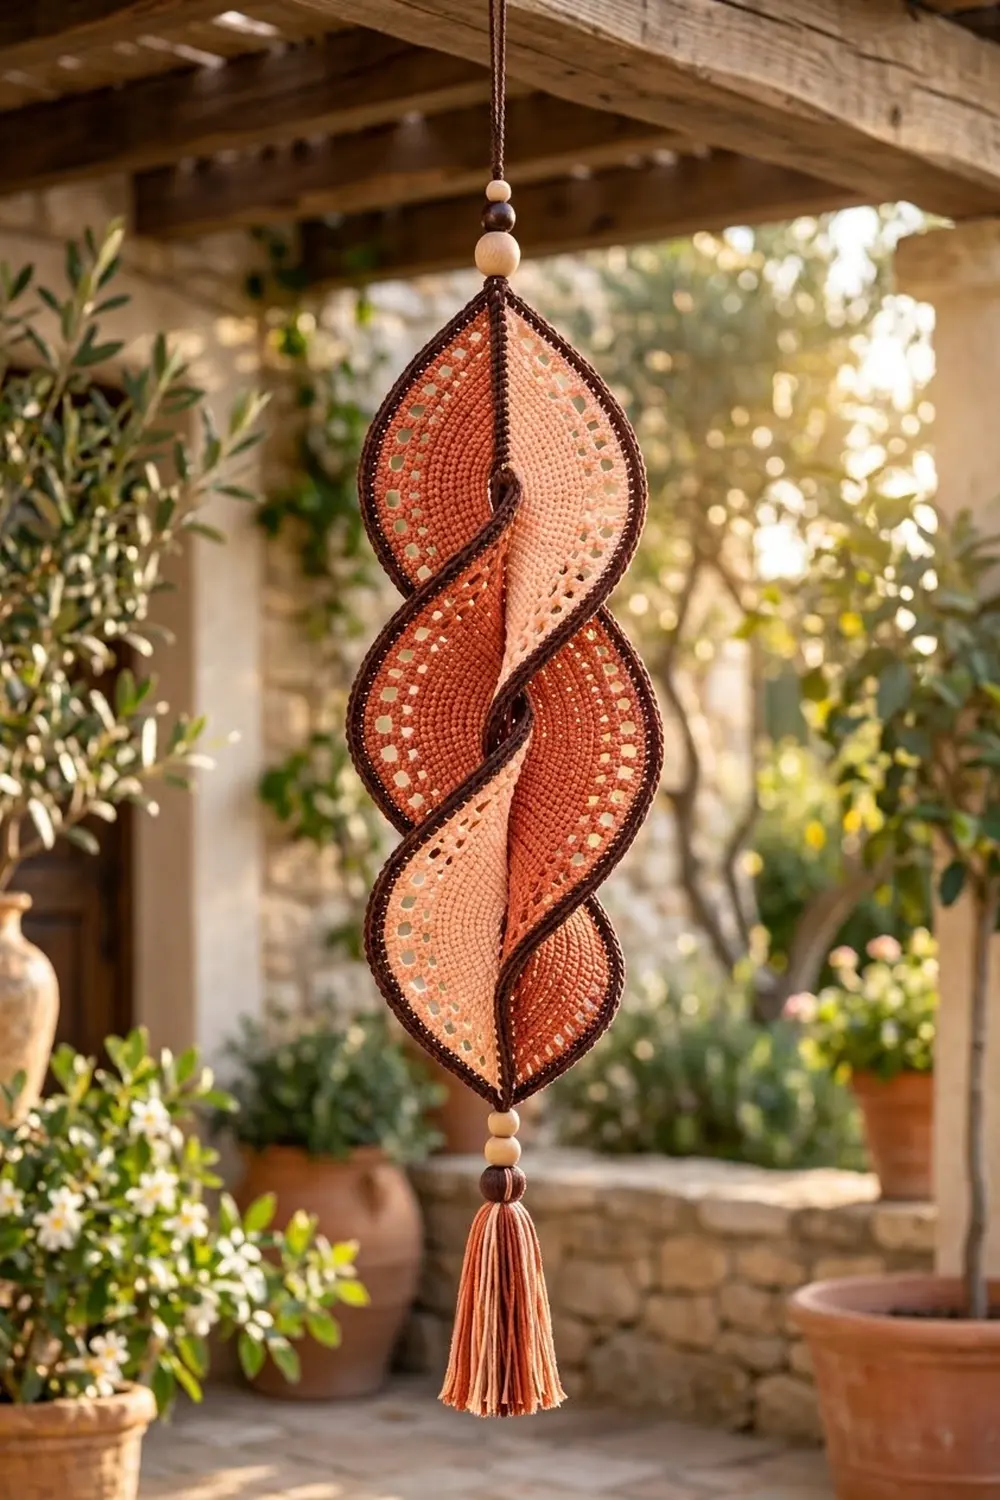
The Terracotta Twist is one crocheted panel shaped like a pointed oval (a lens). When you hang it and give it a twist, it becomes a spiral. A dark brown spine runs down the center. One half is worked in warm terracotta and the other in soft peach. Each half has a curved band of eyelets near its outer edge. A raised, rope-like dark brown edge frames the panel and lets it hold its twist.
The colors are earthy and sun-faded, so the piece suits boho rooms, patios and sunny windows. Wooden beads above and below and a tassel in terracotta, peach and cream finish the look.
This pattern uses US crochet terms. The flat panel measures 17 in (43.2 cm) long by 5.8 in (14.7 cm) wide. Once twisted and hung, the spiral is about 15 in (38.1 cm) long. With the loop, beads and tassel, the whole hanging is about 24 in (61.0 cm).
The construction is simple:
– Crochet a one-row spine.
– Work single crochet rows out from each side of the spine, making each row shorter to form the points.
– Add an eyelet row and a top row on each side.
– Crochet a two-round border over craft wire.
– Block flat, twist, stiffen, and add the hanger and tassel.
Finished Size and Construction
- Flat size: 17 in x 5.8 in (43.2 cm x 14.7 cm)
- Twisted length: about 15 in (38.1 cm), plus about 9 in (22.9 cm) of loop, beads and tassel
- Skill level: Intermediate
- Terminology: US
- Yarn weight: DK (3) cotton
- Hook: 3.5 mm (E-4)
- Number of pieces: 1 panel, plus the tassel and hanging cord
- Layout: one lens-shaped panel with the spine running vertically, terracotta on one side and peach on the other
- Size before border: 16.2 in x 5.0 in (41.1 cm x 12.7 cm)
- Border depth: 0.4 in (1.0 cm) on every edge
Materials
Choose a smooth mercerized or combed DK cotton of about 230 m per 100 g. Cotton keeps the stitches crisp and takes starch well. It also won’t stretch out of its spiral the way acrylic can.
- Color A – Dark Chocolate Brown: 15 g / 35 m (spine, border, hanging cord)
- Color B – Terracotta: 25 g / 58 m (one half of the panel, tassel)
- Color C – Peach: 25 g / 58 m (other half of the panel, tassel)
- Color D – Cream: 5 g / 12 m (tassel accent)
All quantities include a margin of about 15 percent for swatching and yarn tails.
Tools:
- 3.5 mm (E-4) crochet hook
- 40 in (101.6 cm) of 20-gauge (0.8 mm) aluminum craft wire
- Wire cutters and small round-nose pliers
- Wooden beads: one 12 mm dark and one 16 mm natural for the top; two 10 mm natural and one 14 mm dark for the bottom
- A 4.5 in (11.4 cm) piece of cardboard for the tassel
- Tapestry needle, scissors and stitch markers
- Fabric stiffener or heavy spray starch
- Blocking mat and rust-proof pins
Abbreviations (US Terms)
- ch – chain
- sl st – slip stitch
- sc – single crochet
- dc – double crochet
- sk – skip
- sp – space
- st(s) – stitch(es)
- rev sc – reverse single crochet (crab stitch)
- rep – repeat
Reverse single crochet (rev sc): Work from left to right (right to left if you are left-handed). Insert the hook into the next st to the right, yarn over and pull up a loop, then yarn over and pull through both loops. This makes the twisted, rope-like edge.
Reduce X: Turn, sl st in the first X sts, ch 1, then sc in each st across until X sts remain, and leave those last X sts unworked. Each “reduce X” row is 2X sts shorter than the row before it. These shorter rows build the stepped taper toward each point.
Gauge and Checkpoints
Gauge: 20 sc and 22 rows = 4 in (10.2 cm) in sc. That works out to 5 sc = 1 in (2.5 cm). One sc row is about 0.18 in (0.5 cm) tall, and one dc row is about 0.4 in (1.0 cm) tall.
Make a swatch before you start. Ch 21, sc in the second ch from the hook and in each ch across (20 sc), then work 22 rows. The swatch should measure 4 in (10.2 cm) square.
Since this is a single panel, the spine is your first real test. Check these measurements as you go:
- Spine: 81 sc = 16.2 in (41.1 cm)
- After Side B, Row 6: spine plus 6 rows = 1.3 in (3.3 cm) wide
- After Side B, Row 12: spine plus Side B = 2.6 in (6.6 cm) wide; each side is 2.4 in (6.1 cm) tall
- Row 12 top edge: 35 sts = 7.0 in (17.8 cm)
- After Side C: 16.2 in x 5.0 in (41.1 cm x 12.7 cm)
- After border: 17 in x 5.8 in (43.2 cm x 14.7 cm)
If the spine is longer than 16.2 in (41.1 cm), switch to a smaller hook. If it is shorter, switch to a larger hook. A difference of 0.25 in (0.6 cm) is fine. If you are off by more than 0.5 in (1.3 cm), the border counts won’t fit the edge neatly.
The Spine
Foundation: With A, ch 82.
Row 1: Sc in the second ch from the hook and in each ch across. (81 sc)
Fasten off and leave a 6 in (15.2 cm) tail. Don’t turn. Side B is worked into the top of this row. Side C is worked into the free loops of the foundation chain.
Side B (Terracotta)
Hold the spine with the right side facing you and the top loops up.
Row 1: Join B with a sl st in the first sc, ch 1, then sc in the same st and in each sc across. (81 sc)
Row 2: Reduce 1. (79 sc)
Row 3: Reduce 1. (77 sc)
Row 4: Reduce 1. (75 sc)
Row 5: Reduce 2. (71 sc)
Row 6: Reduce 2. (67 sc)
Row 7: Reduce 2. (63 sc)
Row 8: Reduce 3. (57 sc)
Row 9: Reduce 3. (51 sc)
Row 10: Reduce 4. (43 sc)
Row 11 (eyelet row): Turn, sl st in the first 4 sts, ch 4 (counts as dc and ch 1), and sk the next st. *Dc in the next st, ch 1, sk the next st; rep from * until you have worked a dc in the 5th-to-last st. Leave the last 4 sts unworked. (18 dc and 17 ch-1 sps = 35 sts)
Row 12: Ch 1, turn. Sc in each dc and in each ch-1 sp across, ending with a sc in the third ch of the turning chain. (35 sc)
Fasten off and weave in the end.
Each end tapers by a total of 1 + 1 + 1 + 2 + 2 + 2 + 3 + 3 + 4 + 4 = 23 sts. Since 81 − (2 x 23) = 35, the count matches Row 12. The steps start small and get bigger, which follows the curve of a lens. Because of this, the eyelet band runs parallel to the outer edge and fades out toward each point.
Side C (Peach)
Turn the spine over so the free loops of the foundation chain face up.
Row 1: Join C with a sl st in the first free loop, ch 1, then sc in the same loop and in each free loop across. (81 sc)
Rows 2–12: Work exactly as for Side B, Rows 2–12. You will finish with 35 sc.
Fasten off and weave in the ends. The panel now measures 16.2 in x 5.0 in (41.1 cm x 12.7 cm). The A spine is centered and there is a stepped point at each end.
Border
Border gauge: 5 sc = 1 in (2.5 cm), the same as the body of the panel.
The border is two rounds worked all the way around the panel. Round 1 is worked over the wire, and the wire is what lets the panel hold its spiral.
Prepare the wire: Cut 40 in (101.6 cm) of craft wire. With the pliers, bend a tiny closed loop at one end so it can’t snag the yarn.
Each long edge has three parts:
– A stepped edge: 23 exposed sts plus the end of the dc row
– The 35-st top of Row 12
– A second stepped edge
Along the steps, work into every exposed st, including the ones with slip stitches on them. Skip the ends of the short sc rows. The sc you work into each corner st covers the one-row drop.
Round 1: With the right side facing, join A in the spine row end at one point. Hold the wire along the edge and work every st over it.
1. Ch 1, then work (sc, ch 2, sc) in the spine row end.
2. Side B:
– Sc in each of the 23 exposed sts, then 2 sc in the dc row end (25 sc).
– Sc in each of the 35 sts of Row 12 (35 sc).
– 2 sc in the next dc row end, then sc in each of the 23 exposed sts (25 sc).
– Side B total: 85 sc.
3. Work (sc, ch 2, sc) in the spine row end at the opposite point.
4. Work Side C exactly the same way (85 sc).
5. Join with a sl st to the first sc.
6. Trim the wire, leaving 0.5 in (1.3 cm). Bend it back on itself and tuck it inside the stitches.
Round 1 total: 174 sc and 2 ch-2 sps (85 + 85 + 2 + 2 = 174 sc).
Round 2 (trim round): Ch 1 and don’t turn. Rev sc in each sc around, and work 3 rev sc in each ch-2 sp. Join with a sl st to the first st and fasten off. (174 rev sc, one in each existing sc, + 6 rev sc added at the points = 180 rev sc)
Why the math works: Each long edge measures about 17.4 in (44.2 cm) along its outline. That is 7.0 in (17.8 cm) across the top of Row 12 plus about 5.2 in (13.2 cm) along each stepped edge. At 5 sc per inch, 85 sc cover 17.0 in (43.2 cm), so the edge is about 2 percent snug. That slight tension stops the edge from rippling and helps it grip the wire. The sc, ch 2, sc groups add just enough stitches to make a sharp point. Round 2 adds 3 sts at each point so the rope edge can turn the point without pulling.
Final Blocking
- Soak the panel in cool water for 10 minutes, then roll it in a towel and press out the water. Don’t wring it.
- Lay it flat on the blocking mat with the spine perfectly straight.
- Pin it to 17 in x 5.8 in (43.2 cm x 14.7 cm). Pin the points first, then the widest parts, then the curves in between.
- Open each eyelet with a finger so they all look even.
- Let the panel dry completely.
- Coat both sides with fabric stiffener or heavy starch until damp.
- Hold the top point still and turn the bottom point one full turn (360 degrees). The two halves will wrap around the spine and form three lobes. Shape the wire edge with your fingers until the lobes are even.
- Hang the piece by the top point. Clip a light weight, such as a clothespin, to the bottom point and let it dry for 24 hours.
Finishing: Hanger, Beads and Tassel
Hanging cord:
1. Cut two 30 in (76.2 cm) strands of A.
2. Thread both strands through the ch-2 sp at the top point, center them, and knot close to the edge.
3. Slide on the 16 mm natural bead, then the 12 mm dark bead.
4. Knot above the beads and tie the ends into a 3 in (7.6 cm) loop.
Tassel:
1. Hold B, C and a few strands of D together and wrap them 30 times around the 4.5 in (11.4 cm) cardboard.
2. Slide an 8 in (20.3 cm) strand of A under the loops at the top and tie it tightly. Leave its ends long, because they attach the tassel later.
3. Cut through the loops at the bottom and remove the cardboard.
4. Wrap a separate short strand of A around the tassel 0.5 in (1.3 cm) below the top and knot it.
5. Trim the tassel to 4 in (10.2 cm).
Bottom beads:
1. Thread the tassel’s tie through the 14 mm dark bead and then the two 10 mm natural beads.
2. Pass it through the ch-2 sp at the bottom point.
3. Knot securely and hide the ends inside the beads.
Final Quality-Control Checklist
- The spine has 81 sts and runs straight from point to point.
- Each side has 12 rows and ends with 35 sc.
- The eyelets are evenly spaced, with 17 openings on each side.
- Both halves are the same shape and meet the spine at both points.
- Border Round 1 has 174 sc and Round 2 has 180 rev sc.
- No wire shows through the border.
- The flat size before twisting was 17 in x 5.8 in (43.2 cm x 14.7 cm).
- The spiral hangs straight with three even lobes.
- All ends are woven in and the knots are hidden.
Troubleshooting
The edges ruffle. Your border tension is looser than the body. Redo Round 1 with tighter tension or a 3.25 mm hook.
The edges cup and the panel won’t lie flat. The border is too tight. Check that you worked 2 sc in each dc row end and didn’t skip any exposed sts.
The two halves are different widths. Count the reduce rows on each side. One missed or extra reduce row changes the final count by 2 to 8 sts.
The spiral untwists. Use more stiffener or add a second coat, and let it dry fully while it hangs.
The points are rounded. Check that the (sc, ch 2, sc) group is in the spine row end and that Round 2 has 3 rev sc in each ch-2 sp at the points.
The eyelets look uneven. Keep every ch 1 the same size. A chain that is too tight or too loose shows up quickly in an open row.
Care
Dust the hanging gently, or hand wash it in cool water if needed. Reshape it, stiffen it again and hang it to dry. Don’t leave it in strong direct sun for long periods, or the terracotta may fade.
Final Notes
Here is the measurement chain:
– Gauge: 20 sc = 4 in (10.2 cm)
– Spine: 81 sc = 16.2 in (41.1 cm)
– Two 12-row sides bring the panel to 16.2 in x 5.0 in (41.1 cm x 12.7 cm).
– A 0.4 in (1.0 cm) border finishes it at 17 in x 5.8 in (43.2 cm x 14.7 cm).
– One full twist turns the flat lens into a 15 in (38.1 cm) spiral.
If each checkpoint matches, the finished hanging will match too.
Happy crocheting!