

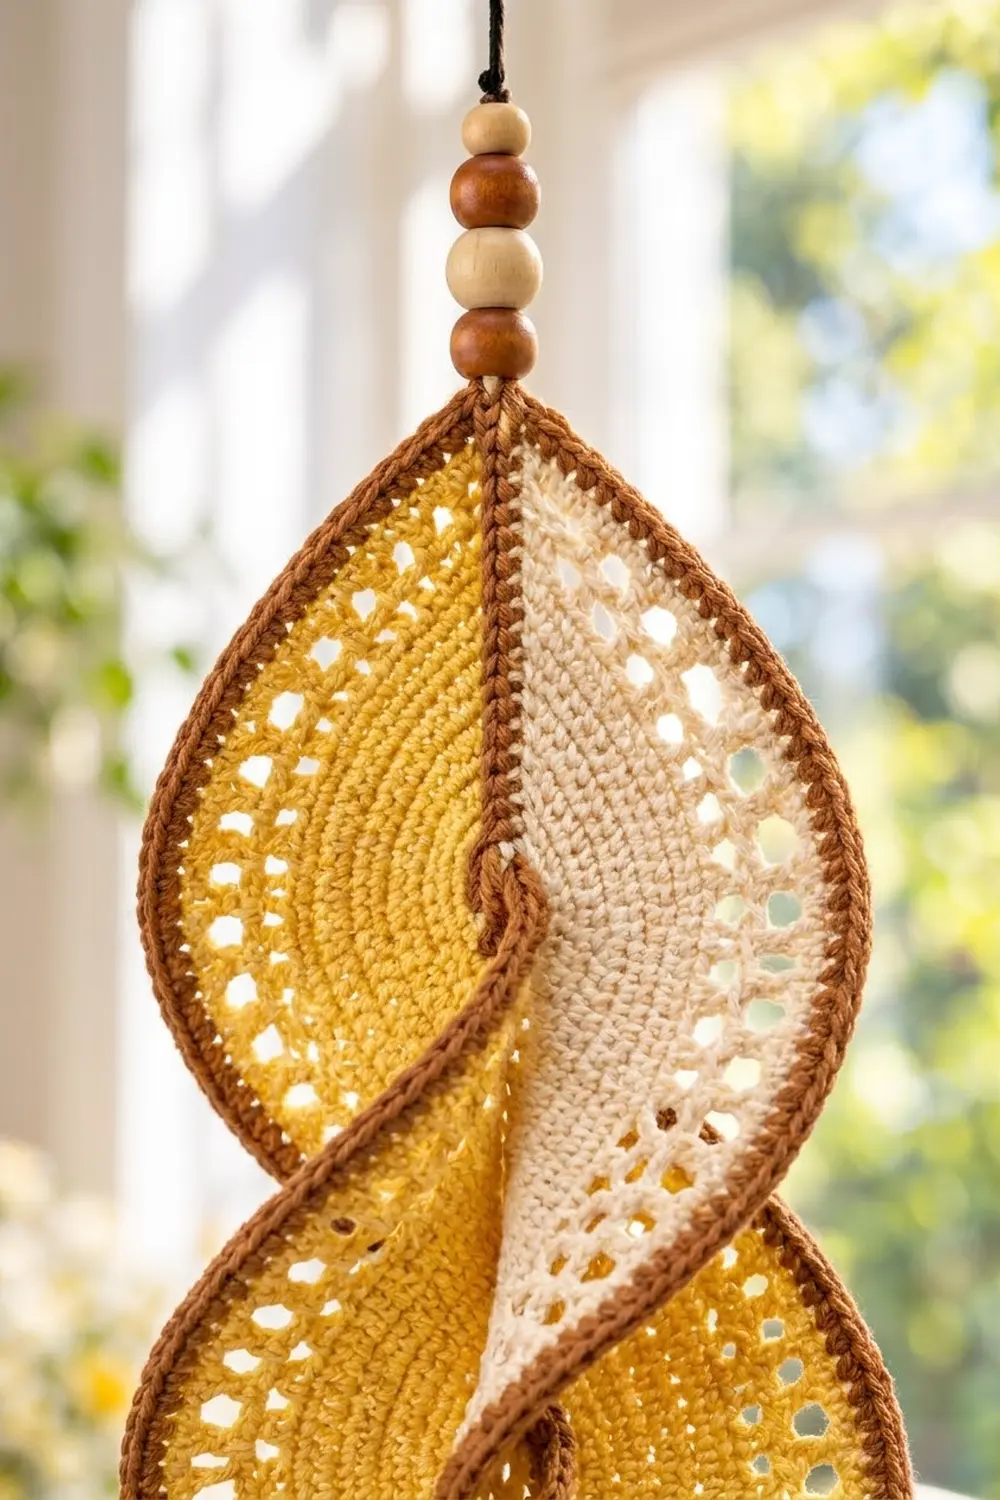
The Sunlit Helix is a long, pointed-oval panel that you twist into a spiral and hang in a sunny window. Light shows through a line of small eyelets, and the twist makes the yellow and cream halves swap places as the piece turns. It looks like a ribbon of sunshine caught in mid-spin.
The palette is mustard yellow, soft cream, and warm caramel brown, finished with natural wooden beads and a two-tone tassel. The style is calm, modern boho. It suits a kitchen window, a porch, or a reading corner.
This pattern uses US crochet terms. The flat finished panel measures 18.5 in (47.0 cm) long by 5.25 in (13.3 cm) wide. Once twisted, the body hangs about 16 in (40.6 cm) tall, and the beads and tassel add about 8 in (20.3 cm) more.
Construction is simple and all in one piece. You start with a brown center spine. Then you work yellow rows along one side and cream rows along the other, using slip stitch steps to taper each half into a point. A two-round brown border goes around the whole piece with craft wire enclosed, and the wire holds the spiral shape.
Finished Size and Construction
- Finished size (flat): 18.5 in x 5.25 in (47.0 cm x 13.3 cm)
- Twisted body height: about 16 in (40.6 cm)
- Total hanging length: about 24 in (61.0 cm), including beads and tassel
- Skill level: Intermediate
- Terminology: US crochet terms
- Yarn weight: DK (light worsted / #3) cotton
- Hook: 3.5 mm (E-4)
- Number of pieces: 1 (single panel)
- Layout: one vertical pointed oval, twisted 1.5 turns
- Size before border: 18 in x 4.25 in (45.7 cm x 10.8 cm)
- Border depth: 0.5 in (1.3 cm) per side
Materials
Use a smooth, mercerized or combed cotton in DK weight. Cotton gives crisp stitch definition, clean eyelets, and a firm fabric that keeps its twist. Avoid fuzzy or very stretchy acrylics, because they blur the eyelets and sag over time.
Yarn (DK cotton, about 125 m per 50 g):
– Mustard yellow: 20 g / 50 m (half the panel plus tassel)
– Cream: 20 g / 50 m (half the panel plus tassel)
– Caramel brown: 15 g / 38 m (spine, border, and hanging cord)
These quantities include a margin of about 25% for your gauge swatch and small differences in tension.
Tools and notions:
– 3.5 mm (E-4) crochet hook
– 44 in (111.8 cm) of 20-gauge craft wire, in brown or copper
– 7 wooden beads, about 0.5 in (1.3 cm), with holes large enough for doubled yarn (5 natural, 2 brown)
– Tapestry needle
– Scissors and wire cutters
– Stiff card 4 in (10.2 cm) tall, for the tassel
– Blocking mat, rust-proof pins, and spray starch or fabric stiffener
Abbreviations (US Terms)
- ch – chain
- sl st – slip stitch
- sc – single crochet
- hdc – half double crochet
- dc – double crochet
- sk – skip
- st(s) – stitch(es)
- sp – space
- rev sc – reverse single crochet (crab stitch)
Special stitch – Reverse sc (crab stitch): Working from left to right (right to left for left-handers), insert the hook into the next stitch to the right, yarn over, pull up a loop, yarn over, and draw through both loops. This makes the rounded, corded edge you see on the finished piece.
Stitch count note: In this pattern, slip stitches and ch-1 spaces count as stitches. Every half-row covers all 81 positions along the spine. This keeps the counts identical from row to row and makes the border easy to work.
Gauge and Checkpoints
Gauge: 18 sts and 8 dc rows = 4 in (10.2 cm). One dc row measures 0.5 in (1.3 cm), and one sc row about 0.25 in (0.6 cm).
Before you start, make a small test swatch: ch 20, then work 8 rows of dc. Measure across the middle of the swatch, not the edges.
Checkpoints:
1. Spine: 81 sc = 18 in (45.7 cm) long.
2. Yellow half complete: 2 in (5.1 cm) from the spine edge to the top of Row 4 at the widest point.
3. Both halves complete: 18 in x 4.25 in (45.7 cm x 10.8 cm).
4. After border: 18.5 in x 5.25 in (47.0 cm x 13.3 cm).
If your piece is too big, go down 0.25 mm in hook size. If it is too small, go up 0.25 mm. Recheck the spine before going on, because every later measurement depends on it.
Center Spine
With brown:
Foundation: Ch 82.
Spine Row: Sc in 2nd ch from hook and in each ch across. (81 sc)
Fasten off. The spine should measure 18 in (45.7 cm). The tops of these sc are the yellow side. The free bottom loops of the foundation chain are the cream side.
Yellow Half
The yellow half is worked in turned rows into the tops of the spine sc. Each row slips over 4 more stitches at each end than the row before. This step-in creates the tapered point.
Row 1: Join yellow in the first sc of the spine. Ch 1 (does not count as a stitch). Sl st in same st, sc in next 2 sts, hdc in next 2 sts, dc in next 71 sts, hdc in next 2 sts, sc in next 2 sts, sl st in last st. Turn. (81 sts: 2 sl st, 4 sc, 4 hdc, 71 dc)
Row 2: Ch 1. Sl st in first 5 sts, sc in next 2 sts, hdc in next 2 sts, dc in next 63 sts, hdc in next 2 sts, sc in next 2 sts, sl st in last 5 sts. Turn. (81 sts: 10 sl st, 4 sc, 4 hdc, 63 dc)
Row 3: Ch 1. Sl st in first 9 sts, sc in next 2 sts, hdc in next 2 sts, dc in next 55 sts, hdc in next 2 sts, sc in next 2 sts, sl st in last 9 sts. Turn. (81 sts: 18 sl st, 4 sc, 4 hdc, 55 dc)
Row 4 (eyelet row): Ch 1. Sl st in first 13 sts, sc in next 2 sts, hdc in next 2 sts, dc in next st, ch 1, sk next st, dc in next st; repeat from * to * 22 more times, hdc in next 2 sts, sc in next 2 sts, sl st in last 13 sts. (81 sts: 26 sl st, 4 sc, 4 hdc, 24 dc, 23 ch-1 sps)
Fasten off and weave in the ends.
Check: The eyelet section in Row 4 is 1 + (23 x 2) = 47 sts. The full row is 13 + 2 + 2 + 47 + 2 + 2 + 13 = 81. The yellow half should now stand 2 in (5.1 cm) tall from the spine at its widest point and taper to the spine at both ends.
Cream Half
Turn the piece over so the free bottom loops of the brown foundation chain face up. There are 81 free loops, one under each spine sc.
Rows 1–4: Join cream in the first free loop. Work Rows 1–4 exactly as for the yellow half, with each row worked into the free loops or the stitches of the previous cream row.
Row stitch counts:
– Row 1: 81 sts
– Row 2: 81 sts
– Row 3: 81 sts
– Row 4: 81 sts, including 23 ch-1 eyelets
Fasten off and weave in the ends.
Checkpoint: The panel should now be a pointed oval, 18 in x 4.25 in (45.7 cm x 10.8 cm). That is 0.25 in (0.6 cm) of spine plus 2 in (5.1 cm) for each half. Both tips should come to a sharp point at the end of the spine.
Border
The brown border is worked over the craft wire, which locks the wire inside the stitches.
Border gauge: 1 sc per stitch along the long edges, which matches the body gauge of 18 sts = 4 in (10.2 cm). That means the border lies flat with no ruffling or cupping.
Prepare the wire: Cut 44 in (111.8 cm) of craft wire. Bend a small closed loop at one end so it can’t poke through the stitches.
Round 1 (sc over wire): Join brown in the first st of yellow Row 4, right next to a tip.
– Holding the wire along the edge, ch 1 and work sc over the wire into each of the 81 sts of yellow Row 4. (81 sc)
– At the tip, work 3 sc over the wire into the end stitch of the spine. (3 sc)
– Work sc over the wire into each of the 81 sts of cream Row 4. (81 sc)
– At the second tip, work 3 sc over the wire into the other end stitch of the spine. (3 sc)
– Sl st to the first sc.
Total: 81 + 3 + 81 + 3 = 168 sc.
Trim the wire so it overlaps its starting end by about 1 in (2.5 cm). Bend a closed loop in this end too, and tuck it under the last few stitches.
Round 2 (corded edge): Ch 1. Rev sc in each st around. Sl st to the first rev sc. (168 rev sc)
Fasten off and leave a 24 in (61.0 cm) brown tail at one tip for the hanger. If you fastened off away from a tip, cut a separate strand.
Why the math works: Each long edge already has exactly 81 stitches, one for every spine stitch. One sc per stitch keeps the edge the same length as the body. The 3 sc at each tip turn the sharp point without tightening it. Each border round adds 0.25 in (0.6 cm), so the 2 rounds add 0.5 in (1.3 cm) per side. That brings the width from 4.25 in (10.8 cm) to 5.25 in (13.3 cm) and the length from 18 in (45.7 cm) to 18.5 in (47.0 cm).
Hanger, Beads, and Tassel
Top hanger: Fold the 24 in (61.0 cm) brown strand in half through the top tip stitch. Thread 4 beads (3 natural, 1 brown) over both strands, starting with the brown bead nearest the tip. Tie an overhand knot above the beads, then knot the ends into a hanging loop.
Tassel: Hold yellow and cream together and wrap them around the 4 in (10.2 cm) card 15 times. That gives 30 strands in total. Tie the top with a 12 in (30.5 cm) cream strand and cut the bottom loops. Wrap the neck 0.5 in (1.3 cm) below the top with yellow and secure it. Trim the tassel to an even length.
Bottom drop: Use the tassel’s tie ends, or a new 12 in (30.5 cm) brown strand, and thread on 3 beads (2 natural, 1 brown, with the brown bead nearest the tassel). Tie the strand through the bottom tip stitch, then knot and hide the ends inside the beads.
Final Blocking
- Lightly mist the flat panel with water. Don’t twist it yet.
- Pin it flat to 18.5 in x 5.25 in (47.0 cm x 13.3 cm), with the spine straight down the center.
- Pin each tip to a sharp point, and open each eyelet with a pin tip if needed.
- Spray evenly with starch or brush on diluted fabric stiffener.
- Let it dry completely, which takes about 6–8 hours.
- Unpin the panel. Hold the top tip still and gently rotate the bottom tip 1.5 full turns (540°), letting the wire border form the spiral.
- Adjust each lobe with your fingers until all 3 lobes are about the same size. The body should hang about 16 in (40.6 cm) tall.
- Hang the piece and give it a final light coat of starch to set the twist.
Final Quality-Control Checklist
- The spine is straight and measures 18 in (45.7 cm).
- Each half has 4 rows, and every row covers all 81 positions.
- Each half has 23 evenly spaced eyelets in Row 4.
- Both tips come to clean, matching points.
- Border Round 1 has 168 sc and Round 2 has 168 rev sc.
- The wire is fully enclosed, with no sharp ends showing.
- The flat size was 18.5 in x 5.25 in (47.0 cm x 13.3 cm) before twisting.
- The twist is even, the lobes are balanced, and the piece hangs straight.
- The beads are secure and the tassel is trimmed evenly.
Troubleshooting
Halves cup or ruffle: Check the row counts. Every row must total 81 stitches, so recount the slip stitches at each end.
Tips look blunt: Make sure Row 1 starts and ends with a slip stitch in the very first and last spine stitches. Pin the tips firmly while blocking.
Eyelets are uneven: Keep each ch-1 loose and the same size. Blocking with a pin helps open tight ones.
Border pulls the edge in: Your border tension is tighter than your body tension. Go up a hook size for the border rounds only.
Wire pokes through: Bend the wire ends into closed loops and overlap them under several stitches.
Twist won’t hold: Add another coat of stiffener and let it dry while the piece hangs. Make sure you are using 20-gauge wire, as thinner wire is too weak.
Piece hangs crooked: Center the hanger strand exactly on the spine’s end stitch.
Care
Dust it gently or use a cool hairdryer setting. If it needs cleaning, spot-clean with a damp cloth and re-starch. Don’t machine wash it, because that can bend the wire.

Final Notes
The measurement chain is short and reliable:
– The spine of 81 sc sets the length at 18 in (45.7 cm).
– Four rows on each side bring the width to 4.25 in (10.8 cm).
– The two-round border makes the flat panel 18.5 in x 5.25 in (47.0 cm x 13.3 cm).
– One and a half turns give a 16 in (40.6 cm) spiral that catches the light from every angle.
If you check the spine first and recount each 81-stitch row, the rest falls into place.
Happy crocheting!