

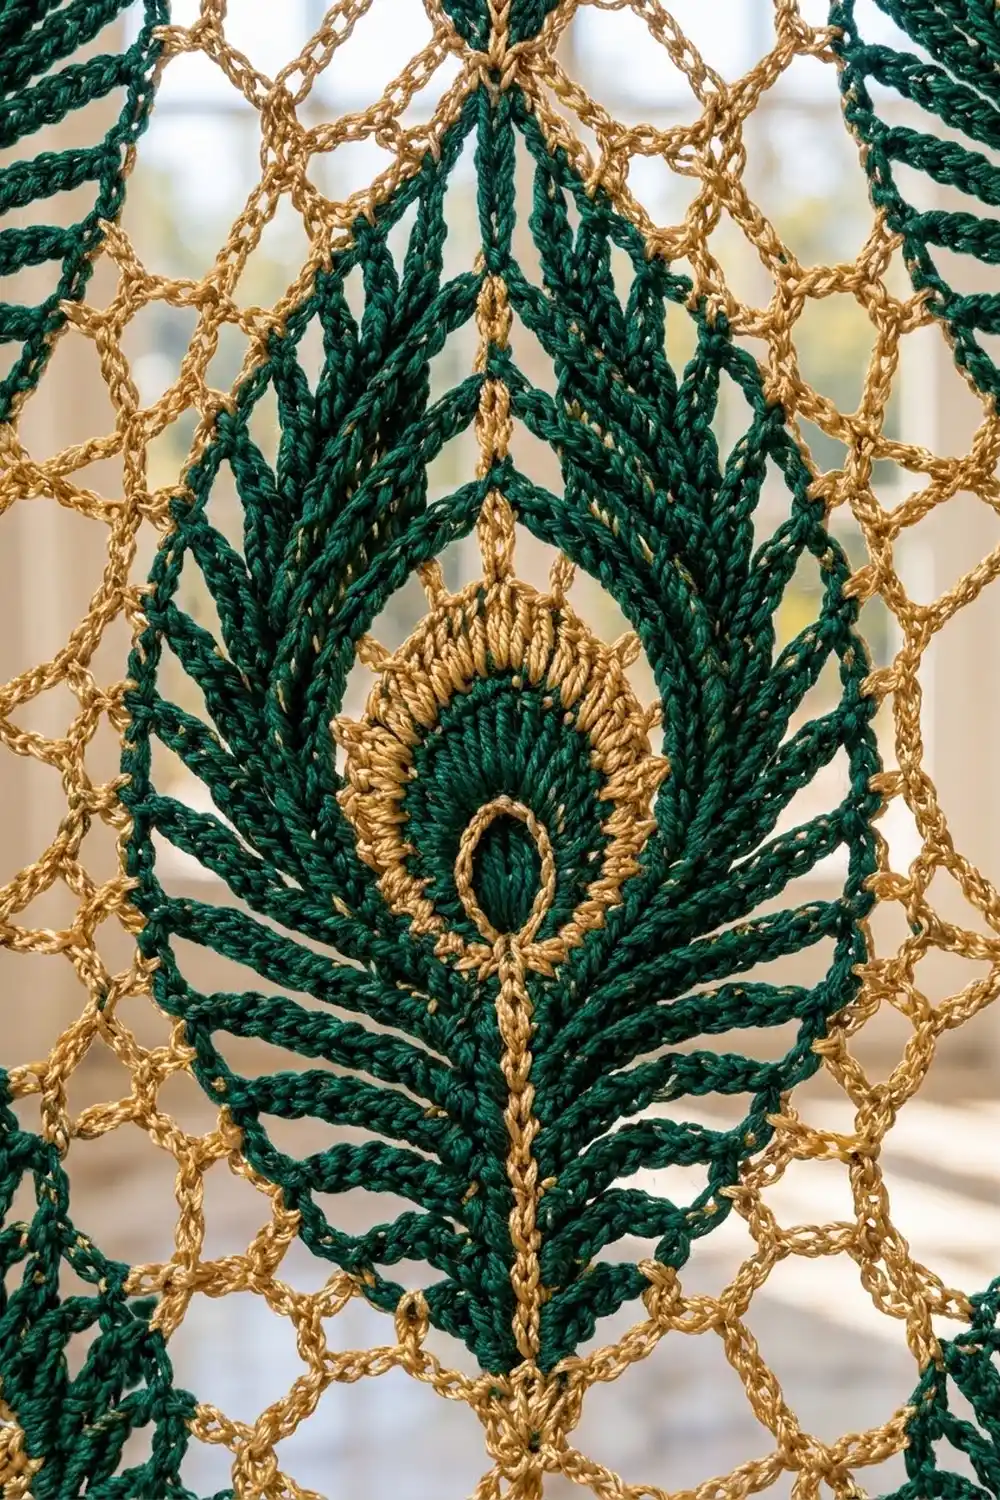
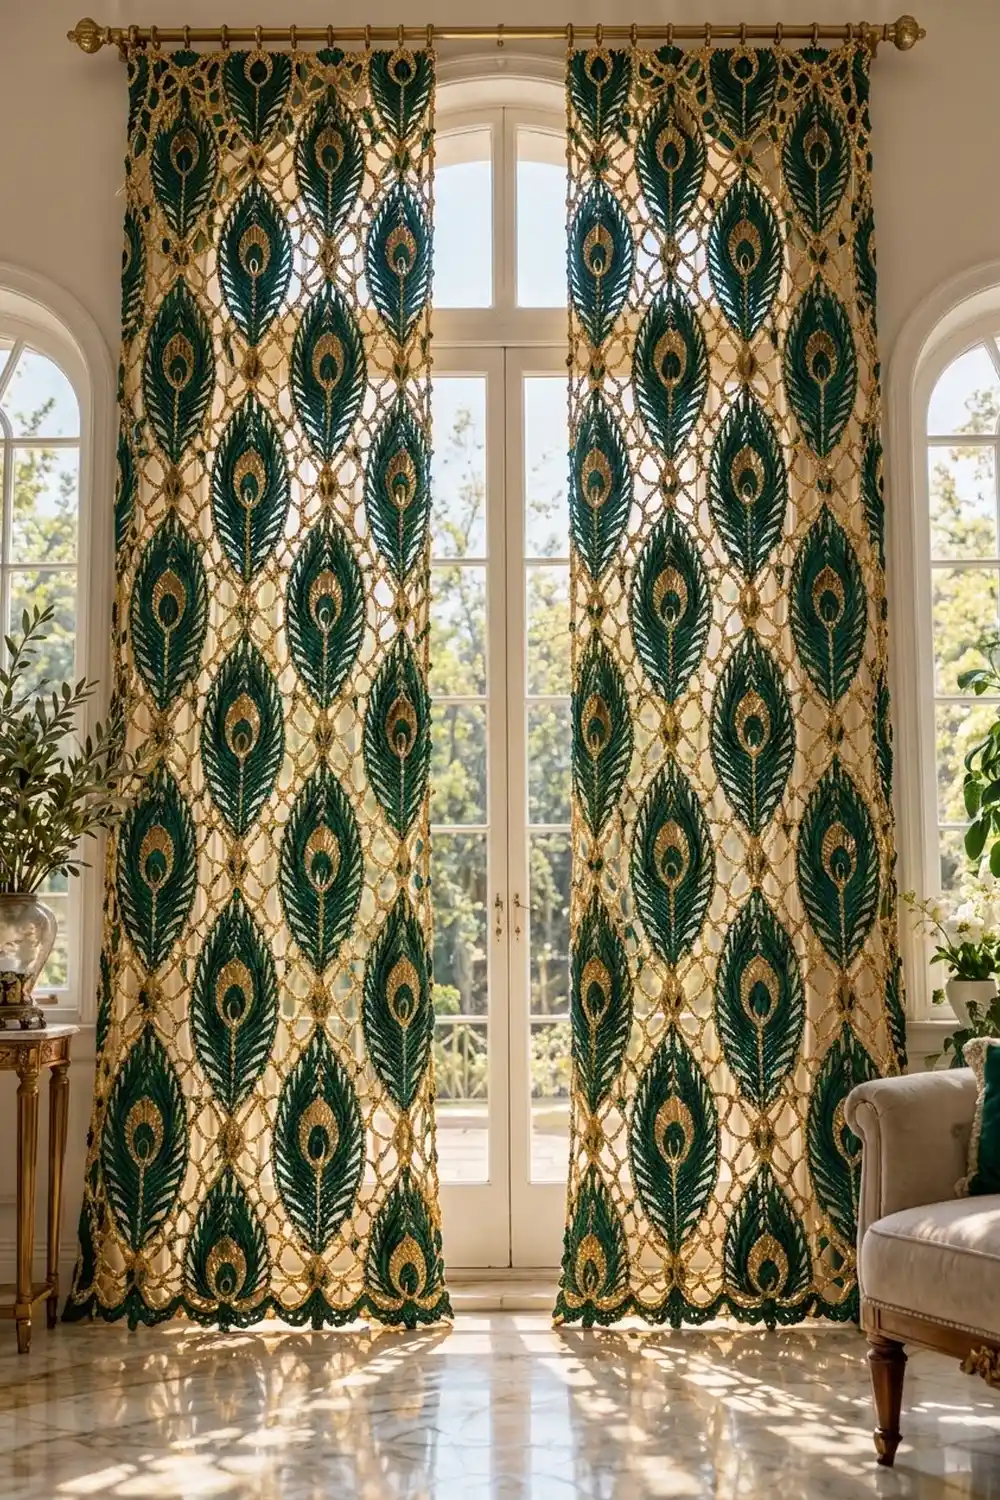
This curtain panel pairs deep emerald peacock feathers with an airy gold mesh. Each feather has a layered “eye” of green and gold rings, a wide band of ridged green barbs, and a fine gold quill line. Gold chain loops frame every feather, and the joined panel reads as a staggered, diamond-like lattice that glows when light comes through.
The palette is two colors: emerald green (A) for the feather barbs and hem scallops, and mustard gold (B) for the eye rings, mesh, seams, and edging. The style is rich but simple to work. Light passes through the mesh, while the feathers give the panel enough weight to hang straight.
The pattern uses US crochet terms. One finished panel measures 38″ x 86″ (96.5 x 218.4 cm) including the border. The photo shows a pair, so make two identical panels.
For each panel, you’ll make 22 rectangular feather blocks and 4 gold half blocks. You join them into four columns, join the columns side by side, and add a two-round border with a green scalloped edge.
Finished Size and Construction
- Finished panel size: 38″ x 86″ (96.5 x 218.4 cm)
- Skill level: Intermediate
- Terminology: US
- Yarn weight: Worsted (#4) cotton
- Hook: 5.0 mm (US H-8)
- Pieces per panel: 22 feather blocks + 4 half blocks (52 pieces for the pair)
- Layout: 4 columns; columns 2 and 4 are shifted down by a half block
- Feather block: 9″ x 12″ (22.9 x 30.5 cm), 30 x 40 sts per side
- Half block: 9″ x 6″ (22.9 x 15.2 cm), 30 x 20 sts per side
- Size before border: 36″ x 84″ (91.4 x 213.4 cm)
- Border depth: 1″ (2.5 cm) on each side
Materials
Use a smooth, tightly plied mercerized cotton or a cotton blend in worsted weight. Plied cotton gives the rope-like stitch definition you see in the barbs and doesn’t stretch much while hanging. These amounts assume about 170 m per 100 g.
For the pair of panels:
- Color A, emerald green: 1,000 g (1,700 m)
- Color B, mustard gold: 1,750 g (2,975 m)
For one panel: A 500 g (850 m) and B 875 g (1,488 m).
These amounts include a margin of about 10% for swatching and seams.
Tools:
- 5.0 mm (US H-8) hook
- 5.5 mm (US I-9) hook for seams if needed
- Tapestry needle
- Locking stitch markers
- Scissors
- Blocking mats, rust-proof pins, and a spray bottle
- Curtain clip rings (about 10 per panel)
Abbreviations (US Terms)
- ch: chain
- sl st: slip stitch
- sc: single crochet
- hdc: half double crochet
- dc: double crochet
- tr: treble crochet (yo twice)
- dtr: double treble (yo 3 times, insert hook, pull up a loop, [yo, pull through 2 loops] 4 times)
- BLO: back loop only
- sp: space
- sk: skip
- rep: repeat
- RS: right side
Surface slip stitch: Hold the yarn behind the work. Insert the hook from the front between stitches, pull up a loop, and pull it through the loop on the hook. This makes a chain-like line on the RS.
Gauge and Checkpoints
Edge gauge: 10 sc = 3″ (7.6 cm). Every block and border measurement depends on this gauge.
Make one feather block and one half block before you make anything else, then check them at these points:
- After feather Rnd 4, the eye is about 2¼” (5.7 cm) across.
- After feather Rnd 7, the feather is about 5½” x 7¾” (14.0 x 19.7 cm).
- After Mesh Rnd 2, the motif is about 7″ x 10″ (17.8 x 25.4 cm).
- After Mesh Rnd 4, the feather block is 9″ x 12″ (22.9 x 30.5 cm).
- After the edge round, the half block is 9″ x 6″ (22.9 x 15.2 cm).
If the block is more than ½” (1.3 cm) too big, go down half a hook size. If it is more than ½” (1.3 cm) too small, go up half a hook size. Matching stitch counts matter more than exact size, because the seams join stitch to stitch.
Feather Block (make 22 per panel)
Feather
Rnd 1 (A): Ch 5. Sc in 2nd ch from hook and in next 2 ch, 3 sc in last ch. Working along the other side of the chain, sc in next 2 ch, 2 sc in the same ch as the first sc. Join with sl st to first sc. (10 sc) Fasten off.
Rnd 2 (B): Join B in any st. Ch 1, 2 hdc in each st around, join. (20 hdc) Fasten off.
Rnd 3 (A): Join A. Ch 1, [sc in next st, 2 sc in next st] 10 times, join. (30 sc) Fasten off.
Rnd 4 (B): Join B. Ch 1, [sc in next 2 sts, 2 sc in next st] 10 times, join. (40 sc) Fasten off.
Lay the eye with the long axis vertical and place a marker in the bottom-center st.
Rnd 5 (A, BLO): Join A in the marked st. Work everything in BLO:
- Bottom: sc in next 4 sts.
- Side 1: hdc in next 3, 2 dc in each of next 5, 2 tr in each of next 4.
- Top: 2 dtr in each of next 4, ch 3 (this is the point), 2 dtr in each of next 4.
- Side 2: 2 tr in each of next 4, 2 dc in each of next 5, hdc in next 3.
- Bottom: sc in next 4. Join.
Count: 8 sc + 21 + 16 + 21 = 66 sts + ch-3 point
Rnd 6 (A, BLO): Ch 1. Work 1 st into each st:
- Sc in next 4.
- Side 1: hdc in next 5, dc in next 8, tr in next 8.
- Top: dtr in next 8, then (2 dtr, ch 3, 2 dtr) in the ch-3 point, then dtr in next 8.
- Side 2: tr in next 8, dc in next 8, hdc in next 5.
- Sc in next 4. Join.
Count: 66 sts worked one per stitch + 4 extra dtr at the point = 70 sts + ch-3 point. Fasten off.
The unworked front loops of Rnds 5–6 make the ridged barb texture.
Rnd 7 (B): Join B in the ch-3 point. Ch 1, sc in the sp, sc in each of the 70 sts, sc in the point sp, ch 2, join to first sc.
Count: 70 sts worked one per stitch + 2 sc in the point = 72 sc + ch-2 point
Quill: With B, work a surface sl st line from the bottom of Rnd 4 straight down through Rnds 5–7 to the bottom center. Weave in the ends.
Gold Mesh Frame (B)
Mesh Rnd 1: Sl st into the point ch-2 sp. Ch 1, sc in the sp. [Ch 5, sk 2 sc, sc in next sc] 23 times. Ch 5, sk last 3 sc, sl st to first sc. (24 ch-5 loops)
Mesh Rnd 2: Sl st into the first 3 ch. Ch 1, sc in the same loop. [Ch 6, sc in next loop] 23 times. Ch 6, join. (24 ch-6 loops)
Lay the block point up. Loop 24 sits over the point. Assign the loops like this:
- Top: loops 23, 24, 1, 2
- Corners: loops 3, 10, 15, 22
- Right side: loops 4–9
- Bottom: loops 11–14
- Left side: loops 16–21
Mesh Rnd 3 (squaring): Sl st to the center of loop 23. Ch 3 (counts as dc). Then work:
- Top: Ch 4, sc in loop 24, ch 4, sc in loop 1, ch 4, dc in loop 2, ch 4.
- Corner: (tr, ch 3, tr) in loop 3, ch 4.
- Long side: Dc in loop 4, [ch 4, sc in next loop] 4 times, ch 4, dc in loop 9, ch 4.
- Corner: (tr, ch 3, tr) in loop 10, ch 4.
- Bottom: Dc in loop 11, ch 4, sc in loop 12, ch 4, sc in loop 13, ch 4, dc in loop 14, ch 4.
- Corner: (tr, ch 3, tr) in loop 15, ch 4.
- Long side: Rep step 3 over loops 16–21.
- Corner: (tr, ch 3, tr) in loop 22, ch 4.
- Join to the top of the beg ch-3.
Each short side now has 5 ch-4 sps and each long side has 7.
Mesh Rnd 4 (edge): Ch 1. Sc in each st, 4 sc in each ch-4 sp, and 3 sc in each corner ch-3 sp. Join and fasten off.
Short side: 1 corner + 1 + tr + (4 + 1) x 4 + 4 + tr + 1 + 1 corner = 30 sts
Long side: same pattern with 6 side sts = 40 sts
Total: 2 x 30 + 2 x 40 − 4 shared corners = 136 sc
Half Block (make 4 per panel)
Work in B throughout.
Row 1: Ch 32. Dc in 8th ch from hook. [Ch 2, sk 2 ch, dc in next ch] 8 times. (10 dc, 9 ch-2 sps)
Rows 2–8: Ch 5 (counts as dc + ch 2), turn. Dc in next dc. [Ch 2, dc in next dc] across, working the last dc in the 3rd ch of the turning ch. (10 dc, 9 sps)
Edge Rnd: Ch 1. Work 3 sc in each corner. Along the top and bottom, work 1 sc in each dc (or in the base ch) and 2 sc in each ch-2 sp. Along the sides, work 2 sc in each row end. Join.
Top/bottom: 8 inner dc + 18 + 2 corner extras + 2 corners = 30 sts
Sides: 16 + 2 corner extras + 2 corners = 20 sts
Total: 96 sc
Make All Pieces
Per panel: 22 feather blocks (about 18 g A and 30 g B each) and 4 half blocks (about 20 g B each).
For the pair: 44 feather blocks and 8 half blocks.
Layout: Each line below equals 6″ (15.2 cm). F = feather block, which spans 2 lines; H = half block.
Line   Col 1  Col 2  Col 3  Col 4
 1     F1     H      F1     H
 2     F1     F1     F1     F1
 3     F2     F1     F2     F1
 4     F2     F2     F2     F2
 5     F3     F2     F3     F2
 6     F3     F3     F3     F3
 7     F4     F3     F4     F3
 8     F4     F4     F4     F4
 9     F5     F4     F5     F4
10     F5     F5     F5     F5
11     F6     F5     F6     F5
12     F6     F6     F6     F6
13     F7     F6     F7     F6
14     F7     H      F7     H
Columns 1 and 3 have 7 feather blocks. Columns 2 and 4 have a half block, 6 feather blocks, and a half block. All feathers point up.
Joining
Method: Flat slip-stitch seam in B. Lay both pieces RS up, edge to edge. Insert the hook through the back loop of one st on each piece and sl st. Match corner to corner and stitch to stitch.
Columns first: Each horizontal seam joins 30 sts to 30 sts.
- Columns 1 and 3: 6 seams each
- Columns 2 and 4: 7 seams each
Checkpoint: Each column measures 9″ x 84″ (22.9 x 213.4 cm).
Long seams: Each column edge has 280 sts.
- Columns 1 and 3: 7 x 40 = 280
- Columns 2 and 4: 20 + 6 x 40 + 20 = 280
The counts match, so the offset columns join stitch to stitch even though the block seams don’t line up. Join column 1 to 2, then 2 to 3, then 3 to 4.
Tension: Each sl st should be the size of one sc. If a seam puckers or pulls the mesh, switch to the 5.5 mm hook.
Checkpoint: The joined panel measures 36″ x 84″ (91.4 x 213.4 cm).
Border
Border gauge: 10 sc = 3″ (7.6 cm), the same as the block edges.
Starting counts, including corners:
- Top and bottom: 4 blocks x 30 = 120 sts
- Long sides: 280 sts
- Perimeter: 2 x 120 + 2 x 280 − 4 = 796 sts
Rnd 1 (B): Join in any st. Ch 1, sc in each st, and work 3 sc in each of the 4 panel corner sts. Join.
Count: 796 sts worked one per stitch + 8 extra corner sc = 804 sc
Per side: 122 on top and bottom, 280 + 2 = 282 on long sides. Between corner sts: 120 and 280.
Rnd 2 (A, scallop): Join in a corner st. Work 7 dc in each corner st. Along each side:
- [Sc in next st, sk 1, 5 dc in next st, sk 1] 30 times along top and bottom
- [Sc in next st, sk 1, 5 dc in next st, sk 1] 70 times along long sides
Join and fasten off.
Count: 200 side scallops + 4 corner scallops.
Why the math works: Rnd 1 works one sc into each stitch, so the edge length stays the same and won’t ruffle. The extra sc are only at the corners. The scallop repeat uses 4 sts, and 120 and 280 both divide evenly by 4, so every side ends cleanly at its corner.
Final Blocking
- Weave in all ends along the seams or the solid feather rounds, never across the open mesh.
- Pin the panel to 36″ x 84″ (91.4 x 213.4 cm) at the seam lines, so the border lies outside the pins.
- Pin each corner block square at 9″ x 12″ (22.9 x 30.5 cm).
- Mist until damp.
- Pin the scallops open so the finished panel measures 38″ x 86″ (96.5 x 218.4 cm).
- Let it dry completely, then hang the panel with clip rings spaced evenly along the top edge.
Final Quality-Control Checklist
- Every feather block has 136 edge sts (30/40 per side).
- Every half block has 96 edge sts (30/20 per side).
- All feathers point up.
- The half blocks are at the top and bottom of columns 2 and 4.
- Each long seam has 280 sts on each side.
- Border Rnd 1 has 804 sc.
- The scallops end cleanly at all 4 corners.
- The panel measures 38″ x 86″ (96.5 x 218.4 cm).
- Both panels match.
Troubleshooting
- Feather cups: Your tension is too tight on the dtr. Loosen the yarn overs, or go up a hook size for Rnds 5–6.
- Feather ruffles: Go down a hook size for Rnd 5.
- Block isn’t rectangular: Recheck the loop assignment before Mesh Rnd 3. Corner loops must be 3, 10, 15, and 22.
- Columns are different lengths: Count the column-edge sts. Each must be 280.
- Wavy border: Make sure you didn’t add sts along the sides in Rnd 1.
- Panel sags: Re-block, and hang it from more clip rings.
Care
Hand wash in cool water with mild soap, roll it in towels, and dry it flat to the blocked measurements. Don’t tumble dry. The weight of a wet panel stretches the mesh.
Final Notes
The measurement chain is short:
- 10 sc = 3″ (7.6 cm).
- Feather blocks are 30 x 40 sts, or 9″ x 12″ (22.9 x 30.5 cm), and half blocks are 30 x 20 sts, or 9″ x 6″ (22.9 x 15.2 cm).
- Four columns of 280 sts make 36″ x 84″ (91.4 x 213.4 cm).
- A 1″ (2.5 cm) border brings the panel to 38″ x 86″ (96.5 x 218.4 cm).
If each stage matches its count, the next stage will fit. Make a second panel the same way.
Happy crocheting!