

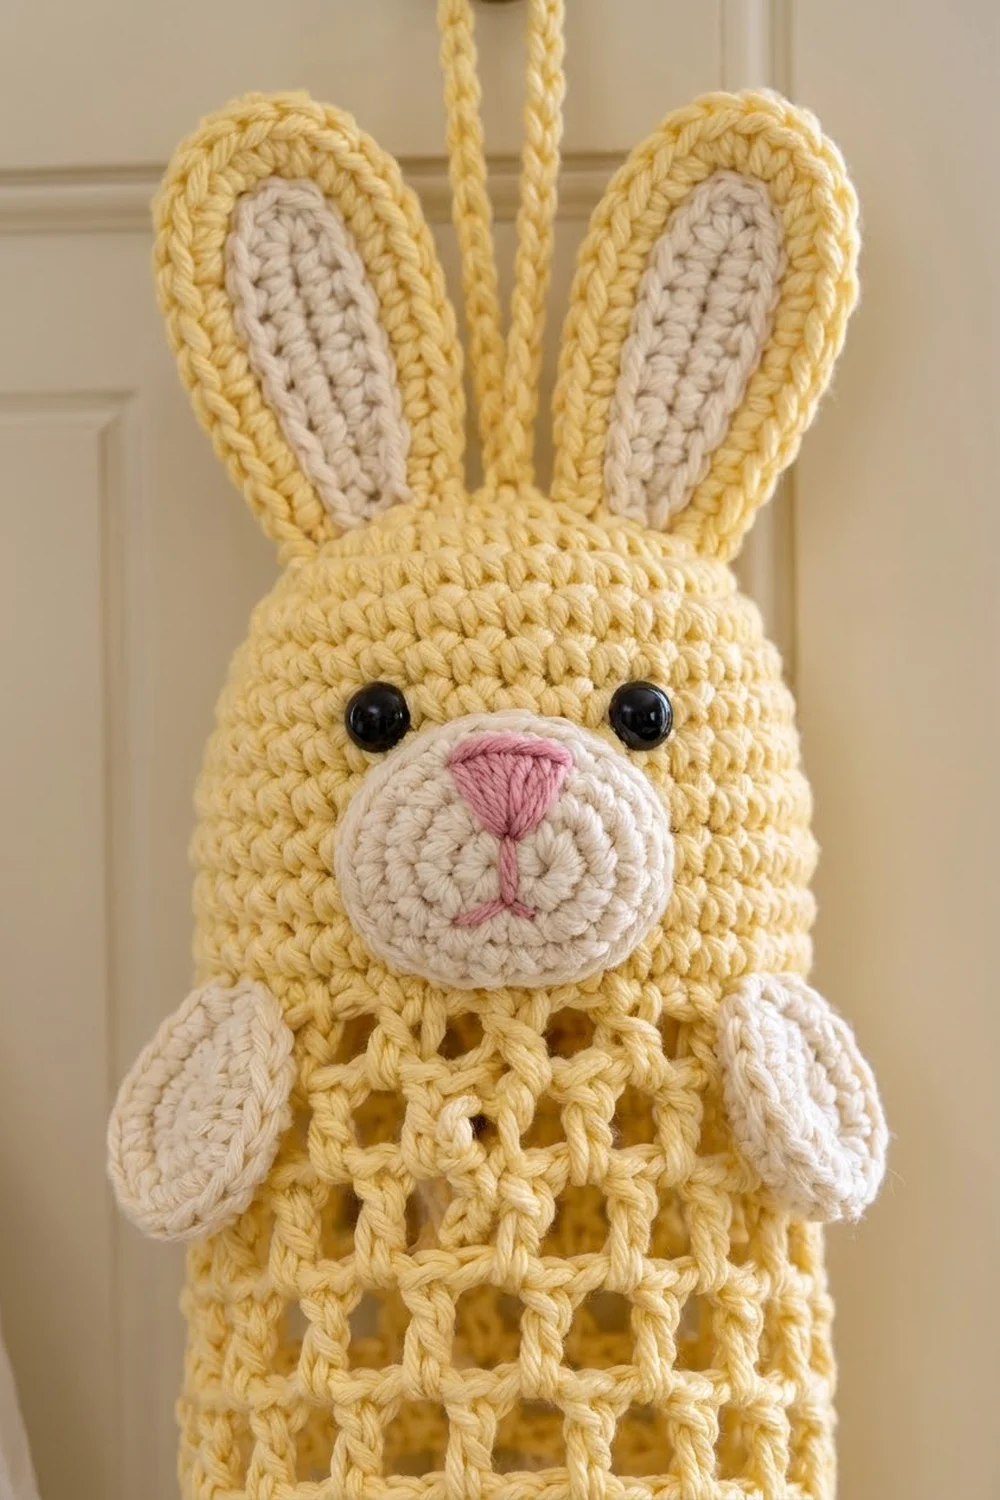
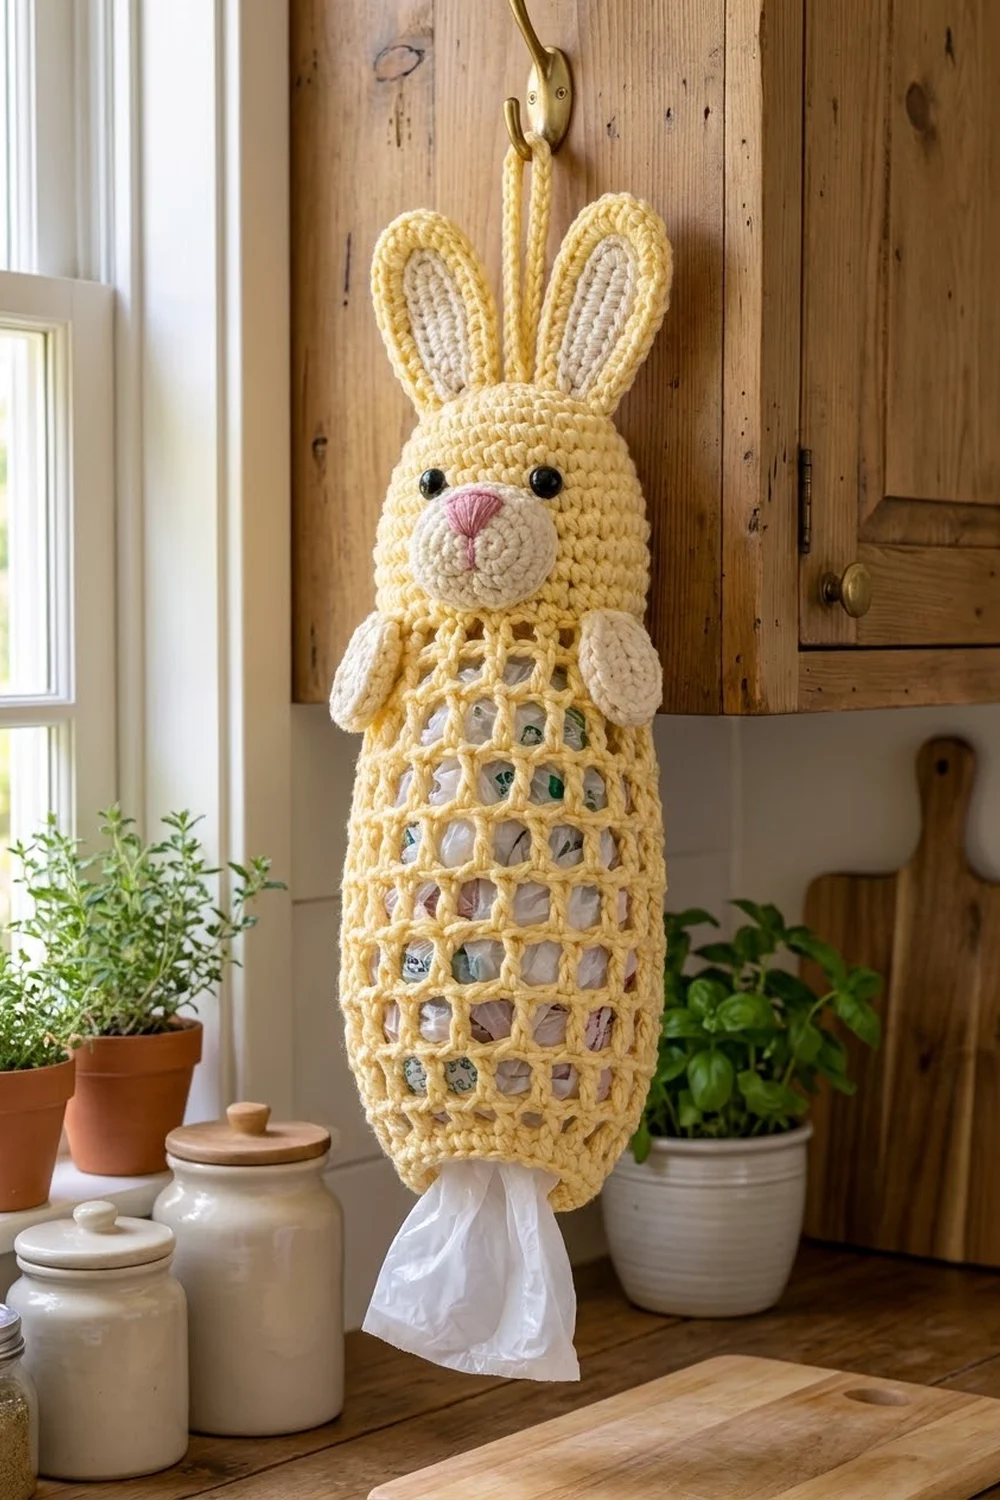
This cheerful bunny bag holder keeps plastic grocery bags neatly in one place. It hangs from a cabinet knob or door hook. The head is solid and the body is an open mesh, so you can see when the holder needs refilling. Pull one bag out through the bottom whenever you need it.
The main color is a soft butter yellow with cream accents: inner ears, muzzle and paws. A touch of pink embroidery makes the nose. The holder suits a spring kitchen, an Easter table, or any farmhouse-style space. Rose pink with cream works just as well.
This pattern uses US crochet terms. The finished body measures 6 in (15.2 cm) wide flat and 18 in (45.7 cm) long. With the ears, the total height is about 20.5 in (52.1 cm).
The body is worked in one piece from the top down. You start with a single crochet dome for the head, switch to a double crochet mesh for the body, then finish with a narrowing single crochet band. You make the ears, muzzle and paws separately and sew them on, then add the hanging loop.
Finished Size and Construction
- Finished size: 6 in (15.2 cm) wide flat × 18 in (45.7 cm) long; about 20.5 in (52.1 cm) including ears
- Skill level: Easy / advanced beginner
- Terminology: US crochet terms
- Yarn weight: Worsted (#4), cotton or cotton blend
- Hook: 5.0 mm (H-8)
- Number of pieces: 1 body + 2 ears + 1 muzzle + 2 paws (6 pieces total, assembled into one holder)
- Layout: Head on top, mesh body below, bottom band at the opening
- Head size: 6 in (15.2 cm) wide flat × 5 in (12.7 cm) tall
- Size before border: 6 in (15.2 cm) wide × 17 in (43.2 cm) long
- Border depth: 1 in (2.5 cm), narrowing the opening to 4.5 in (11.4 cm) flat
Materials
Choose a smooth worsted-weight cotton. Cotton holds its shape when loaded with bags, and it shows the mesh grid clearly. Acrylic also works, but it stretches more over time.
- Yellow (main color): 60 g / 110 m (120 yd)
- Cream (contrast): 15 g / 27 m (30 yd)
- Pink (embroidery): 3 g / 5 m (5 yd)
Tools:
- 5.0 mm (H-8) crochet hook
- Two 8 mm black safety eyes
- Stitch marker
- Tapestry needle
- Straight pins
- Scissors
The quantities above include a margin of about 20% for gauge swatches and small differences in tension.
Abbreviations (US Terms)
- ch – chain
- sl st – slip stitch
- sc – single crochet
- hdc – half double crochet
- dc – double crochet
- sc2tog – single crochet 2 together
- st(s) – stitch(es)
- sp – space
- rnd – round
- MR – magic ring
Special stitch – mesh square: one dc followed by ch 1. Each mesh square counts as 2 sts: the dc and the ch.
Gauge and Checkpoints
- Single crochet gauge: 16 sts × 16 rnds = 4 in (10.2 cm)
- Mesh gauge: 8 mesh squares × 8 rnds = 4 in (10.2 cm), so each square is 0.5 in (1.3 cm) wide and tall.
The two gauges are linked: 2 sc take up the same width as one mesh square. This is why the head and the mesh have the same circumference.
Test one piece first. Crochet the head through Rnd 8 and measure it before you continue.
- After Rnd 8: The flat circle measures about 4 in (10.2 cm) across.
- After Rnd 20: The head tube measures 6 in (15.2 cm) wide flat and 5 in (12.7 cm) tall.
- After Rnd 44: The piece measures 17 in (43.2 cm) long.
- After Rnd 48: The piece measures 18 in (45.7 cm) long.
If your circle is larger than 4 in (10.2 cm), go down half a hook size. If it is smaller, go up half a size. Your row height matters too: if your dc rounds are taller than 0.5 in (1.3 cm), the body gets long. Shorten the dc by pulling up a lower loop rather than changing the stitch count.
Body
Work in continuous joined rounds with yellow. Place the join at one side edge so it stays hidden when the holder hangs flat.
Head (solid sc dome)
Rnd 1: In MR, ch 1, 6 sc; sl st to first sc. (6 sts)
Rnd 2: Ch 1, 2 sc in each st around; sl st to first sc. (12 sts)
Rnd 3: Ch 1, (sc, 2 sc in next st) 6 times; sl st to first sc. (18 sts)
Rnd 4: Ch 1, (sc in next 2 sts, 2 sc in next st) 6 times; sl st to first sc. (24 sts)
Rnd 5: Ch 1, (sc in next 3 sts, 2 sc in next st) 6 times; sl st to first sc. (30 sts)
Rnd 6: Ch 1, (sc in next 4 sts, 2 sc in next st) 6 times; sl st to first sc. (36 sts)
Rnd 7: Ch 1, (sc in next 5 sts, 2 sc in next st) 6 times; sl st to first sc. (42 sts)
Rnd 8: Ch 1, (sc in next 6 sts, 2 sc in next st) 6 times; sl st to first sc. (48 sts)
Checkpoint: the circle is about 4 in (10.2 cm) across.
Rnds 9–20: Ch 1, sc in each st around; sl st to first sc. (48 sts each round)
The head is now a tube 6 in (15.2 cm) wide flat and 5 in (12.7 cm) tall. Flatten it with the join at one side. Stitches 1–24 are the front, and the center front falls between sts 12 and 13.
Mesh Body
Rnd 21 (conversion round): Ch 4 (counts as dc + ch 1). Skip next st, dc in next st, ch 1, skip next st. Repeat from * 22 more times. Sl st to 3rd ch of beg ch-4.
Count: 24 dc + 24 ch-1 sps, worked as 48 sts (1 per existing st) + 0 extra = 48 sts.
Rnd 22: Ch 4 (counts as dc + ch 1). Skip ch-1 sp, dc in next dc, ch 1, skip ch-1 sp. Repeat from * 22 more times. Sl st to 3rd ch of beg ch-4. (24 mesh squares; 48 sts)
Rnds 23–44: Repeat Rnd 22. (24 mesh squares; 48 sts each round)
Each dc sits directly on the dc below it, which makes the stacked square grid. You now have 24 mesh rounds, which measure 12 in (30.5 cm). Checkpoint: the piece measures 17 in (43.2 cm) from the top of the head.
Ears (make 2)
Each ear is a U shape worked around a foundation chain. It has a cream center and a yellow rim.
Row 1: With cream, ch 10. Work along the chain:
- Sc in 2nd ch from hook, hdc in next 2 ch, dc in next 5 ch, 5 dc in last ch.
- Rotate the work and continue along the other side of the chain: dc in next 5 ch, hdc in next 2 ch, sc in last ch.
- Fasten off the cream. (8 + 5 + 8 = 21 sts)
Row 2: Join yellow in the first st. Ch 1 (does not count), sc in next 8 sts, 2 sc in each of next 5 sts, sc in next 8 sts. Turn. (26 sts)
Row 3: Ch 1, sc in next 8 sts, (2 sc in next st, sc in next st) 5 times, sc in next 8 sts. (8 + 15 + 8 = 31 sts)
Fasten off and leave a 10 in (25.4 cm) tail. Each ear measures about 1.25 in (3.2 cm) wide × 3 in (7.6 cm) tall.
Muzzle
Rnd 1: With cream, ch 4. Sc in 2nd ch from hook, sc in next ch, 3 sc in last ch. Working along the other side of the chain: sc in next ch, 2 sc in last ch. Sl st to first sc. (8 sts)
Rnd 2: Ch 1, 2 sc in each st around; sl st to first sc. (16 sts)
Rnd 3: Ch 1, (sc in next st, 2 sc in next st) 8 times; sl st to first sc. (24 sts)
Fasten off and leave a 12 in (30.5 cm) tail. The muzzle is an oval about 2 in (5.1 cm) wide × 1.75 in (4.4 cm) tall.
With pink, embroider a small triangle nose at the top center of the muzzle using satin stitch. Then stitch a short vertical line down from the nose, and a shallow V on each side for the mouth.
Paws (make 2)
Rnds 1–2: Work as for Muzzle Rnds 1–2. (16 sts)
Fasten off and leave a 10 in (25.4 cm) tail. Each paw is an oval about 1.5 in (3.8 cm) wide × 1.75 in (4.4 cm) tall.
Border (Bottom Band)
The bottom band firms up the opening and narrows it so bags don’t fall out.
Border gauge: 16 sc × 16 rnds = 4 in (10.2 cm), the same as the head. The band’s 4 rounds measure 1 in (2.5 cm).
Rnd 45 (conversion round): Ch 1. Sc in each dc and in each ch-1 sp around. Sl st to first sc.
- Count: 48 sts (1 per existing st) + 0 extra = 48 sts
- Per side when flattened: 24 front, 24 back
Rnd 46: Ch 1, (sc in next 2 sts, sc2tog) 12 times; sl st to first sc.
- Count: 36 sts
- Per side when flattened: 18 front, 18 back
Rnds 47–48: Ch 1, sc in each st around; sl st to first sc.
- Count: 36 sts each round
- Per side when flattened: 18 front, 18 back
Fasten off and weave in the end.
Why the math works: 48 divides evenly by 4, so the 12 decreases fall evenly and the narrowing stays smooth with no pucker. At 4 sts per inch, 36 sts makes a circumference of 9 in (22.9 cm), or 4.5 in (11.4 cm) flat. That gives a gentle taper from the 6 in (15.2 cm) head. The opening is still wide enough to pull bags out.
Assembly
- Eyes: Insert the safety eyes from the inside through the bottom opening. Place them in Rnd 13, in st 9 and st 15 of the front. That puts them 6 sts, or 1.5 in (3.8 cm), apart. Secure the backs.
- Muzzle: Pin the muzzle centered below the eyes so it covers about Rnds 14–20. Whipstitch around its edge.
- Ears: Pinch the open base of each ear slightly. Sew one ear on each side of the top center, across Rnds 5–6, about 1 in (2.5 cm) apart. Sew through both the yellow rim and the cream base.
- Paws: Pin one paw at each side edge so it straddles Rnds 20–22. Let the outer half extend past the side fold. Sew only the inner half to the body so the paw stands out at the edge.
- Hanging loop: Join yellow at the center of the magic ring and ch 26. Sl st in the same st to form a loop. Sl st in each ch around the loop to firm it up, then fasten off. The loop stands about 3 in (7.6 cm) tall.
Final Blocking
- Lightly mist the holder with water, or soak it for 10 minutes and press out the water in a towel.
- Lay it flat with the join along one side edge.
- Pin the body to 6 in (15.2 cm) wide and 18 in (45.7 cm) long.
- Line up the mesh squares into straight vertical columns, checking each one is about 0.5 in (1.3 cm) square.
- Pin the bottom band to 4.5 in (11.4 cm) wide.
- Pin the ears upright and smooth them flat, curving the tips gently.
- Let it dry completely before you hang it.
Final Quality-Control Checklist
- [ ] Head Rnd 8 has 48 sts and measures about 4 in (10.2 cm) across.
- [ ] Head measures 6 in (15.2 cm) wide flat.
- [ ] Every mesh round has 24 dc and 24 ch-1 spaces.
- [ ] Mesh columns stack straight with no slant.
- [ ] Rnd 45 has 48 sts; Rnds 46–48 each have 36 sts.
- [ ] Total body length is 18 in (45.7 cm).
- [ ] Eyes are level and 1.5 in (3.8 cm) apart.
- [ ] Muzzle is centered and the nose is symmetrical.
- [ ] Ears are evenly spaced and firmly attached.
- [ ] Paws are at the same height on both sides.
- [ ] Hanging loop is secure at the top center.
- [ ] All ends are woven in.
Troubleshooting
- The head cups or ruffles: Your tension changed during the increases. Recount each round against the totals above.
- The mesh twists in a spiral: You probably worked the beginning ch-4 into a ch-sp instead of skipping it. Always skip the sp and work into the next dc.
- The mesh is narrower than the head: You may have dropped a square. Count 24 dc on every round.
- The body is too long: Your dc stitches are too tall. Shorten them, or work fewer mesh rounds. Each round removed takes 0.5 in (1.3 cm) off the length.
- The ears flop forward: Add a few stitches through the base, catching the head fabric, or work Row 3 of the ear more tightly.
- Bags slip out of the bottom: Add one more round of (sc in next st, sc2tog) to bring the count to 24 sts.
Care
Hand wash in cool water and lay flat to dry. Remove the bags first, and avoid the dryer so the safety eyes and the mesh stay in shape.
Final Notes
Everything in this pattern depends on one gauge chain:
- 16 sc per 4 in (10.2 cm) gives a 48-st head that measures 6 in (15.2 cm) flat.
- That converts 1:1 into 24 mesh squares of 0.5 in (1.3 cm) each.
- Twenty-four mesh rounds add 12 in (30.5 cm), bringing the length to 17 in (43.2 cm).
- The 1 in (2.5 cm) band finishes the body at 18 in (45.7 cm) and narrows the opening to 4.5 in (11.4 cm).
Check each measurement in turn and your bunny will hang straight, neat and ready for bags.
Happy crocheting!