

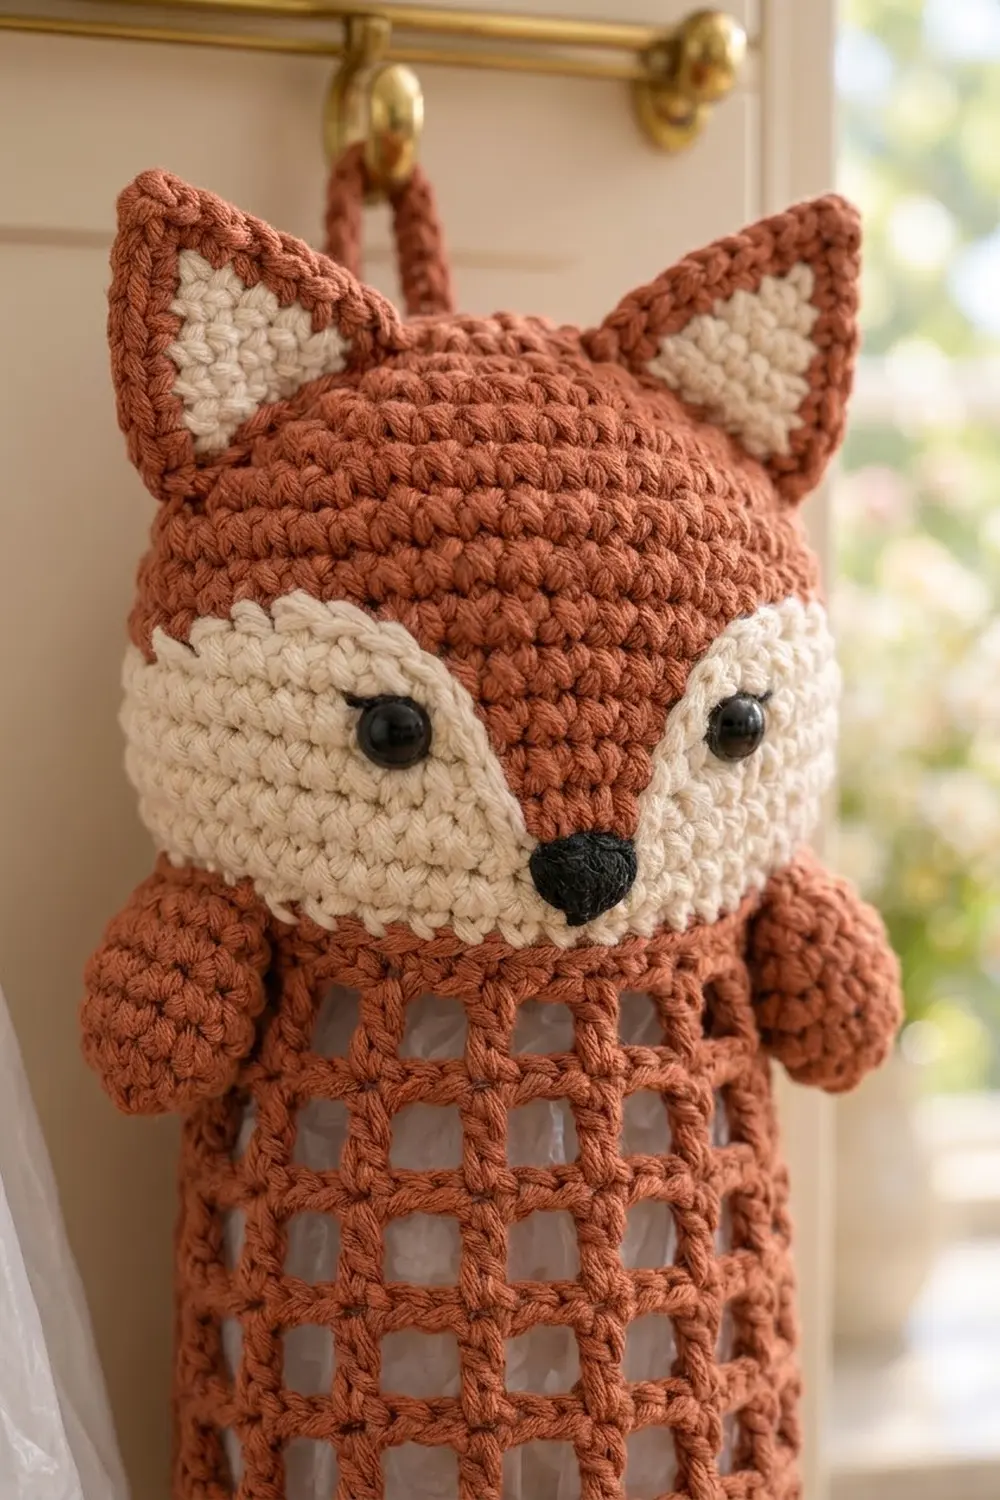
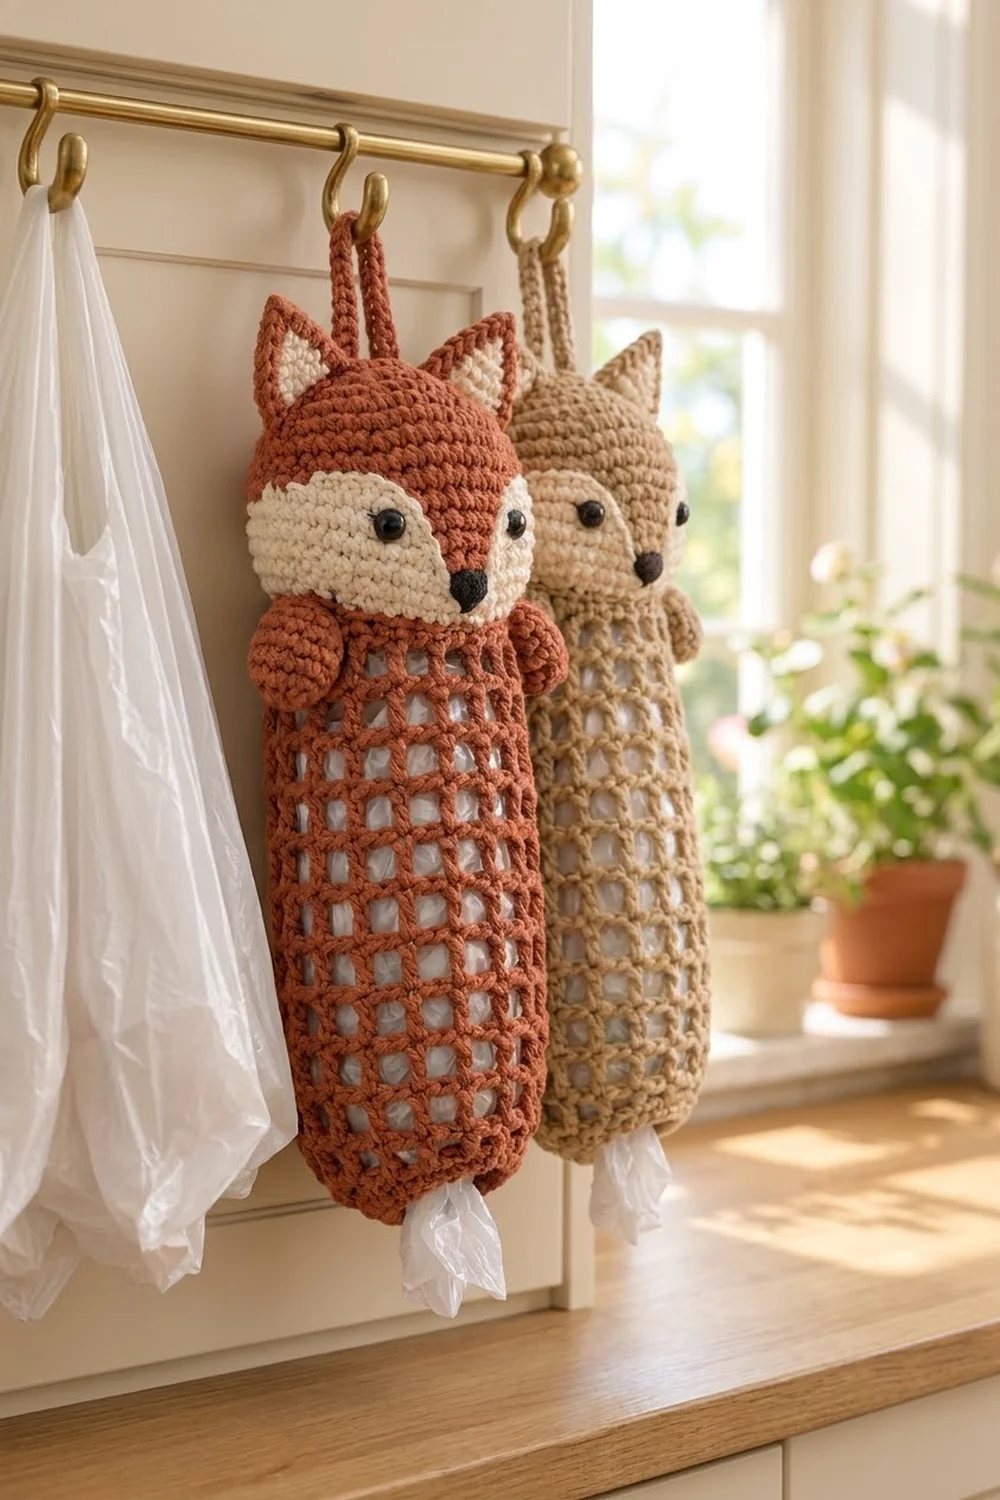
This little fox hangs on a cabinet rail and keeps your plastic bags in one tidy, breathable place. The body is an open square mesh, so you can see when it’s time to refill. The domed head, pointed ears and two round paws give it a friendly face.
The main color is a warm rust, with cream for the face mask and inner ears and black for the eyes and nose. The style is clean and graphic: bold mesh bars, a smooth single-crochet head and a simple appliqué face. A soft beige works well as a second colorway.
This pattern uses US crochet terms. The finished holder measures 6 in (15.2 cm) wide laid flat and 16.9 in (42.9 cm) long, plus a 2.5 in (6.4 cm) hanging loop.
Construction is mostly one continuous piece. You start at the bottom with a chain ring, work the mesh tube upward, change to solid rounds for the head and close the top. Then you add the bottom border into the foundation chain. The mask, ears, paws and loop are made separately and sewn on.
Finished Size and Construction
- Finished size: 6 in (15.2 cm) wide flat × 16.9 in (42.9 cm) long, plus a 2.5 in (6.4 cm) loop
- Skill level: Easy–Intermediate
- Terminology: US crochet terms
- Yarn weight: Worsted (#4) cotton
- Hook: 5.0 mm (H-8)
- Number of pieces: 1 holder (main body plus small sewn-on parts)
- Layout: Single vertical tube, head at top, opening at bottom
- Body circumference: 12 in (30.5 cm), which is 6 in (15.2 cm) flat
- Size before border: 6 × 16 in (15.2 × 40.6 cm)
- Border depth: 0.9 in (2.3 cm)
Materials
Use a smooth, firmly twisted worsted cotton or cotton blend. Cotton holds the mesh open and keeps the head from sagging. Avoid very soft acrylic, which stretches under the weight of the bags.
- Rust (main color): 120 g, about 185 m
- Cream (face and inner ears): 15 g, about 23 m
- Black (nose): 2 g, about 3 m
All quantities include a margin of about 15%.
Tools:
– 5.0 mm (H-8) crochet hook
– 5.5 mm (I-9) hook for the foundation chain (optional)
– Two 10 mm black safety eyes
– A small handful of fiberfill for the paws
– Stitch markers
– Tapestry needle
– Scissors
– Tape measure
– Pins
Abbreviations (US Terms)
- ch – chain
- sl st – slip stitch
- sc – single crochet
- dc – double crochet
- sc2tog – single crochet 2 together
- sc3tog – single crochet 3 together
- inc – 2 sc in the same stitch
- sp – space
- MR – magic ring
- st(s) – stitch(es)
- rnd(s) – round(s)
Special stitch – mesh square: one dc followed by ch 2. Each mesh square spans 3 stitch widths: the dc plus the two chains.
Gauge and Checkpoints
Single crochet gauge: 16 sc and 18 rnds = 4 in (10.2 cm), so one sc round is about 0.2 in (0.5 cm) tall.
Mesh gauge: 4 mesh squares = 3 in (7.6 cm) wide, and 5 mesh rounds = 3 in (7.6 cm) tall. Each square is about 0.75 in (1.9 cm) wide, and each round is about 0.6 in (1.5 cm) tall.
Both gauges give the same 4 sts per inch, so the 48-stitch rounds stay the same width whether they’re solid or mesh.
Test the base first. Work the foundation, Rnd 1 and 5 mesh rounds, then check:
- After Rnd 1: circumference 12 in (30.5 cm), flat width 6 in (15.2 cm).
- After Rnd 6: the mesh is 3 in (7.6 cm) tall above Rnd 1.
- After Rnd 21: the tube is about 12.2 in (31.0 cm) long.
- After Rnd 38: the body is about 16 in (40.6 cm) long, with the head about 3.8 in (9.7 cm) tall.
- After the border: 16.9 in (42.9 cm) total.
If your piece is too big, go down half a hook size. If it’s too small, go up half a size. If only the mesh height is off, adjust the number of mesh rounds rather than changing the stitch counts.
Main Body
Foundation and Base
With rust and the larger hook, ch 48. Join with a sl st to the first ch to form a ring, taking care not to twist it. Switch to the 5.0 mm hook.
Rnd 1: Ch 1. Work 1 sc into one loop of each ch (use the back bump if you can). Leave the other loop free for the border. Join with a sl st to the first sc. (48 sts)
Mesh Tube
Rnd 2 (first mesh round): Ch 5 (counts as 1 dc + ch 2). Skip the next 2 sc. Dc in the next sc, ch 2, skip 2 sc; repeat from * 14 more times. Join with a sl st to the 3rd ch of the beginning ch-5. (16 dc + 16 ch-2 sps = 48 sts, 16 mesh squares)*
Rnds 3–21: Ch 5 (counts as dc + ch 2). Dc in the next dc, ch 2; repeat from * 14 more times. Join with a sl st to the 3rd ch of the beginning ch-5. (16 squares, 48 sts each round)*
That gives 20 mesh rounds in total, about 12 in (30.5 cm). Place each dc directly on top of the dc below so the bars run straight up the tube.
Head
Rnd 22 (conversion round): Ch 1. Work 1 sc in each dc and 2 sc in each ch-2 sp. Join. (16 sc worked 1-per-dc + 32 sc in spaces = 48 sts)
Rnds 23–33: Ch 1, sc in each st around, join. (48 sts each round, 11 rounds)
Stop and place the face now, while the top is still wide open (see Face Mask below). Pin the mask so its lower edge sits on Rnd 23. Push the safety eyes through the mask and the head fabric together, just above the mask’s top straight edge and 1.5 in (3.8 cm) apart. Lock the washers inside the head.
Rnd 34: Sc 4, sc2tog; repeat from * 7 more times. (40 sts)*
Rnd 35: Sc 3, sc2tog; repeat from * 7 more times. (32 sts)*
Rnd 36: Sc 2, sc2tog; repeat from * 7 more times. (24 sts)*
Rnd 37: Sc 1, sc2tog; repeat from * 7 more times. (16 sts)*
Rnd 38: Sc2tog 8 times. (8 sts)
Fasten off, leaving a 6 in (15.2 cm) tail. Weave the tail through the front loops of the last 8 sts, pull tight and secure it. The head is 17 rounds tall (Rnds 22–38), about 3.8 in (9.7 cm).
Leave the head hollow. When you load the holder, bags pushed up from the bottom fill the head and keep the dome round.
Face Mask (Cream)
Ch 15.
Rnd 1: Sc in the 2nd ch from the hook, sc 12, then 3 sc in the last ch. Working along the other side of the chain, sc 12, then 2 sc in the last ch. Join. (1 + 12 + 3 + 12 + 2 = 30 sts)
Rnd 2: Inc in each of the first 2 sts, sc 12, inc in each of the next 3 sts, sc 12, inc in each of the last 2 sts. Join. (4 + 12 + 6 + 12 + 4 = 38 sts)
Rnd 2 checks out: the oval has 5 end stitches at each end (3 + 2 at one end, 2 + 3 at the other), and every one of those 10 end stitches gets 1 increase, so 30 + 8 increases = 38. To be exact, Rnd 1 has 3 end stitches at one end and 2 at the other, plus the first stitch. Rounds 2 and 3 below treat that first stitch as an end stitch, which is why each oval end gets 5 stitches. Follow the counts as written.
Rnd 3: Sc 1, inc 2 times, sc 12, sc 1, inc 3 times, sc 12, sc 1, inc 2 times, then sc 1. Join. (6 + 12 + 9 + 12 + 6 + 1 = 46 sts)
Rnd 3 adds 7 increases at the two ends, and the last end stitch is worked straight.
Rows 4–6 (center point): These are worked across the center 4 sts of one 12-stitch straight edge, which becomes the top.
- Row 4: Join cream in the 5th st of the top straight edge. Sc 4, turn. (4 sts)
- Row 5: Ch 1, sc2tog twice, turn. (2 sts)
- Row 6: Ch 1, sc2tog. (1 st)
Fasten off, leaving a long tail for sewing. The mask measures about 4.8 in (12.2 cm) wide and 2.2 in (5.6 cm) tall at the point.
Embroider the nose with black yarn in satin stitch: a small downward triangle 0.5 in (1.3 cm) wide, centered just below the point and between the eyes. After the eyes are set, whipstitch the whole mask edge to the head.
Ears (Make 2 in Rust)
Rnd 1: 4 sc in a MR. (4)
Rnd 2: Sc 1, inc 2 times. (6)
Rnd 3: Sc 2, inc 2 times. (8)
Rnd 4: Sc 3, inc 2 times. (10)
Rnd 5: Sc 4, inc 2 times. (12)
Rnd 6: Sc 5, inc 2 times. (14)
Rnd 7: Sc 14.
Fasten off with a long tail. Flatten each ear into a triangle about 1.75 in (4.4 cm) wide and 1.6 in (4.1 cm) tall. Do not stuff.
Inner Ears (Make 2 in Cream)
- Row 1: Ch 6. Sc in the 2nd ch from the hook and in each remaining ch, turn. (5)
- Row 2: Ch 1, sc 5, turn. (5)
- Row 3: Ch 1, sc2tog, sc 1, sc2tog, turn. (3)
- Row 4: Ch 1, sc 3, turn. (3)
- Row 5: Ch 1, sc3tog. (1)
Fasten off. Each inner ear is about 1.25 in (3.2 cm) wide and 1.1 in (2.8 cm) tall. Sew one centered on the front of each ear, with the point toward the ear tip.
Paws (Make 2 in Rust)
- Rnd 1: 6 sc in a MR. (6)
- Rnd 2: Inc in each st. (12)
- Rnds 3–5: Sc 12.
- Rnd 6: Sc2tog 6 times. (6)
Stuff the paw lightly, close it and leave a tail. Each paw is about 1.5 in (3.8 cm) long.
Hanging Loop (Rust)
Ch 25. Sc in the 2nd ch from the hook and in each remaining ch. (24 sts)
The strip is about 6 in (15.2 cm) long. Fasten off with a long tail.
Assembly
- Ears: Flatten the head with the face centered. Sew the base of each ear across Rnds 32–35 at the top corners, tilting each ear slightly outward.
- Paws: Sew one paw on each side fold, covering Rnds 20–21, so the paws peek out just below the head.
- Loop: Fold the strip in half. Sew both ends over the closed center of Rnd 38 so the loop stands up about 2.5 in (6.4 cm).
Border (Bottom Band)
Border gauge: the same as the sc gauge, 16 sts = 4 in (10.2 cm) and about 0.2 in (0.5 cm) per round.
Hold the holder upside down. Join rust in any free loop of the foundation chain. With the tube laid flat, each “side” is half the round.
Rnd 1: Ch 1, sc in each free ch loop, join. (48 sts, 24 per side)
Rnd 2: Sc 4, sc2tog; repeat from * 7 more times, join. (40 sts, 20 per side)*
Rnd 3: Sc 3, sc2tog; repeat from * 7 more times, join. (32 sts, 16 per side)*
Rnd 4: Ch 1, sc in each st, join. (32 sts, 16 per side)
Fasten off and weave in the end.
Why the math works: The foundation chain has exactly 48 loops, matching Rnd 1 of the body, so nothing is added or skipped. Each decrease round removes 8 evenly spaced stitches, so the bottom gathers into a smooth, round cup instead of a pucker. The final 32 sts make an 8 in (20.3 cm) opening, about 2.5 in (6.4 cm) across, or 4 in (10.2 cm) wide flat. That’s small enough to hold bags in and wide enough to pull one out. The four rounds add 0.9 in (2.3 cm), bringing the 16 in (40.6 cm) body to 16.9 in (42.9 cm).
Final Blocking
- Weave in every remaining tail, hiding the ends inside the solid sc areas rather than along the mesh bars.
- Wet the holder with cool water and gently squeeze it out in a towel. Don’t wring it.
- Slip a rolled towel or a cardboard tube about 3.8 in (9.7 cm) across into the mesh. Lay the holder flat at 6 in (15.2 cm) wide.
- Square up the mesh by gently pulling each column of bars straight. Pin the length to 16 in (40.6 cm) from the base of the border to the top of the head.
- Pinch the ear tips into points and shape the head into a smooth dome.
- Let it dry completely, then remove the pins and the form.
Final Quality-Control Checklist
- 16 mesh squares around on every mesh round, with straight vertical bars
- Flat width of 6 in (15.2 cm) through the mesh and the head
- Head is 3.8 in (9.7 cm) tall and closed neatly at the top
- Mask centered, with the point between the eyes
- Eyes are level and locked firmly
- Ears are symmetrical, with the inner ears centered
- Paws sit at the same height on both sides
- Loop is secure and stitched through several stitches, not just one
- Bottom opening is 4 in (10.2 cm) flat and evenly gathered
- Total length is 16.9 in (42.9 cm), plus the 2.5 in (6.4 cm) loop
Troubleshooting
The mesh spirals or leans: Make sure each dc sits directly on the dc below, and always join to the 3rd ch of the beginning ch-5.
The holes look like rectangles: Your dc is too tall. Pull the yarn snug after each yarn-over, or try a slightly shorter dc technique.
The mesh is wider than the head: Your chains are loose. Tighten the ch-2 spaces or go down a hook size for the mesh rounds only.
The foundation ring pulls in: Remake the chain with the larger hook.
The head looks flat: Load a few bags up into the head, or reblock the dome over a ball.
The bottom opening is too tight: Skip Rnd 3 of the border and work Rnd 4 over 40 sts.
The paws droop: Sew them through two rounds of mesh bars, not just one.
Care
Hand wash in cool water with mild soap and lay flat to dry, reshaping the mesh while it’s damp. Avoid the dryer, which can shrink cotton and loosen the safety eyes.
Final Notes
The measurement chain is simple once the gauge is right. At 4 sts per inch, 48 sts make a 12 in (30.5 cm) circumference and a 6 in (15.2 cm) flat width. Twenty mesh rounds add 12 in (30.5 cm). The 17-round head adds 3.8 in (9.7 cm), for a 16 in (40.6 cm) body. Four border rounds bring it to 16.9 in (42.9 cm), with the loop adding 2.5 in (6.4 cm) on top.
Check each step as you go and your fox will hang straight and stay neat.
Happy crocheting!