

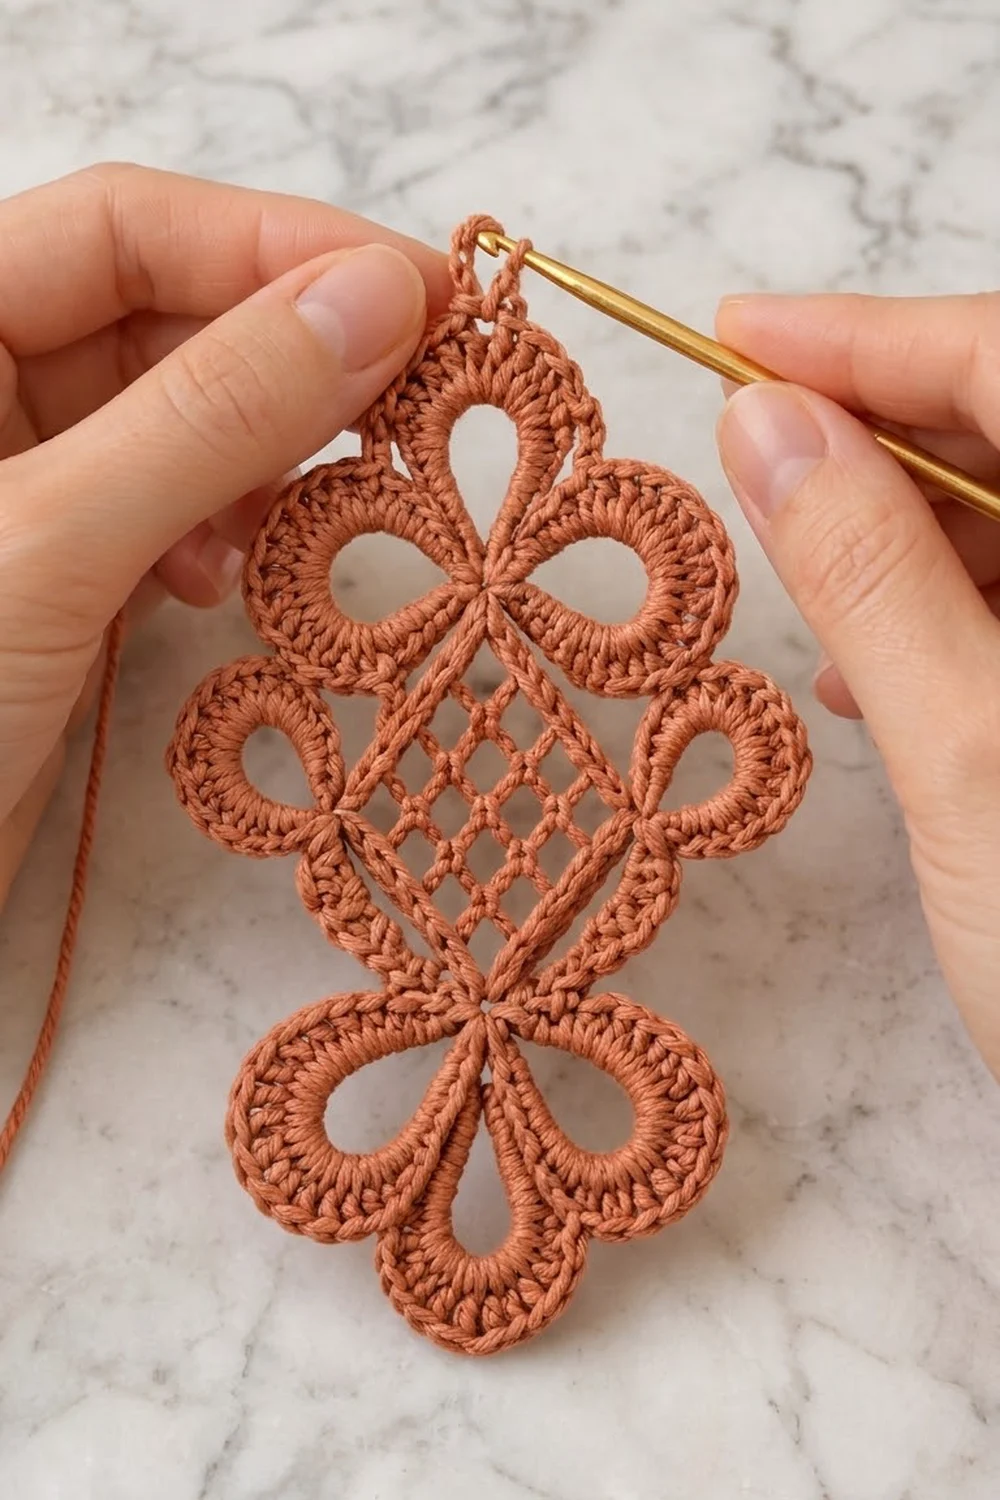
The Sienna Lattice Diamond is a single, tall lace motif. In the middle is an open filet mesh square turned on point. A solid single crochet frame goes around the mesh, and thick, rope-like teardrop loops grow from all four corners.
It is worked in one warm terracotta cotton. With just one color, the texture stands out: the crisp grid in the center, the raised frame, and the tightly covered loops with a softly beaded outer edge. The style takes after vintage Irish lace, but the motif is simple enough to finish in one evening.
The pattern uses US crochet terms. The finished motif measures about 6 in (15.2 cm) wide across the side loops and 9 in (22.9 cm) tall from petal tip to petal tip.
The motif is made all in one piece. First you work a 5 x 5 filet mesh square in rows. Then you add two rounds of single crochet for the frame. Next comes one round that builds the loops at each corner: one round loop at the left and right, and a four-petal cluster at the top and bottom. A final round of single crochet outlines everything.
Finished Size and Construction
- Finished size: 6 in (15.2 cm) wide x 9 in (22.9 cm) tall
- Skill level: Intermediate
- Terminology: US crochet terms
- Yarn weight: DK / light worsted (weight 3) cotton
- Hook: 4.0 mm (G-6)
- Number of pieces: 1 single motif
- Layout: one diamond, with the mesh square set on point and clusters at top and bottom
- Mesh square: 2.25 in (5.7 cm) per side
- Size before border: 5.75 in (14.6 cm) wide x 8.75 in (22.2 cm) tall
- Border depth: about 0.125 in (0.3 cm) per edge
Materials
Choose a smooth mercerized or combed cotton in DK weight. Cotton shows each stitch clearly, keeps the open mesh square, and keeps the covered loops firm. Avoid fuzzy or very stretchy yarn, because the loops will lose their rope-like look.
A warm mid-tone such as terracotta, rust or clay works best. Very dark shades hide the mesh. Very pale shades make the frame look flat.
- Terracotta (main and only color): 15 g, about 35 m
Quantities include a margin of roughly 40% over what the motif actually uses, so you have enough for a gauge test and some ripping back.
Tools:
- 4.0 mm (G-6) crochet hook
- Tapestry needle
- Scissors
- 4 locking stitch markers
- Blocking mat and rustproof pins
- Spray bottle with water
- Optional: light spray starch
Abbreviations (US Terms)
- ch – chain
- sl st – slip stitch
- sc – single crochet
- dc – double crochet
- sp – space
- st(s) – stitch(es)
- sk – skip
- rep – repeat
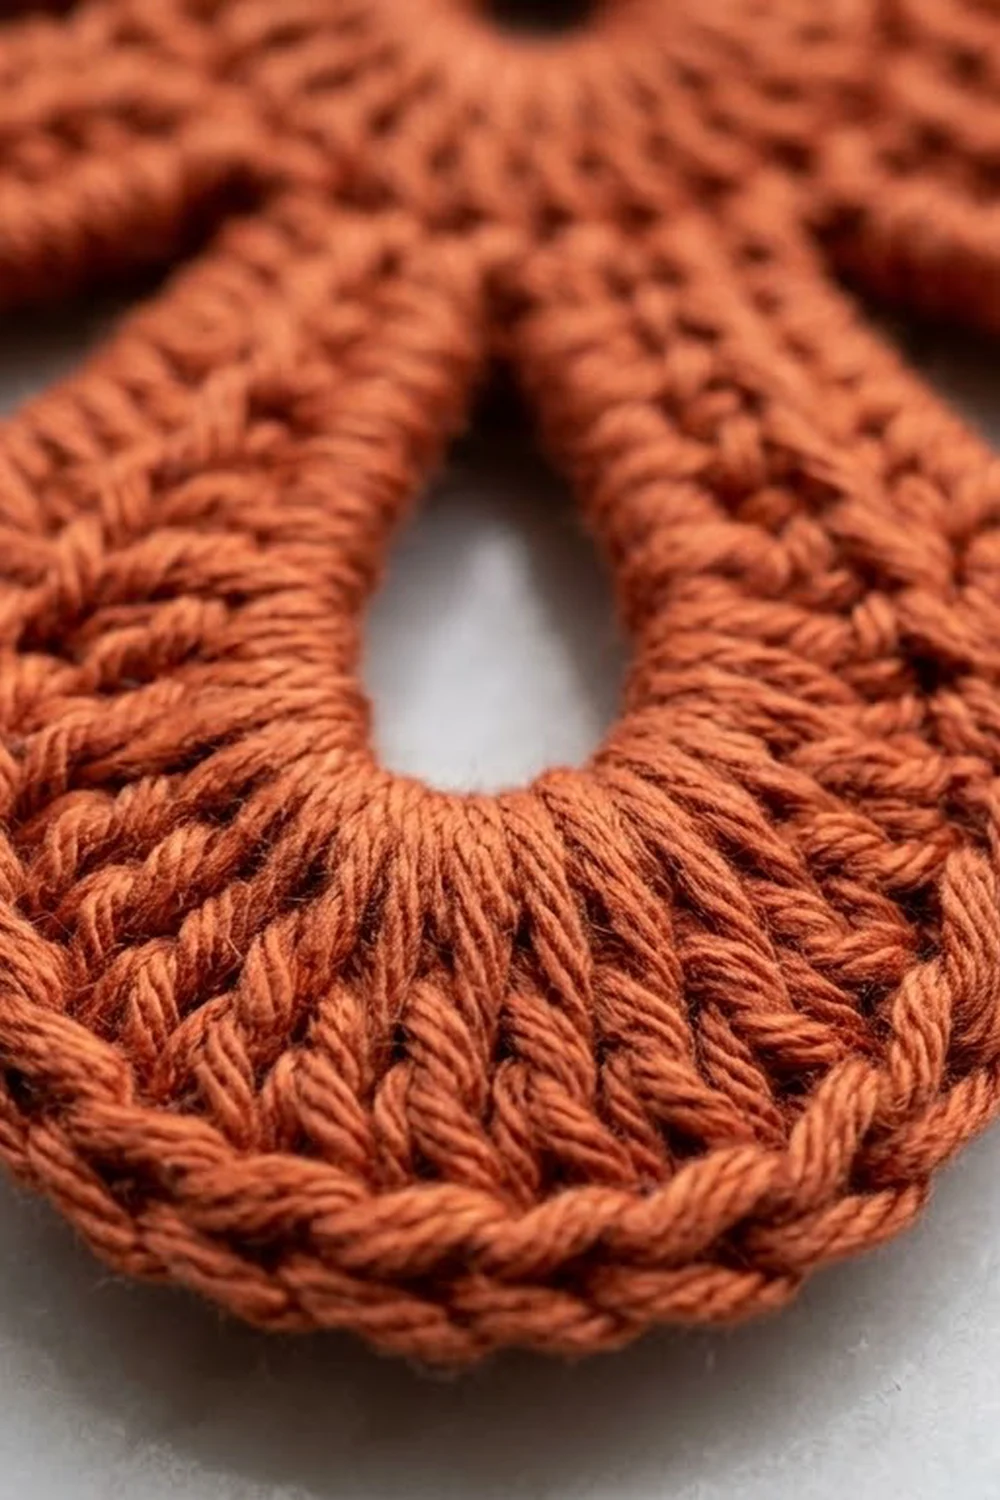
Special technique – covered loop: Make the stated number of chains, then sl st into the stated anchor point to close the chain into a loop. Work the stated number of sc into the loop (around the chain, not into each separate chain). Pack them tightly so the chain is fully hidden. Sl st into the anchor again to finish.
Hub: In each cluster, the hub is the 6th (last) ch of the first spine. All three outer petals are anchored there, so they spread out from one point.
Gauge and Checkpoints
Gauge for this motif is measured on the mesh square: 5 mesh blocks x 5 rows = 2.25 in (5.7 cm) square. That makes each block about 0.45 in (1.1 cm).
Make the mesh square first and measure it before you go on. Every later measurement depends on it.
Checkpoints:
- After Row 5: 2.25 in (5.7 cm) square
- After Round 1: 2.625 in (6.7 cm) square
- After Round 2: 3 in (7.6 cm) square, about 4.25 in (10.8 cm) corner to corner
- After Round 3: 5.75 in (14.6 cm) wide x 8.75 in (22.2 cm) tall
- After Round 4 (border): 6 in (15.2 cm) wide x 9 in (22.9 cm) tall
If your square is too big, go down a hook size (3.75 mm). If it is too small, go up to 4.5 mm. A difference of 0.25 in (0.6 cm) on the square grows to about 0.75 in (1.9 cm) on the finished height, so fix it now.
Mesh Square (Center)
Work in rows. Each mesh block is 1 dc and ch 2.
Foundation: Ch 20.
Row 1: Dc in 8th ch from hook. The 7 skipped ch count as the first dc, ch 2, and the skipped base chains. Ch 2, sk 2 ch, dc in next ch. Rep from * 3 more times. Turn. (5 mesh blocks; 6 dc counting the turning ch)
Rows 2–5: Ch 5 (counts as dc + ch 2), sk first dc, dc in next dc. Ch 2, dc in next dc. Rep from * 2 more times. Ch 2, sk 2 ch of turning ch, dc in next ch. Turn. (5 mesh blocks)
At the end of Row 5, do not fasten off. Check the square: it should be 2.25 in (5.7 cm) per side.
Frame
The frame turns the square into the raised diamond outline. Rotate the square so one corner points up. Name the corners Right, Bottom, Left and Top. You start at the Right corner.
Round 1: Ch 1. Working along the edge, work 15 sc evenly along the edge, 3 sc per mesh block (2 sc in each row-end sp or ch-2 sp, and 1 sc around each dc post or into each dc). Ch 2 at the corner. Rep from * on all 4 edges. Sl st in first sc. (60 sc: 15 sc per side, plus 4 ch-2 corner sps)
The ch-2 corner spaces are not counted as stitches in this round.
Round 2: Sl st into the Right corner ch-2 sp. Ch 1, (sc, ch 2, sc) in corner sp, sc in each of next 15 sc. Rep from * around. Sl st in first sc. (68 sc: 17 sc per side, plus 4 ch-2 corner sps)
Each side count of 17 includes the 2 sc next to the corners. That is 15 sc worked one per stitch, plus 2 sc added at the corners.
Checkpoint: 3 in (7.6 cm) square, about 4.25 in (10.8 cm) corner to corner. Place a marker in each corner ch-2 sp.
Loop Round
Round 3: Sl st into the Right corner ch-2 sp.
Right loop: Ch 1, sc in corner sp. Ch 12, sl st in the sc just made. Work 18 sc into the ch-12 loop. Sl st in the same sc.
Side 1: Sc in each of next 17 sc, ending at the Bottom corner. The 17th sc is Anchor A.
Bottom cluster:
- Spine 1: Ch 6. The 6th ch is the hub.
- Petal 1: Ch 16, sl st in hub. Work 22 sc into the ch-16 loop, sl st in hub.
- Petal 2 (tip petal): Ch 18, sl st in hub. Work 26 sc into the ch-18 loop, sl st in hub.
- Petal 3: Ch 16, sl st in hub. Work 22 sc into the ch-16 loop, sl st in hub.
- Spine 2: Ch 6, sk corner ch-2 sp, sc in first sc of next side. This sc is Anchor B.
- Cover the spines: Work 7 sc into Spine 2 toward the hub, sl st in hub. Work 7 sc into Spine 1 toward the frame, sl st in Anchor A.
- Sl st in corner ch-2 sp, sl st in Anchor B.
The two covered spines and the frame corner form the fourth, inner petal. It is an open teardrop whose rounded end rests against the mesh tip and whose point meets the hub.
Side 2: Sc in each of next 16 sc. This side has 17 sc including Anchor B.
Left loop: Sc in Left corner sp. Ch 12, sl st in the sc just made. Work 18 sc into the loop. Sl st in the same sc.
Side 3: Sc in each of next 17 sc. The 17th sc is Anchor A for the top.
Top cluster: Work exactly as the Bottom cluster, steps 1–7.
Side 4: Sc in each of next 16 sc. Sl st in first sc of round.
Round 3 counts:
- Frame: 4 sides x 17 sc = 68 sc, + 2 corner sc = 70 sc
- Side loops: 2 x 18 sc = 36 sc
- Each cluster: 22 + 26 + 22 + 7 + 7 = 84 sc; 2 clusters = 168 sc
- Round total: 274 sc
Checkpoint: 5.75 in (14.6 cm) wide x 8.75 in (22.2 cm) tall. The petals should lie flat and fan out evenly from the hubs.
Border
The border is one round of sc that outlines the frame sides, the spines and all the outer petals. It creates the thick, beaded outer rim on every loop.
Border gauge: about 17 sc per 3 in (7.6 cm) on the straight frame sides. On the curves, the border makes 3 sc for every 2 sc it is worked into.
Round 4: Continue from Round 3 at the Right corner.
- Right loop: Sk first sc of loop, sc in next sc, 2 sc in next sc. Rep from * 8 times, sk last sc. (24 sc)
- Side 1: Sc in each of 17 sc. (17 sc)
- Bottom cluster: Sc in each of 7 sc on Spine 1. On Petal 1: sk first sc, sc in next, 2 sc in next 10 times, sk last sc (30 sc). On Petal 2: sk first sc, sc in next, 2 sc in next 12 times, sk last sc (36 sc). On Petal 3: work as Petal 1 (30 sc). Sc in each of 7 sc on Spine 2. (110 sc)
- Side 2: Sc in each of 17 sc. (17 sc)
- Left loop: Work as Right loop. (24 sc)
- Side 3: Sc in each of 17 sc. (17 sc)
- Top cluster: Work as Bottom cluster. (110 sc)
- Side 4: Sc in each of 17 sc. (17 sc)
Sl st in first sc. Fasten off, leaving a 6 in (15.2 cm) tail.
Border total: 4 frame sides x 17 sc = 68 sc; 2 side loops x 24 sc = 48 sc; 2 clusters x 110 sc = 220 sc. Total = 336 sc.
Why the math works: On the straight frame sides, the border works 1 sc per stitch (17 on 17), so the edges stay straight and do not ruffle. On each petal and loop, the outer edge is longer than the covered row underneath. So the border skips only the 2 crowded stitches by the hub and adds half again: 20 worked stitches become 30, 24 become 36, and 16 become 24. That 1.5 ratio lets the rim lie flat around each curve. Skipping the stitches at the hub keeps the petals separate so they don’t bunch up in the center.
Optional hanging chain: Join yarn at the center sc of the top petal, ch 10, sl st in the same st. Fasten off. This loop is not counted in the measurements.
Final Blocking
- Weave in all ends along the back of the frame sc, not through the mesh.
- Soak the motif in cool water for 10 minutes. Squeeze gently; do not wring.
- Roll it in a towel to remove extra water.
- Lay it flat on the blocking mat, right side up.
- Pin the 4 mesh corners first, so the square measures 2.25 in (5.7 cm) per side and the grid lines are straight.
- Pin the frame corners so the frame is 3 in (7.6 cm) per side.
- Pin each petal tip and each side loop outward. Check that it measures 6 in (15.2 cm) across and 9 in (22.9 cm) tall.
- Open each loop and the inner petals with a pin so the centers are clear.
- Mist with starch if you want a firmer piece. Let it dry completely before unpinning.
Final Quality-Control Checklist
- Mesh square has 5 x 5 open blocks and measures 2.25 in (5.7 cm).
- Round 2 has 17 sc per side and 4 ch-2 corners.
- Each side loop has 18 covering sc and 24 border sc.
- Each cluster has 3 outer petals and 1 open inner petal.
- Cluster petals have 22 / 26 / 22 sc, and each spine has 7 sc.
- Border total is 336 sc.
- Finished motif is 6 in (15.2 cm) x 9 in (22.9 cm).
- Both clusters match in size and petal angle.
- No chain shows through the covered loops.
Troubleshooting
Chain shows through a loop: Your sc are too loose or there are too few. Push the stitches together along the chain. If gaps remain, add 1–2 sc, and adjust the border increases so the border still covers all but 2 stitches.
Mesh square is not square: Your dc are too tall or too short for the ch-2. Make the ch-2 a little tighter or looser, or use a hook 0.25 mm different for the mesh only.
Frame sides ruffle: You worked more than 15 sc per edge in Round 1. Recount 3 sc per block.
Petals cup instead of lying flat: The border is too tight. Go up one hook size for Round 4 only.
Petals flare and wave: The border is too loose, or you increased more often than every other stitch. Recount to 30 / 36 / 30.
Hub is bulky: Keep the hub sl sts loose, and make sure you skip the stitches next to the hub in the border.
Clusters are uneven: Check that Spine 1 and Spine 2 each have 6 ch and 7 covering sc in both clusters.
Care
Hand wash in cool water with mild soap and dry flat, reshaping to 6 in (15.2 cm) x 9 in (22.9 cm). Re-block with light starch if the loops soften over time.
Final Notes
The measurements build in a short, simple chain. A 2.25 in (5.7 cm) mesh square becomes a 3 in (7.6 cm) frame after two sc rounds. The loop round brings the motif to 5.75 in (14.6 cm) x 8.75 in (22.2 cm). The border adds about 0.125 in (0.3 cm) per edge, for a finished size of 6 in (15.2 cm) x 9 in (22.9 cm).
If the mesh is right, everything after it falls into place. Measure early, count the 17 sc on every side, and keep your covered loops firm. The result is a crisp, sculptural single motif that hangs well and lies flat just as well.
Happy crocheting!