

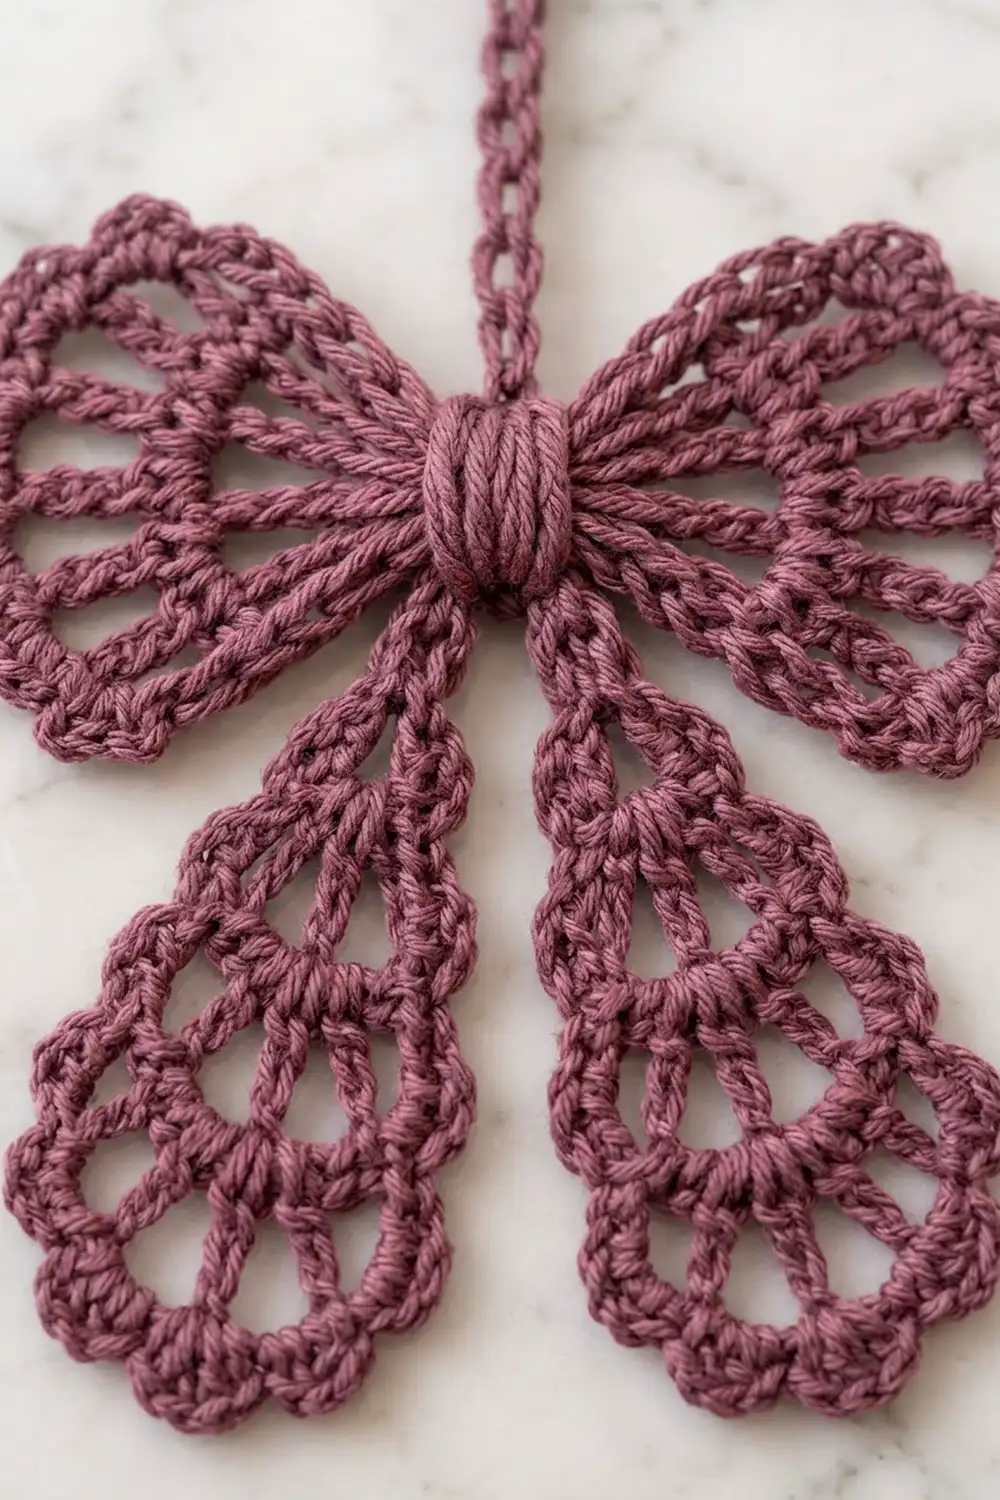
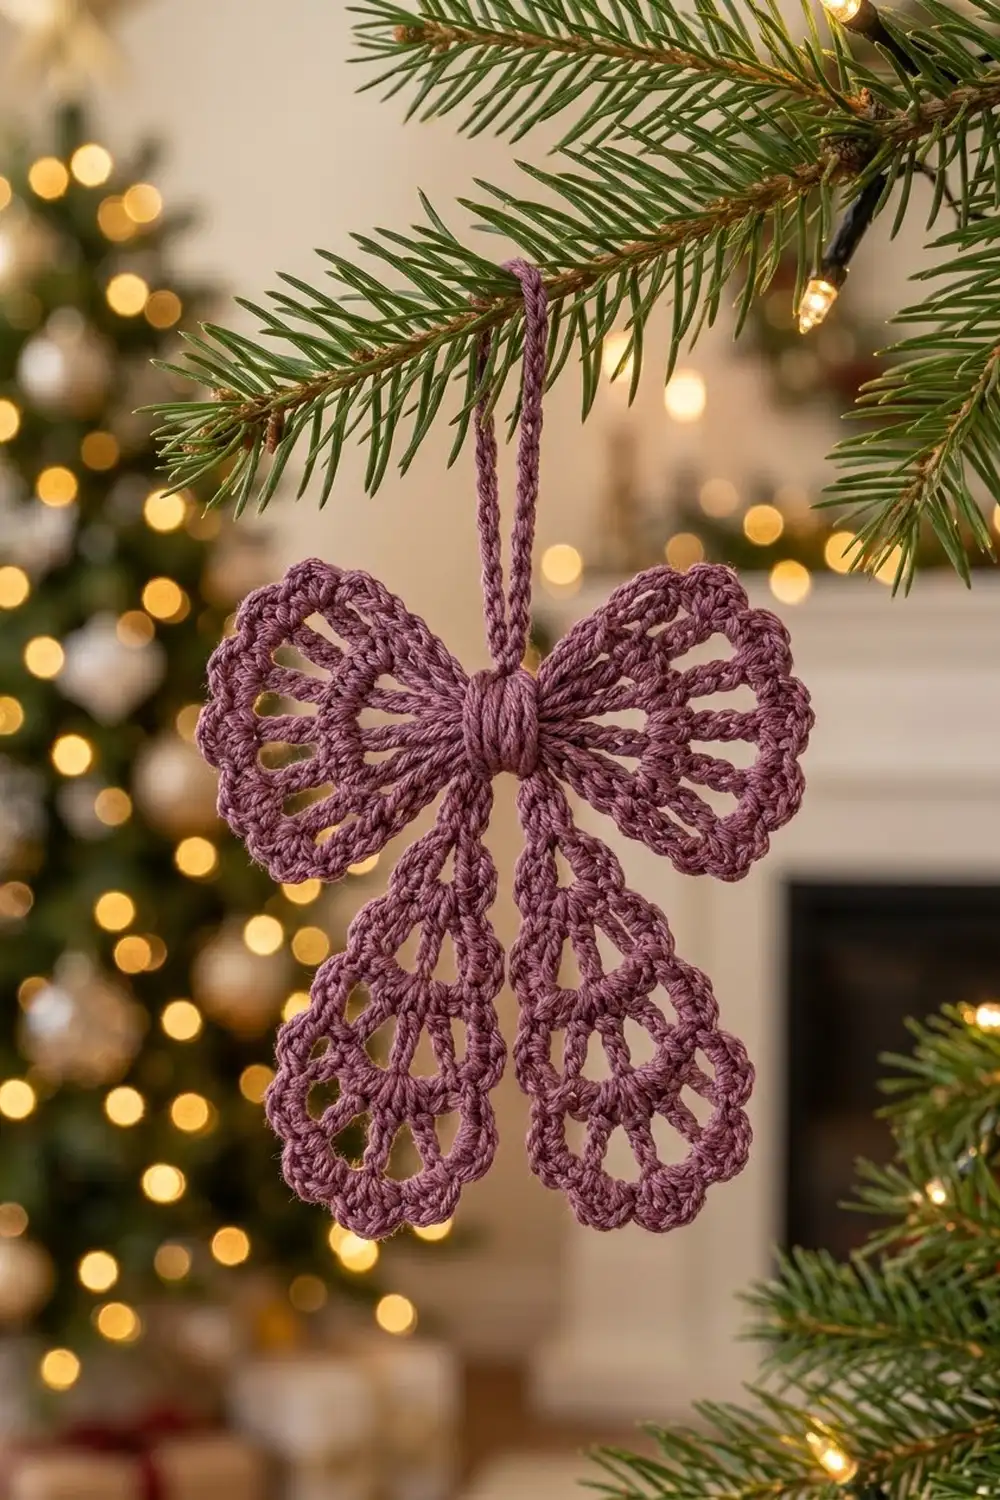
This lacy bow ornament has two open fan wings, two long scalloped tails, and a plump wrapped knot in the middle. Worked in a soft dusty plum, it looks vintage and a little romantic, and it shows up well against green branches and warm fairy lights.
The pattern uses US crochet terms throughout. The finished bow measures about 4 in (10.2 cm) wide and 4.5 in (11.4 cm) tall. The hanging loop adds about 1.3 in (3.3 cm), so the total length is about 5.8 in (14.7 cm).
It’s built in one piece around a small double crochet center. Each wing and each tail is worked in short rows straight off that center, so nothing needs to be sewn. Each wing and tail then gets a picot scallop edging. A tiny single crochet strip wraps the middle to form the knot, and a chain loop finishes the top.
The bow is quick to make, works up from very little yarn, and blocks into a crisp shape that holds well on a tree.
Finished Size and Construction
- Finished size: about 4 in (10.2 cm) wide x 4.5 in (11.4 cm) tall, plus a 1.3 in (3.3 cm) hanging loop
- Skill level: Easy (confident beginner)
- Terminology: US crochet terms
- Yarn weight: DK (#3), cotton or cotton blend
- Hook: 3.5 mm (E-4)
- Number of pieces: 1 bow motif, plus 1 small wrap strip for the knot
- Layout: one standalone bow: 1 center, 2 wings, 2 tails
- Piece size: center disk 1.25 in (3.2 cm); wings 1.5 in (3.8 cm) long; tails 2.3 in (5.8 cm) long
- Size before border (edging): about 3.5 in (8.9 cm) wide x 4 in (10.2 cm) tall
- Border (edging) depth: 0.25 in (0.6 cm) on the wings, 0.3 in (0.8 cm) on the tails
Materials
Yarn: Use a smooth DK cotton or cotton blend. Cotton shows the lace clearly and holds its shape after blocking. Avoid fuzzy or very splitty yarn, because the picots and chain spaces will blur.
- Dusty plum / mauve: 12 g, about 28 m (31 yd), for one bow including the knot strip and hanging loop
A typical 50 g ball (about 115 m) makes four bows. The quantity above includes a margin of about 25 percent for your gauge swatch and weaving in ends.
Tools:
- 3.5 mm (E-4) crochet hook
- Tapestry needle
- Scissors
- 4 stitch markers
- Rustproof pins and a blocking mat or folded towel
- Spray bottle with water
- Ruler or tape measure
Abbreviations (US Terms)
- ch – chain
- sl st – slip stitch
- sc – single crochet
- dc – double crochet
- sp – space
- st(s) – stitch(es)
- rep – repeat
Special stitch – picot scallop: In this pattern, a “picot” is a ch-3 worked between single crochets in the same space, for example (sc, ch 3, sc) in one space. The ch-3 is not closed with a slip stitch. It forms a small open arch, which gives the soft scalloped edge.
Gauge and Checkpoints
Gauge: 20 dc and 10 rows = 4 in (10.2 cm) in standard rows. One dc row is about 0.4 in (1.0 cm) tall.
Make one full bow as your test piece before making several. Check these points as you go:
- After the Center: the disk is about 1.25 in (3.2 cm) across.
- After Wing Row 3: the wing extends about 1.2 in (3.0 cm) from the edge of the disk.
- After Tail Row 5: the tail extends about 2 in (5.1 cm) from the edge of the disk.
- After the edging: the wings are about 1.5 in (3.8 cm) long and the tails about 2.3 in (5.8 cm) long.
- After blocking: the bow is about 4 in (10.2 cm) wide and 4.5 in (11.4 cm) tall, within 0.25 in (0.6 cm).
If your bow is too big: go down to a 3.25 mm (D-3) hook, or tighten the height of your double crochets.
If your bow is too small: go up to a 3.75 mm (F-5) hook.
Row height matters more than width here. Tall, loose double crochets make floppy tails, and short, tight ones make the fans cup.
Pattern
Center
Make a magic ring.
Round 1: Ch 3 (counts as dc), work 19 dc into the ring. Pull the ring fully closed. Join with sl st to the top of the beginning ch-3. (20 sts)
Fasten off and weave in the tail on the back.
Turn the disk so the beginning ch-3 sits at 12 o’clock and call that stitch 1. Number the rest going around in your working direction. Mark the first stitch of each section like this:
- Stitch 1: top gap (the hanging loop attaches here)
- Stitches 2–5: Wing A
- Stitch 6: side gap
- Stitches 7–10: Tail A
- Stitch 11: bottom gap
- Stitches 12–15: Tail B
- Stitch 16: side gap
- Stitches 17–20: Wing B
Check: 1 + 4 + 1 + 4 + 1 + 4 + 1 + 4 = 20 stitches. Each section takes up a 72-degree slice of the circle, so the wings angle up and outward and the tails angle downward.
Wings (make 2: Wing A on sts 2–5, Wing B on sts 17–20)
All wing rows are worked flat, turning at the end of each row.
Row 1: With the right side facing, join yarn with sl st in the first stitch of the section. Ch 3 (counts as dc), dc in the same st, then 2 dc in each of the next 3 sts. Turn. (8 dc)
This growth row doubles the base, so the wing flares straight out into a fan.
Row 2: Ch 4 (counts as dc + ch 1), dc in next dc, (ch 1, dc in next dc) 6 times, working the last dc in the top of the turning ch-3. Turn. (8 dc, 7 ch-1 sps)
Row 3: Ch 5 (counts as dc + ch 2), dc in next dc, (ch 2, dc in next dc) 6 times, working the last dc in the 3rd ch of the turning ch-4. (8 dc, 7 ch-2 sps)
Don’t fasten off. The wing edging is worked next, under Border (Edging) below.
Checkpoint: the wing reaches about 1.2 in (3.0 cm) out from the disk. The dc spokes should spread like an open fan without cupping.
Tails (make 2: Tail A on sts 7–10, Tail B on sts 12–15)
Row 1: With the right side facing, join yarn with sl st in the first stitch of the section. Ch 3 (counts as dc), dc in each of the next 3 sts. Turn. (4 dc)
This row is not increased, which gives the tail its narrow “neck” where it leaves the knot.
Row 2: Ch 3 (counts as dc), dc in the same st, 2 dc in each of the next 2 dc, 2 dc in the top of the turning ch-3. Turn. (8 dc)
Row 3: Ch 4 (counts as dc + ch 1), dc in next dc, (ch 1, dc in next dc) 6 times. Turn. (8 dc, 7 ch-1 sps)
Row 4: Ch 5 (counts as dc + ch 2), dc in next dc, (ch 2, dc in next dc) 6 times, working the last dc in the 3rd ch of the turning ch-4. Turn. (8 dc, 7 ch-2 sps)
Row 5: Ch 6 (counts as dc + ch 3), dc in next dc, (ch 3, dc in next dc) 6 times, working the last dc in the 3rd ch of the turning ch-5. (8 dc, 7 ch-3 sps)
Don’t fasten off. Go on to the tail edging.
Checkpoint: the tail is about 2 in (5.1 cm) long from the disk. It’s narrow at the top and widens into a rounded teardrop as the chain spaces grow.
Center Knot Strip
Row 1: Ch 5, sc in the 2nd ch from the hook and in each ch across. (4 sc)
Rows 2–14: Ch 1, turn, sc in each st across. (4 sc)
Fasten off, leaving a 10 in (25.4 cm) tail. The strip measures about 0.75 in (1.9 cm) wide x 2.4 in (6.1 cm) long.
Lay the strip vertically over the center of the bow. Bring both ends around to the back and sew the short ends together, pulling snug. The strip should squeeze the top and bottom gap stitches inward to form the bow’s “waist.” The result is a padded, rounded knot. Tack it to the disk in two places on the back so it doesn’t slide.
Hanging Loop
Join yarn with sl st through stitch 1 of the center, catching the top fold of the knot strip at the same time. Ch 24, then sl st in the same st to close the loop. Fasten off and weave in.
The chain is about 2.7 in (6.9 cm) long, so the folded loop stands about 1.3 in (3.3 cm) tall.
Border (Edging)
The edging is worked across the outer curved edge of each wing and tail. It is the last row of each section and is worked straight on from the final mesh row. The sides of the rows stay plain, matching the smooth sides of the fans.
Border gauge: each picot scallop is about 0.25 in (0.6 cm) deep on the wings and 0.3 in (0.8 cm) deep on the tails.
Wing Edging (Row 4 of each wing)
Ch 1, turn. Sc in the first dc. Then repeat this 7 times: (sc, ch 3, sc) in the next ch-2 sp, sc in the next dc. Work the last sc in the 3rd ch of the turning ch-5. Fasten off.
Count per wing: 8 sc on dc + 14 sc in spaces = 22 sc and 7 picots
Tail Edging (Row 6 of each tail)
Ch 1, turn. Sc in the first dc. Then repeat this 7 times: (2 sc, ch 3, 2 sc) in the next ch-3 sp, sc in the next dc. Work the last sc in the 3rd ch of the turning ch-6. Fasten off.
Count per tail: 8 sc on dc + 28 sc in spaces = 36 sc and 7 picots
Why the Math Works
Both edgings keep the same count of 8 spokes and 7 spaces as the row below. The edging only fills spaces; it never adds new spokes, so the fans stay at the shape you built.
A ch-2 space on a wing is about two stitches wide, and 2 sc fill it neatly. A ch-3 space on a tail is wider, so it needs 4 sc to lie flat. Each picot sits in the middle of a space, between two spokes, so the 7 scallops line up evenly with the 7 gaps in the mesh.
With fewer sc in the spaces, the edge would pull in and the fans would cup. With more, the edge would ruffle.
Weave in all ends on the back, hiding them inside the dc spokes rather than across the open spaces.
Final Blocking
- Wet the bow completely with cool water, or spray it until it’s evenly damp.
- Press out the extra water in a towel. Don’t wring it.
- Lay the bow face up on the blocking mat, with the hanging loop at the top.
- Pin the center first, then pin the knot so it sits upright and centered.
- Spread each wing so its middle spoke points about 60 degrees from vertical. Pin the tip of each spoke.
- Angle each tail about 20 degrees from vertical so it hangs mostly downward. Pin the tip of each spoke.
- Pin each picot open into a small round arch.
- Measure the bow: about 4 in (10.2 cm) wide and 4.5 in (11.4 cm) tall. Adjust the pins if needed.
- Straighten the hanging loop so it lies flat.
- Let the bow dry completely, about 6–8 hours, before removing the pins.
For a crisper ornament, mist it with fabric stiffener before drying.
Final Quality-Control Checklist
- The center has 20 sts, with sections in the order wing, gap, tail, gap, tail, gap, wing, gap.
- Each wing has 8 dc spokes and 7 ch-2 sps, plus an edge of 22 sc and 7 picots.
- Each tail has a narrow 4-dc neck, 8 dc spokes, 7 ch-3 sps, and an edge of 36 sc and 7 picots.
- Both wings match each other in size, and so do both tails.
- The knot strip is snug, centered, and tacked down at the back.
- The hanging loop is centered at the top and securely attached.
- No ends show through the lace on the front.
- The blocked size is about 4 in x 4.5 in (10.2 cm x 11.4 cm).
Troubleshooting
The wings cup forward: your dc rows are too tight compared with the chain spaces. Re-block firmly, or rework Row 3 with slightly looser chains.
The tails ruffle: you may have worked too many sc in the tail edging. Check for exactly 4 sc per ch-3 sp.
The tails look stubby: your rows are short. Go up a hook size, or lift each dc loop a little taller.
There’s a gap at the gap stitches: that’s expected. The knot strip covers the top and bottom gaps. If the side gaps look too open, pull the knot strip tighter.
The knot slides around: add another tack stitch through the strip and the back of the disk.
The bow is lopsided: count the center stitches again. Each wing and tail must start on its exact stitch number.
Care
Hand wash in cool water with mild soap, press dry in a towel, and lay flat to re-block. Store the ornament flat or hang it by its loop so the tails don’t crease.
Final Notes
The measurements build on each other in one chain:
- A 20-stitch center about 1.25 in (3.2 cm) across
- Wings that reach 1.2 in (3.0 cm) after the mesh rows and 1.5 in (3.8 cm) after the edging
- Tails that reach 2 in (5.1 cm) after the mesh rows and 2.3 in (5.8 cm) after the edging
- A blocked bow about 4 in (10.2 cm) wide and 4.5 in (11.4 cm) tall, with a 1.3 in (3.3 cm) loop
If your gauge matches at each checkpoint, the finished size will follow. Make one, check it, and then make as many as you like for the tree or for gift toppers.
Happy crocheting!