

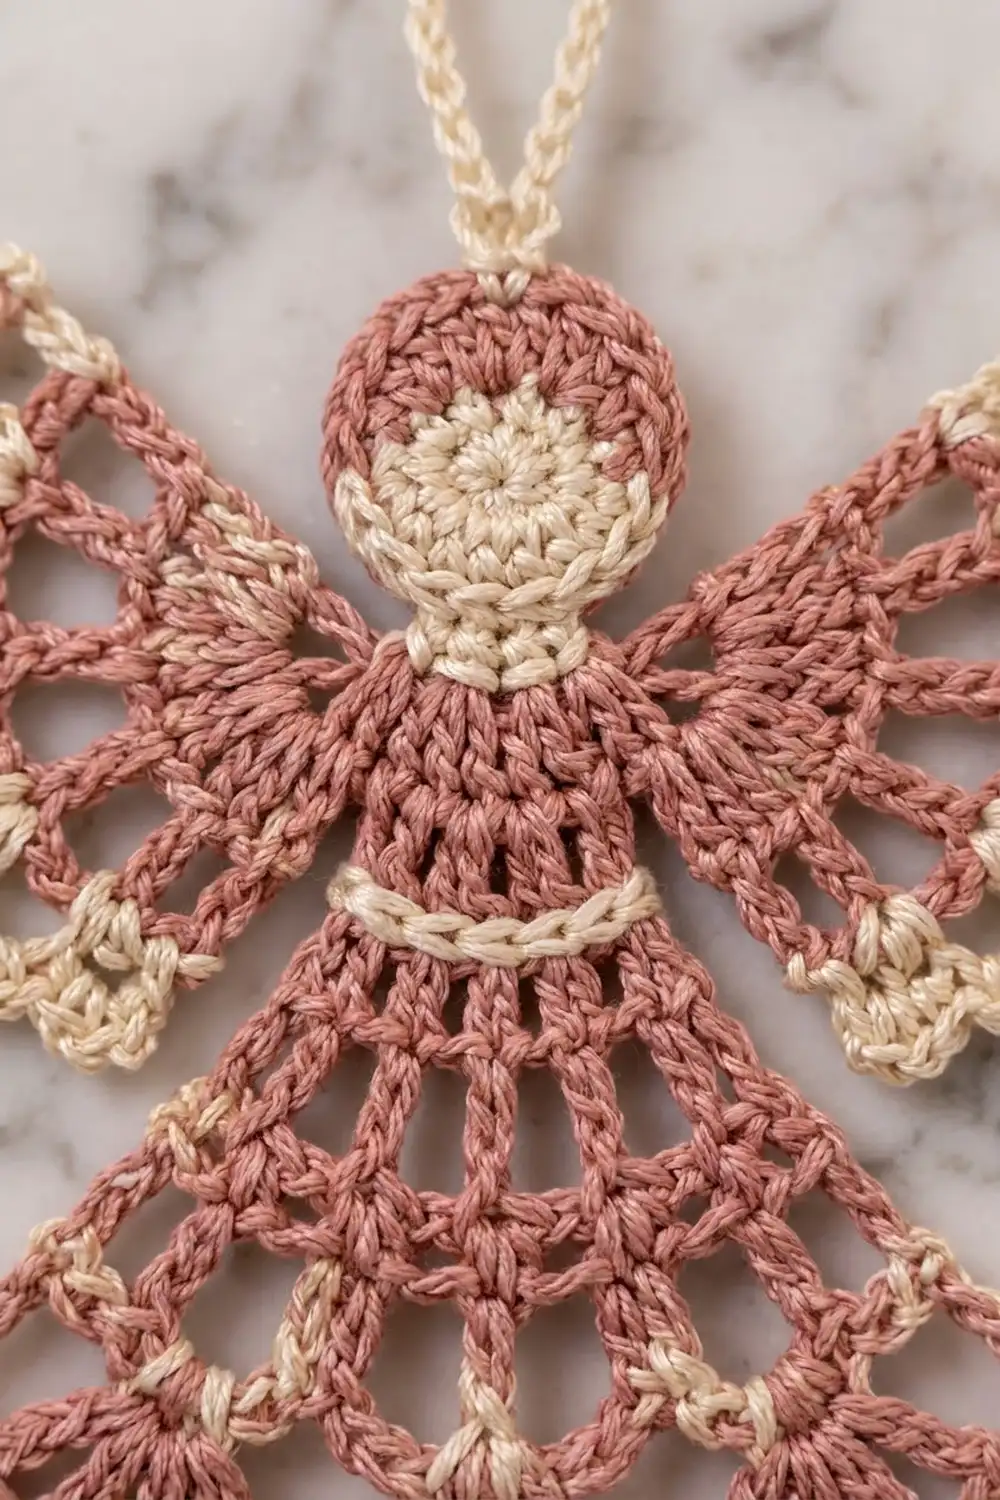
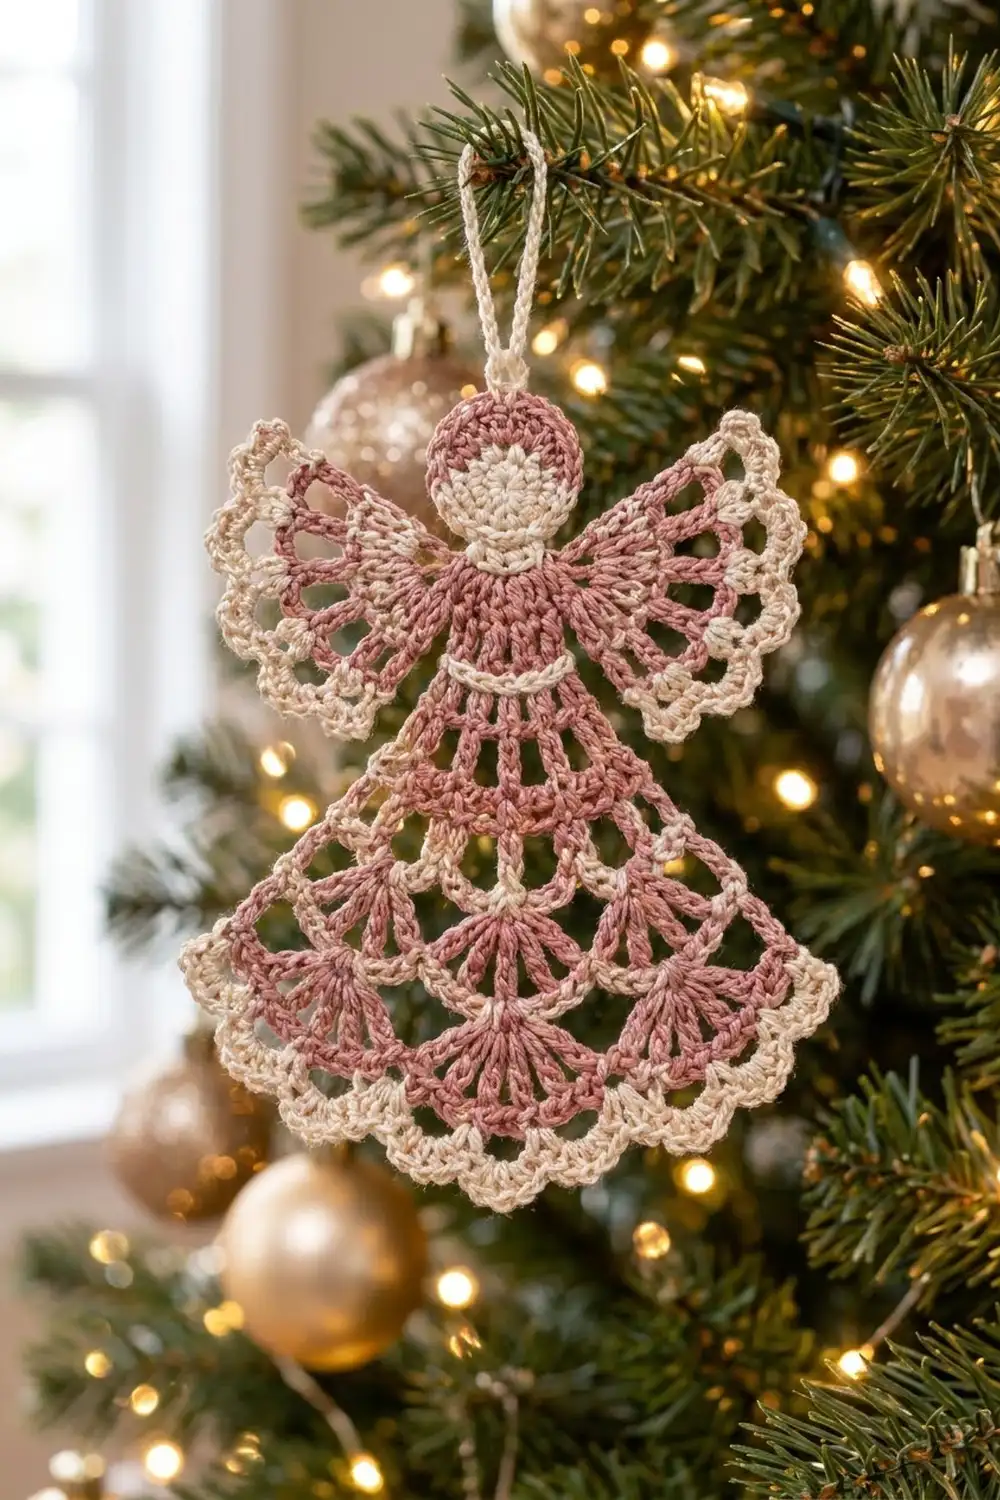
This lace angel is a small, flat thread ornament with a vintage feel. A round head sits above a bell-shaped skirt made of three tiers of openwork fans. Two fan wings open out from the shoulders. Each fan, wing and the hem ends in a crisp cream edge.
The palette is soft and warm. Dusty rose carries the body and wings, and cream outlines the face, waistband, wing edges and scalloped hem. The contrast makes the lace easy to see against green branches or a white wall.
The pattern uses US crochet terms. The finished angel measures 4 in (10.2 cm) tall from the top of the head to the hem, not counting the hanging loop, and 4 in (10.2 cm) wide at the hem and across the wings.
Construction is simple and done all in one piece. You work the head in the round, then work the skirt in turned rows from the bottom of the head. Next you add a cream hem border and work each wing straight onto the shoulders. A chain loop finishes the angel. There is nothing to sew together, only a few tacking stitches.
Finished Size and Construction
- Finished size: 4 in × 4 in (10.2 cm × 10.2 cm), not counting the loop
- Skill level: Intermediate
- Terminology: US crochet terms
- Yarn weight: Lace (size 10 crochet cotton thread)
- Hook: 1.75 mm steel hook (US steel 4)
- Number of pieces: 1 (wings and borders are worked onto the body)
- Layout: Single ornament, no joining
- Head size: 0.9 in (2.3 cm) across
- Size before border: 3.75 in × 3.75 in (9.5 cm × 9.5 cm)
- Border depth: 0.25 in (0.6 cm) at the hem
- Hanging loop: about 1.5 in (3.8 cm) tall
Materials
Use a mercerized cotton thread in size 10. It holds its shape after starching and shows off the picots. Avoid fuzzy or very soft threads because the fans will blur.
- Color A – Dusty Rose: 8 g (about 45 m)
- Color B – Cream: 4 g (about 22 m)
Tools:
– 1.75 mm (US steel 4) steel hook
– Fine tapestry needle
– 3–4 stitch markers
– Scissors
– Fabric stiffener or starch
– Blocking board and rustproof pins
– Ruler or tape measure
These quantities include a margin for a test swatch and weaving in ends. One ball of each color will make many angels.
Abbreviations (US Terms)
- ch – chain
- sl st – slip stitch
- sc – single crochet
- hdc – half double crochet
- dc – double crochet
- sp – space
- st(s) – stitch(es)
- RS – right side
Special stitches:
– V-st: (dc, ch 2, dc) in the same st.
– Shell: 7 dc in the same sp.
– Picot: ch 3, sl st in the 3rd ch from the hook.
– Scallop: (sc, hdc, picot, hdc, sc) in the same sp.
Gauge and Checkpoints
Thread gauge varies a lot between makers, so make the head first and measure it before going on.
Gauge: Head Rounds 1–2 = 0.9 in (2.3 cm) across, lying flat.
Checkpoints:
– After the head: 0.9 in (2.3 cm) across
– After Row 2 (waistband): 1 in (2.5 cm) wide, 1.25 in (3.2 cm) from the top of the head
– After Row 5 (Tier 1): 2 in (5.1 cm) wide
– After Row 7 (Tier 2): 3 in (7.6 cm) wide
– After Row 9 (Tier 3): 3.75 in (9.5 cm) wide and 3.75 in (9.5 cm) tall
– After the hem border: 4 in (10.2 cm) tall and 4 in (10.2 cm) wide
If your head is too large (over 1 in / 2.5 cm), go down a hook size or tighten your dc. If it is too small (under 0.75 in / 1.9 cm), go up a hook size. Each single shell in Row 5 should spread about 0.4 in (1.0 cm). If a shell is much wider or narrower, the skirt will end up out of proportion.
Head
With Color B (Cream):
Round 1: Ch 4, sl st in the first ch to form a ring. Ch 3 (counts as dc), work 11 dc in the ring, then sl st in the top of the ch-3. (12 dc) Fasten off Color B.
Round 2: Join Color A (Rose) in any st. Ch 3 (counts as dc), work 1 dc in the same st, then 2 dc in each st around. Sl st in the top of the ch-3. (24 dc) Fasten off.
The head should be a flat cream circle with a rose ring. It measures 0.9 in (2.3 cm) across.
Skirt
The skirt is worked in turned rows from 5 sts at the bottom of the head. Fold the head in half with the Round 2 join at the top. Place markers in the 5 sts centered at the bottom.
Row 1 (Rose, shoulders): With RS facing, join Color A in the first marked st. Ch 3 (counts as dc) and work 1 dc in the same st. Work 2 dc in each of the next 3 sts, then 1 dc in the last marked st. (9 dc) Fasten off.
Row 2 (Cream, waistband): With RS facing, join Color B in the first dc. Ch 1, then sc in each dc across. (9 sc) Fasten off.
This makes the narrow cream band across the bodice.
Row 3 (Rose, spokes): With RS facing, join Color A in the first sc. Ch 5 (counts as dc + ch 2), then dc in the next sc. Ch 2, dc in the next sc; repeat from * across. (9 dc, 8 ch-2 sps) Turn.
Row 4 (V row): Ch 5 (counts as dc + ch 2) and dc in the first dc, which makes the first V-st. Ch 3, skip the next dc, V-st in the next dc; repeat from * 3 more times. (5 V-sts, 4 ch-3 sps) The V-sts sit on dc 1, 3, 5, 7 and 9. Turn.
Row 5 (Tier 1 fans): Sl st in the first dc and into the first V-st sp. Ch 3 (counts as dc) and work 6 dc in the same sp to make the first shell. Sc in the next ch-3 sp, then work a shell in the next V-st sp; repeat from * 3 more times. (5 shells = 35 dc, plus 4 sc) Turn.
Checkpoint: the piece is 2 in (5.1 cm) wide.
Row 6 (V row): Ch 5 (counts as dc + ch 2) and dc in the same st. This is the edge V-st in the first dc of the shell. Ch 2, then V-st in the 4th (center) dc of the same shell. Ch 3, V-st in the center dc of the next shell; repeat from * 3 more times. Ch 2, then V-st in the last dc of the last shell (the top of the turning ch-3). (7 V-sts: 5 center + 2 edge) Turn.
Row 7 (Tier 2 fans): Sl st into the first V-st sp. Ch 3 (counts as dc) and work 6 dc in the same sp. Sc in the next ch sp, then work a shell in the next V-st sp; repeat from * 5 more times. (7 shells = 49 dc, plus 6 sc) Turn.
Checkpoint: the piece is 3 in (7.6 cm) wide.
Row 8 (V row): Repeat Row 6. This time the center V-st is repeated across 7 shells, plus 2 edge V-sts. (9 V-sts) Turn.
Row 9 (Tier 3 fans): Repeat Row 7 across all V-sts. (9 shells = 63 dc, plus 8 sc) Fasten off.
Checkpoint: the piece is 3.75 in (9.5 cm) wide and 3.75 in (9.5 cm) tall from the top of the head.
Each V row adds exactly 2 edge V-sts, so the skirt grows by one shell on each side per tier (5, 7, 9). This keeps the triangle outline even.
Border
The border is a cream hem along the bottom of Row 9 plus a cream edge on each wing. All counts below are for a single edge.
Border gauge: One 7-dc shell gets 3 scallops and measures about 0.42 in (1.1 cm). The border adds 0.25 in (0.6 cm) of depth.
Hem Border
Hem Row 1 (Cream): With RS facing, join Color B in the first dc of the first shell of Row 9. Ch 1, then sc in the same dc. [Ch 3, skip 1 dc, sc in the next dc] 3 times; this places sc in dc 1, 3, 5 and 7. Skip the sc between shells and sc in dc 1 of the next shell. Then [ch 3, skip 1 dc, sc in the next dc] 3 times. Repeat from * across the remaining 8 shells. (36 sc, 27 ch-3 loops) Turn.
Hem Row 2: Ch 1. Work a scallop in each ch-3 loop across. Between shells, the 2 sc from Row 1 sit side by side, so the scallops simply butt together there. Sl st in the last sc. (27 scallops, 27 picots) Fasten off.
Why the math works: Each shell has 7 dc, an odd number. That means “sc, skip 1” lands on both the first and last dc of every shell. You get 4 sc and 3 loops per shell, so 9 × 4 = 36 sc and 9 × 3 = 27 loops. Each fan ends up with exactly 3 cream scallops, and every shell edge is balanced.
Wings (make 2, worked onto the body)
Wing Row 1 (Rose): With RS facing, join Color A with a sl st in the row-end of Row 2 at one side. Ch 5 (counts as dc + ch 2). Working around the post of the end st of Row 1 (the turning ch counts), work [dc, ch 2] 3 times, then dc. (5 dc, 4 ch-2 sps) Turn.
The spokes fan outward and up toward the head.
Wing Row 2: Ch 5 (counts as dc + ch 2) and dc in the same st. Ch 2, V-st in the next dc; repeat from * 3 more times. (5 V-sts = 10 dc, 9 ch-2 sps) Fasten off.
Wing Row 3 (Cream): With RS facing, join Color B in the first dc. Ch 1 and sc in the same dc. Work 3 sc in the next ch-2 sp, then sc in the next dc; repeat from * 8 more times. (37 sc) The count works out as 1 + (9 × 4). Turn.
Wing Row 4: Ch 1 and sc in the first sc. Ch 3, skip 1 sc, sc in the next sc; repeat from * 17 more times. (19 sc, 18 ch-3 loops) Fasten off.
Because 37 is odd, the last loop ends exactly on the last sc. Repeat the wing on the other side of the body, joining in the row-end of Row 2.
Each wing reaches about 1.4 in (3.6 cm) from the shoulder. Including the body, the wingspan is 4 in (10.2 cm). With matching thread, tack the top corner of each wing to the side of the head (Round 2) with 2–3 small stitches.
Hanging Loop
Join Color B in the center top st of Round 2 of the head. Ch 30, then sl st in the same st. Fasten off. The loop stands about 1.5 in (3.8 cm) tall.
Final Blocking
- Weave in all ends along the stitches of matching color. Trim them close.
- Soak the angel in fabric stiffener, or in a firm starch solution.
- Gently press out the extra liquid in a towel. Do not wring.
- Pin the angel flat on a blocking board. Pin the head to 0.9 in (2.3 cm) across, and the skirt and hem to 4 in (10.2 cm) wide and 4 in (10.2 cm) tall.
- Pin each fan point on the hem to make 27 even scallops. Open every picot.
- Spread each wing into a smooth fan and pin all 18 picot loops.
- Let it dry completely, at least 12 hours, before unpinning.
Final Quality-Control Checklist
- Head is round, flat and 0.9 in (2.3 cm) across
- Cream waistband runs straight across the shoulders
- Skirt has 3 tiers: 5, 7 and 9 shells
- Every shell has 7 dc
- Hem has 27 scallops, 3 per bottom fan
- Each wing has 5 V-sts and 18 picot loops
- Both wings are the same size and angle
- Finished size is 4 in × 4 in (10.2 cm × 10.2 cm)
- Loop is centered and secure
- All ends are hidden
Troubleshooting
Skirt curls or cups: The V rows are too tight. Loosen the ch-3 spaces or go up a hook size.
Skirt ruffles: The shells are too loose. Tighten the dc or go down a hook size.
Skirt edges lean unevenly: Check that you made both edge V-sts in Rows 6 and 8.
Hem count is off: Recount your shells in Row 9. You need 9 shells, and each one takes 4 sc.
Wings droop: Starch them more heavily and tack the top corners to the head.
Head ripples: Round 2 is too loose. Use a smaller hook for the head only.
Care
Hand wash in cool water only, then re-starch and re-block. Store the angel flat between tissue paper so the picots stay crisp.
Final Notes
The measurements build in a chain. A 0.9 in (2.3 cm) head leads to a 1 in (2.5 cm) waistband. The skirt then grows from 5 to 7 to 9 shells, reaching 3.75 in (9.5 cm) wide and tall. The cream border adds 0.25 in (0.6 cm), for a finished ornament of 4 in × 4 in (10.2 cm × 10.2 cm). If you check your size at each step, your angel will come out right.
Happy crocheting!