

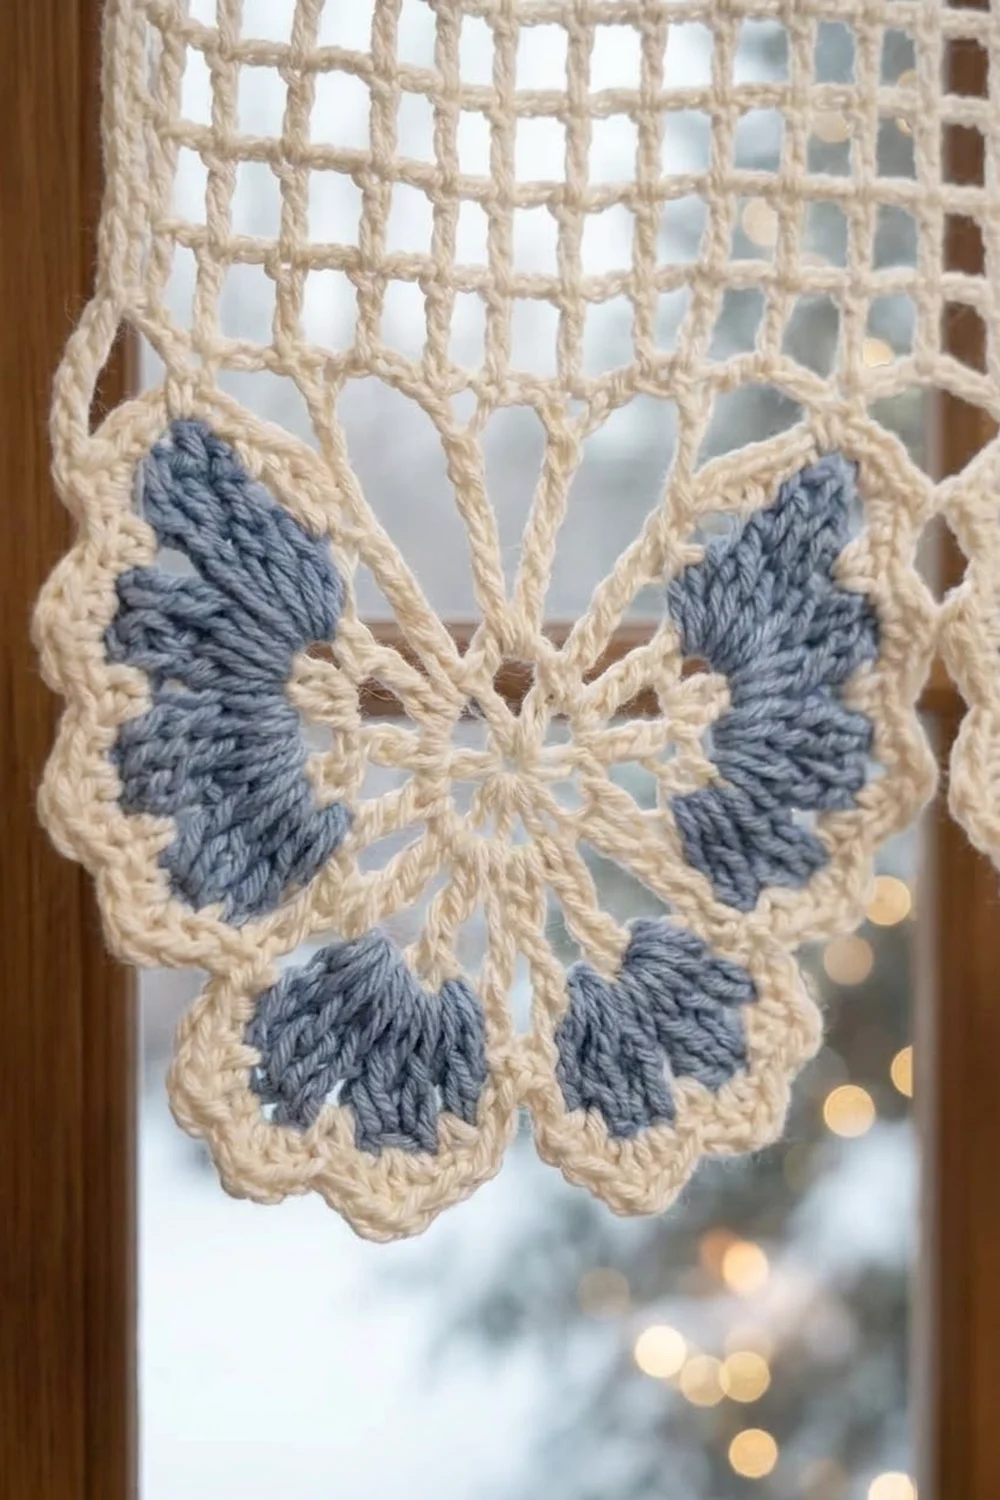
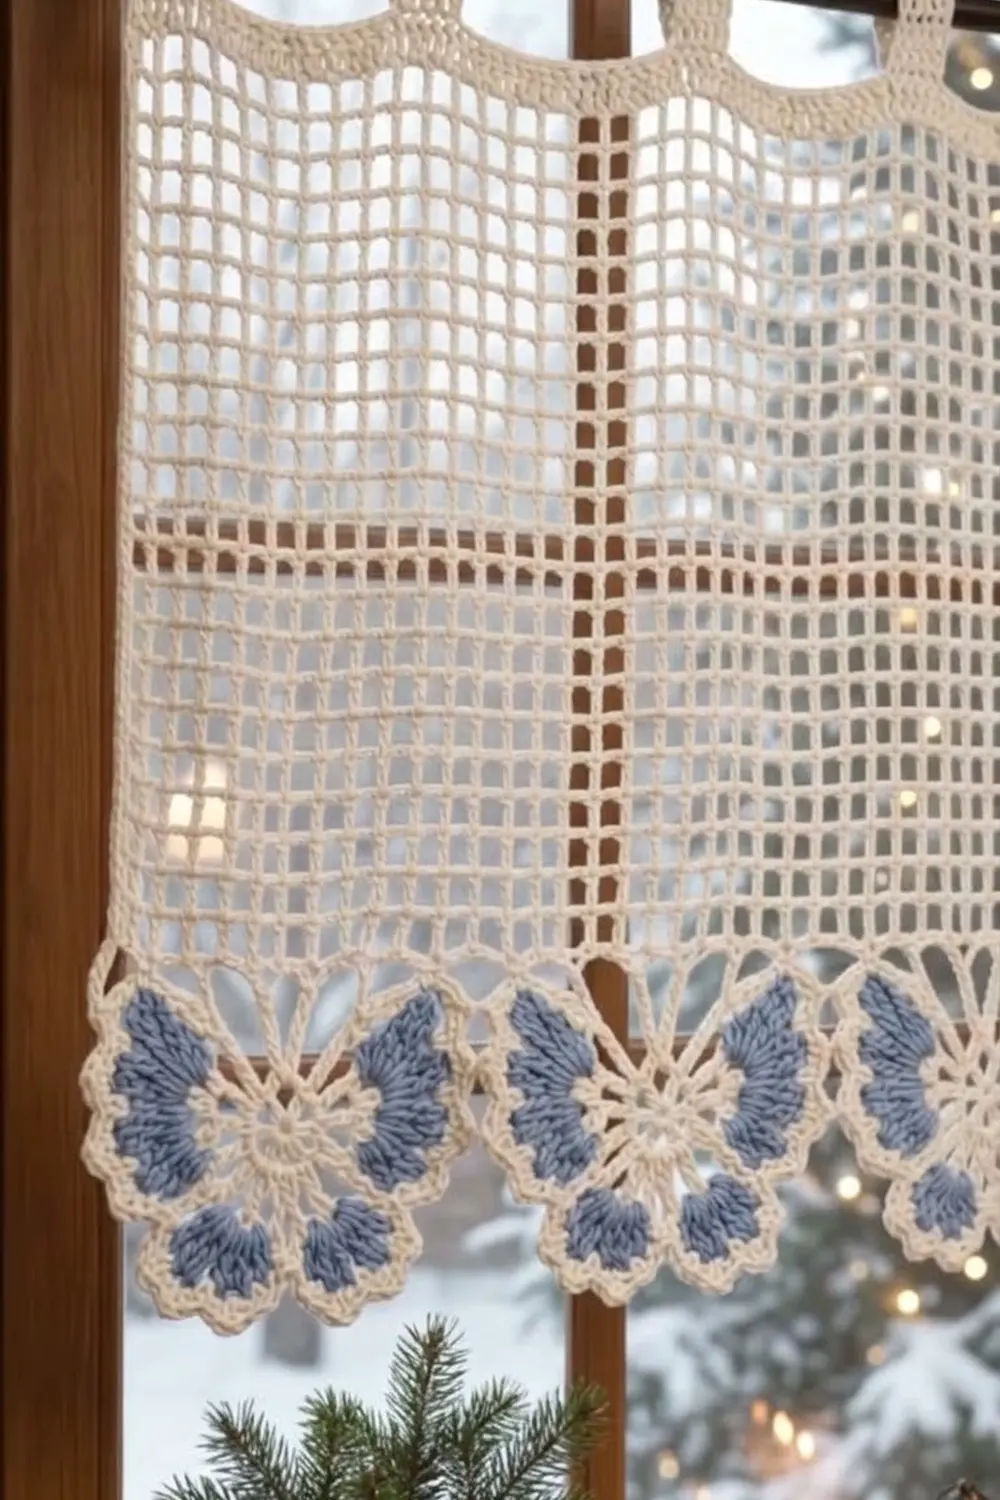
This window curtain panel pairs a clean, open mesh body with a row of soft flower blooms along the bottom edge. Light passes through the regular grid of square openings, and the trim gives the lower edge a scalloped, lacy finish.
The panel is worked in cream cotton. Each bloom has a cream center and cream outline, and each petal has a blue-gray filled center. Four evenly spaced loop tabs at the top slide onto a curtain rod. The look is calm, wintry, and cottage-style.
This pattern uses US crochet terms. The finished panel measures 27.5 in (69.9 cm) wide by 19 in (48.3 cm) tall, not counting the tabs. Each tab forms a 2 in (5.1 cm) loop above the top edge.
The panel is a single piece. You crochet the filet mesh body in rows from the bottom up. Then you work a solid top band, four tabs, the flower trim along the foundation edge, and a narrow side edging, all directly onto the same piece. No sewing of separate motifs is needed, only folding and stitching down the tab ends.
Finished Size and Construction
- Finished size: 27.5 in (69.9 cm) wide x 19 in (48.3 cm) tall, plus 2 in (5.1 cm) tab loops
- Skill level: Intermediate
- Terminology: US crochet terms
- Yarn weight: Worsted (#4) cotton
- Hook: 5.0 mm (US H-8)
- Number of pieces: 1
- Layout: One panel, 36 mesh squares wide x 20 mesh rows tall
- Piece size before border: 27 in (68.6 cm) x 15 in (38.1 cm), mesh body only
- Border depth: Top band 1 in (2.5 cm), bottom flower trim 3 in (7.6 cm), side edging 0.25 in (0.6 cm) each side
Materials
Yarn advice: Use a smooth, mercerized or combed worsted-weight cotton of about 180 m per 100 g. Cotton holds the square mesh crisply and blocks well. Avoid fuzzy or very stretchy yarns, because the mesh will sag on the rod.
- Cream (main color): 250 g / 450 m (492 yd)
- Blue-gray (petal centers): 25 g / 45 m (49 yd)
Tools:
- 5.0 mm (US H-8) crochet hook
- Tapestry needle
- Scissors
- Stitch markers (at least 8)
- Measuring tape
- Blocking mats or a large towel, plus rust-proof pins
- Spray bottle
All quantities include a margin of roughly 15% for gauge swatches and tension differences.
Abbreviations (US Terms)
- ch – chain
- sl st – slip stitch
- sc – single crochet
- hdc – half double crochet
- dc – double crochet
- tr – treble crochet (yarn over twice)
- sp – space
- sk – skip
- RS / WS – right side / wrong side
Mesh square: one dc post plus a ch-2 space. Each mesh square uses 3 stitches of width.
Hub: (tr, [ch 3, tr] 4 times) all in the same stitch. This makes 5 tr and 4 ch-3 spokes.
Petal: (hdc, dc, 3 tr, dc, hdc) all in the same ch-3 spoke. This makes 7 stitches.
Gauge and Checkpoints
Mesh gauge: 4 mesh squares and 4 mesh rows = 3 in (7.6 cm) square. Each square measures 0.75 in (1.9 cm).
Sc gauge: 16 sc and 16 rows = 4 in (10.2 cm), or 4 sc per inch.
Test first: Before starting the panel, make a small mesh swatch. Ch 17, then work Row 1 as written below to get 4 squares. Work 3 more rows. Lightly wet it, pat it flat, and let it dry. It should measure 3 in (7.6 cm) square.
Checkpoints:
- After mesh Row 1: 27 in (68.6 cm) wide
- After mesh Row 4: 3 in (7.6 cm) tall
- After mesh Row 20: 15 in (38.1 cm) tall
- After the top band: 16 in (40.6 cm) tall
- After the flower trim: 19 in (48.3 cm) tall
If your swatch is too big, go down 0.5 mm in hook size. If it is too small, go up 0.5 mm. Do not change the number of squares. The trim math depends on exactly 36 squares and 109 edge stitches.
Mesh Body
Use cream. Work all rows flat.
Foundation: Ch 113. This is 3 x 36 + 5.
Row 1 (RS): Dc in 8th ch from hook. The 7 skipped ch count as the first dc and first ch-2 sp. Ch 2, sk 2 ch, dc in next ch. Repeat from * across.
- Total: 36 mesh squares (37 dc posts, counting the skipped ch as a post)
Rows 2–20: Ch 5 (counts as dc + ch 2), turn. Dc in next dc. Ch 2, dc in next dc. Repeat from * across, working the last dc into the top of the beginning chain.
- Total each row: 36 mesh squares, 37 dc posts
Do not fasten off. Check the size: 27 in (68.6 cm) x 15 in (38.1 cm). Every opening should look square. If the rows look taller than wide, tighten your yarn-over slightly on the dc.
Border
The border has four parts. Work them in this order:
- A. Top band
- B. Tabs
- C. Flower trim
- D. Side edging
Border gauge: All sc work in the border uses the same gauge as your swatch, 4 sc per inch. The border is not worked tighter than the body. Its stitch counts come straight from the mesh structure.
A. Top Band
Work into the top of mesh Row 20.
Band Row 1 (conversion row): Ch 1, turn. Sc in each dc and 2 sc in each ch-2 sp across.
- Count: 37 sc (1 per post) + 72 sc (2 per space x 36 spaces) = 109 sc
Band Rows 2–4: Ch 1, turn. Sc in each sc across.
- Count each row: 109 sc
Fasten off. The band is 4 rows deep, or 1 in (2.5 cm).
B. Tabs (make 4)
The 109 band stitches split as follows:
- 3 sc margin
- Tab of 7 sc
- 25 sc gap
- Tab of 7 sc
- 25 sc gap
- Tab of 7 sc
- 25 sc gap
- Tab of 7 sc
- 3 sc margin
Check the total: 3 + 7 + 25 + 7 + 25 + 7 + 25 + 7 + 3 = 109.
Place markers in sc 4, 36, 68, and 100. Each tab begins at a marker.
Tab Row 1: With RS facing, join cream at a marker. Ch 1, sc in the same st and the next 6 sts.
- Count: 7 sc, 1.75 in (4.4 cm) wide
Tab Rows 2–20: Ch 1, turn. Sc in each sc across.
- Count each row: 7 sc
The tab is 5 in (12.7 cm) long. Fasten off, leaving a 12 in (30.5 cm) tail.
To finish each tab: Fold the tab to the WS. Whipstitch the last row to the WS at the seam line between band Row 1 and mesh Row 20. This forms a loop standing 2 in (5.1 cm) above the band. Make sure all four loops are the same height before weaving in the ends.
The tabs sit 6.25 in (15.9 cm) apart, with equal gaps between them.
C. Flower Trim
Turn the panel upside down so the foundation edge is on top. Each bloom uses 18 stitches. That gives 6 blooms x 18 + 1 = 109 stitches.
Trim Row 1 (RS, conversion row): Join cream at the right corner. Ch 1. Work 1 sc into the base of each dc post and 2 sc into each 2-ch gap between posts, working over the foundation chain.
- Count: 37 + 72 = 109 sc
Trim Row 2 (WS, hub row): Ch 1, turn. Sc in the first sc. Then work this repeat 6 times:
Ch 8, sk 8 sc, Hub in the next sc, ch 8, sk 8 sc, sc in the next sc.
- Check: 1 + 6 x (8 + 1 + 8 + 1) = 109 stitches used
- Count: 7 sc, 6 hubs (30 tr, 24 ch-3 spokes), 12 ch-8 sps
Fasten off. Each hub becomes the cream center of a bloom.
Trim Row 3 (RS, blue-gray petals, worked bloom by bloom): With RS facing, join blue-gray in the first ch-3 spoke of a hub. Work a Petal in that spoke. Sl st in the next tr, Petal in the next spoke. Repeat from * twice more. Fasten off.
- Count per bloom: 4 petals (28 sts) + 3 sl st
Repeat for all 6 blooms. You will have 24 blue-gray petals in total. The packed tr stitches give each petal its filled blue-gray center.
Trim Row 4 (RS, cream outline): With RS facing, join cream in the first sc of Row 2. Ch 1, sc in the same sc. Then work this repeat 6 times:
8 sc in the ch-8 sp. Sk the first hub tr. Work the outline below into each of the 4 petals, skipping the sl sts between them. Sk the last hub tr. 8 sc in the next ch-8 sp. Sc in the next sc.
Outline for each petal:
- Sc in the hdc
- 2 sc in the dc
- Sc in the next tr
- (sc, ch 2, sc) in the center tr
- Sc in the next tr
- 2 sc in the dc
- Sc in the hdc
This makes 10 sc and 1 ch-2 tip per petal.
- Count per repeat: 8 + 40 + 8 + 1 = 57 sc
- Total: 1 + (6 x 57) = 343 sc, plus 24 ch-2 tips
The fan-shaped petals with their outlined tips create the scalloped lower edge. Each bloom measures 4.5 in (11.4 cm) across. The trim hangs 3 in (7.6 cm) below the mesh. Fasten off.
D. Side Edging
With RS facing, join cream at the top corner of the band on one side. Work down the edge as follows:
- 1 sc in each band row-end: 4 sc
- 3 sc around each mesh row-end post: 60 sc
-
1 sc in the trim Row 1 row-end: 1 sc
-
Count per side: 4 + 60 + 1 = 65 sc
Fasten off. Repeat on the other side.
Why the math works:
- Each mesh square is 3 stitches wide. The 36 squares convert to 109 sc (37 posts + 72 space stitches).
- 109 sc is exactly 6 bloom repeats of 18, plus 1 closing sc. It also splits evenly around the four tabs.
- On the sides, 3 sc per 0.75 in (1.9 cm) mesh row matches the 4 sc per inch gauge. So 65 sc covers 16.25 in (41.3 cm), which equals the 1 in band + 15 in mesh + 0.25 in trim Row 1.
- The side edging adds 0.25 in (0.6 cm) per side, bringing the width from 27 in (68.6 cm) to 27.5 in (69.9 cm).
Final Blocking
- Weave in all ends along solid stitches, not across open mesh.
- Soak the panel in cool water for 10 minutes. Press out the water in a towel. Do not wring.
- Lay it flat and pin the corners to 27.5 in (69.9 cm) x 19 in (48.3 cm).
- Pin the side edges straight every 2 in (5.1 cm).
- Square up the mesh openings with your fingers. Check that the rows run level.
- Pin each of the 24 petal tips, keeping the blooms evenly spaced at 4.5 in (11.4 cm).
- Pull the tabs straight. Optionally, mist the trim with spray starch.
- Let the panel dry completely before unpinning.
Final Quality-Control Checklist
- 36 mesh squares across and 20 mesh rows tall
- Mesh body is 27 in x 15 in (68.6 cm x 38.1 cm)
- Top band and trim Row 1 each have 109 sc
- 4 tabs, each 7 sc wide, all forming equal 2 in (5.1 cm) loops
- 6 blooms, each with 4 blue-gray petals
- Each side edge has 65 sc
- Finished size is 27.5 in x 19 in (69.9 cm x 48.3 cm)
- All ends are secured with no blue-gray showing on the cream outline
Troubleshooting
Openings look rectangular: Your dc height is off. Adjust your yarn-over tension, or block more firmly.
Wrong stitch count in band Row 1: Make sure you worked exactly 2 sc into each space, not 3.
Trim ruffles: The ch-8 spaces are too long for your tension. Try ch 7 instead and keep 8 sc in each space.
Trim pulls the panel narrower: Your chains are tight. Loosen them, or chain with a 5.5 mm hook.
Tabs are uneven: Recount the 20 rows on each tab, and resew them at the same seam line.
Petals curl: Block them firmly, and lightly starch the trim.
Panel sags on the rod: Use a firmer cotton, or go down a hook size for the top band.
Care
Hand wash in cool water with mild soap, then reshape and dry flat. Light ironing on a cotton setting under a cloth is fine, but avoid pressing the blooms flat.
Final Notes
Everything in this pattern flows from a single measurement chain:
- 0.75 in (1.9 cm) mesh squares give 27 in (68.6 cm) across 36 squares.
- 20 rows give 15 in (38.1 cm) of height.
- The 36 squares convert to 109 sc, which feeds both the four tabs and the six blooms.
- The 1 in (2.5 cm) band, 3 in (7.6 cm) trim, and 0.25 in (0.6 cm) side edging bring the panel to 27.5 in x 19 in (69.9 cm x 48.3 cm).
Check your gauge first, count at each checkpoint, and the panel will hang straight.
Optional: for a wider window, add squares in multiples of 6 (one extra bloom each). Keep in mind that this changes the tab spacing.
Happy crocheting!