

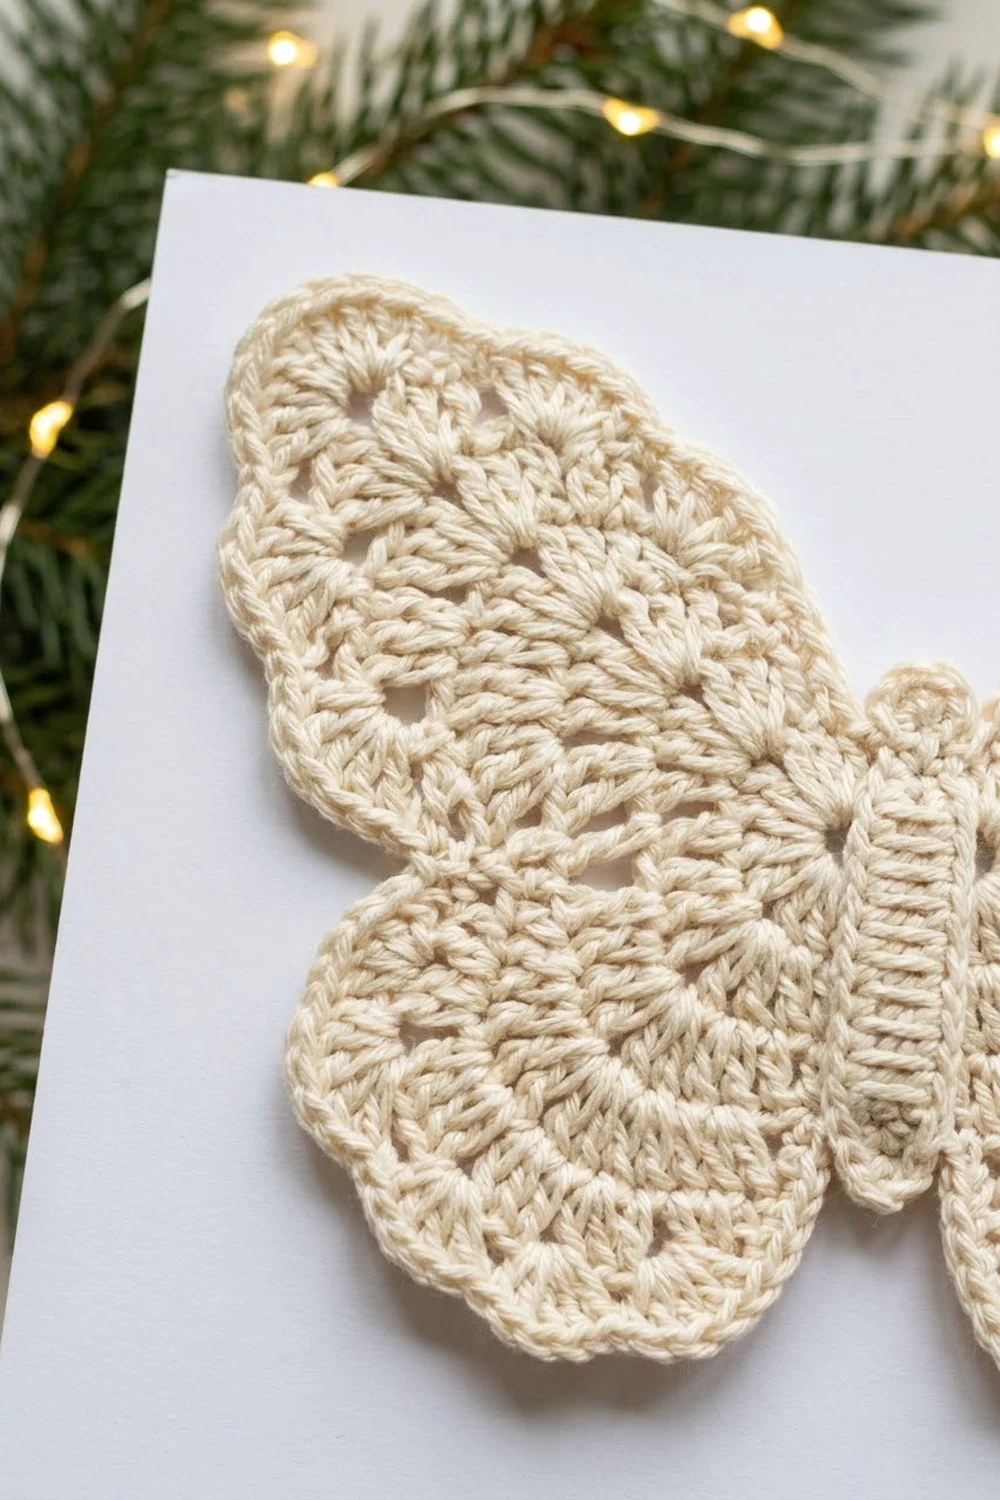
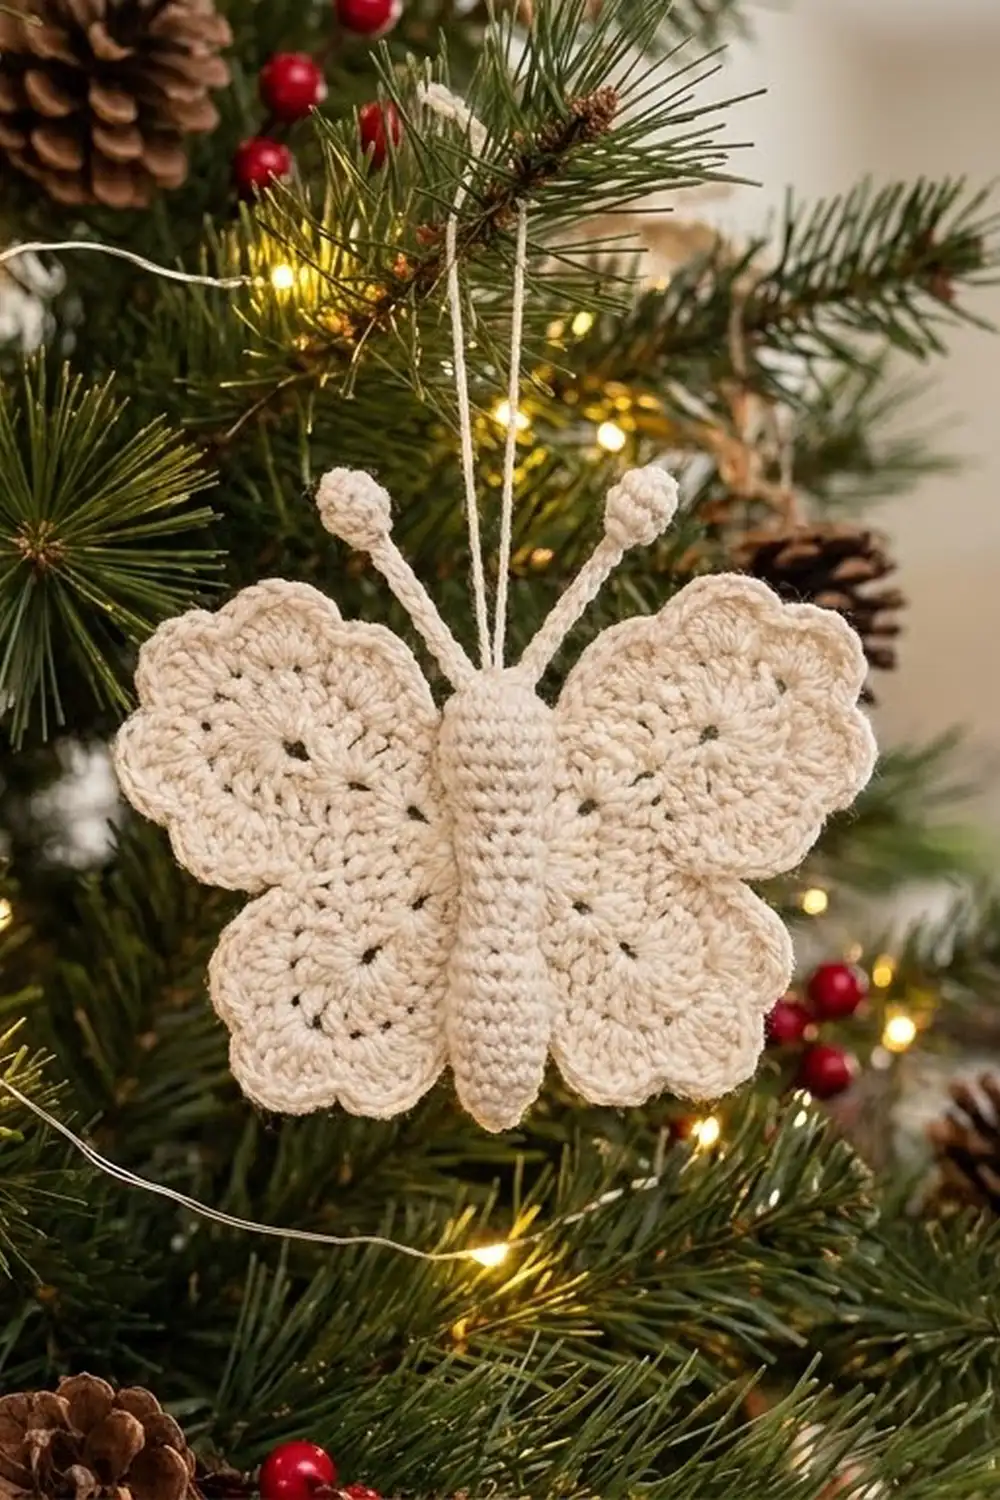
The Snowdrift Butterfly is a small, lacy crochet motif with four rounded wings, a ridged rectangular body, and two long antennae tipped with tiny bobbles. Each wing is a fan of radiating stitches around an open center, finished with a scalloped shell-stitch edge.
The whole butterfly is worked in one neutral color: cream, white, or light tan. A single shade keeps the focus on stitch definition. It looks lovely tucked among holiday greenery, on a gift tag, or as an appliqué.
This pattern uses US crochet terms. The finished wingspan is about 5.5 in (14.0 cm).
Construction is simple. You crochet the body first as a short strip of back-loop sc rows. Then you work the upper and lower wings directly into the body’s side edges as anchored fan rows. Next, you add the antennae to the top of the body. Last, you work the shell-stitch scallops around each wing as the border. The butterfly is one single piece. You only rejoin the yarn to start each new section.
Finished Size and Construction
- Finished size: about 5.5 in (14.0 cm) wingspan. Wing height is about 4.75 in (12.1 cm) from the top of the upper wings to the bottom of the lower wings.
- Skill level: Easy-intermediate
- Terminology: US crochet terms
- Yarn weight: DK / light worsted (#3), cotton or cotton blend
- Hook: 3.5 mm (E-4)
- Number of pieces: 1 (one motif, worked in sections without sewing)
- Layout: central body, with 2 upper wings, 2 lower wings, and 2 antennae
- Body size: 0.9 in × 2.4 in (2.3 cm × 6.1 cm)
- Size before border: about 4.7 in (11.9 cm) wingspan
- Border depth: about 0.4 in (1.0 cm) of shell scallops on each wing
Materials
Yarn advice: Choose a smooth, mercerized or matte cotton in DK weight. Cotton shows radiating stitches clearly and blocks crisply. Avoid fuzzy or highly textured yarns, because they hide the open wing centers.
- Cream (main and only color): 10 g, about 23 m (25 yd)
Tools:
- 3.5 mm (E-4) crochet hook
- Tapestry needle
- Scissors
- 4 stitch markers
- Ruler or tape measure
- Blocking mat, rust-proof pins, and a spray bottle
- Optional: light spray starch
The yarn quantity includes a margin for joining tails, a gauge check, and one frogged section.
Abbreviations (US Terms)
- ch – chain
- sl st – slip stitch
- sc – single crochet
- dc – double crochet
- tr – treble crochet
- BLO – back loop only
- st(s) – stitch(es)
- sp – space
- [ ] – repeat the instructions in brackets the number of times stated
Special stitches:
- Bobble: [Yo, insert hook in indicated st, yo, pull up a loop, yo, draw through 2 loops] 5 times. You now have 6 loops on the hook. Yo, draw through all 6 loops.
- Shell: 5 dc in the same st.
- Anchor sl st: a sl st into the indicated row-end of the body. It holds each wing row snug against the body. It is never counted as a stitch.
Gauge and Checkpoints
Gauge: 18 sc and 20 rows = 4 in (10.2 cm). That works out to 4.5 sc and 5 rows per inch.
Test one piece first. The body doubles as your gauge swatch. Make it, then measure it before you start the wings.
Checkpoints:
- Body: 0.9 in wide × 2.4 in tall (2.3 cm × 6.1 cm), with a tolerance of ±0.1 in (0.3 cm).
- After the upper wing, Row 4: the wing reaches about 1.9 in (4.8 cm) out from the body edge.
- After the lower wing, Row 4: the wing reaches about 1.6 in (4.1 cm) out from the body edge.
- Before the border: the wingspan is about 4.7 in (11.9 cm).
- After the border and blocking: the wingspan is about 5.5 in (14.0 cm).
If your body is too big, go down to a 3.25 mm hook. If it is too small, go up to a 3.75 mm hook. Remake the body before continuing. Every wing count is built on the body’s 12 row-ends, so the body has to be right before anything else.
Body
The body is worked flat in rows. Working in the back loop only creates horizontal ridges, which give the body its segmented look.
Row 1: Ch 5, sc in 2nd ch from hook and in each remaining ch. (4 sc)
Rows 2–12: Ch 1 (does not count as a st), turn, sc BLO in each st across. (4 sc)
Fasten off and weave in the tails.
Checkpoint: 0.9 in × 2.4 in (2.3 cm × 6.1 cm). You should see 6 raised ridges on each face.
Setup: Hold the body with Row 12 at the top. On each long side there are 12 row-ends. Number them from the top down: row-end 1 is Row 12, and row-end 12 is Row 1.
Place markers at row-ends 6 and 7 on both sides. This is the “waist,” where the upper and lower wings meet.
Wings
Each side of the body gets one upper wing (row-ends 1–6) and one lower wing (row-ends 7–12). You work them continuously.
The chain arch in Row 1 forms the open center of the wing. The dc and tr rows then radiate outward from that arch, which creates the fan lines.
Upper Wing (Side A)
Row 1: Join yarn with a sl st in row-end 6. Ch 12, sl st in row-end 1. (1 ch-12 arch)
Row 2: Turn. Ch 1, then work 16 sc into the ch-12 sp. Anchor sl st in row-end 6. (16 sc)
Row 3: Turn. Skip the anchor sl st. Ch 3 (counts as dc in the first sc), 2 dc in the next sc, [dc in next sc, 2 dc in next sc] 7 times. Anchor sl st in row-end 1. (24 dc)
Check the count: 1 + 2 + (7 × 3) = 24.
Row 4: Turn. Ch 4 (counts as tr in the first st), tr in the next st, [2 tr in next st, tr in next 3 sts] 5 times, tr in the last 2 sts (the last st is the top of the ch-3). Anchor sl st in row-end 6. (29 tr)
Check the count: 2 + (5 × 5) + 2 = 29. Sts used: 2 + 20 + 2 = 24.
Do not fasten off.
Lower Wing (Side A)
Row 1: Sl st in row-end 7. Ch 10, sl st in row-end 12. (1 ch-10 arch)
Row 2: Turn. Ch 1, then work 14 sc into the ch-10 sp. Anchor sl st in row-end 7. (14 sc)
Row 3: Turn. Ch 3 (counts as dc in the first sc), 2 dc in the next sc, [dc in next sc, 2 dc in next sc] 6 times. Anchor sl st in row-end 12. (21 dc)
Check the count: 1 + 2 + (6 × 3) = 21.
Row 4: Turn. Ch 4 (counts as tr in the first st), tr in the next st, [2 tr in next st, tr in next 3 sts] 4 times, tr in the last 3 sts. Anchor sl st in row-end 7. (25 tr)
Check the count: 2 + (4 × 5) + 3 = 25. Sts used: 2 + 16 + 3 = 21.
Fasten off and leave a 6 in (15.2 cm) tail.
Side B
Rotate the body so that Side B faces you, with Row 12 still at the top. Number the row-ends from the top, just as before.
Repeat the Upper Wing and Lower Wing exactly as written. Because every wing row is turned, Side B mirrors Side A automatically.
Checkpoint: The upper wings reach about 1.9 in (4.8 cm) from the body, and the lower wings reach about 1.6 in (4.1 cm). The wingspan before the border is about 4.7 in (11.9 cm).
Antennae
Setup: With Row 12 at the top, join yarn with a sl st in the 2nd sc of Row 12.
First antenna: Ch 10. Work a bobble in the 4th ch from the hook, then ch 1 to close. Sl st in each of the next 6 ch, back toward the body. Sl st in the same sc where you joined.
Move over: Sl st in the 3rd sc of Row 12.
Second antenna: Ch 10. Work a bobble in the 4th ch from the hook, then ch 1 to close. Sl st in each of the next 6 ch. Sl st in the same 3rd sc.
Fasten off.
The 3 skipped chains fold behind each bobble and round it into a small ball. Each antenna is about 1.25 in (3.2 cm) long, with a bobble about 0.3 in (0.8 cm) across.
Border: Shell-Stitch Scallops
The border is a single shell row worked into Row 4 of each wing. Work it after all four wings are done. That way you can check symmetry before committing to the scallops.
Border gauge: Each shell repeat uses 4 stitches. At 4.5 sts per inch, that is about 0.9 in (2.3 cm) of the treble edge per scallop. The scallops add about 0.4 in (1.0 cm) of depth.
Upper Wings (each)
Row 5: Join yarn with a sl st in the first tr of Row 4 at the row-end-6 end. Ch 1, sc in the same st, [skip 1 st, shell in next st, skip 1 st, sc in next st] 7 times. Anchor sl st in row-end 1. (7 shells, 8 sc)
Lower Wings (each)
Row 5: Join yarn with a sl st in the first tr of Row 4 at the row-end-7 end. Ch 1, sc in the same st, [skip 1 st, shell in next st, skip 1 st, sc in next st] 6 times. Anchor sl st in row-end 12. (6 shells, 7 sc)
Fasten off after each wing.
Why the Math Works
A shell repeat needs a multiple of 4 sts, plus 1 st so the row can begin and end with an sc.
- Upper wing: 29 = (4 × 7) + 1, which gives 7 shells.
- Lower wing: 25 = (4 × 6) + 1, which gives 6 shells.
Every edge starts and ends on an sc, so the scallops sit symmetrically. Both wings also close neatly at the waist and at the body corners.
Checkpoint: The wingspan should now be 4.7 in + 0.4 in + 0.4 in = 5.5 in (14.0 cm).
Final Blocking
- Weave in all tails along the body edges or through the backs of the wing stitches.
- Soak the butterfly in cool water for 5 minutes. Then press out the water gently in a towel. Do not wring it.
- Lay it flat on the blocking mat, right side up.
- Pin the body straight, at 0.9 in × 2.4 in (2.3 cm × 6.1 cm).
- Pin each wing’s open center into a smooth teardrop.
- Pin the tip of every shell, so the scallops fan out evenly.
- Check that the wingspan is 5.5 in (14.0 cm). Make sure the left and right wings match.
- Spread the antennae into a gentle V shape and pin under each bobble.
- If you want extra crispness, mist with light starch.
- Let it dry completely, at least 12 hours, before unpinning.
Final Quality-Control Checklist
- [ ] Body: 4 sts wide, 12 rows tall, with 6 clear ridges per face
- [ ] Upper wings: 16 sc, 24 dc, 29 tr, and 7 shells
- [ ] Lower wings: 14 sc, 21 dc, 25 tr, and 6 shells
- [ ] Upper and lower wings meet at the waist (row-ends 6 and 7)
- [ ] Open wing centers are round and not collapsed
- [ ] Both antennae are the same length, with firm bobbles
- [ ] Wingspan is about 5.5 in (14.0 cm)
- [ ] All tails are woven in invisibly
Troubleshooting
Wings ruffle or cup: Your tension on the dc and tr rows is looser than on the body. Go down half a hook size for the wings only.
Wings pull the body inward: Your anchor sl sts are too tight. Work them loosely, into a single strand at the row-end.
The open center disappears: Your arch chains are too tight. Make the ch-12 and ch-10 arches with relaxed tension, or work them with a hook one size larger.
Shell counts don’t fit: Recount Row 4. Remember that the ch-4 counts as the first tr, and the top of the ch-3 counts as the last st.
Left and right wings differ: Make sure you numbered the row-ends from the top on both sides. Starting from the bottom on one side flips the wings.
Bobbles look flat: Pull up each bobble loop to full height before you close it.
Care
Hand wash in cool water and lay flat to dry. If the motif softens over time, re-block and starch it lightly.
Final Notes
The measurement chain runs like this. The body sets the foundation at 0.9 in × 2.4 in (2.3 cm × 6.1 cm). The anchored fan rows build the wings to a 4.7 in (11.9 cm) wingspan. Finally, the shell border adds 0.4 in (1.0 cm) on each side, for a finished wingspan of 5.5 in (14.0 cm).
If your body matches gauge, every count after it will fall into place.
Optional: If you’d like more, you can make several butterflies in different neutral shades to scatter across a gift table.
Happy crocheting!