

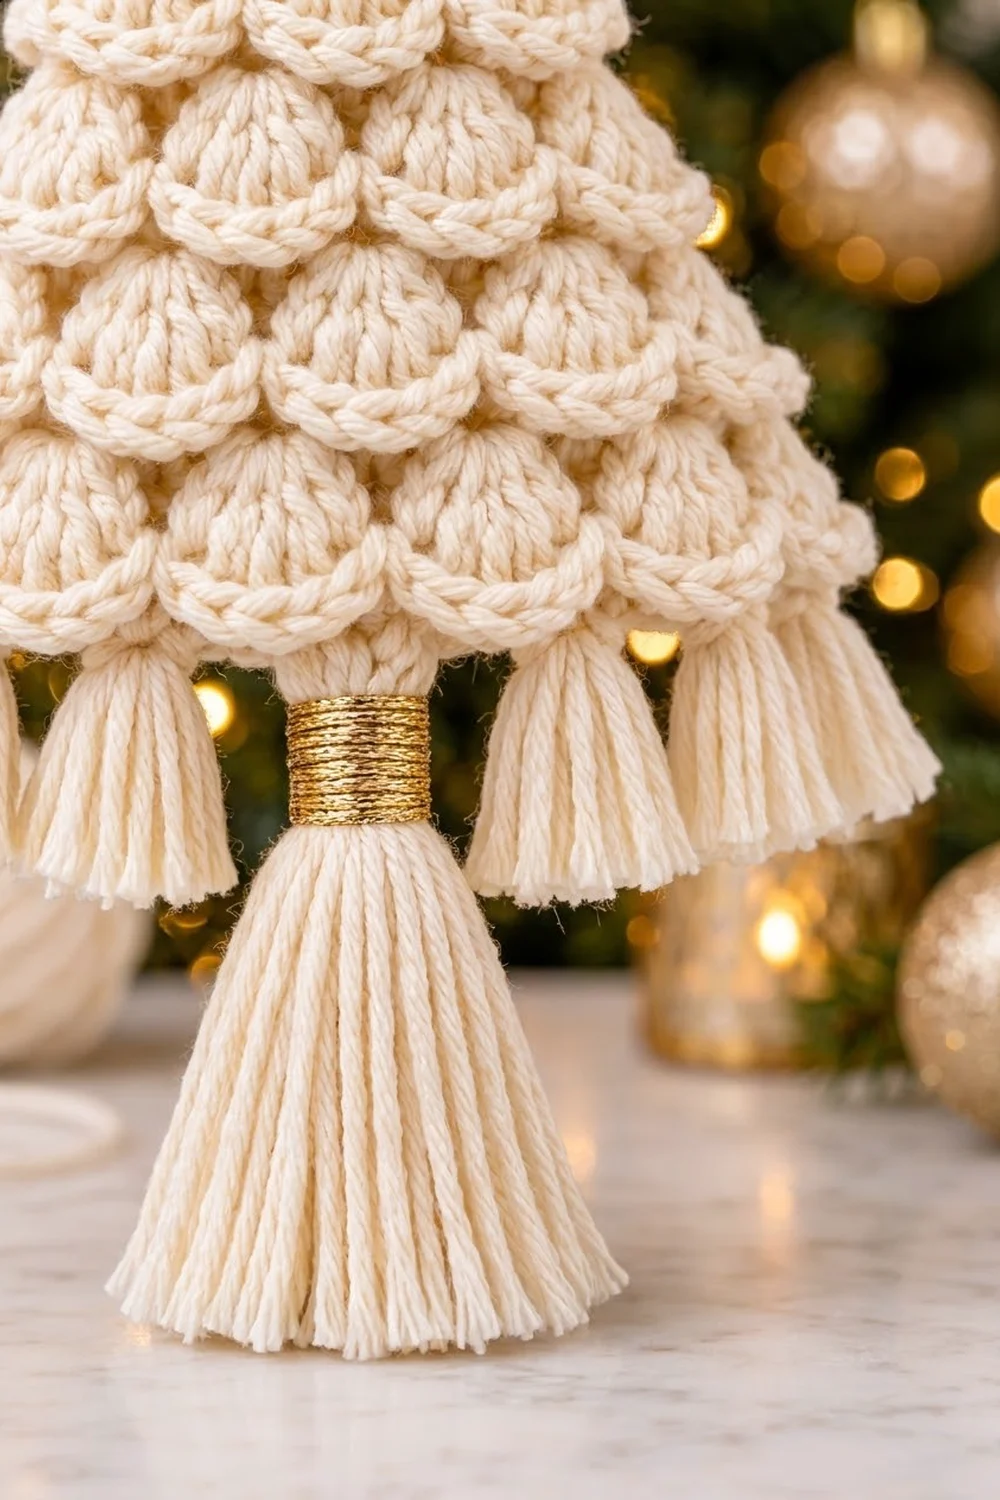
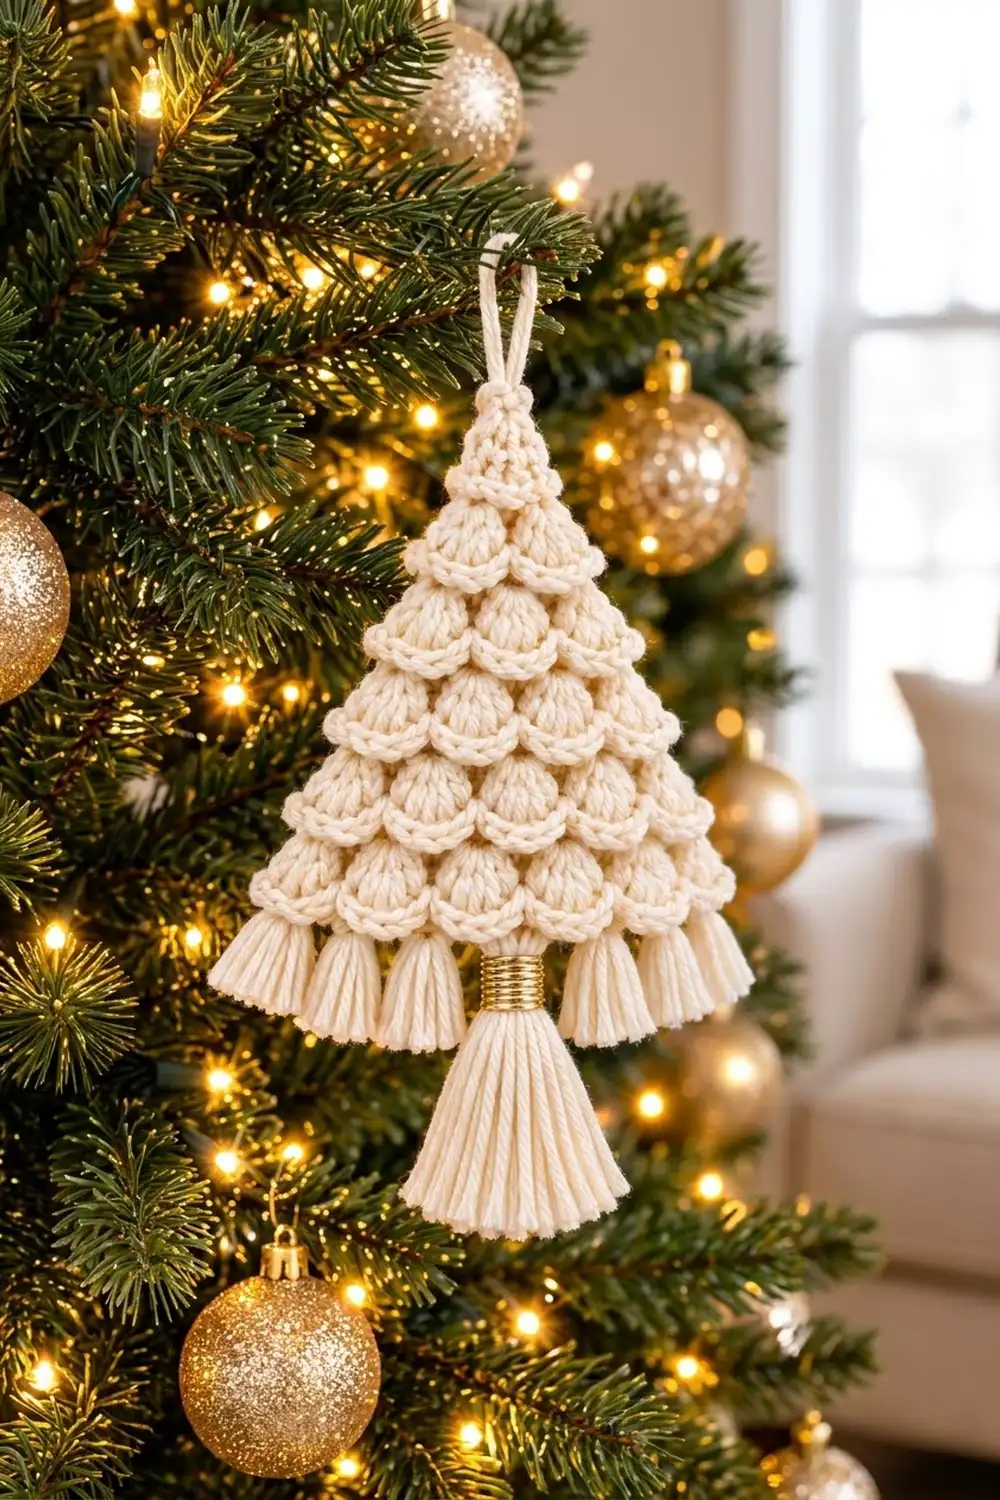
The Ivory Cascade ornament is a small, flat Christmas tree covered in rows of puffy shell scales. Each scale has a raised chain-like rim along its curve, so the tree looks layered and almost braided. Six mini tassels hang from the bottom edge, with a longer center tassel finished in a band of gold thread.
The design uses one color, warm cream, plus a small amount of gold metallic thread for the center tassel. A single color keeps the look soft and elegant, and the ornament suits neutral, gold, or Scandinavian-style trees.
This pattern uses US crochet terms. The finished body measures 5 in (12.7 cm) wide at the bottom and 4.5 in (11.4 cm) tall. Including the hanging loop and center tassel, the ornament hangs about 9 in (22.9 cm) long.
You work the tree flat in rows, starting at the tip and going down. Every right-side row is a shell row, and every wrong-side row is worked in front loops only. This leaves a free loop on the right side, which forms the chain rim on each scale. A slip-stitch rim row finishes the bottom edge, then you add the hanging loop and the tassels.
Finished Size and Construction
- Finished body size: 5 in (12.7 cm) wide × 4.5 in (11.4 cm) tall
- Total hanging length: about 9 in (22.9 cm)
- Skill level: Easy–Intermediate
- Terminology: US crochet terms
- Yarn weight: DK (weight 3)
- Hook: 4.0 mm (G-6)
- Number of pieces: 1 (single flat piece)
- Layout: Triangle with 6 tiers of shells (1, 2, 3, 4, 5, 6 shells)
- Piece size: 5 in (12.7 cm) × 4.5 in (11.4 cm)
- Size before border: 5 in (12.7 cm) × 4.4 in (11.2 cm)
- Border depth: about 0.1 in (0.3 cm) (one slip-stitch rim row, bottom edge only)
Materials
Yarn: Choose a smooth DK cotton or cotton-blend yarn in cream or ivory. Cotton shows the shell texture clearly and makes neat, heavy tassels that hang straight. Avoid fuzzy yarns, because they blur the chain rims.
- Cream (main color): 30 g, about 70 m (77 yd)
- Gold metallic thread or fine metallic yarn: 1 g, about 2 m (2.2 yd)
Tools:
- 4.0 mm (G-6) crochet hook
- Tapestry needle
- Sharp scissors
- Stiff card 3 in (7.6 cm) wide, for the small tassels
- Stiff card 6.5 in (16.5 cm) wide, for the center tassel
- Rust-proof pins and a blocking mat
- Spray bottle
All quantities include a margin of about 20% for your swatch and tassel trimming.
Abbreviations (US Terms)
- ch – chain
- sc – single crochet
- dc – double crochet
- sl st – slip stitch
- sk – skip
- st(s) – stitch(es)
- FLO – front loop only
- RS / WS – right side / wrong side
- rep – repeat
Special stitch – Shell: Work 5 dc in the same stitch.
Note: The ch 1 at the start of a row does not count as a stitch.
Gauge and Checkpoints
Gauge: 20 sc and 24 rows = 4 in (10.2 cm) in standard sc rows with a 4.0 mm hook.
Tier gauge: One tier (1 shell row + 1 WS row) = 0.7 in (1.8 cm) tall.
This ornament is small, so the tree itself works as your gauge swatch. Crochet through Row 4 and measure before you go on.
Checkpoints:
- After Row 2 (5 sts): 1 in (2.5 cm) wide
- After Row 4 (9 sts): 1.8 in (4.6 cm) wide, 1.1 in (2.8 cm) tall
- After Row 8 (17 sts): 3.4 in (8.6 cm) wide, 2.5 in (6.4 cm) tall
- After Row 12 (25 sts): 5 in (12.7 cm) wide, 3.9 in (9.9 cm) tall
- After Row 13: 4.4 in (11.2 cm) tall
If your piece is too big: Go down to a 3.75 mm (F-5) hook, or check that your WS rows are not loose.
If your piece is too small: Go up to a 4.5 mm (7) hook. Small shells also tend to cup, so a larger hook helps them sit flat.
Tree Body
Work in rows. Turn at the end of every row.
Row 1 (RS): Ch 2, 3 sc in 2nd ch from hook. Turn. (3 sts)
Row 2 (WS): Ch 1, 2 sc in first st, sc in next st, 2 sc in last st. Turn. (5 sts)
This is the solid tip of the tree.
Tier 1
Row 3 (RS, shell row): Ch 1, sc in first st, sk 1, shell in next st, sk 1, sc in last st. Turn. (7 sts: 2 sc + 5 dc)
Row 4 (WS, rim row): Work all sts in FLO. Ch 1, 3 sc in first sc. Then sk the 1st dc of the shell, sc in each of the next 3 dc, and sk the 5th dc. Work 3 sc in last sc. Turn.
Count: 5 worked one per stitch + 4 edge increases = 9 sts.
The 5 sts worked one per stitch are the 2 end sc plus the 3 sc over the shell. Each end sc takes 3 sc instead of 1, which adds 2 sts at each end.
Working in FLO on the WS leaves the back loops free on the RS. These free loops form the raised chain rim along the curve of each shell. The 1st and 5th dc of each shell are left unworked so the shell can puff out like a scale.
Shell Row (Rows 5, 7, 9, 11, 13)
RS: Ch 1, sc in first st, *sk 1, shell in next st, sk 1, sc in next st; rep from * across, ending with sc in last st. Turn.
Each repeat uses 4 base sts and makes 6 sts (5 dc + 1 sc).
WS Rim Row (Rows 6, 8, 10, 12)
WS (all sts in FLO): Ch 1, 3 sc in first sc. *Sk 1st dc of next shell, sc in each of next 3 dc, sk 5th dc, sc in next sc; rep from * across until 1 shell remains. Over the last shell, sk 1st dc, sc in next 3 dc, sk 5th dc. Work 3 sc in last sc. Turn.
Each new shell row places its shells on the sc between the shells of the row above, plus one new shell at each end. This creates the staggered, overlapping scale pattern.
Row-by-Row Counts
Row 5 (Tier 2): 2 shells. (13 sts)
Row 6: 9 worked one per stitch + 4 edge increases = 13 sts
Row 7 (Tier 3): 3 shells. (19 sts)
Row 8: 13 worked one per stitch + 4 edge increases = 17 sts
Row 9 (Tier 4): 4 shells. (25 sts)
Row 10: 17 worked one per stitch + 4 edge increases = 21 sts
Row 11 (Tier 5): 5 shells. (31 sts)
Row 12: 21 worked one per stitch + 4 edge increases = 25 sts
Row 13 (Tier 6): 6 shells. (37 sts)
Do not fasten off. Go on to the border.
Count check: A shell row with n shells needs 4n + 1 base sts and makes 6n + 1 sts. The WS row after it makes (4n + 1) + 4 = 4(n + 1) + 1 sts. That is exactly the base the next tier needs, so every row fits with no extra or missing stitches.
Border
The border is one slip-stitch rim row along the bottom edge only. The two slanted sides are left as they are, because the outer shells of each tier form a natural scalloped edge.
Border gauge: Work the sl sts loosely, at the same width as the stitches below. The 37 sts of Row 13 should still measure 5 in (12.7 cm) after the rim row.
Row 14 (WS, rim row): Ch 1, sl st loosely in FLO of each st across. (37 sl st)
Count per side:
- Bottom edge: 37 sl st (1 sc + 6 repeats of 5 dc + 1 sc)
- Slanted sides: 0 sts
- Corners: none added
Fasten off and weave in the end.
Why the math works: Row 14 places exactly one sl st in each Row 13 stitch, so the bottom shells keep their full curve with no ruffling or puckering. Working in FLO from the WS leaves the free loop on the RS, which gives the bottom shells the same chain rim as the tiers above.
Hanging Loop
With the RS facing, join cream with a sl st in the center sc of Row 1 at the tip. Ch 16, then sl st in the same st. Ch 1 and work 20 sc over the chain loop. Sl st in the tip st and fasten off. The finished loop stands about 1.5 in (3.8 cm) tall.
Small Tassels (make 6)
- Wrap cream yarn 12 times around the 3 in (7.6 cm) card.
- Slide a 6 in (15.2 cm) length of yarn under the wraps at the top and tie it tightly.
- Cut the loops at the bottom of the card.
- Wrap a separate strand of cream 3 times around the tassel, 0.25 in (0.6 cm) below the top. Knot it and hide the ends inside the tassel.
- Trim the tassel to 1.25 in (3.2 cm).
Center Tassel (make 1)
- Wrap cream yarn 40 times around the 6.5 in (16.5 cm) card.
- Tie the top with a 10 in (25.4 cm) strand and cut the bottom loops.
- Wrap gold thread tightly around the neck, 0.5 in (1.3 cm) below the top, for about 12 neat turns. This makes a band 0.5 in (1.3 cm) deep.
- Knot the gold thread and hide the ends inside the tassel.
- Trim the tassel to 3 in (7.6 cm).
Attaching the Tassels
Use each tassel’s tie strands to attach it.
- Tie one small tassel to the center (3rd) dc of each Row 13 shell. This gives 3 small tassels on each side.
- Tie the center tassel to the center sc of Row 13, which is stitch 19 of 37, between shells 3 and 4.
- Knot all ties on the WS and weave in the ends.
Final Blocking
- Spray the ornament lightly with water until damp but not wet.
- Lay it RS up on the blocking mat.
- Pin the tip, then pin the bottom corners 5 in (12.7 cm) apart.
- Measure 4.5 in (11.4 cm) from the tip to the bottom edge and pin the center bottom.
- Use your fingertips to round each shell so it puffs up, and roll each chain rim outward.
- Comb the tassels straight with your fingers or a fine comb, and trim them again if needed.
- Let the ornament dry completely, then unpin it.
For extra crisp tassels, hold a steam iron above them without touching and let them hang until cool.
Final Quality-Control Checklist
- Body measures 5 in (12.7 cm) wide and 4.5 in (11.4 cm) tall
- Tiers have 1, 2, 3, 4, 5, and 6 shells from tip to bottom
- Each shell sits centered between two shells of the row above
- A chain rim shows along the lower curve of every shell
- Bottom edge has 37 sl sts and lies flat
- Hanging loop is centered at the tip and stands about 1.5 in (3.8 cm) tall
- 6 small tassels, each 1.25 in (3.2 cm), are evenly spaced
- Center tassel is 3 in (7.6 cm) with a neat gold band 0.5 in (1.3 cm) deep
- All ends are woven in on the WS
Troubleshooting
Shells look flat: Make sure you skip the 1st and 5th dc on WS rows. If they are already skipped, go up half a hook size.
No chain rim visible: You are probably working the WS rows in back loops. Work them in front loops (the loop nearest you) instead.
Shells don’t stagger: Recount the WS row. It must end with 4 more sts than the 1-per-stitch count, from the 3 sc worked into each end sc.
Sides curl: WS rows are too tight. Loosen your tension or block the piece firmly.
Bottom edge pulls in: The Row 14 sl sts are too tight. Rip back and redo them over a larger hook.
Tassels splay: Steam them and trim them evenly. Tighten the neck wraps.
Care
Spot-clean with cool water and mild soap, then reshape and dry flat. Store the ornament flat in tissue so the shells and tassels keep their shape.
Final Notes
The measurement chain is simple:
- Gauge of 20 sc = 4 in (10.2 cm) gives a 9-st Row 4 of 1.8 in (4.6 cm).
- Each tier adds 4 sts and 0.7 in (1.8 cm), so Row 12 reaches 25 sts at 5 in (12.7 cm).
- The 37-st sixth tier and the one-per-stitch rim finish the body at 5 in (12.7 cm) × 4.5 in (11.4 cm).
- The loop and tassels bring the total hanging length to about 9 in (22.9 cm).
Check your gauge at each checkpoint and the tree will come out right.
Happy crocheting!