

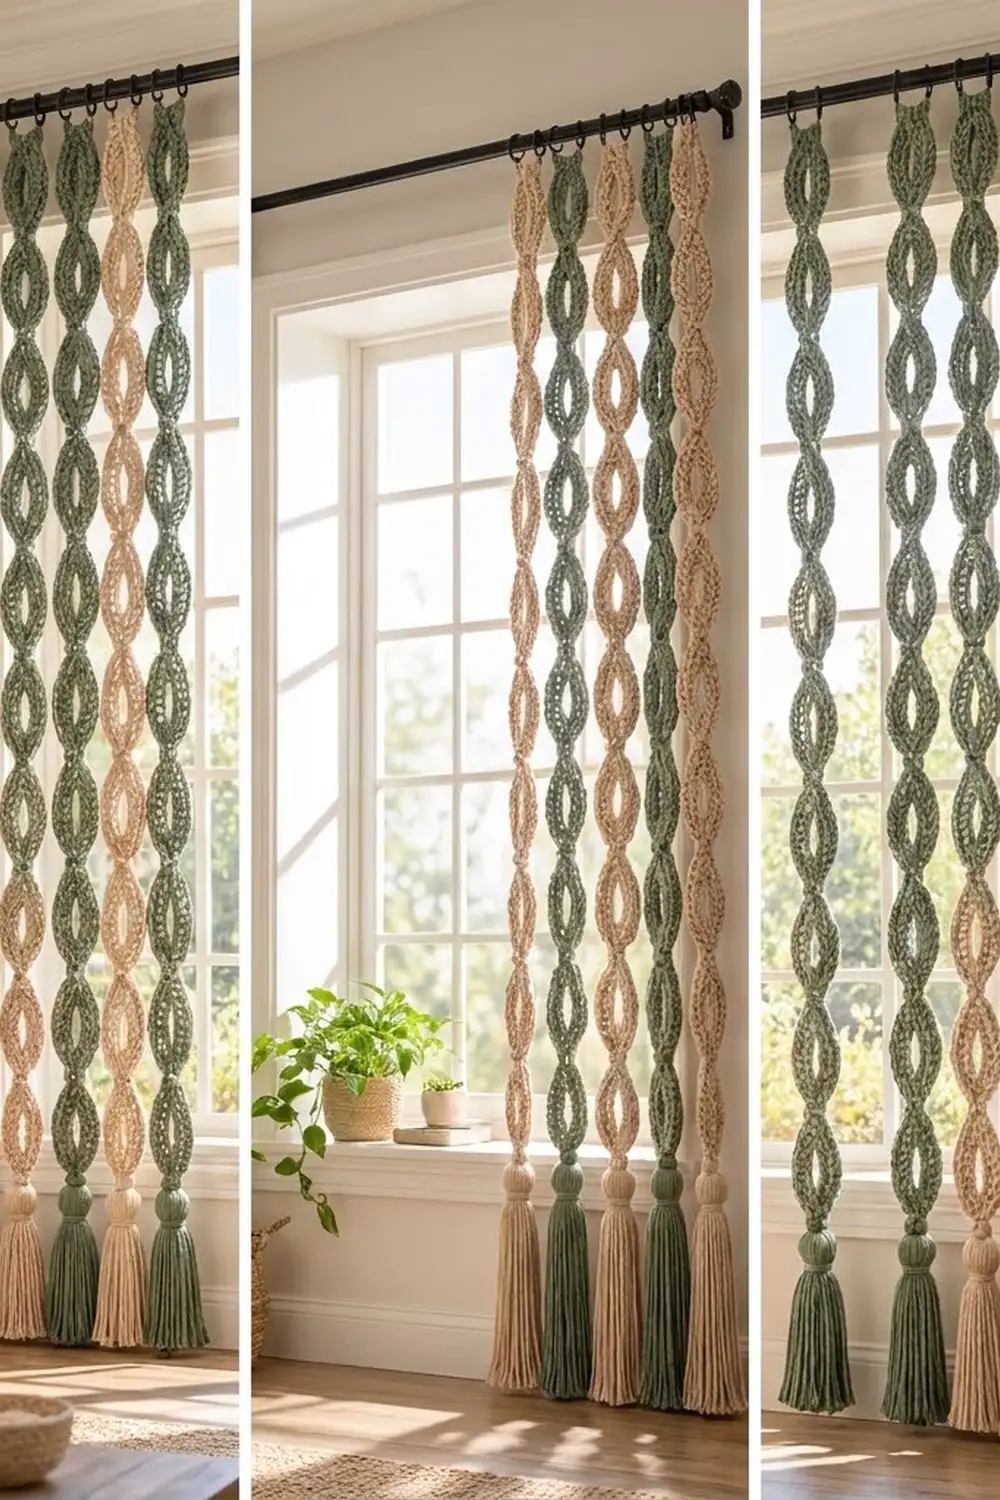
This strand curtain is a soft boho accent for a window, doorway, or blank wall. Each strand is a column of linked eye-shaped loops, so it looks twisted or braided. A full tassel with a rounded head hangs at the bottom.
The curtain alternates two colors, sage green and warm sand beige. Bulky yarn gives every loop a thick, rope-like outline, and a slip-stitch round on top adds a crisp braided line. The style is relaxed and natural, and it works well with linen, wood, and plants.
The pattern uses US crochet terms. Each finished strand is 62 in (157.5 cm) long, measured from the fold of the hanging tab to the tassel tips. Eight strands spaced 3 in (7.6 cm) apart make a curtain about 24 in (61.0 cm) wide.
Construction is simple. Each eye is a chain ring with one round of single crochet and one round of back-loop slip stitches. You join each new eye to the one above it as you go, then cinch the waist with a few yarn wraps. A hanging tab goes at the top and a wrapped tassel at the bottom. The strands stay separate and hang side by side on the rod.
Finished Size and Construction
- Finished strand length: 62 in (157.5 cm)
- Curtain width: 24 in (61.0 cm) with 8 strands at 3 in (7.6 cm) on center
- Skill level: Easy
- Terminology: US crochet terms
- Yarn weight: Bulky (#5)
- Hook: 6.0 mm (US J-10)
- Number of pieces: 8 separate strands (4 sage, 4 sand), each made of 10 eyes, 1 hanging tab, and 1 tassel
- Layout: 8 strands in one row, alternating colors, hung from a rod, not joined to each other
- Piece size (one eye, flattened): 5 in (12.7 cm) long × 2.25 in (5.7 cm) wide
- Size before border (10 linked eyes): 50 in (127.0 cm)
- Border depth (hanging tab drop): 3 in (7.6 cm)
Materials
Yarn: Choose a smooth bulky cotton or cotton blend with good stitch definition. Rope-style or chainette yarns show the braided texture best. Avoid fuzzy or very stretchy yarns, because the eyes will sag over a long drop.
- Color A, Sage Green: 350 g / 420 m (4 strands)
- Color B, Sand Beige: 350 g / 420 m (4 strands)
Each strand uses about 90 m: 61 m for the eyes, 2 m for the tab, 4.5 m for the waist cinches, and 22.5 m for the tassel. The quantities above include a margin of about 15% for gauge swatches and tassel trimming.
Tools:
- 6.0 mm (US J-10) crochet hook
- 8 wooden beads, 1 in (2.5 cm) diameter, for the tassel heads
- Stiff card, 10 in (25.4 cm) tall, for wrapping tassels
- Stitch markers (at least 4)
- Large-eye tapestry needle
- Sharp scissors
- Measuring tape
- Curtain rod or dowel
Abbreviations (US Terms)
- ch: chain
- sc: single crochet
- sl st: slip stitch
- BLO: back loop only
- st(s): stitch(es)
- rnd: round
- MR: magic ring (not used; listed for reference)
Special stitch: Joining slip stitch (join-sl st). Insert the hook into the BLO of the next sc on the current eye. Then insert it through both loops of the matching slip stitch on the previous eye. Yarn over and pull through everything on the hook. This links the two eyes without adding a stitch to the round count.
Gauge and Checkpoints
Gauge: 10 sc and 12 rows = 4 in (10.2 cm) in sc with a 6.0 mm hook. This works out to 2.5 sts per inch.
Make one complete eye before you start a full strand. Gauge controls the length of every strand, and any error is multiplied by 10 eyes and 8 strands.
Checkpoint 1, foundation ring: Before you join it, the 30-ch foundation should measure 12 in (30.5 cm) when laid straight without stretching.
Checkpoint 2, after Rnd 1: The band should be about 0.33 in (0.8 cm) tall. The ring lies flat without ruffling or cupping.
Checkpoint 3, after Rnd 2: The band is 0.5 in (1.3 cm) wide. Flatten the ring into an eye with tips at sts 1 and 16. It should measure 5 in (12.7 cm) long and 2.25 in (5.7 cm) wide.
If your eye is too big: Go down half a hook size and work a new test eye. Do not cut the ring down to fewer chains. The tip stitches depend on an even 30-st count.
If your eye is too small: Go up half a hook size. Your Rnd 2 slip stitches may also be too tight, so lift each loop slightly onto the hook shaft before you pull through.
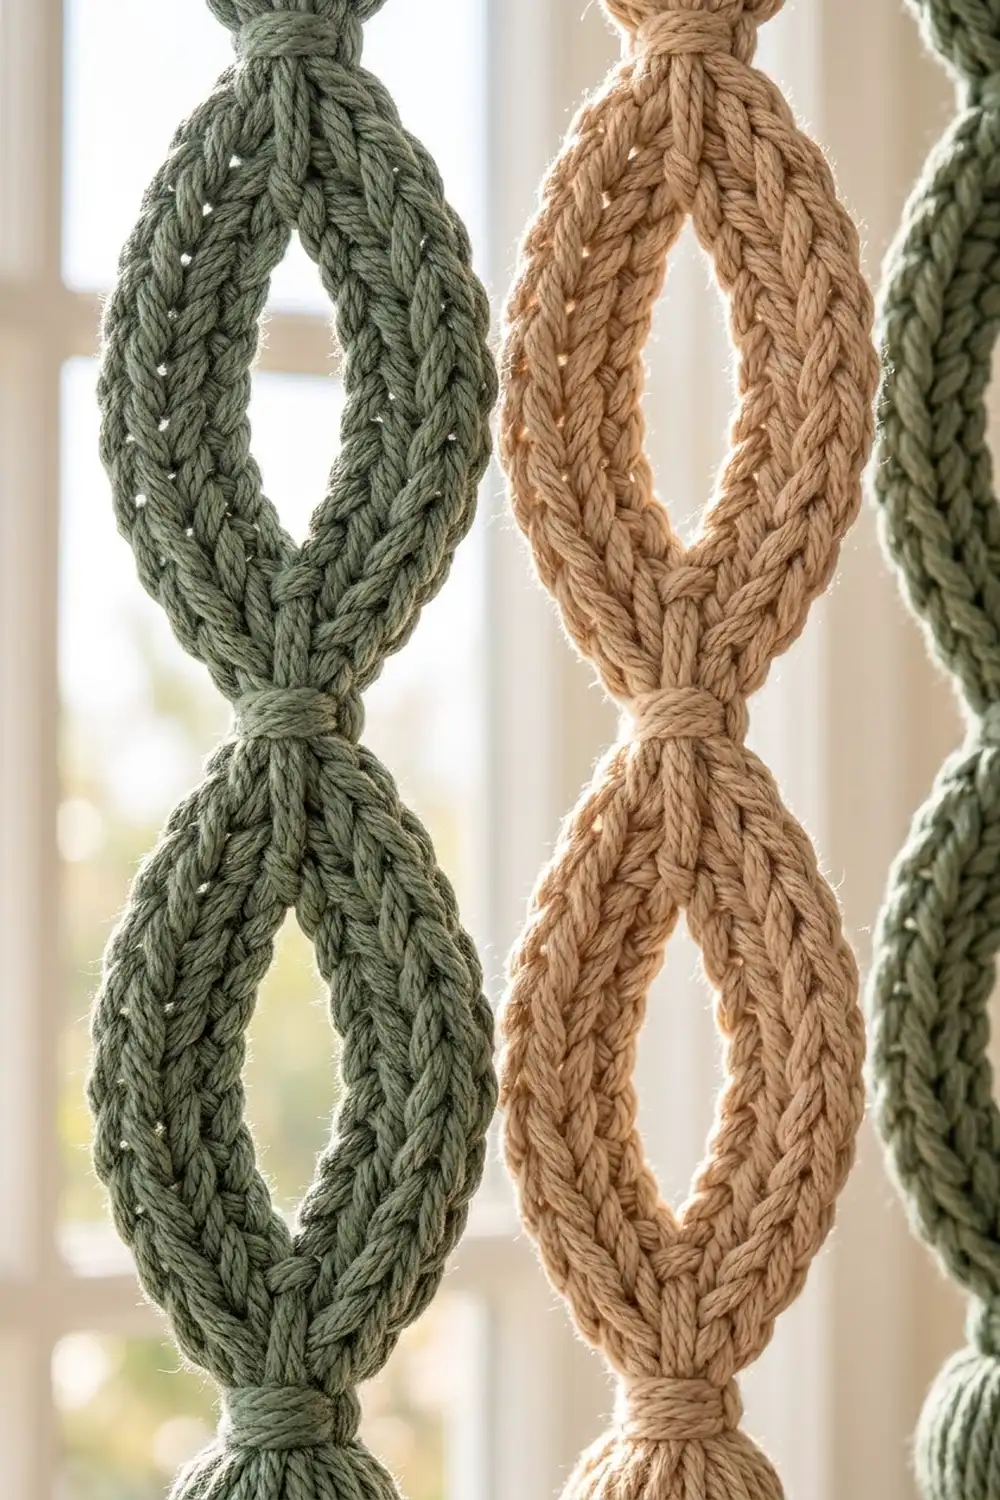
Eye Motif
Make 10 per strand.
Foundation: Ch 30. Sl st into the first ch to form a ring, taking care not to twist the chain. (30 ch)
Rnd 1: Ch 1. Working into the back bump of each ch, sc in each ch around. Sl st to the first sc to join. (30 sc)
Working into the back bump leaves a neat chain edge on the underside. It also keeps the ring from flaring.
Rnd 2 (Eye 1 only): Ch 1. Sl st in BLO of each sc around. Join with a sl st to the first sl st. (30 sl st)
These back-loop slip stitches form the raised braided line along the top of the band. Keep them even and slightly relaxed.
Mark the tips: Place a marker in sts 1 and 16 of Rnd 2. St 1 is the top tip. Sts 16–17 are the bottom tip. There are 14 sts between st 1 and st 16 on each side of the ring. (St 1 + 14 + st 16 + 14 = 30.)
Fasten off and leave a 12 in (30.5 cm) tail on Eye 1 for the first waist cinch.
Joining (Building the Strand)
Rnd 2 (Eyes 2–10, join-as-you-go): Work the foundation and Rnd 1 as usual. Hold the new eye directly below the previous eye, with the previous eye’s bottom tip (sts 16–17) facing the new eye.
- Sts 1–2: Ch 1. Work a join-sl st into the BLO of sc 1 of the new eye and through sl st 16 of the previous eye. Then work a join-sl st into the BLO of sc 2 and through sl st 17 of the previous eye.
- Sts 3–30: Sl st in BLO of each remaining sc around (28 sl st).
- Join with a sl st to the first st. (30 sl st: 2 join-sl st + 28 sl st)
Stitch-to-stitch logic: Each join-sl st counts as one of the new eye’s own 30 stitches. Nothing is added to either eye. The previous eye still has 30 stitches, and two of them now carry the join.
Waist cinch: Use the 12 in (30.5 cm) tail left on the upper eye. Wrap it 4 times snugly around the joined tips, just above and below the join. Then pull the needle up through the wraps and weave the tail into the band. The cinch is about 0.5 in (1.3 cm) wide. It gives the strand its pinched, twisted look.
Tension advice: Keep the join-sl sts the same tension as the rest of Rnd 2. If they are tight, the waist puckers and the eye tilts. If they are loose, the strand twists sideways when it hangs.
Size checkpoint: After 5 eyes, the strand should measure 25 in (63.5 cm) tip to tip when laid flat. After 10 eyes, it should measure 50 in (127.0 cm). One strand has 9 waist cinches.
Leave a 12 in (30.5 cm) tail on Eye 10 for attaching the tassel.
Make All Pieces
- Color A, Sage: 4 strands (40 eyes, 4 tabs, 4 tassels, 36 waist cinches)
- Color B, Sand: 4 strands (40 eyes, 4 tabs, 4 tassels, 36 waist cinches)
Layout grid, left to right on the rod (3 in / 7.6 cm on center):
| A | B | A | B | A | B | A | B |
  1   2   3   4   5   6   7   8
Each eye is 2.25 in (5.7 cm) wide, so there is a 0.75 in (1.9 cm) gap between neighboring strands. The total width is 8 × 3 in = 24 in (61.0 cm).
Border: Hanging Tab Edge
A strand curtain has no surrounding border. Its finishing edge is the hanging tab at the top of each strand. Work the tab on Eye 1.
Border gauge: The tab is worked a little denser than the main fabric, at 3 sc per inch. This keeps the loop firm on the rod.
Tab Rnd 1: With the right side facing, join the strand color with a sl st in st 1 (the top tip) of Eye 1’s Rnd 2. Ch 15. Sl st in st 2 of Eye 1 to form the loop. (15 ch)
Tab Rnd 2: Ch 1. Work 18 sc over the chain loop, enclosing the chain. Sl st into st 1 of Eye 1 to finish. (18 sc: 9 sc per side of the loop)
Side counts: The loop has two sides, the front leg and the back leg. Each side holds 9 sc. There are no corners, so no stitches are counted twice. 9 + 9 = 18.
Why the math works: 15 chains at 2.5 sts per inch make a loop with a 6 in (15.2 cm) circumference. Folded over the rod, it drops 3 in (7.6 cm). Packing 18 sc onto that 6 in loop gives 3 sts per inch. That is slightly denser than gauge, so the tab stiffens without shrinking.
This loop fits a rod up to about 1.5 in (3.8 cm) in diameter. For a thicker rod, add 3 ch to the loop and 4 sc to Rnd 2 (2 sc per side) for each extra 1 in (2.5 cm) of diameter.
Fasten off and weave in the ends.
Tassel
Make 1 per strand, in the strand’s color.
- Wrap the yarn 40 times around the 10 in (25.4 cm) card. Cut through all the wraps along one edge. This gives 40 strands, each 20 in (50.8 cm) long.
- Lay the strands flat in a bundle. Tie the bundle tightly at its center with Eye 10’s 12 in (30.5 cm) tail. Pass the tail through sts 16–17 at Eye 10’s bottom tip and knot it securely.
- Set the 1 in (2.5 cm) wooden bead on the center tie. Fold all the strands down over the bead and spread them evenly so no wood shows. This forms the rounded ball head, covered with 80 ends.
- Cut a separate 24 in (61.0 cm) piece of yarn. Wrap it 6 times tightly just below the bead to form the neck, about 0.5 in (1.3 cm) wide. Thread the tail under the wraps and down into the fringe.
- Trim the fringe so the tassel measures 9 in (22.9 cm) from the top of the head to the tips.
Strand total check: 3 in tab drop + 50 in eyes + 9 in tassel = 62 in (157.5 cm).
Final Blocking
- Lay each strand flat on a towel and shape every eye to 5 in × 2.25 in (12.7 cm × 5.7 cm).
- Hover a steam iron 1 in (2.5 cm) above the work. Do not press it down, or the braided line will flatten.
- Let the strand dry completely, which takes about 30 minutes.
- Steam the tassel. Comb the fringe straight with your fingers or a wide comb.
- Hang the strand on the rod for 24 hours. The tassel’s weight evens out the eyes.
- Re-trim the tassel tips after hanging, because cotton relaxes slightly.
Final Quality-Control Checklist
- Every eye has exactly 30 sc in Rnd 1 and 30 sl st in Rnd 2.
- Eyes 2–10 each include exactly 2 join-sl sts within their 30-st count.
- Each strand has 10 eyes, 9 waist cinches, 1 tab, and 1 tassel.
- Each tab has 15 ch and 18 sc (9 sc per side).
- Each tassel measures 9 in (22.9 cm) and the bead is fully covered.
- All strands measure 62 in (157.5 cm), with no more than 0.5 in (1.3 cm) difference between them.
- The colors alternate A, B, A, B across the rod.
- All ends are woven in at least 2 in (5.1 cm) along a band.
Troubleshooting
Eyes twist sideways when hanging: The join-sl sts are looser than the rest of Rnd 2. Redo the join with firmer tension, and make sure sts 1–2 sit exactly opposite sts 16–17.
The band cups or ruffles: For cupping, work Rnd 1 into the back bumps, not the top loops. For ruffling, the foundation chain is too loose, so chain with a smaller hook.
Strands end up different lengths: Measure after every 5 eyes. Fix the difference by blocking. If the gap is more than 1 in (2.5 cm), reshape the eyes on the longer strand narrower and longer to match.
The bead shows through the tassel head: Add 10 more wraps when you make the tassel. Or spread the strands more evenly before you wrap the neck.
The tab slips on the rod: Add 2 sc to Tab Rnd 2 (1 per side) to stiffen it. Or slide a small rubber ring onto the rod between strands.
Care
Spot clean or hand wash cold, then lay flat to dry and re-steam to shape. Do not wring the tassels. Comb them straight while damp.
Final Notes
Every measurement depends on the one before it. The gauge is 10 sc = 4 in (10.2 cm). That makes a 30-st ring with a 12 in (30.5 cm) circumference, which flattens into a 5 in × 2.25 in (12.7 cm × 5.7 cm) eye. Ten linked eyes make 50 in (127.0 cm). Adding the 3 in (7.6 cm) tab drop and the 9 in (22.9 cm) tassel gives a 62 in (157.5 cm) strand. Eight strands at 3 in (7.6 cm) on center make a 24 in (61.0 cm) curtain.
Check the first eye carefully and the rest of the project will follow. Happy crocheting!