

The Lavender Fanlight curtain panel is made of soft half-circle fans that hang like a row of lace shells down the window. Each fan has a lilac center of spoke-like stitches, a cream lace frame, and a picot edge. Light comes through the open chain lattice between the fans.
The palette has only two colors: a soft lilac and a warm cream. The style is romantic cottage lace, and it works in a bedroom, a sunroom, or any window where you want privacy without losing light.
This pattern uses US crochet terms. One finished panel measures 43 in (109.2 cm) wide and 79.5 in (201.9 cm) long, borders included. Make two panels for a pair of curtains.
Construction is simple and repeats throughout. You work each fan flat in turned rows from a magic ring. Fans in the same row join as you go on their last row. A cream chain lattice then links the rows. Finally, you add a narrow border down both sides and a solid hanging band across the top. The bottom edge keeps its natural fan scallops.
Finished Size and Construction
- Finished size: 43 in x 79.5 in (109.2 cm x 201.9 cm)
- Skill level: Intermediate
- Terminology: US terms
- Yarn weight: Sport (#2), mercerized cotton
- Hook: 3.5 mm (E-4)
- Number of pieces: 96 fan motifs
- Layout: 6 fans across x 16 fan rows
- Piece size: 7 in (17.8 cm) wide x 3.5 in (8.9 cm) tall
- Lattice gap between fan rows: 1.5 in (3.8 cm)
- Size before border: 42 in x 78.5 in (106.7 cm x 199.4 cm)
- Border depth: 0.5 in (1.3 cm) on each side, 1 in (2.5 cm) across the top
Materials
Use a smooth mercerized cotton in sport weight. Cotton keeps the stitches crisp, holds its shape in sunlight, and makes the picots stand out. Avoid fuzzy or very stretchy yarns, because the long lattice chains will sag.
- Lilac (Color A): 450 g, about 1,350 m (nine 50 g balls of 150 m each)
- Cream (Color B): 700 g, about 2,100 m (fourteen 50 g balls of 150 m each)
These quantities are for one panel and include a margin of about 10–15%. Each fan uses about 4 g of lilac and 6 g of cream, lattice included.
Tools:
– 3.5 mm (E-4) crochet hook
– Tapestry needle
– Stitch markers
– Rust-proof blocking pins and foam mats
– Spray bottle
– Measuring tape
Abbreviations (US Terms)
- ch – chain
- sl st – slip stitch
- sc – single crochet
- hdc – half double crochet
- dc – double crochet
- tr – treble crochet
- sk – skip
- sp – space
- RS – right side
Picot: ch 3, sl st in the first ch.
Join-picot: ch 1, sl st into the matching picot of the finished neighbor fan, ch 1, sl st in the first of those chains. This replaces a normal picot when you join as you go.
Gauge and Checkpoints
Gauge: 21 sc and 24 rows = 4 in (10.2 cm) in cream.
Make one complete fan before anything else, block it lightly, and measure it. The whole panel depends on this one piece.
Checkpoints, measured along the straight edge:
– After Row 2: 2 in (5.1 cm) wide
– After Row 4: 4 in (10.2 cm) wide
– After Row 5: 5 in (12.7 cm) wide
– After Row 6: 6 in (15.2 cm) wide
– After Row 7: 7 in (17.8 cm) wide, 3.5 in (8.9 cm) tall
– Row 8 header: 37 sc across 7 in (17.8 cm)
If your fan is larger than 7 in (17.8 cm), go down half a hook size. If it is smaller, go up half a size. If the lilac section ruffles, your tr stitches are too loose. If it cups, the dc in Row 4 are too tight.
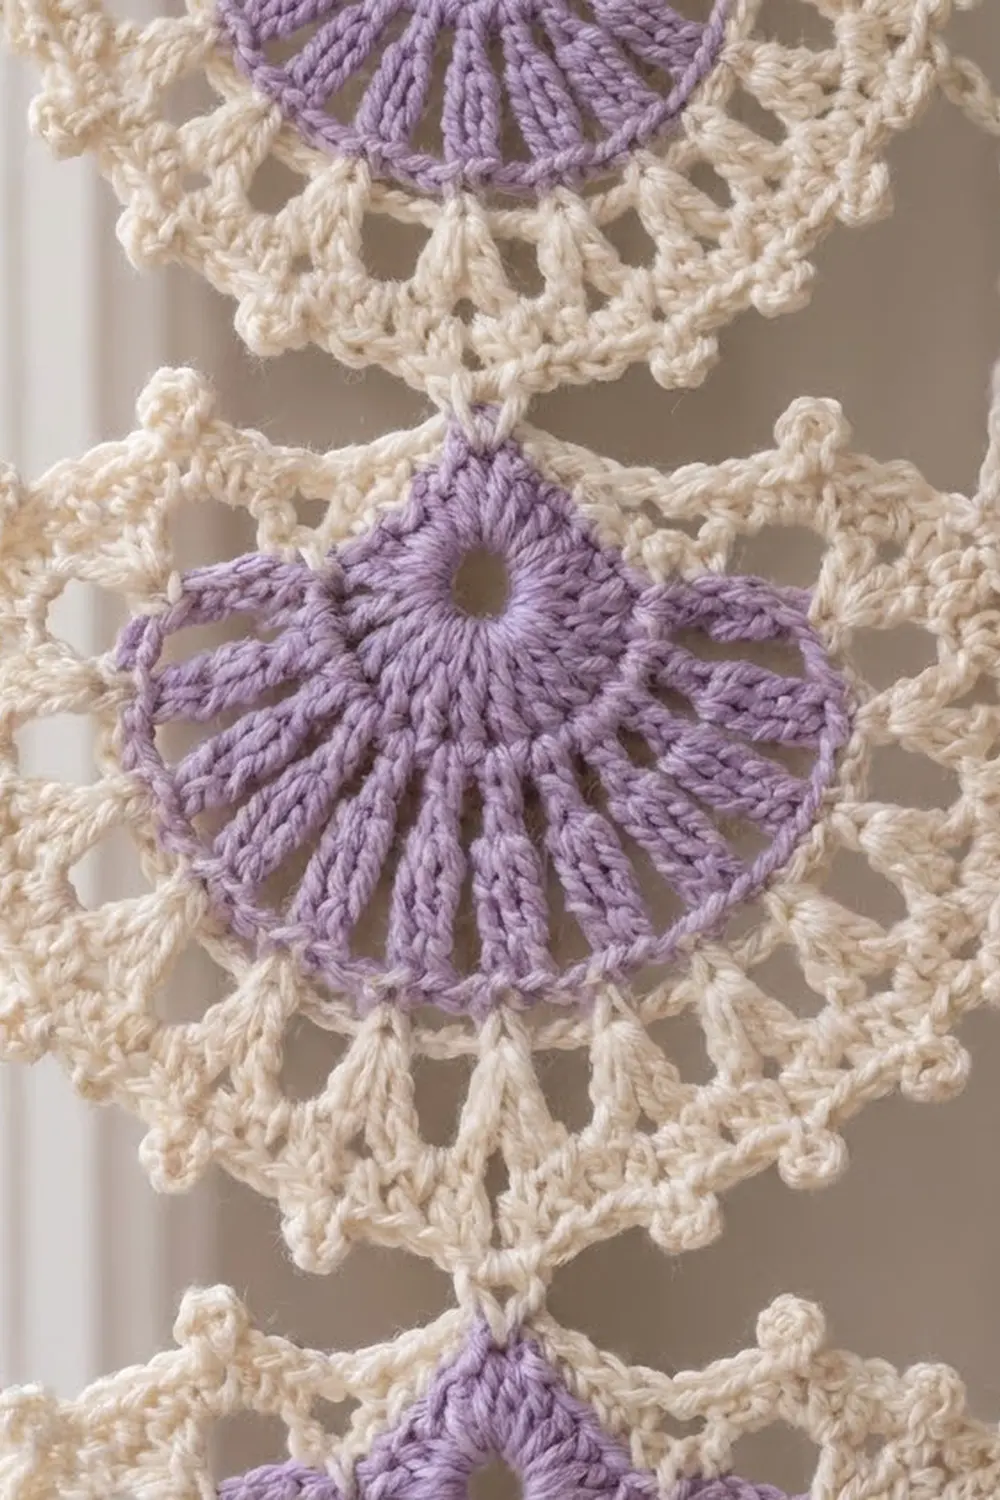
The Fan Motif
Work in turned rows. The straight edge is the top of the fan.
Row 1 (Lilac): Make a magic ring. Ch 3 (counts as a dc), then work 10 dc in the ring. Pull the ring snug but don’t join, so the stitches form a half circle. Turn. (11 dc)
Row 2: Ch 3 (counts as a dc), dc in the same stitch, then 2 dc in each remaining stitch across. Turn. (22 dc)
Row 3: Ch 4 (counts as a tr), tr in the next stitch, ch 2, tr in each of the next 2 stitches; repeat from * 9 more times. Turn. (22 tr in 11 pairs, 10 ch-2 sps)*
The 11 pairs of tr form the radiating spokes.
Row 4 (conversion row): Ch 3 (counts as a dc), dc in the next tr, 3 dc in the next ch-2 sp, dc in each of the next 2 tr; repeat from * across. Fasten off lilac. (22 dc worked into the tr + 30 dc worked into the spaces = 52 dc)*
Row 5 (Cream): With the RS facing, join cream in the first stitch. Ch 1, sc in the same stitch, ch 5, sk 2 stitches, sc in the next stitch; repeat from * 16 more times. Turn. (18 sc, 17 ch-5 arches)*
Check: 1 + (17 x 3) = 52 stitches used.
Row 6: Ch 1, sc in the first sc, 5 dc in the next ch-5 arch, sc in the next sc; repeat from * across. Turn. (18 sc + 85 dc = 103 stitches, 17 shells)*
Row 7 (picot edge): Ch 1, sc in the first sc, ch 4, sk 2 dc, (dc, picot, dc) in the center dc of the shell, ch 4, sk 2 dc, sc in the next sc; repeat from * across. Don’t fasten off. (18 sc, 34 ch-4 loops, 17 picot points)*
Always start Row 7 at the fan’s left corner, with the straight edge on top and the RS facing. That way picot 1 is always at the far left and picot 17 at the far right.
Row 8 (header): Rotate the fan to work across the straight edge. Work sc into the row ends as follows: 2 sc in the end of Row 7, 3 sc in Row 6, 2 sc in Row 5, 3 sc in Row 4, 4 sc in Row 3, 2 sc in Row 2, and 2 sc in Row 1 (18 sc). Work 1 sc into the center ring. Then repeat the row-end sequence in reverse to the other corner (18 sc). Fasten off. (37 sc)
The header must measure 7 in (17.8 cm) and lie straight without pulling.
Make All Pieces
Make 96 fans in total. Every fan uses lilac for Rows 1–4 and cream for Rows 5–8.
Join the fans in each row as you go on Row 7 (see Joining). Each finished row of fans is called a strip, and you need 16 strips of 6 fans.
Layout (F = one fan, straight edge up; ~ = lattice):
Strip 1:   F F F F F F   <- top border here
           ~ ~ ~ ~ ~ ~
Strip 2:   F F F F F F
           ~ ~ ~ ~ ~ ~
  ...      (repeat)
           ~ ~ ~ ~ ~ ~
Strip 16:  F F F F F F   <- free scallop hem
Joining
Joining fans in a row (join as you go): Make the first fan of the strip in full. For every fan after that, work Row 7 as normal until picots 1 and 2. Work those two as join-picots, joining them to picots 17 and 16 of the fan on the left. Finish the row as normal, then work Row 8.
The two fans now touch at their upper side curves, and their headers sit side by side with no gap. One strip measures 42 in (106.7 cm) wide. Check that after the second fan the pair measures 14 in (35.6 cm) across.
Lattice between strips: Lay Strip 1 above Strip 2, with both RS facing up. Join cream in sc 1 of the header on the leftmost fan of Strip 2. Then:
Ch 6, sl st in the next free bottom picot of the fan above (start with picot 5), ch 6, sk 3 header sc, sc in the next sc; repeat from * 8 more times.
This uses picots 5 through 13 of the upper fan and anchors at header sc 1, 5, 9 and so on up to 37 below. The math: (37 − 1) ÷ 4 = 9 repeats, matching the 9 bottom picots. Sc in sc 1 of the next fan’s header and repeat the same 9 repeats for that fan. Continue across all 6 fans and fasten off. (18 ch-6 segments per fan, 108 per lattice row)
Picots 3, 4, 14 and 15 stay free inside the diamond gaps as decoration.
Tension: Keep every ch-6 the same length. Loose chains make the panel grow longer over time. Check that the lattice gap measures 1.5 in (3.8 cm) when the fabric is relaxed.
Join all 16 strips this way, which gives 15 lattice rows.
Size checkpoint: Two strips joined measure 8.5 in (21.6 cm) tall. The full panel measures 42 in x 78.5 in (106.7 cm x 199.4 cm): 16 x 3.5 in = 56 in (142.2 cm) of fans, plus 15 x 1.5 in = 22.5 in (57.2 cm) of lattice.
Border
Border gauge: Same as the motif gauge, 21 sc = 4 in (10.2 cm).
Left side, Row 1 (cream): With the RS facing, join in header sc 1 of the top-left fan. Work this sequence for each fan down the left column:
Ch 5, sc in picot 1; ch 5, sc in picot 2; ch 5, sc in picot 3; ch 5, sc in picot 4. That makes 4 ch-5 loops.
To bridge the lattice gap, ch 7 and sc in header sc 1 of the fan below. Repeat for all 16 fans and finish at picot 4 of the bottom fan, with no bridge after it. Turn. (16 x 4 = 64 ch-5 loops + 15 ch-7 bridges = 79 loops)
Left side, Row 2: Ch 1, work 5 sc in each ch-5 loop and 7 sc in each ch-7 bridge. Fasten off. (64 x 5 + 15 x 7 = 320 + 105 = 425 sc)
Right side, Rows 1–2: With the RS facing, join in picot 14 of the bottom-right fan and work upward. For each fan: ch 5, sc in picot 15; ch 5, sc in picot 16; ch 5, sc in picot 17; ch 5, sc in header sc 37. Bridge each gap with ch 7, sc in picot 14 of the fan above. Row 2 is worked the same as on the left side. (79 loops, then 425 sc)
The side borders measure about 0.5 in (1.3 cm) wide. 425 sc over 78.5 in (199.4 cm) works out to about 5.4 sc per inch. That is slightly more than gauge, which lets the border follow the curve of the scallops without pulling them in.
Top band, Row 1: With the RS facing, join at the top-left corner. Work 3 sc across the end of the left side border, 1 sc in each of the 222 header sc (6 fans x 37), and 3 sc across the end of the right side border. Turn. (222 + 6 = 228 sc)
Top band, Rows 2–6: Ch 1, sc in each stitch across. Turn. (228 sc in each row)
Fasten off after Row 6. The band is 1 in (2.5 cm) deep.
Why the math works: 228 sc at gauge measures about 43 in (109.2 cm). That equals the 42 in (106.7 cm) of fans plus 0.5 in (1.3 cm) of side border at each edge. Because the band matches the width exactly, the top hangs straight with no ripple or pucker. Hang the panel with clip rings.
Final Blocking
- Weave in all ends along the stitches of the same color.
- Soak the panel in cool water for 10 minutes, then press the water out gently. Don’t wring it.
- Roll it in towels to remove more moisture.
- Lay it flat on blocking mats with the RS facing up.
- Pin the top band straight first, at 43 in (109.2 cm).
- Pin both side borders straight down to 79.5 in (201.9 cm).
- Pin each picot point of the bottom strip so the scallops are even.
- Open the lattice diamonds with your fingers. Every gap should measure 1.5 in (3.8 cm).
- Let it dry completely before unpinning.
Final Quality-Control Checklist
- Each fan has 11 spoke pairs and 17 picot points.
- Every header measures 7 in (17.8 cm) with 37 sc.
- Neighbor fans are joined at picots 1–2 and 16–17 only.
- Every lattice row has 108 even ch-6 segments.
- Both side borders have 425 sc.
- The top band has 228 sc in every row.
- The blocked panel measures 43 in x 79.5 in (109.2 cm x 201.9 cm).
- No ends show through the open lace.
Troubleshooting
- The fan won’t lie flat: Recount Row 4 (it should have 52 dc) and Row 6 (103 stitches).
- The lilac section ruffles: Your tr stitches are too tall. Pull the yarn snug before each yarn-over.
- The header pulls the fan in: Add 1 sc to the Row 3 row end on each side. Keep the total at 37 by working 1 sc less into Row 3 on the next fan.
- The lattice sags: Rework it with ch 5 instead of ch 6, and check against the 1.5 in (3.8 cm) gap.
- The top band flares: Your gauge is loose. Rework the band with a 3.25 mm hook.
- The fans tilt: Make sure every Row 7 starts at the left corner.
Care
Hand wash in cool water with a mild detergent and dry flat. Lightly re-block when needed so the lattice and scallops stay even.

Final Notes
The measurement chain is simple. One fan is 7 in (17.8 cm) wide, with a 37-sc header. Six fans make a 42 in (106.7 cm) strip. Sixteen strips with 1.5 in (3.8 cm) lattice gaps make a 78.5 in (199.4 cm) panel. A 0.5 in (1.3 cm) border on each side and a 1 in (2.5 cm) top band bring the finished panel to 43 in x 79.5 in (109.2 cm x 201.9 cm). Check each link in that chain and the panel will hang straight.
Happy crocheting!