

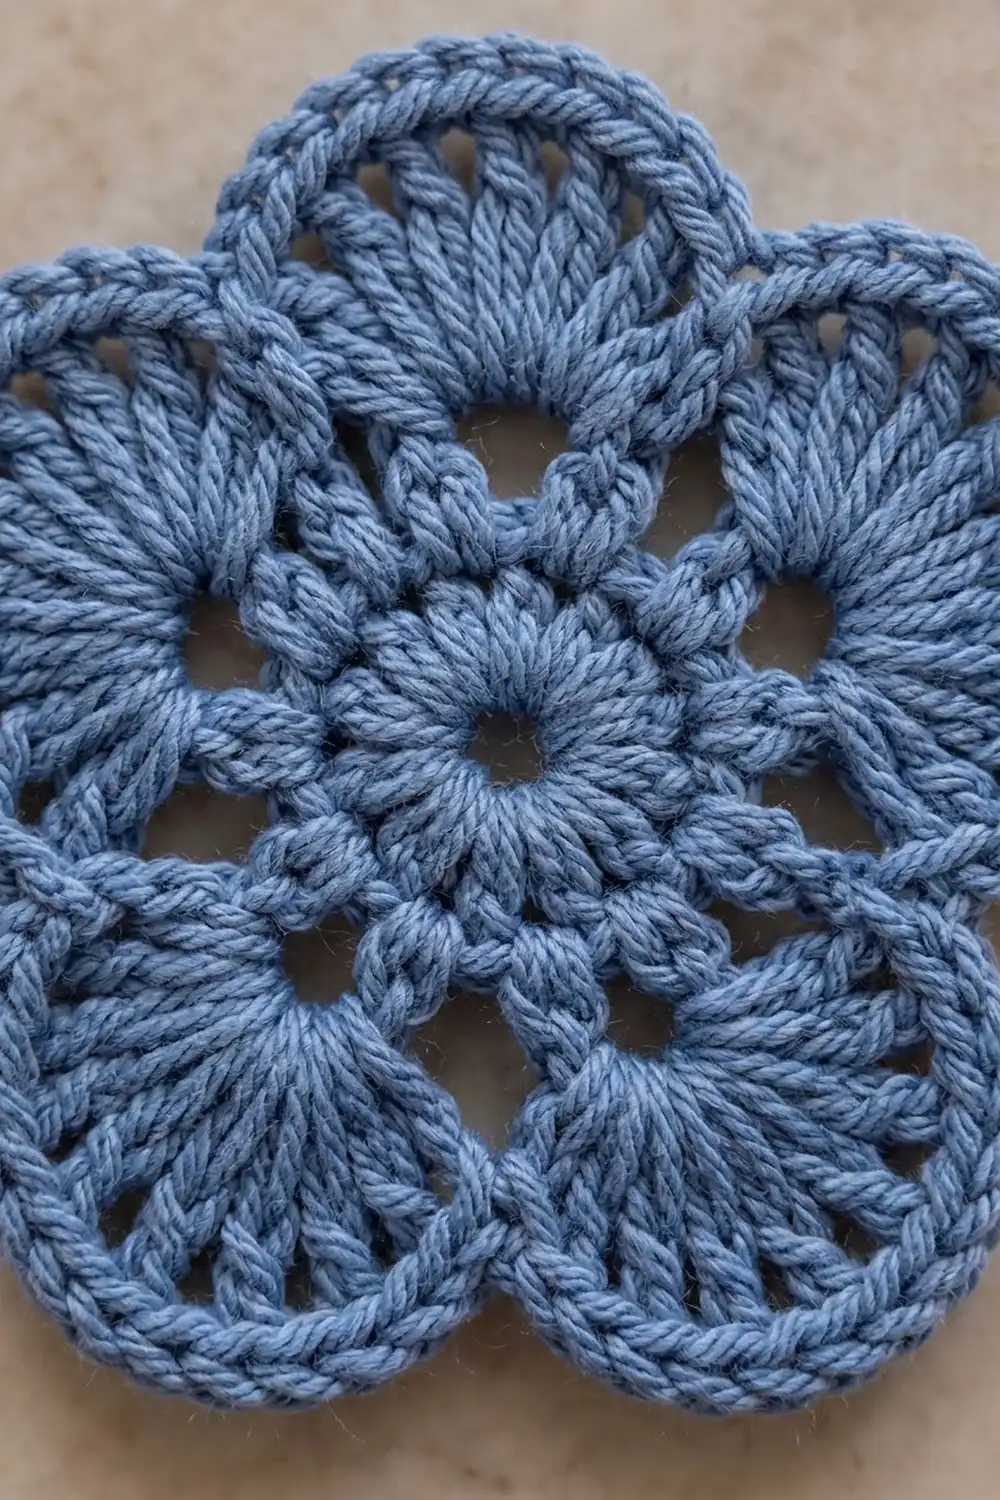
The Cornflower Wheel is a lacy, one-piece flower motif. A round center wheel of radiating double crochet spokes is surrounded by six rounded lobes. Each lobe has its own small eyelet and a fan of spokes, and the whole piece is finished with a thick, smooth single crochet rim that follows every scallop.
This sample is worked in one solid color, a soft cornflower/denim blue. A plain color lets the spokes, eyelets, and raised rings stand out. The look is vintage lace, but because it’s worked in worsted-weight cotton it has enough body to lie flat without heavy starching.
The pattern uses US crochet terms. The finished motif measures about 6.5 in (16.5 cm) across from the tip of one lobe to the tip of the opposite lobe.
The motif is worked in six continuous rounds and never turned. Rounds 1-2 make the center wheel. Round 3 throws six chain loops around it, Round 4 fills each loop with a fan to form the lobes, and Rounds 5-6 build the scalloped rim.
Finished Size and Construction
- Finished size: 6.5 in (16.5 cm) lobe tip to lobe tip
- Skill level: Easy to intermediate
- Terminology: US crochet terms
- Yarn weight: Worsted / aran (#4), cotton or cotton blend
- Hook: 5 mm (H-8)
- Number of pieces: 1 (single motif, no joining)
- Layout: Center wheel surrounded by 6 lobes in a ring
- Piece size: Each lobe is about 2.5 in (6.4 cm) wide after the rim
- Size before border (after Round 4): 5.5 in (14.0 cm)
- Border depth: 2 rounds, about 0.5 in (1.3 cm) all around
Materials
Yarn: Use a smooth, tightly plied worsted-weight cotton or cotton blend. Mercerized or combed cotton shows the spokes most clearly. Fuzzy or loosely spun yarns will blur the eyelets.
- Cornflower Blue (main color): 20 g, about 36 m (39 yd)
That quantity includes roughly a 20% margin for your gauge swatch, the yarn tail, and any frogging.
Tools:
- 5 mm (H-8) crochet hook
- Tapestry needle
- Scissors
- Stitch marker (1 or 2)
- Rust-proof blocking pins
- Blocking mat or folded towel
- Spray bottle with clean water
- Ruler or tape measure
Abbreviations (US Terms)
- ch – chain
- sl st – slip stitch
- sc – single crochet
- dc – double crochet
- sp – space
- st(s) – stitch(es)
- rep – repeat
- [ ] x times – work the bracketed steps the stated number of times
Special stitch – notch slip stitch: At the point where two lobes meet, work a sl st into the ch-1 space (Round 5) or into the sl st below (Round 6). This keeps the deep V between lobes crisp. A notch slip stitch is never counted as a stitch.
Beginning ch 3: In Round 1, ch 3 counts as the first dc. Everywhere else the starting ch 1 does not count as a stitch.
Gauge and Checkpoints
Base gauge: 16 sc = 4 in (10.2 cm) in a flat swatch with a 5 mm hook. Matching this exactly matters less than hitting the motif checkpoints below.
Test one piece first. Make one full motif before buying extra yarn or planning a project around it. Measure at every checkpoint, laid flat and unstretched:
- After Round 1: center wheel 1.5 in (3.8 cm) across
- After Round 2: 2 in (5.1 cm) across
- After Round 3: 2.75 in (7.0 cm) across, measured loop to loop
- After Round 4: 5.5 in (14.0 cm) lobe tip to lobe tip
- After Round 6: 6.5 in (16.5 cm) lobe tip to lobe tip
A difference of 0.25 in (0.6 cm) at any checkpoint is fine and will block out.
If your motif is too big: go down to a 4.5 mm hook, or tighten the ch-5 loops in Round 3. Oversized loops are the most common cause of floppy lobes.
If your motif is too small: go up to a 5.5 mm hook. If only the rim is tight, use the larger hook for Rounds 5-6 only.
If the center cups or ruffles: fix it before going on. A center that isn’t flat after Round 2 won’t flatten later.
Pattern
Round 1 – Center Wheel Spokes
Make a magic ring.
Ch 3 (counts as first dc), work 17 dc into the ring. Pull the ring closed, leaving a small eyelet about 0.25 in (0.6 cm) across in the middle. Join with a sl st to the top of the beginning ch 3.
Stitch count: 18 dc.
These 18 dc are the radiating spokes of the center wheel. Spacing should be even all around, with no gap at the join.
Round 2 – Center Ring
Ch 1 (does not count). *Sc in each of next 2 dc, 2 sc in next dc; rep from * 5 more times. Join with a sl st to the first sc.
Stitch count: 24 sc (18 sc worked one per dc, plus 6 extra).
This round makes the raised, ropey ring that frames the center wheel. Place a marker in the first sc so you can find your start in Round 3.
Round 3 – Lobe Loops
Ch 1 (does not count). Sc in the same st as the join. *Ch 5, skip next 3 sc, sc in next sc; rep from * 4 more times. Ch 5, skip last 3 sc, and join with a sl st to the first sc.
Stitch count: 6 sc and 6 ch-5 loops.
Check the math: each repeat uses 1 sc plus 3 skipped sts, so 6 x 4 = 24, which uses all of Round 2. Each ch-5 loop arches over 3 skipped stitches. The small opening left under the loop becomes the eyelet in the center of that lobe.
Round 4 – Lobe Fans
Sl st into the first ch-5 loop. Ch 1 (does not count).
*Work (sc, 13 dc, sc) into the ch-5 loop, ch 1, skip next sc; rep from * 5 more times. Join with a sl st to the first sc.
Stitch count: 90 sts (15 per lobe: 2 sc and 13 dc) plus 6 ch-1 sps.
The 13 dc fan out around each loop like the spokes of a small wheel. Keep them packed tight against each other. The ch-1 between lobes sits over the Round 3 sc and anchors the base of each lobe. Lay the motif flat and check for the 5.5 in (14.0 cm) checkpoint before starting the rim.
Border (Scalloped Rim)
The rim gives the motif its smooth, rounded outline and the thick edge you can see around each lobe. It is worked in sc with a notch slip stitch between lobes.
Border gauge: Along the curved edge, the rim should work out to about 4 sc per inch (2.5 cm). That matches the base gauge and keeps the scallops flat instead of ruffled or cupped.
Round 5 – First Rim Round
Ch 1 (does not count).
*Skip the sc at the start of the lobe. Sc in next dc, [2 sc in next dc, sc in next dc] 6 times. Skip the sc at the end of the lobe, and work a notch sl st into the next ch-1 sp; rep from * 5 more times. The last notch sl st lands in the ch-1 sp where you started, so no separate join is needed.
Per lobe: 19 sc (13 sc worked one per dc, plus 6 extra) and 1 notch sl st.
Round total: 114 sc and 6 notch sl sts.
Check the math: 1 + (6 x 2) = 13 dc used per lobe, so every dc of the fan is covered once.
Round 6 – Second Rim Round
Ch 1 (does not count).
*Sc in next 2 sc, [2 sc in next sc, sc in next 2 sc] 5 times, sc in next 2 sc. Work a notch sl st into the notch sl st of Round 5; rep from * 5 more times. The last notch sl st lands where the round began.
Per lobe: 24 sc (19 sc worked one per stitch, plus 5 extra) and 1 notch sl st.
Round total: 144 sc and 6 notch sl sts.
Check the math: 2 + (5 x 3) + 2 = 19 sts used per lobe, so all 19 sc from Round 5 are covered once.
Fasten off, leaving a 6 in (15.2 cm) tail. Weave in all ends along the back of the rim, following the stitch direction.
Why the Border Math Works
After Round 4, each lobe is roughly three-quarters of a circle. Each sc round adds about 0.25 in (0.6 cm) of radius. Three-quarters of 2π x 0.25 in is about 1.2 in (3.0 cm) of extra outer edge per lobe. At 4 sc per inch, that’s about 5 extra stitches per lobe.
Round 6 adds exactly 5 extra stitches per lobe (19 to 24), so it lies flat. Round 5 adds 6 because it sits right on top of the dc fan, and the dc tops are spread farther apart than sc stitches. The notch slip stitches add no width. They just pull the edge into the V between lobes so each scallop stays rounded and separate.
Final Blocking
- Weave in ends first. Blocking sets the yarn, and tails woven in afterward tend to pucker.
- Dampen the motif. Mist it with water until it is evenly damp, or soak it in cool water for 5 minutes and roll it in a towel to press out excess water. It should be damp, not dripping.
- Pin the center. Lay it face up on the mat. Pin the center eyelet so it is round, about 0.25 in (0.6 cm) across.
- Pin the lobe tips. Measure 6.5 in (16.5 cm) between opposite lobe tips and pin all 6 tips evenly spaced around the center, about 60 degrees apart.
- Pin the notches. Pin each notch sl st inward toward the center so the V between lobes is clear and even.
- Shape the lobes. Use your fingertips to round each scallop. Open each lobe eyelet and straighten the dc spokes so they all point outward from it.
- Dry completely. Leave it pinned until fully dry, at least 6 to 12 hours depending on humidity.
- Measure again. Unpin and measure. The motif should hold 6.5 in (16.5 cm) without relaxing more than 0.25 in (0.6 cm).
Final Quality-Control Checklist
- Round 1 has 18 dc and the center eyelet is closed to about 0.25 in (0.6 cm).
- Round 2 has 24 sc and the center ring lies flat.
- Round 3 has 6 sc and 6 ch-5 loops evenly spaced around the center.
- Round 4 has 13 dc in every lobe fan, with no lobe missing a stitch.
- Round 5 has 19 sc per lobe, 114 total.
- Round 6 has 24 sc per lobe, 144 total.
- All 6 notches form a clean V, with no gaps or loose loops.
- The motif measures 6.5 in (16.5 cm) lobe tip to lobe tip after blocking.
- Each lobe is about 2.5 in (6.4 cm) wide and all six lobes match in size.
- Ends are woven in securely and invisible from the front.
Troubleshooting
The center domes up. Your Round 1 dc are too tight, or the magic ring is pulled shut before all 17 dc fit. Redo Round 1 with slightly taller, looser dc.
The center ruffles. You probably have more than 18 dc in Round 1 or more than 24 sc in Round 2. Count again.
The lobes are different sizes. Check that every ch-5 loop in Round 3 has exactly 5 chains and skips exactly 3 sc. One short loop gives one small lobe.
The lobe eyelets are closed up. The ch-5 loops are too tight. Go up 0.5 mm for Round 3 only.
The rim ruffles. Check that you made exactly 6 increases per lobe in Round 5 and 5 in Round 6. If counts are right, use a hook 0.5 mm smaller for Rounds 5-6.
The rim cups or pulls the lobes inward. Use a hook 0.5 mm larger for Rounds 5-6, and check you didn’t skip any increases.
The notches look blunt. Make sure each notch sl st goes into the ch-1 sp (Round 5) or the sl st below (Round 6), not into the neighboring sc.
The motif is too big or too small overall. Go back to the checkpoints. The first round that is off is the one to fix.
Care
Hand wash in cool water with a mild detergent, press out water in a towel, and dry flat, reshaping to 6.5 in (16.5 cm). Cotton can be pressed with a warm iron through a cloth if the lobes need sharpening.

Final Notes
The Cornflower Wheel builds up through a simple measurement chain. An 18-dc center wheel of 1.5 in (3.8 cm) grows to a 24-sc ring of 2 in (5.1 cm). Six ch-5 loops bring it to 2.75 in (7.0 cm). The 13-dc lobe fans open it to 5.5 in (14.0 cm). Finally, two rim rounds of 19 and then 24 sc per lobe finish the motif at 6.5 in (16.5 cm).
If each checkpoint matches, the finished piece will too. Measure at each stage, keep your ch-5 loops even, and give the motif a careful pinned block.
Happy crocheting!