

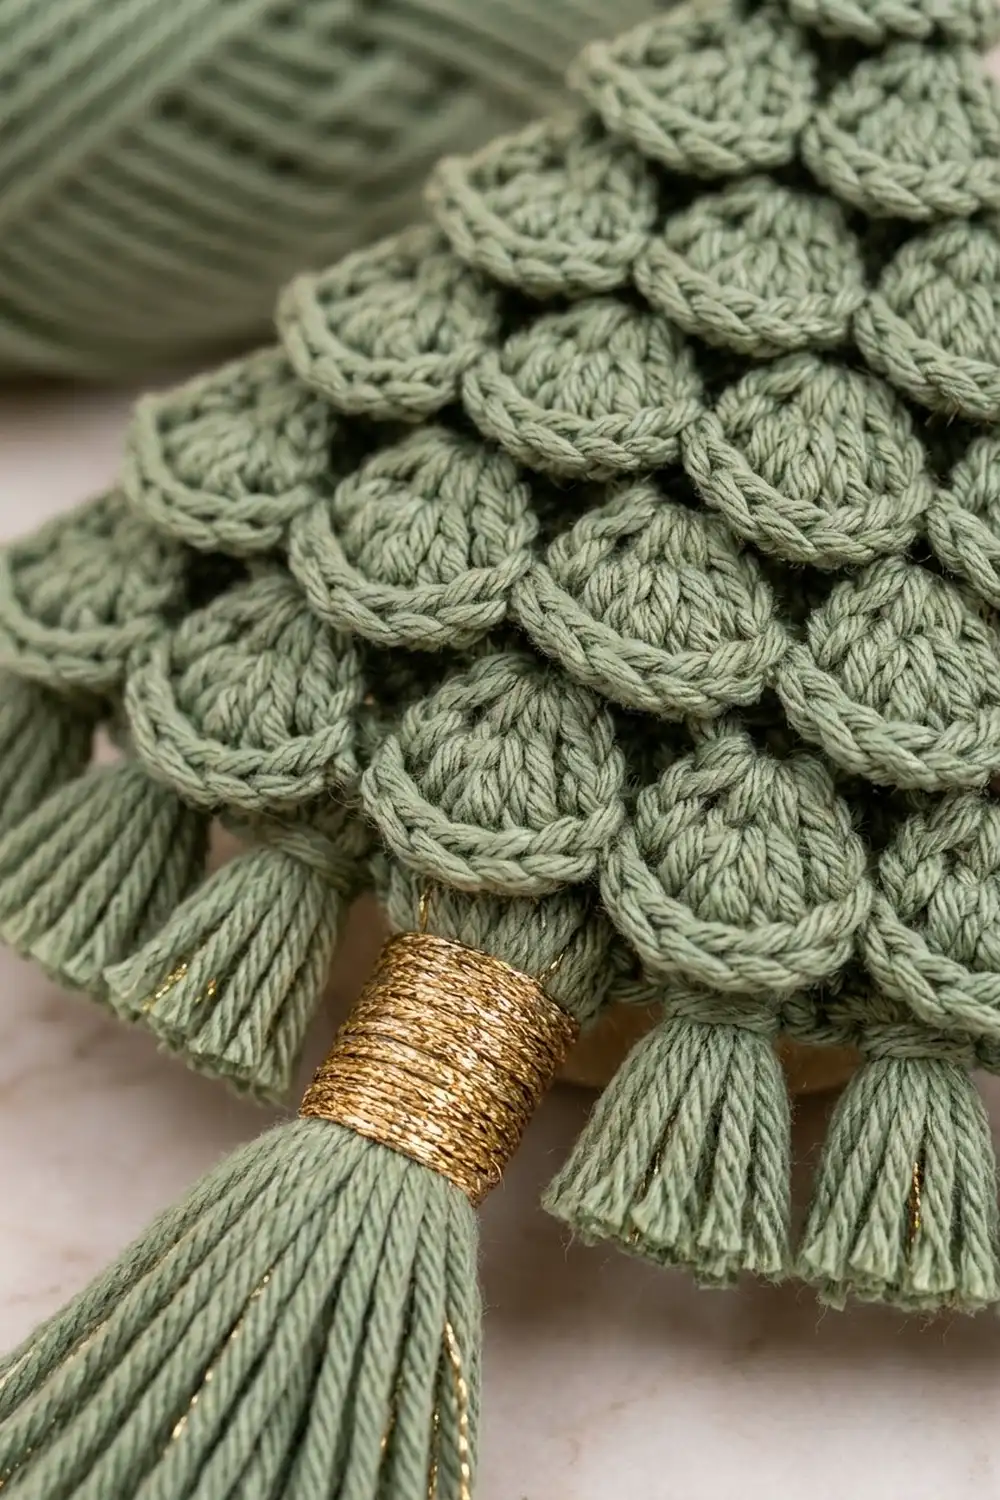
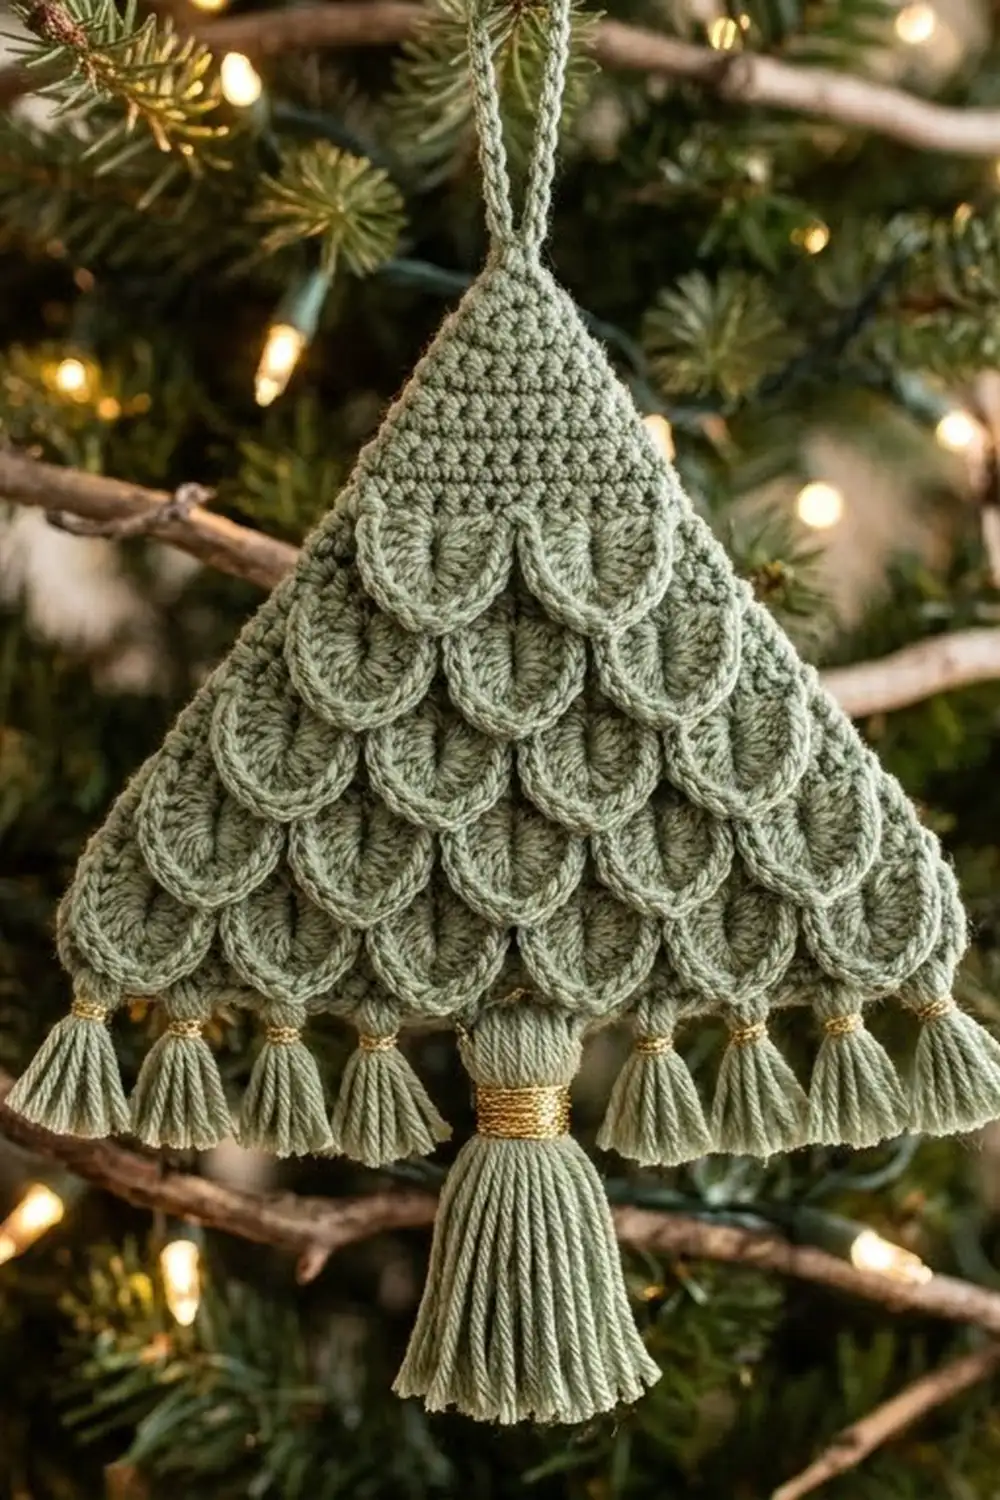
This little tree ornament is covered in soft, rounded scales that overlap like shingles on a roof. The upper scales tuck over the lower ones, so the tree looks full and layered even though it is one flat piece.
The ornament is made in a single sage green yarn. A short fringe of mini tassels runs along the bottom, and a longer center tassel makes the trunk. A few turns of gold metallic thread around the trunk tassel’s neck add a bit of shine. It looks great on a real tree, tied to a gift, or hung in a window.
This pattern uses US crochet terms. The tree body measures 4.75 in (12.1 cm) wide by 5 in (12.7 cm) tall. With the hanging loop and trunk tassel, the ornament is about 9.5 in (24.1 cm) long.
You work the piece flat from the bottom up. A single crochet base row comes first. After that you alternate “post rows” and “scale rows” (the crocodile stitch). Each tier has one fewer scale than the tier below it, which shapes the triangle without any separate decreasing. A small solid tip and a hanging loop finish the top. Last of all, you add the tassels.
Finished Size and Construction
- Finished size (body): 4.75 in (12.1 cm) wide × 5 in (12.7 cm) tall
- Total length with loop and trunk: 9.5 in (24.1 cm)
- Skill level: Intermediate
- Terminology: US
- Yarn weight: DK (weight 3)
- Hook: 4.0 mm (G-6)
- Number of pieces: 1 crocheted piece plus 7 tassels
- Layout: 5 scale tiers of 6, 5, 4, 3, and 2 scales (bottom to top), then a solid tip
- Piece size: base row 4.5 in (11.4 cm) wide
- Size before border: 4.75 in (12.1 cm) × 5 in (12.7 cm)
- Border depth: mini tassel fringe 1.25 in (3.2 cm); trunk tassel 3 in (7.6 cm)
Materials
Yarn: Use a smooth DK cotton or cotton blend with good stitch definition. Crocodile stitch eats yarn, and tightly twisted cotton keeps the scale edges crisp. Avoid fuzzy yarns, because they hide the scale outlines.
- Sage green: 25 g / 55 m (about 60 yd). That covers the body, the loop, and all 7 tassels.
- Gold metallic thread or embroidery floss: 1 m (about 1 yd), for wrapping the trunk tassel
Tools:
– 4.0 mm (G-6) crochet hook
– Yarn needle
– Scissors
– Stiff cardboard cut to 3 in (7.6 cm) and 6.5 in (16.5 cm) wide, for wrapping tassels
– Pins and a blocking mat
– Spray bottle
The yarn amounts include a margin of about 20 percent for swatching and tassel trimming.
Abbreviations (US Terms)
- ch – chain
- sl st – slip stitch
- sc – single crochet
- dc – double crochet
- sc2tog – single crochet 2 together
- sp – space
- st(s) – stitch(es)
Special stitch: Crocodile scale. A scale is worked around a pair of dc posts, not into the tops of stitches. Hold the piece so the pair lies horizontally. Work 4 dc around the first post, working from its top down toward its base. Ch 1 (this is the tip of the scale). Then work 4 dc around the second post, working from its base up toward its top. Each scale has 9 sts (4 dc, ch 1, 4 dc) and curves down over the row below.
Gauge and Checkpoints
Gauge: 22 sc = 4.5 in (11.4 cm) and 5 rows of sc = 1 in (2.5 cm). One finished tier adds about 0.8 in (2.0 cm) of height.
Because the ornament is a single piece, the first rows act as your gauge swatch. Work Rows 1–3, then stop and measure:
- After Row 1: base row measures 4.5 in (11.4 cm).
- After Row 3: bottom tier measures 4.75 in (12.1 cm) across the scales.
- After Row 7: body is about 2.4 in (6.1 cm) tall.
- After Row 11: body is about 4 in (10.2 cm) tall.
- After Row 16: body is 5 in (12.7 cm) tall.
If your base row is too wide, go down to a 3.5 mm hook. If it is too narrow, go up to a 4.5 mm hook. If the scales cup or ruffle, your dc are too loose, so tighten your tension on the scale rows only.
Tree Body
Foundation: Ch 23.
Row 1 (base row): Sc in the 2nd ch from the hook and in each ch across. (22 sc)
Row 2 (post row, Tier 1): Ch 3 (counts as the first dc), turn. Dc in the next st. Ch 2, skip 2 sts, dc in each of the next 2 sts. Repeat from * to * 4 more times. (6 post pairs = 12 posts, 5 ch-2 sps)
The post pairs sit on base stitches 1–2, 5–6, 9–10, 13–14, 17–18, and 21–22, so the row uses all 22 sts.
Row 3 (scale row, Tier 1): Turn. Make 1 crocodile scale around the next post pair, then sl st in the next ch-2 sp. Repeat from * to * 4 more times. Make 1 crocodile scale around the last pair, then sl st in the top of the beginning ch-3. (6 scales = 54 sts, plus 6 sl sts)
The scales should hang down over the base row.
Row 4 (post row, Tier 2): Turn. Fold the first scale forward so you can work behind it. Sl st in the top of each of the 2 posts of the first pair, then sl st in the next ch-2 sp of Row 2. Ch 3 (counts as dc) and dc in the same sp. Ch 2, 2 dc in the next ch-2 sp of Row 2. Repeat from * to * 3 more times. Leave the last post pair unworked. (5 post pairs = 10 posts, 4 ch-2 sps)
Each new pair sits in a gap between two scales below. That brick offset is what makes the shingle look.
Row 5 (scale row, Tier 2): Turn. Make 1 crocodile scale around the next pair, then sl st in the next ch-2 sp. Repeat from * to * 3 more times. Make 1 scale around the last pair, then sl st in the top of the ch-3. (5 scales = 45 sts, plus 5 sl sts)
Row 6 (post row, Tier 3): Work as for Row 4, but repeat from * to * 2 more times instead of 3. (4 pairs = 8 posts, 3 ch-2 sps)
Row 7 (scale row, Tier 3): Work as for Row 5, but make 4 scales in total. (4 scales = 36 sts, plus 4 sl sts)
Checkpoint: The body is about 2.4 in (6.1 cm) tall.
Row 8 (post row, Tier 4): Work as for Row 4, but repeat from * to * 1 more time. (3 pairs = 6 posts, 2 ch-2 sps)
Row 9 (scale row, Tier 4): Make 3 scales. (3 scales = 27 sts, plus 3 sl sts)
Row 10 (post row, Tier 5): Work as for Row 4, but make only the first pair and then 1 repeat. (2 pairs = 4 posts, 1 ch-2 sp)
Row 11 (scale row, Tier 5): Make 2 scales. (2 scales = 18 sts, plus 2 sl sts)
Checkpoint: The body is about 4 in (10.2 cm) tall.
Width check: Each post row is 4 stitch-widths narrower than the one before it: 22, 18, 14, 10, 6. That means the tree loses 2 stitch-widths on each side per tier, which gives you the even triangle.
Tip and Hanging Loop
Row 12: Ch 1, turn. Working behind the Row 11 scales into the tops of the Row 10 posts: sc in each of the first 2 posts, 2 sc in the ch-2 sp, sc in each of the last 2 posts. (6 sc)
The tip is 1.25 in (3.2 cm) wide.
Row 13: Ch 1, turn. Sc2tog, sc in the next 2 sts, sc2tog. (4 sc)
Row 14: Ch 1, turn. Sc in each st across. (4 sc)
Row 15: Ch 1, turn. Sc2tog twice. (2 sc)
Row 16: Ch 1, turn. Sc2tog. (1 sc)
Hanging loop: Ch 18, then sl st into the same st to close the loop. Fasten off and leave an 8 in (20.3 cm) tail. Weave the tail back down through the chain once to make the loop firmer. The loop hangs 1.5 in (3.8 cm) above the point.
Weave in the starting tail along the base row.
Border: Bottom Fringe and Trunk
On this ornament, the “border” is the tassel fringe sewn along the base row. The base row sits hidden under the Tier 1 scales, so the tassel tops tuck neatly out of sight.
Border gauge: One mini tassel every 4 base stitches, about 0.8 in (2.0 cm) apart.
Mini tassels (make 6): Wrap the yarn 12 times around the 3 in (7.6 cm) card. Slide a 12 in (30.5 cm) strand under the wraps at one edge and tie it tightly. This tie becomes the top of the tassel. Cut the wraps at the opposite edge. Wrap a separate 6 in (15.2 cm) strand around the neck, 0.25 in (0.6 cm) below the top, 3 times, and knot it. Trim the ends to a finished length of 1.25 in (3.2 cm).
Trunk tassel (make 1): Wrap the yarn 30 times around the 6.5 in (16.5 cm) card. Tie the top with a 12 in (30.5 cm) strand and cut the bottom. Wrap the gold thread tightly around the neck, starting 0.25 in (0.6 cm) below the top, to make a band 0.5 in (1.3 cm) deep (about 12 turns). Hide the gold ends under the band with your needle. Trim to 3 in (7.6 cm).
Placement: Number the 22 base stitches from right to left.
- Right group: sew mini tassels to sts 1, 5, and 9.
- Center: sew the trunk tassel between sts 11 and 12.
- Left group: sew mini tassels to sts 14, 18, and 22.
Why the math works: The 22 stitches have their center line between sts 11 and 12. The pairs 1/22, 5/18, and 9/14 are mirror pairs around that line, so the fringe is perfectly symmetrical. The trunk tassel sits exactly on the center line. Using the tie tails, sew each tassel on through the back of the base row and knot it on the wrong side.
Final Blocking
- Spritz the ornament lightly with water until it is damp but not wet.
- Lay it right side up on a blocking mat.
- Pin the base row straight to 4.5 in (11.4 cm).
- Shape the body into a triangle 5 in (12.7 cm) tall, with the point centered above the trunk.
- Gently smooth each scale downward so it curves over the tier below. Do not flatten the scales completely.
- Comb the tassel strands straight with your fingers, then lay them flat.
- Let it dry fully, then trim any uneven tassel ends.
Final Quality-Control Checklist
- Base row is 4.5 in (11.4 cm) wide.
- Tiers read 6, 5, 4, 3, 2 scales from bottom to top.
- Every scale has 4 dc on each side of a ch-1 tip.
- Each scale is centered over a gap in the tier below.
- Tip is centered, with no gaps behind the top scales.
- Body is 5 in (12.7 cm) tall.
- Six mini tassels are evenly spaced, three on each side of the trunk.
- The gold band is tight, 0.5 in (1.3 cm) deep, with no loose ends showing.
- The hanging loop is secure and 1.5 in (3.8 cm) tall.
- All ends are woven in on the wrong side.
Troubleshooting
- Scales flip upward: You worked the scale on the wrong side. Turn the piece so the posts lie horizontally before you start each scale.
- Tree leans to one side: You skipped or added a post pair. Count the pairs: 6, 5, 4, 3, 2.
- Gaps behind scales: Your post rows are too loose. Pull the ch-2 spaces snugly.
- Scales are too crowded: Use 3 dc per side instead of 4, and keep that change in every scale.
- Tassels look skimpy: Add 2–4 more wraps to each mini tassel.
- Gold thread slips: Put a dot of fabric glue under the band before wrapping.
Care
Hand wash in cool water and lay flat to dry, reshaping the scales while damp. Store the ornament flat or hanging, not crushed in a box.
Final Notes
The measurement chain is simple: 22 base stitches give you 4.5 in (11.4 cm). Six scales flare to 4.75 in (12.1 cm). Five tiers of 0.8 in (2.0 cm) each plus a 1 in (2.5 cm) tip give a 5 in (12.7 cm) body. Add the 1.5 in (3.8 cm) loop and the 3 in (7.6 cm) trunk tassel, and the ornament reaches 9.5 in (24.1 cm). Check each of those numbers as you go and your tree will come out even and full.
Happy crocheting!