

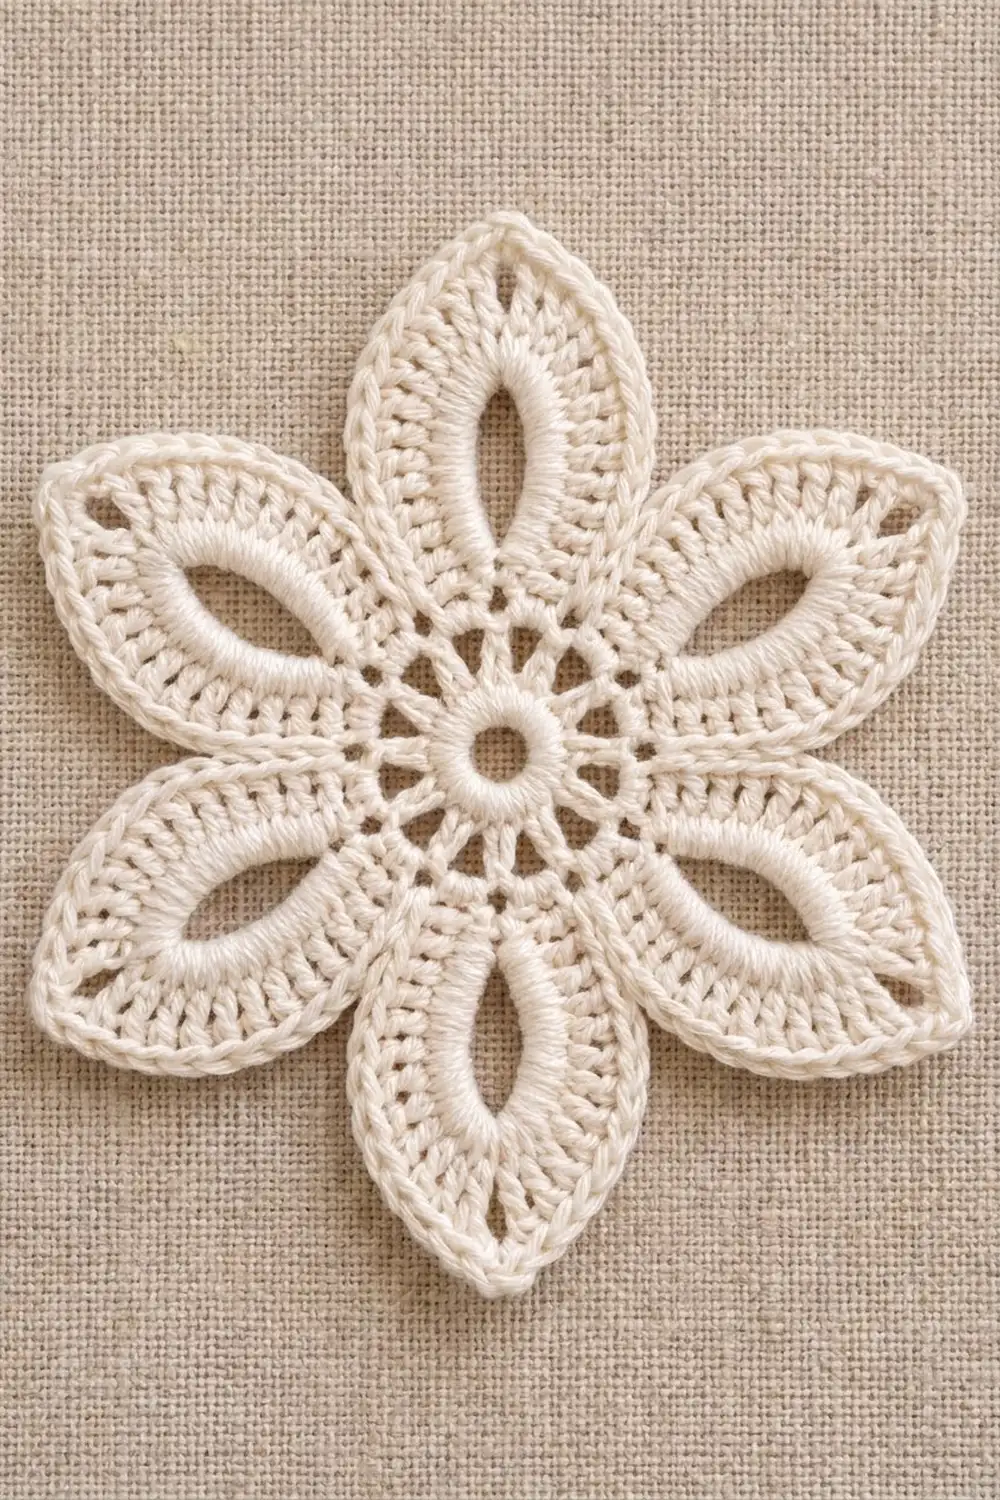
This six-petal lace flower is crocheted in one piece from the center out. Each pointed petal has an open almond-shaped eyelet framed by a thick wall of double crochet, and a crisp single crochet edge outlines the whole flower. A small open hole sits at the center, and a ring of airy spokes connects it to the petals.
The sample is a soft ivory cream in mercerized cotton, which keeps the stitches crisp and the eyelets open after blocking. The style is classic vintage lace: light, elegant, and quick enough to make many times over. One motif works as a coaster, a gift-tag ornament, a table accent, or an appliqué.
The pattern uses US crochet terms. After blocking, the finished motif measures 5.5 in (14.0 cm) from one petal tip to the opposite tip.
Here’s how it’s built. You start with a chain ring and a solid round of double crochet, then work a round of spokes. Next you make six long chain loops and fill each one with graduated stitches to form a petal. A single crochet border round finishes the motif by sharpening the tips and pulling in the notches between the petals.
Finished Size and Construction
- Finished size: 5.5 in (14.0 cm) tip to tip, about 3.5 in (8.9 cm) across the inner notches
- Skill level: Intermediate
- Terminology: US crochet terms
- Yarn weight: Fingering (super fine) mercerized cotton
- Hook: 2.5 mm
- Number of pieces: 1
- Layout: single six-petal motif, worked in the round
- Piece size: 5.5 in (14.0 cm)
- Size before border: 5.25 in (13.3 cm) after Round 4
- Border depth: 0.125 in (0.3 cm) at each petal tip
Materials
Choose a smooth, mercerized cotton in fingering weight. Mercerized cotton gives clear stitch definition, holds a pinned shape well, and keeps the eyelets open. Fuzzy or very soft yarns blur the lace, so avoid them. A slightly firm, tightly plied cotton gives the most defined petals.
- Ivory/cream: 10 g, about 37 m
Tools:
- 2.5 mm crochet hook
- Tapestry needle
- Scissors
- Blocking mat or folded towel
- Rust-proof pins (at least 13)
- Spray bottle with water
- Ruler or tape measure
The yarn quantity includes a margin of about 40 percent to cover your gauge test, the tails, and any ripping back.
Abbreviations (US Terms)
- ch: chain
- sl st: slip stitch
- sc: single crochet
- hdc: half double crochet
- dc: double crochet
- sp: space
- sk: skip
- rep: repeat
- st(s): stitch(es)
- sc4tog: single crochet 4 together
Special stitch, sc4tog: [Insert hook in next st, yarn over, pull up a loop] 4 times (5 loops on hook), yarn over, pull through all 5 loops. This makes 1 stitch and decreases 3.
Working into a loop: When the pattern says to work into a ch-14 loop, put the hook into the open space of the loop, not into the individual chains. The stitches wrap around the chain and hide it.
Gauge and Checkpoints
Your first motif is your gauge test. Work through Round 2 and measure before you go any further. Gauge matters most in the center because every petal is anchored there.
Checkpoints (unblocked, lying flat):
- After Round 1: 1 in (2.5 cm) across
- After Round 2: 1.75 in (4.4 cm) across
- One ch-14 loop from Round 3, laid flat: 1.25 in (3.2 cm) from base to fold
- After Round 4: 5.25 in (13.3 cm) tip to tip
- After Round 5: 5.5 in (14.0 cm) tip to tip
If your motif is too big: Switch to a 2.25 mm hook, or tighten your chains. Loose chains in Round 3 are the most common cause of oversized petals.
If your motif is too small: Switch to a 2.75 mm hook. If only the petals are short, make your Round 3 chains slightly looser and keep your dc stitches tall.
A difference of 0.25 in (0.6 cm) at Round 2 grows to about 0.75 in (1.9 cm) at the finished tips, so fix it early.
Pattern
Before You Begin
- Leave a 6 in (15.2 cm) starting tail. You can work over it in Round 1 to secure it.
- The beginning chains count as stitches where noted.
- Count your stitches at the end of every round. The final border depends on each petal side having exactly 12 stitches.
- Work with the right side facing you throughout. Don’t turn.
Round 1: Center Ring
Ch 6 and join with a sl st to the first ch to form a ring.
Ch 3 (counts as dc), then work 17 dc into the ring. Join with a sl st to the top of the beginning ch-3.
Count: 18 dc.
The ring stays open and forms the small hole at the center of the flower. Spread the stitches evenly around the ring before joining.
Round 2: Spokes
Ch 5 (counts as dc + ch 2), dc in next dc, ch 2. *Dc in next dc, ch 2; rep from * 15 more times. Join with a sl st to the 3rd ch of the beginning ch-5.
Count: 18 dc and 18 ch-2 sps.
These spaced dc are the spokes between the center and the petals. Check that the piece measures 1.75 in (4.4 cm) across and lies flat. If it cups, your chains are too tight. If it waves, they are too loose.
Round 3: Petal Loops
Sl st in the first ch-2 sp. Ch 1, (sc, ch 14, sc) in the same sp, [ch 2, sc in next ch-2 sp] twice, ch 2.
*(Sc, ch 14, sc) in next ch-2 sp, [ch 2, sc in next ch-2 sp] twice, ch 2; rep from * 4 more times. Join with a sl st to the first sc.
Count: 6 ch-14 loops, 18 ch-2 sps, 24 sc.
Each repeat uses three ch-2 sps from Round 2. One holds the petal loop and the other two each hold a plain sc, which gives six evenly spaced loops. Keep the loops untwisted. Lay the piece flat and confirm that each loop measures about 1.25 in (3.2 cm) from base to fold.
Round 4: Petals
Ch 1. *Sk next sc (the first sc of the loop group). Work into the ch-14 loop: 2 sc, 2 hdc, 7 dc, (dc, ch 3, dc), 7 dc, 2 hdc, 2 sc. Sk next sc (the second sc of the loop group). [2 sc in next ch-2 sp, sk next sc] twice, 2 sc in next ch-2 sp. Rep from * 5 more times. Join with a sl st to the first sc.
Per petal: 24 sts + 1 ch-3 tip sp. Between petals: 6 sc.
Count: 180 sts and 6 ch-3 sps.
The petal stitches crowd onto the loop and push it outward. The middle of the loop stays open and becomes the almond eyelet. The graduated stitches (sc, hdc, dc) make each petal narrow at the base, wide in the middle, and pointed at the ch-3 tip.
As you go, gently slide the stitches along each loop so they sit evenly on both sides. If one side holds more of the stitches, the eyelet ends up off-center. Check that the motif now measures 5.25 in (13.3 cm) tip to tip.
Border
The border is a single round of sc. It defines the outline, sharpens each tip, and creates the V-shaped notch between petals.
Border gauge: about 7 sc per 1 in (2.5 cm) along the petal edge. At that rate, each 12-sc petal side covers about 1.7 in (4.3 cm) of curved edge.
Round 5: Edging
Ch 1, sc in same st as join, sc in next 11 sts (12 sc along the first side of the petal). (Sc, ch 2, sc) in ch-3 tip sp. Sc in next 12 sts (second side of the petal). Sc in next sc, sc4tog over next 4 sc, sc in next sc.
*Sc in next 12 sts, (sc, ch 2, sc) in ch-3 tip sp, sc in next 12 sts, sc in next sc, sc4tog over next 4 sc, sc in next sc; rep from * 4 more times. Join with a sl st to the first sc. Fasten off.
Per petal side: 13 sc (12 sts worked 1-per-st + 1 tip sc).
Per petal: 24 sts worked 1-per-st + 2 extra tip sc = 26 sc, plus 1 ch-2 tip sp.
Between petals: 6 sts become 3 sts (sc, sc4tog, sc).
Count: (144 petal sts worked 1-per-st + 12 extra tip sc) + 18 notch sts = 174 sts and 6 ch-2 sps.
Why the Math Works
Each petal side in Round 4 has 12 sts: 2 sc, 2 hdc, 7 dc, and the first dc of the tip group. Working 1 sc into each one keeps the side the same length, so the edge lies flat without ruffling.
At the tip, the 2 extra sc and the ch-2 add just enough length to turn a sharp point. Without them, the tip would curl under.
Between petals, the 6 base sc drop to 3. That pulls the notch inward and makes a clean V. The border adds about 0.125 in (0.3 cm) at each tip, so 5.25 in + 2 × 0.125 in = 5.5 in (14.0 cm).
Final Blocking
- Weave in both tails along the back of solid stitches, not through the open eyelets.
- Soak the motif in cool water for 10 minutes. Roll it in a towel and press out the water. Don’t wring it.
- Lay the motif face up on a blocking mat.
- Pin the center hole open to about 0.5 in (1.3 cm) across.
- Pin each petal tip through its ch-2 sp, spacing the tips evenly so opposite tips are 5.5 in (14.0 cm) apart.
- Pin each notch so the motif measures about 3.5 in (8.9 cm) across opposite notches.
- Open each almond eyelet by placing a pin at its widest point.
- Mist lightly and let the motif dry completely, for at least 6 hours.
- Unpin and check the measurements again.
For a firmer finish, mist with light spray starch before it dries.
Final Quality-Control Checklist
- The center hole is open and round
- Round 2 has 18 evenly spaced spokes
- All six petals are the same length and evenly spaced
- Each petal has one open, centered almond eyelet
- Each petal side has 13 sc in Round 5
- Each tip has a ch-2 point
- Each notch has a clear V shape
- Round 5 totals 174 sts and 6 ch-2 sps
- The motif measures 5.5 in (14.0 cm) tip to tip
- Tails are woven in and can’t be seen from the front
Troubleshooting
Petals are different lengths. Your ch-14 loops vary in tension. Remake Round 3 and count each chain carefully.
Eyelets close up. The loop is too short for the stitches packed into it. Make looser chains, or chain 15 instead of 14 and keep the stitch counts the same.
Eyelets sit off-center. Too many stitches bunched on one side of the loop. Slide them evenly before you work the tip group.
Petals ruffle. Your dc stitches are too loose or your hook is too big. Go down one hook size for Round 4.
The center cups upward. Round 1 is too tight. Work the 17 dc a little more loosely, or start with a ch-7 ring.
Notches look rounded instead of V-shaped. Make sure each sc4tog covers exactly 4 base sc, and pull it snug.
Tips are blunt. Check that you worked (sc, ch 2, sc) in every ch-3 sp, and pin the tips sharply when blocking.
The Round 5 count is off. Count each petal side before you reach the tip. There should be 12 sts before the tip sc.
Care
Hand wash in cool water with mild soap and lay flat to dry. If the motif loses its shape, re-pin the tips and the eyelets.

Final Notes
Every measurement builds on the one before it. Round 1 sets a 1 in (2.5 cm) center, and Round 2 grows it to 1.75 in (4.4 cm) with 18 spokes. Round 3 adds six loops of 1.25 in (3.2 cm). Round 4 fills them into petals for 5.25 in (13.3 cm) tip to tip. Round 5 adds 0.125 in (0.3 cm) at each tip, for a finished 5.5 in (14.0 cm) flower.
If each checkpoint matches, the finished motif will match too. Make one, block it carefully, and enjoy the crisp lace petals.
Happy crocheting!