

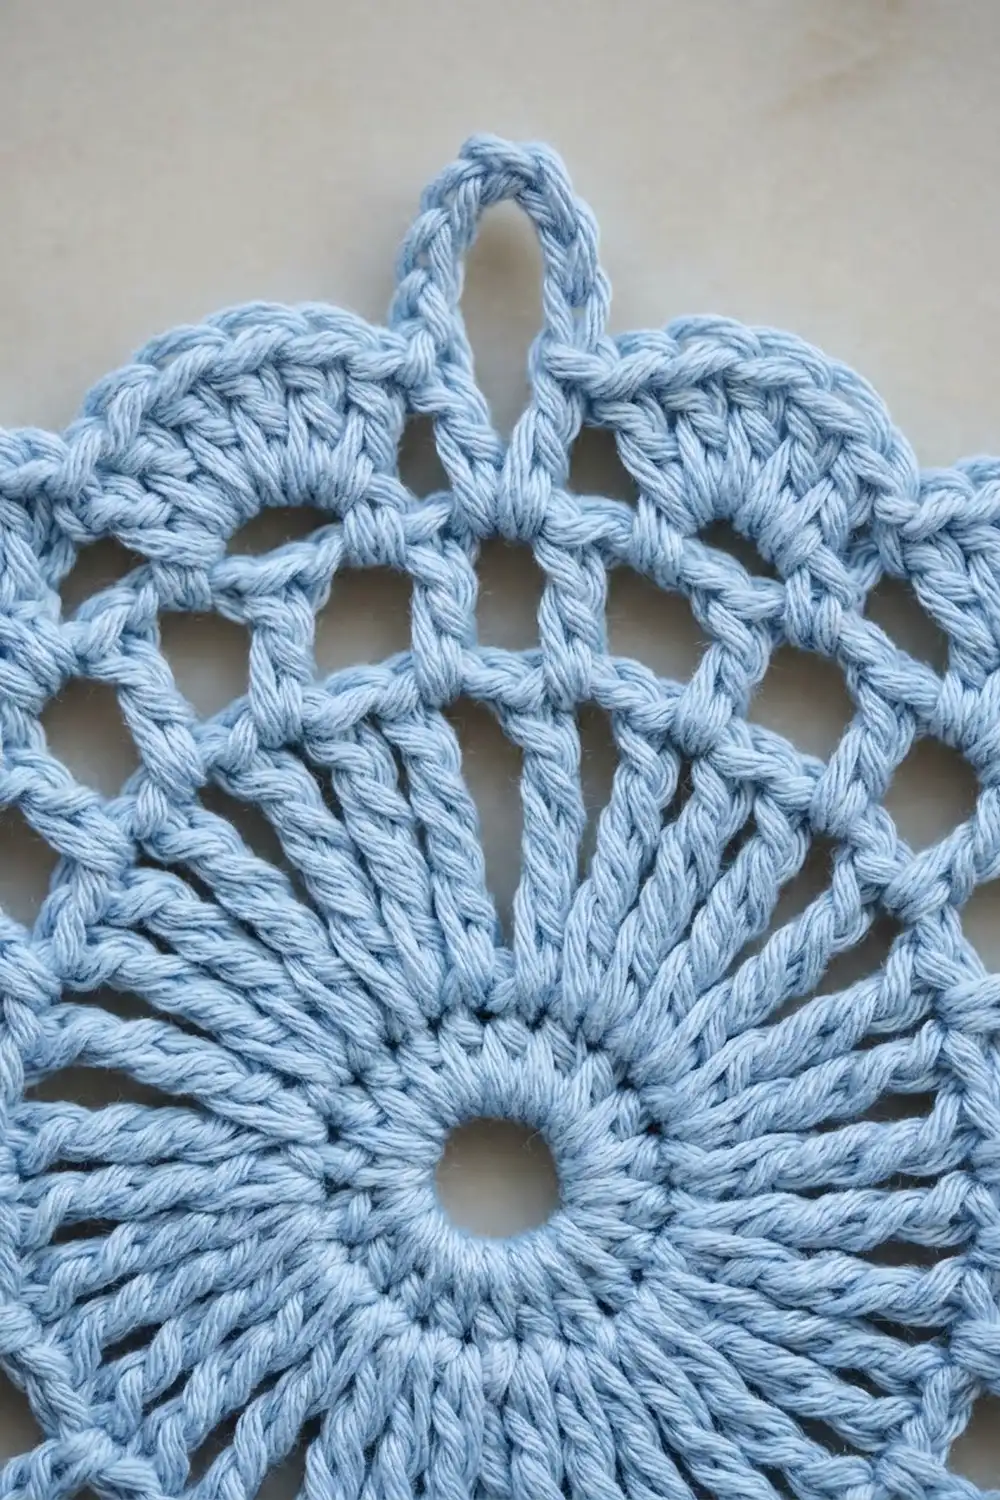
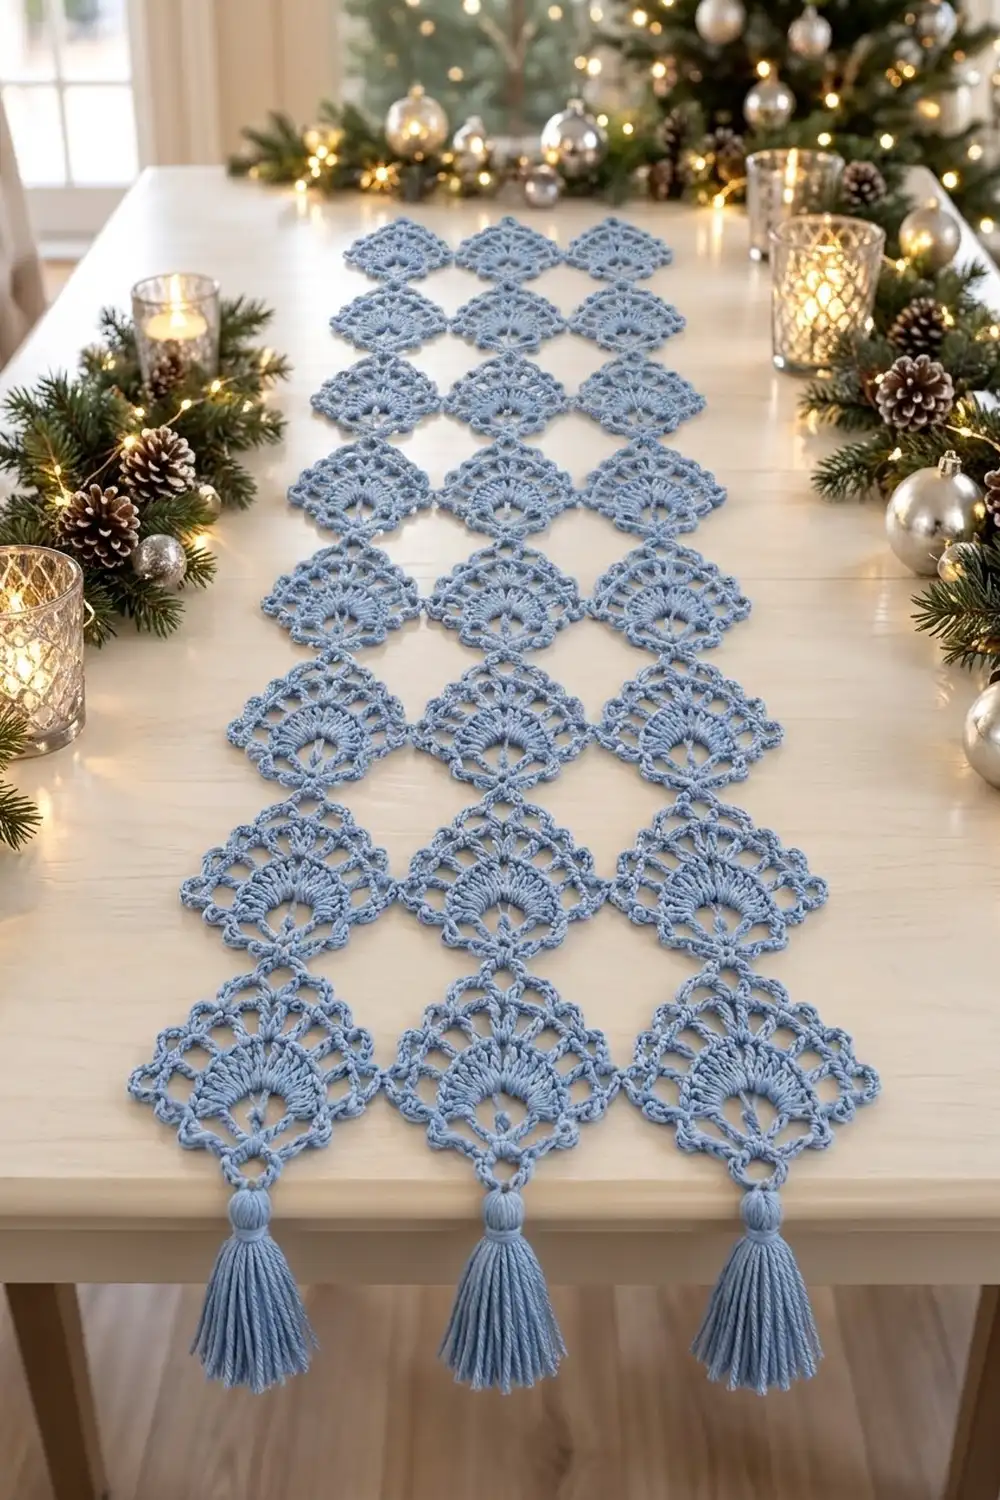
The Frosted Fan Table Runner is a lacy runner made of small fan motifs stacked in tidy columns. Each fan starts from a tiny open ring, opens into solid double crochet spokes, and ends in a scalloped arch edge with a pointed loop at the top. When the motifs are stacked, the open spaces between them form a lattice of diamonds that lets the tabletop show through.
The sample uses one soft powder-blue cotton, which looks cool and wintry against pine greenery and silver ornaments. In white, ivory or pale gray it would work in any season. Three wrapped tassels hang from the bottom row of motifs.
This pattern uses US crochet terms. The finished runner measures 15.5 in (39.4 cm) wide by 28.5 in (72.4 cm) long including the border. With the tassels, the overall length is 32 in (81.3 cm).
Construction is simple to follow. You make 24 identical fan motifs, each worked in five turned rows from a chain ring. You join them as you go in the last row, three across and eight tiers long. One edging round of single crochet goes around the whole outline, and then you add the tassels.
Finished Size and Construction
- Finished runner: 15.5 in x 28.5 in (39.4 cm x 72.4 cm), plus 3.5 in (8.9 cm) tassels
- Skill level: Intermediate
- Terminology: US crochet terms
- Yarn weight: DK (#3) cotton
- Hook: 4.0 mm (G-6)
- Number of pieces: 24 motifs plus 3 tassels
- Layout: 3 columns x 8 tiers
- Single motif size: 5 in (12.7 cm) wide x 3.5 in (8.9 cm) tall, blocked
- Size before border: 15 in x 28 in (38.1 cm x 71.1 cm)
- Border depth: about 0.25 in (0.6 cm) on every side
Materials
Choose a smooth mercerized or combed cotton in DK weight. Cotton shows the open fan structure clearly, holds a crisp shape after blocking, and stands up to washing on a dining table. Avoid fuzzy or brushed yarns, because they blur the spokes and arches.
Yarn:
– Light Blue: 100 g, about 230 m (252 yd)
– Motifs: about 65 g / 150 m
– Border: about 10 g / 20 m
– Tassels: about 12 g / 25 m
– The rest is margin.
The quantities include a margin of about 15–20% for gauge differences, swatching and weaving in tails.
Tools:
– 4.0 mm (G-6) crochet hook
– Tapestry needle
– Scissors
– A piece of stiff card 4 in (10.2 cm) tall, for the tassels
– Rustproof pins and a blocking mat
– Spray bottle
– Measuring tape
Abbreviations (US Terms)
- ch – chain
- sl st – slip stitch
- sc – single crochet
- dc – double crochet
- sp – space
- st(s) – stitch(es)
- tch – turning chain
- rep – repeat
- RS / WS – right side / wrong side
Special terms:
– Arch: a loop made of 5 ch, anchored by an sc at each end.
– Apex loop: a loop of 9 ch at the top center of Row 5. It forms the pointed tip of the fan.
– Joining ch-5 arch: ch 2, sl st in the 3rd ch of the matching arch on the neighboring motif, ch 2. It replaces a regular ch-5 arch.
– Picot: ch 3, sl st in the last sc made.
Gauge and Checkpoints
Make one complete motif before starting the runner, then block it. This motif is your gauge swatch, and you can use it as the first motif of the runner.
Measure flat after each row:
– After Row 1: 1.25 in (3.2 cm) wide x 0.75 in (1.9 cm) tall
– After Row 2: 2 in (5.1 cm) wide x 1 in (2.5 cm) tall
– After Row 3: 3 in (7.6 cm) wide x 1.5 in (3.8 cm) tall
– After Row 4: 4 in (10.2 cm) wide x 2 in (5.1 cm) tall
– After Row 5, blocked: 5 in (12.7 cm) wide x 3.5 in (8.9 cm) tall from base to apex tip
Base gauge: 16 sc = 4 in (10.2 cm).
If your Row 3 is wider than 3.25 in (8.3 cm), change to a 3.75 mm hook. If it is narrower than 2.75 in (7.0 cm), change to a 4.5 mm hook. A difference of 0.25 in (0.6 cm) per motif adds up to 0.75 in (1.9 cm) across the width and 2 in (5.1 cm) along the length, so check before you go on.
Fan Motif
Orientation: The ring sits at the bottom center and the apex loop points up. Row 5 is worked with the RS facing, so arches 1–5 are on the right half of the motif and arches 7–11 are on the left half. The apex loop is position 6.
Ring: Ch 6, then sl st in the first ch to form a ring.
Row 1 (RS): Ch 3 (counts as dc), then work 10 dc in the ring. Turn.
11 dc. Crowd the stitches onto one half of the ring so the lower half stays open and bare. That bare half is the base ring you will see on the finished motif.
Row 2 (WS): Ch 5 (counts as dc + ch 2). Work [dc in next dc, ch 2] 9 times, then dc in the top of the tch. Turn.
11 dc, 10 ch-2 sps.
Row 3 (RS): Sl st in the first ch-2 sp. Ch 3 (counts as dc), then work 2 dc in the same sp. Work [ch 1, 3 dc in next ch-2 sp] 9 times. Turn.
30 dc in 10 groups of 3, 9 ch-1 sps. These are the solid spokes of the fan.
Row 4 (WS): Ch 1. Sc in the first dc. Work [ch 5, sc in next ch-1 sp] 9 times, then ch 5 and sc in the top of the tch. Turn.
11 sc, 10 ch-5 arches. The 6th sc is the center sc, and it sits directly above the middle of the ring.
Row 5 (RS): Ch 1. Sc in the first sc, which is the right base corner.
– Work [ch 5, sc in next ch-5 arch] 5 times. These are arches 1–5.
– Ch 9 for the apex loop, then sc in the next ch-5 arch.
– Work [ch 5, sc in next ch-5 arch] 4 times. These are arches 7–10.
– Ch 5, then sc in the last sc, which is the left base corner. This is arch 11.
– Fasten off.
12 sc, 10 ch-5 arches, 1 ch-9 apex loop.
The apex loop spans the top of the center sc from Row 4. Because it is almost twice the length of a regular arch, it stands up into a point. The first and last sc of the row sit on the ends of Row 4, so the base stays straight.
Weave in the ring tail now. Leave the final tail until the motif is joined.
Make All Pieces
You will make 24 motifs, all in Light Blue, and 3 tassels, also in Light Blue.
Tier 1 is at the far end of the runner and Tier 8 is at the near, tasseled end. Within each tier, work the right motif first, then the middle motif, then the left motif.
          Left   Middle   Right
Tier 1:  [ L1 ]  [ M1 ]  [ R1 ]   <- apex loops free (top end)
Tier 2:  [ L2 ]  [ M2 ]  [ R2 ]
Tier 3:  [ L3 ]  [ M3 ]  [ R3 ]
Tier 4:  [ L4 ]  [ M4 ]  [ R4 ]
Tier 5:  [ L5 ]  [ M5 ]  [ R5 ]
Tier 6:  [ L6 ]  [ M6 ]  [ R6 ]
Tier 7:  [ L7 ]  [ M7 ]  [ R7 ]
Tier 8:  [ L8 ]  [ M8 ]  [ R8 ]   <- tassels hang from rings
All motifs point toward Tier 1. Make R1 completely, with no joins. Every other motif is joined during its Row 5.
Joining
Method: Join as you go in Row 5, using sl sts into the center chains of arches and into the ring above. Work Rows 1–4 of each new motif as usual. Then work Row 5 with the substitutions below. All other parts of Row 5 stay exactly as written.
Side joins (middle and left motifs): These motifs join to their right-hand neighbor in the same tier.
– Arch 1: ch 2, sl st in the 3rd ch of the neighbor’s arch 11, ch 2, sc in the next ch-5 arch.
– Arch 2: ch 2, sl st in the 3rd ch of the neighbor’s arch 10, ch 2, sc in the next ch-5 arch.
The two base corners now sit side by side. Arches 3–11 stay free on this side.
Apex joins (Tiers 2–8): Each apex joins to the motif directly above it in the column.
– In place of ch 9: ch 4, then insert the hook around the bare lower half of the ring of the motif directly above and sl st, then ch 4, and sc in the next ch-5 arch.
This sets the tip of the lower fan into the base ring of the upper fan.
Stitch-to-stitch logic: Each join replaces a chain loop with the same number of chains split around the sl st. A ch-5 arch becomes 2 + sl st + 2. The ch-9 apex becomes 4 + sl st + 4. The sl st takes the place of the center chain, so no length is added or lost and the motif keeps its 5 in (12.7 cm) width.
Tension: Keep each joining sl st as loose as a normal chain. A tight sl st pulls the arches inward and puckers the diamond spaces. If a join looks pinched, undo it and work it over a slightly lifted hook.
Size checkpoint: After Tier 2, the piece should measure 15 in (38.1 cm) wide and 7 in (17.8 cm) from the Tier 1 apex tips to the Tier 2 base. When all eight tiers are done, it should measure 15 in x 28 in (38.1 cm x 71.1 cm).
Border
Border gauge: Work 1 sc per chain in every free arch, which is 5 sc per ch-5 arch. Along a flat base edge, work 2 sc per dc row-end and 1 sc per sc row-end. Each half base edge therefore takes 2 + 2 + 2 + 1 = 7 sc.
Round 1 (RS): Join the yarn with a standing sc in the right base corner of R8. Work counterclockwise, in the order below.
Right long side, from bottom to top:
– On R8: work 5 sc in each of arches 1–5. Skip the joined apex.
– On each of R7 through R1: work 7 sc along the right half of the base edge, from the ring outward to the corner. Then work 5 sc in each of arches 1–5.
– Count: (8 motifs x 25 sc) + (7 base edges x 7 sc) = 200 + 49 = 249 sc.
Top end, from right to left:
– R1 apex loop: 4 sc, picot, 4 sc.
– R1 arches 7–9: 5 sc in each arch.
– Valley: 2 sc in the free upper half of R1’s arch 10, then 2 sc in the free upper half of M1’s arch 2.
– M1 arches 3–5: 5 sc in each arch.
– M1 apex loop: 4 sc, picot, 4 sc.
– M1 arches 7–9: 5 sc in each arch.
– Valley: 4 sc in the same way as the first valley.
– L1 arches 3–5: 5 sc in each arch.
– L1 apex loop: 4 sc, picot, 4 sc.
– Count: 8 + 15 + 4 + 15 + 8 + 15 + 4 + 15 + 8 = 92 sc, plus 3 picots.
Left long side, from top to bottom:
– On each of L1 through L7: work 5 sc in each of arches 7–11. Then work 7 sc along the left half of the base edge, from the corner inward to the ring.
– On L8: work 5 sc in each of arches 7–11.
– Count: 200 + 49 = 249 sc.
Bottom end, from left to right:
– On each of L8, M8 and R8: work 7 sc along the left half of the base edge, 6 sc around the bare half of the ring, and 7 sc along the right half of the base edge. That is 20 sc per motif.
– Between L8 and M8, and again between M8 and R8, work a valley: 2 sc in each free lower half of the joined corner arches, for 4 sc per valley.
– Count: (3 x 20) + (2 x 4) = 68 sc.
Sl st to the first sc and fasten off.
Round total: 249 + 92 + 249 + 68 = 658 sc, plus 3 picots.
Why the math works: One sc per chain fills each arch without stretching or ruffling it. Two sc per dc row-end matches the height of a dc row. Each long side repeats exactly the same 25-sc motif side eight times, plus seven identical 7-sc base edges, with nothing added at the joins, so both sides match stitch for stitch and lie straight. The border adds about 0.25 in (0.6 cm) on every side, which brings the runner from 15 in x 28 in (38.1 cm x 71.1 cm) to 15.5 in x 28.5 in (39.4 cm x 72.4 cm).
Tassels (make 3):
1. Wrap the yarn 30 times around the 4 in (10.2 cm) card.
2. Thread a 12 in (30.5 cm) strand under the wraps at the top and tie it tightly. Cut through the wraps at the bottom.
3. Wrap a second strand 6 times around the bundle, 0.5 in (1.3 cm) below the top, to form a rounded head. Knot it and bury the ends inside the tassel.
4. Trim the tassel to 3.5 in (8.9 cm).
5. Use the top tie to attach one tassel through the 6 border sc around each ring of L8, M8 and R8.
Final Blocking
- Weave in all remaining tails, following the line of the chains so they stay hidden.
- Soak the runner in cool water for 10 minutes. Press out the water. Do not wring it.
- Roll the runner in a towel to remove the excess moisture.
- Lay it on a blocking mat, RS up, measuring 15.5 in x 28.5 in (39.4 cm x 72.4 cm).
- Pin both long sides straight first, placing a pin at every base corner.
- Pin each apex loop of Tier 1 into a point. Ease every arch into an even, rounded shape.
- Open each diamond space by pinning the arches beside the joins.
- Let the runner dry completely, which takes 12–24 hours. Comb out the tassels and trim them evenly.
Final Quality-Control Checklist
- [ ] All 24 motifs have 12 sc, 10 arches and 1 apex loop in Row 5.
- [ ] Each motif measures 5 in x 3.5 in (12.7 cm x 8.9 cm).
- [ ] Every apex in Tiers 2–8 is set into the ring above it.
- [ ] Every side join is at arches 1/11 and 2/10.
- [ ] The border count is 249 / 92 / 249 / 68 sc.
- [ ] Both long sides measure 28.5 in (72.4 cm).
- [ ] The three tassels hang at the same length.
- [ ] No tails are visible on the RS.
Troubleshooting
The fan cups instead of lying flat: The Row 1 stitches are too tight around the ring. Rework Row 1 more loosely, or go up 0.5 mm for Rows 1–2 only.
The base edge curves upward: Work the first and last sc of Rows 4 and 5 exactly on the row ends. Skipping them pulls the corners up.
The apex flops over: Block the apex with a pin at the tip. Spray-starching the top end lightly also helps.
The diamond spaces are puckered: The joining sl sts are too tight. Rework the affected joins more loosely.
The border ruffles along the arches: Check that you have exactly 5 sc per arch. Extra sc ruffle the edge and too few cup it.
The runner is too short: Check your gauge on Row 3. Add a ninth tier if you need to, which adds 3.5 in (8.9 cm) and adds 32 sc to each long side.
Care
Hand wash in cool water with a mild detergent, then lay the runner flat to dry and pin lightly to reshape it. If needed, press it under a cloth with a warm iron, avoiding the tassels.
Final Notes
The measurement chain runs from Row 3 at 3 in (7.6 cm) wide, to a finished motif of 5 in x 3.5 in (12.7 cm x 8.9 cm). Three columns of eight tiers make 15 in x 28 in (38.1 cm x 71.1 cm) before the border. The border brings that to 15.5 in x 28.5 in (39.4 cm x 72.4 cm), and the tassels add 3.5 in (8.9 cm). If you confirm your gauge on the first motif, every later number follows from it.
Happy crocheting!