

The Frosted Bell Teardrop is a lacy Christmas ornament worked in soft powder blue. It is an open teardrop frame with a small cream bell hanging in the middle. The frame has a smooth inner edge, a band of fans with small windows between them, and a firm single crochet outer edge. A chain loop at the top hangs it from a branch.
You need two colors: light powder blue for the frame, the hanging loop and the bell cord, and warm cream for the bell and its clapper. Using mercerized cotton gives crisp stitches and a slight sheen under tree lights, so the ornament looks delicate without being fragile.
The pattern uses US crochet terms. The finished frame measures 4 in (10.2 cm) wide and 5 in (12.7 cm) tall, not counting the hanging loop. The inner opening is about 2 in (5.1 cm) wide and 2.75 in (7.0 cm) tall, and the bell is about 1 in (2.5 cm) tall.
You work the frame in joined rounds outward from a chain ring. The ring becomes the inner edge of the teardrop. A ch-2 corner at the top makes the point, and increases along the bottom keep the curve flat. The bell is a tiny piece worked top down in rounds. It hangs from the inner point on a short blue chain.
Finished Size and Construction
- Finished size: 4 in (10.2 cm) wide x 5 in (12.7 cm) tall, plus a hanging loop of about 2 in (5.1 cm)
- Skill level: Easy-intermediate
- Terminology: US
- Yarn weight: Sport (#2) cotton
- Hook: 2.75 mm (C/2)
- Number of pieces: 1 ornament: one teardrop frame plus one small bell and clapper hung inside
- Layout: Single ornament, not joined to anything else
- Bell size: about 1 in (2.5 cm) tall x 1.25 in (3.2 cm) wide at the rim
- Size before border: 3.75 in (9.5 cm) x 4.75 in (12.1 cm) after Round 3
- Border depth: 1 round of single crochet, about 0.125 in (0.3 cm) on every edge
Materials
Choose a smooth mercerized cotton or cotton blend in sport weight, around 150-170 m per 50 g. It holds the fan shapes and the sharp point well. Plain acrylic also works, but it makes a softer frame that needs more starch to hold its shape.
- Color A, powder blue: 8 g, about 25 m (27 yd)
- Color B, cream: 3 g, about 9 m (10 yd)
- 2.75 mm (C/2) crochet hook
- Tapestry needle
- 1 stitch marker
- Scissors
- Blocking mat and rustproof pins
- Fabric stiffener or spray starch (optional but recommended)
- A pinch of fiberfill or yarn scraps for the clapper (optional)
These amounts include a margin of about 20 percent for swatching and weaving in ends.
Abbreviations (US Terms)
- ch – chain
- sl st – slip stitch
- sc – single crochet
- hdc – half double crochet
- dc – double crochet
- sp – space
- st(s) – stitch(es)
- MR – magic ring
Special stitch – Fan: Work 5 dc in the same stitch. The center (3rd) dc of each fan is used again as a reference point in Round 4.
Point V: (dc, ch 2, dc) worked into the top point space. This keeps the teardrop tip sharp.
Gauge and Checkpoints
Gauge: 24 sc and 26 rows = 4 in (10.2 cm) in sc with a 2.75 mm hook.
Make one full frame before you work out any changes, because lace often measures differently from a swatch. Measure each round lying flat and relaxed, without stretching it.
- After Round 1: inner opening about 2 in (5.1 cm) wide x 2.75 in (7.0 cm) tall
- After Round 2: about 3.25 in (8.3 cm) x 4.25 in (10.8 cm)
- After Round 3: about 3.75 in (9.5 cm) x 4.75 in (12.1 cm)
- After Round 4: 4 in (10.2 cm) x 5 in (12.7 cm)
Too big? Go down to a 2.5 mm hook and pull the foundation chain a little tighter. Too small? Go up to a 3.0 mm hook. If Round 2 cups or ruffles, fix the hook size first. Do not change the stitch counts, because the fan spacing relies on them.
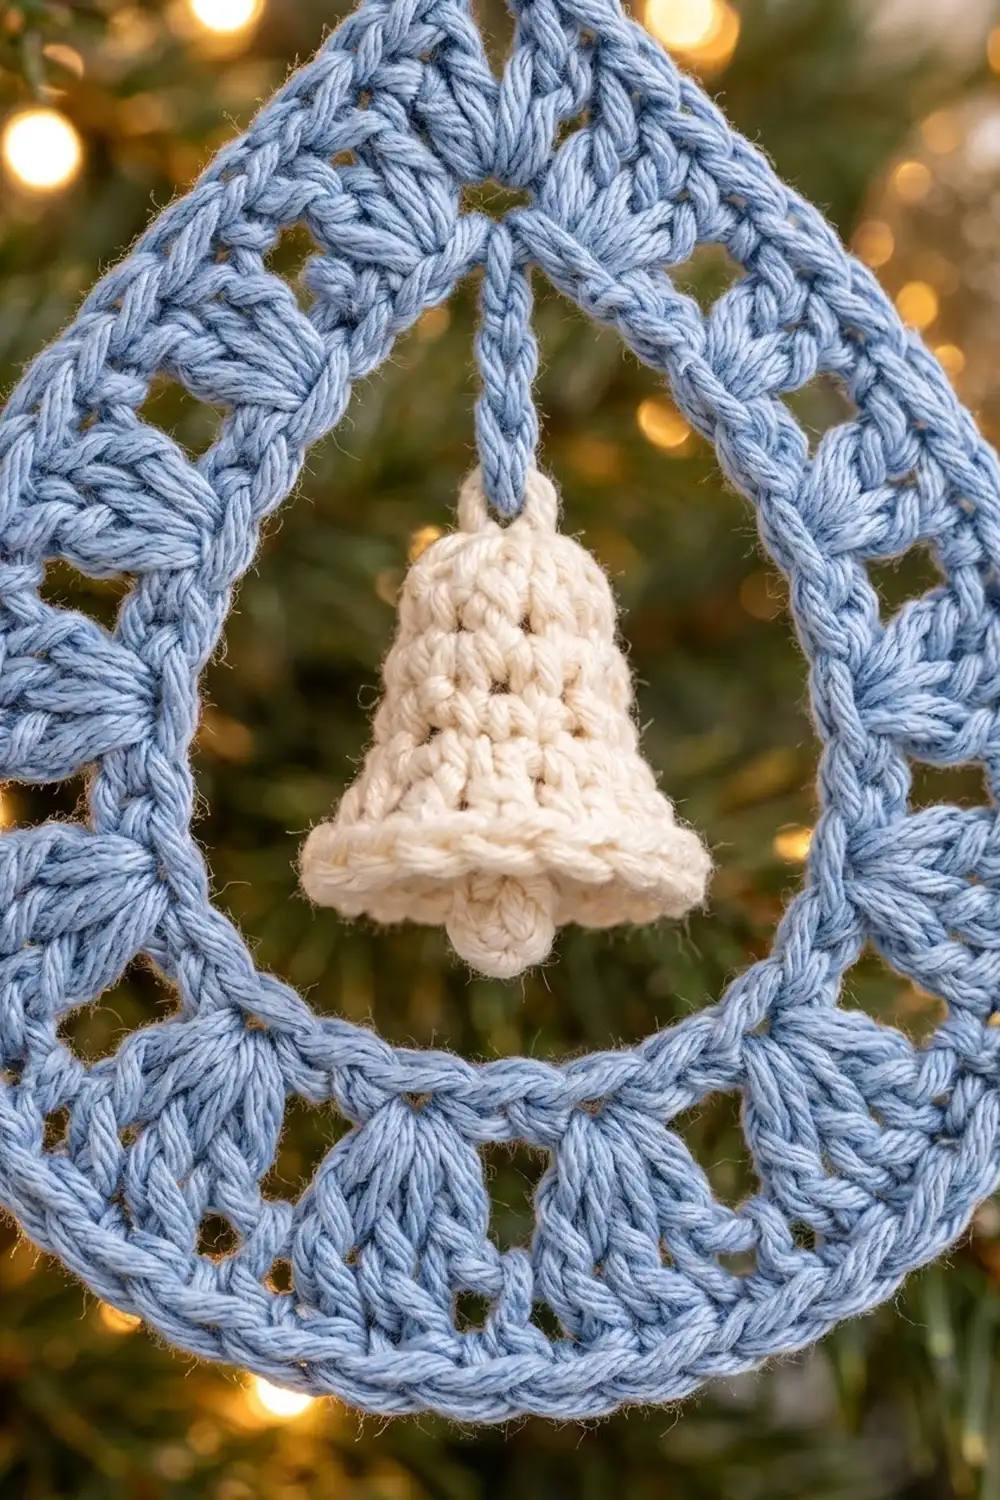
Teardrop Frame
Work with Color A. Do not turn at the end of any round, so the right side faces you throughout.
Foundation: Ch 45 and sl st in the first ch to form a ring, taking care not to twist it. The ch where you joined (ch 1) becomes the top point of the teardrop.
Round 1 (inner edge): Ch 1. Work (sc, ch 2, sc) in ch 1 for the point. Sc in each of the next 14 ch (the first side). Sc in the next ch, (2 sc in the next ch, sc in the next ch) 7 times, sc in the next ch (the bottom curve, 16 ch). Sc in each of the last 14 ch (the second side). Sl st to the first sc. (53 sc + 1 ch-2 point sp)
This is a conversion round: 44 ch worked 1-per-ch (44 sc) + 7 extra sc from the increases + 2 sc in the point ch = 53 sc. Place a marker in the point sp.
Round 2 (fan round): Sl st into the point ch-2 sp. Ch 3 (counts as a dc), ch 2, dc in the same sp to make the Point V. Ch 2, skip the next 2 sc, Fan in the next sc. Ch 2, skip 2 sc, dc in the next sc (the spoke), ch 2, skip 2 sc, Fan in the next sc, repeat from * to * 7 more times. Ch 2, skip the last 2 sc, sl st to the top of the beginning ch-3.
(9 fans, 8 spokes, 2 Point V dc = 55 dc; 18 ch-2 sps + 1 point ch-2 sp)
Check the stitch use: 2 skipped + 1 fan st + 8 repeats of 6 sts (48) + 2 skipped = 53, which uses every sc of Round 1. The ch-2 spaces on either side of each spoke form the small open windows.
Tip: Fan 5 should be worked into sc 27, which sits at the bottom center directly opposite the point. If it lands anywhere else, take out the round and recount before continuing.
Round 3 (fan tops): Sl st into the point ch-2 sp. Ch 2 (does not count), (hdc, ch 2, hdc) in the same sp. Hdc in the next dc. Hdc in the next ch-2 sp, hdc in each dc of the next Fan, hdc in the next ch-2 sp, hdc in the next spoke dc, repeat from * to * 8 times in total. Then hdc in the next ch-2 sp, hdc in each dc of Fan 9, hdc in the last ch-2 sp, and hdc in the top of the beginning ch-3. Sl st to the first hdc.
(75 hdc + 1 ch-2 point sp)
This is a conversion round: 55 dc worked 1-per-st (55 hdc) + 18 hdc, one in each ch-2 sp + 2 hdc in the point sp = 75 hdc. Working only 1 hdc in each window space leaves the windows open below, and the frame grows enough to stay flat without rippling.
Check your size against the Round 3 measurements before you start the border.
Bell
Work with Color B. You will work in a continuous spiral, so move your marker up to the first stitch of each round.
Round 1: Make a MR and work 6 sc in it. (6)
Round 2: 2 sc in each st. (12)
Rounds 3–5: Hdc in each st. (12 each round)
Round 6: Hdc in the next st, 2 hdc in the next st, repeat 6 times. (18)
Round 7 (flared rim): Sc in each of the next 2 sts, 2 sc in the next st, repeat 6 times. Sl st to the next st. (24)
Fasten off and weave in the end. The stacked hdc rounds give the bell its lightly textured sides, and Rounds 6 and 7 flare the rim. The bell should measure about 1 in (2.5 cm) tall and 1.25 in (3.2 cm) across the rim.
Clapper: With Color B, make a MR and work 6 sc in it. Pull the ring tight, tuck the tail inside (or a tiny pinch of fiberfill) to make a little ball, and leave a 6 in (15.2 cm) tail. Thread that tail up through the inside of the bell and out the center of the MR at the top. Adjust it so about 0.25 in (0.6 cm) of the ball shows below the rim, then knot it securely inside the bell top.
Hanging the bell: With Color A, join with a sl st around the foundation ch 1 at the inner point of the frame. Ch 5, which is about 0.75 in (1.9 cm). Fasten off with a 6 in (15.2 cm) tail. Thread the tail through the top center of the bell, back up through the last chain, and knot it. Weave in the end. The bell should hang centered with about 0.75 in (1.9 cm) of space below it.
Border
Border gauge: 6 sc per 1 in (2.5 cm) along the outer edge.
Round 4: Join Color A in the point ch-2 sp of Round 3, or, if you did not fasten off, sl st into that sp. Ch 1, (sc, ch 2, sc) in the same sp. Sc in each hdc around, but work 2 sc in the center (3rd) hdc of Fans 2 through 8. Sl st to the first sc. (82 sc + 1 ch-2 point sp)
This is a conversion round: 73 hdc worked 1-per-st (73 sc) + 7 extra sc at the centers of Fans 2–8 + 2 sc in the point sp = 82 sc.
Per side: The teardrop has 2 mirrored halves that meet at the point and at the bottom center of Fan 5. Each half has 1 point sc + 36 sc + 3 extra sc (from Fans 2–4 or Fans 6–8) + 1 sc of the pair at the Fan 5 center = 41 sc. Two halves of 41 sc = 82 sc, with no stitch counted twice.
Why the math works: At 6 sc per in, 82 sc covers about 13.7 in (34.8 cm). That matches the outer edge of a 4 in x 5 in (10.2 cm x 12.7 cm) teardrop. All 7 increases sit on the bottom curve, where the outer edge needs the most room, while the straighter sides near the point stay 1-to-1 and keep the point sharp.
Hanging loop: Do not fasten off. Ch 24, which is about 4 in (10.2 cm) of chain, and sl st into the same first sc to make a loop about 2 in (5.1 cm) tall. Fasten off with a 12 in (30.5 cm) tail. Wrap the tail tightly 6 times around the base of the loop just above the point to make a neat collar. Then pass the needle under the wraps and weave in the end.
Final Blocking
- Weave in all ends, keeping the bell tails inside the bell.
- Lightly wet the frame, or spray it until it is damp. Keep the bell dry if you prefer it soft.
- Lay the frame on the blocking mat and gently pull it into shape: 4 in (10.2 cm) wide and 5 in (12.7 cm) tall.
- Pin the point first, then the bottom center, then both widest points.
- Pin the inner opening to 2 in (5.1 cm) x 2.75 in (7.0 cm) so the inner point is sharp.
- Open each window and spread each fan evenly with a pin tip.
- Apply stiffener if you are using it, and let the ornament dry completely, about 6-12 hours.
- Unpin it and straighten the bell so it hangs centered.
Final Quality-Control Checklist
- Round counts are 53, 55 dc with 18 spaces, 75, and 82.
- There are 9 fans, with Fan 5 at the exact bottom center.
- The outer and inner points line up on one vertical line.
- The frame lies flat with no ripples or cupping.
- It measures 4 in x 5 in (10.2 cm x 12.7 cm) after blocking.
- The bell hangs straight with about 0.75 in (1.9 cm) of clearance below it.
- The clapper shows just below the rim.
- The loop collar is tight and all ends are hidden.
Troubleshooting
The frame ripples: Your Round 2 or 3 is too loose. Go down a hook size, or check that you made only 1 hdc in each ch-2 sp.
The frame cups: Your tension is too tight. Go up a hook size for Rounds 2–4 only.
The fans are off-center: Recount Round 1. Fan 5 must land on sc 27.
The point is rounded: Make sure each round has its ch-2 point space, then pin the point firmly while blocking.
The bell tilts: Re-tie the hanging chain through the exact center of the bell’s MR.
The ring twisted: Undo the ring and rejoin it. A twisted ring cannot be fixed later.
The windows close up: Check that you skipped exactly 2 sc on each side of every spoke in Round 2.
Care
Hand wash in cool water, gently press out the water, and dry the ornament flat, pinned back into shape. Store it flat in tissue so the point and fans keep their shape until next season.

Final Notes
The measurement chain is short and easy to check. The 45-ch ring opens to 2 in x 2.75 in (5.1 cm x 7.0 cm). The fans bring the frame to 3.25 in x 4.25 in (8.3 cm x 10.8 cm). The hdc round makes it 3.75 in x 4.75 in (9.5 cm x 12.1 cm). The 82-sc border finishes it at 4 in x 5 in (10.2 cm x 12.7 cm). Hang the 1 in (2.5 cm) bell from the inner point and your ornament is ready for the tree.
Happy crocheting!