

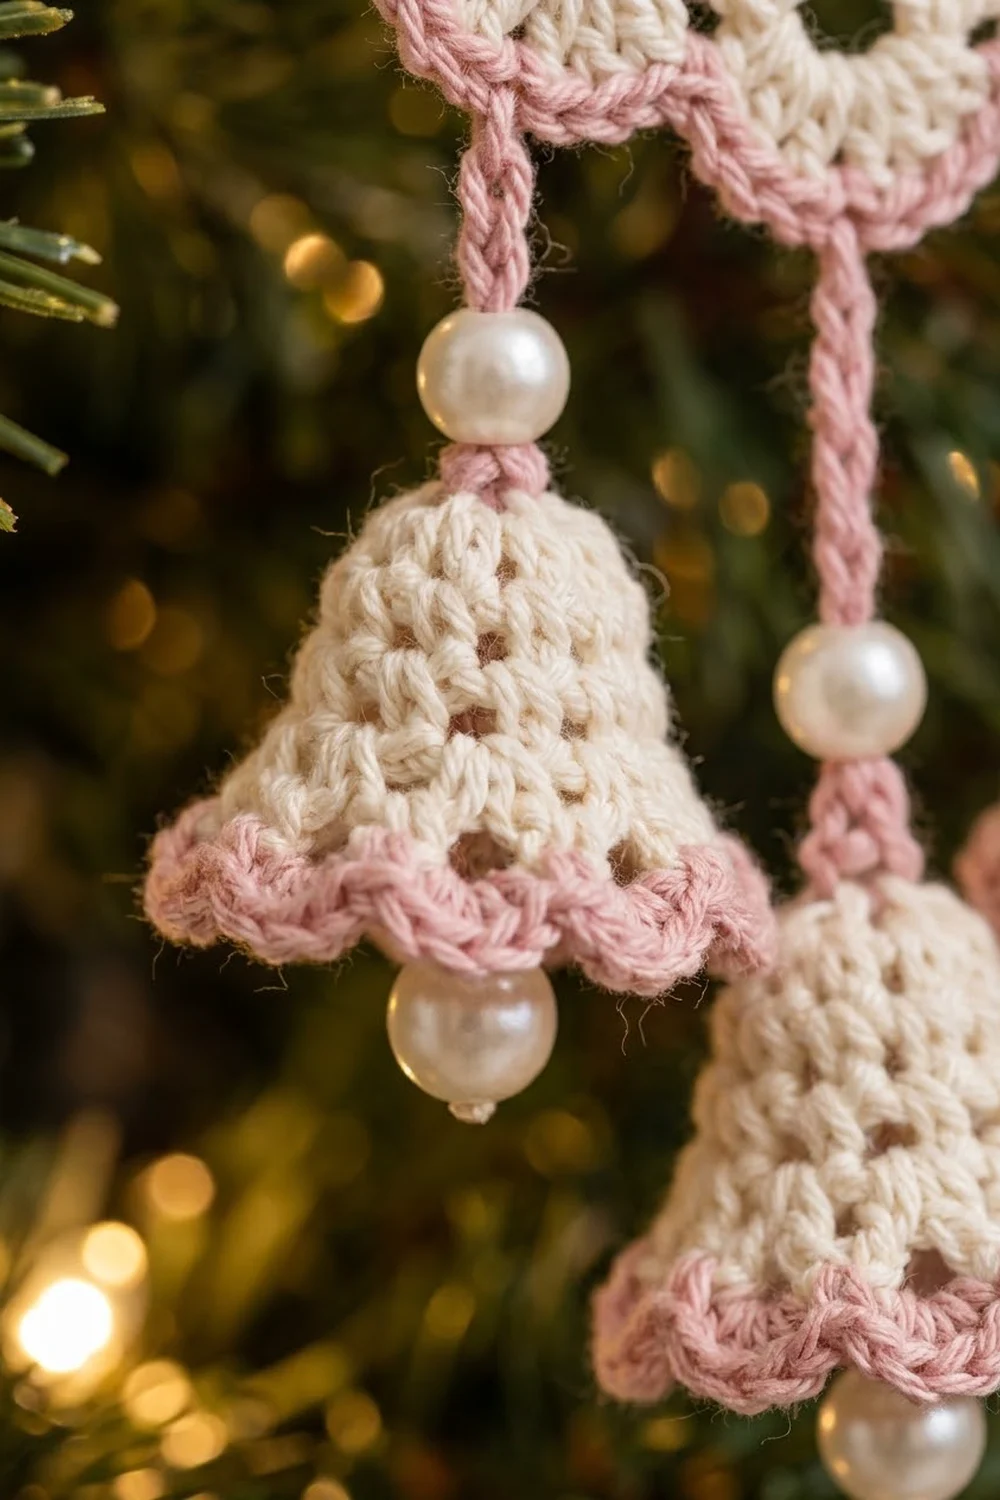
This little wreath ornament is lacy, soft and a bit vintage. It is an upright cream oval with a ring of arched windows and a scalloped blush-pink edge. A tiny pink bow sits at the top, and three cream bells hang below on pink chain cords, each finished with pearl beads.
The palette is just two colors: warm cream for the wreath and bells, and dusty pink for the edging, bow, cords and bell rims. Six pearl beads add a bit of shine against the tree lights.
The pattern uses US crochet terms. The finished wreath measures 3.25 in wide x 4.25 in tall (8.3 x 10.8 cm). With the hanging loop and bells included, the whole ornament is about 9.5 in (24.1 cm) long.
Construction is simple. You crochet the wreath in joined rounds from a chain ring outward, and taller stitches at the top and bottom turn the circle into an oval. Two pink rounds make the scalloped edge. Then you make the bow and three bells separately, chain the cords and hanging loop directly from the wreath, and sew everything together.
Finished Size and Construction
- Finished wreath size: 3.25 x 4.25 in (8.3 x 10.8 cm)
- Total ornament length: about 9.5 in (24.1 cm), from the top of the loop to the lowest bead
- Skill level: Intermediate (fine thread, small parts)
- Terminology: US crochet terms
- Yarn weight: Size 3 cotton crochet thread (fingering/lace weight)
- Hook: 2.0 mm steel hook
- Number of pieces: 1 ornament, made from 5 crocheted parts: 1 wreath, 1 bow and 3 bells
- Layout: Single oval wreath, with the bow centered at the top and 3 bells hanging below
- Wreath size before border: 2.75 x 3.75 in (7.0 x 9.5 cm)
- Border depth: 0.25 in (0.6 cm) per side, 2 rounds
- Bell size: 1 x 1 in (2.5 x 2.5 cm)
- Bow width: 1.5 in (3.8 cm)
Materials
Use a mercerized cotton thread in size 3. It shows stitch detail well, holds its shape after starching and doesn’t fuzz. You can use size 10 thread with a 1.5 mm hook for a smaller ornament, but every measurement below will shrink.
- Cream (Color A): about 18 g / 25 m, for the wreath and bells
- Blush pink (Color B): about 21 g / 30 m, for the border, bow, cords, loop and bell rims
These amounts are based on cotton at roughly 1.4 m per gram. Both include a margin of about 25% for your gauge check and tails.
Tools and notions:
– 2.0 mm steel crochet hook
– 6 white pearl beads, 6 mm, with holes large enough for the thread or a beading needle
– Fine beading needle or dental floss threader, for stringing beads
– Tapestry needle
– 4 locking stitch markers
– Fabric stiffener or heavy spray starch
– Rust-proof pins and a foam blocking board
– Small scissors and a ruler
Abbreviations (US Terms)
- ch – chain
- sl st – slip stitch
- sc – single crochet
- hdc – half double crochet
- dc – double crochet
- sk – skip
- st(s) – stitch(es)
- sp – space
- rnd – round
- MR – magic ring
Special stitch – Petal: (sc, hdc, 7 dc, hdc, sc) all worked into one ch-7 loop. One petal = 11 sts.
Gauge and Checkpoints
Gauge: 8 sc = 1 in (2.5 cm) and 8 sc rnds = 1 in (2.5 cm). One dc rnd is about 0.25 in (0.6 cm) tall. Chains also measure about 8 ch per 1 in (2.5 cm).
Work Rnds 1–2 of the wreath first as your test piece. If they match the checkpoint, keep going on the same piece.
Checkpoints:
– After Rnd 1: the inner opening, gently shaped into an oval, is about 1.5 x 2.25 in (3.8 x 5.7 cm). The outer edge is about 1.75 x 2.5 in (4.4 x 6.4 cm).
– After Rnd 2: 2 x 3 in (5.1 x 7.6 cm)
– After Rnd 4: 2.75 x 3.75 in (7.0 x 9.5 cm)
– After the border: 3.25 x 4.25 in (8.3 x 10.8 cm)
Too big? Go down to a 1.75 mm hook. Too small? Go up to a 2.25 mm hook. If only the height is off, check your dc height rather than your sc width. Tall, loose dc stitches stretch the oval vertically.
Wreath (Color A, Cream)
Rnd 1: Ch 48 and sl st in the first ch to form a ring, taking care not to twist it. Ch 1, sc in each ch around, then sl st in the first sc to join. (48 sc)
Now divide the round into four quarters of 12 sts each:
– Top quarter: sts 43–48 and 1–6. The top center falls between st 48 and st 1.
– Right side: sts 7–18
– Bottom quarter: sts 19–30
– Left side: sts 31–42
Place markers in st 7, st 19, st 31 and st 43.
Rnd 2 (shaping): Sl st in each st across to st 43. Ch 3 in st 43 (counts as the first dc), then work around:
– Top quarter: 2 dc in next st, then (dc in next st, 2 dc in next st) 5 times. Together with the beginning ch-3, that gives 18 sts.
– Right side: hdc in next st, 2 sc in next st, (sc in next st, 2 sc in next st) 4 times, hdc in next st, 2 hdc in next st. (18 sts)
– Bottom quarter: (dc in next st, 2 dc in next st) 6 times. (18 sts)
– Left side: work the same as the right side. (18 sts)
Sl st in the top of ch-3 to join. (72 sts)
The dc stitches at the top and bottom add height, while sc at the sides adds very little width. This makes the oval. The hdc at each junction smooths the change in stitch height.
In Rnd 2, the 6 old top stitches before the top center became 9 new stitches. That puts the top center between the 9th and 10th stitches of Rnd 2.
Rnd 3 (windows): Sl st in the next 9 sts, ending in the 10th st. Call this st 1; it sits just past the top center. Ch 1, sc in the same st. Ch 7, sk 5 sts, sc in next st. Repeat from * 10 more times. Ch 7, sk 5 sts, and sl st in the first sc to join. (12 sc, 12 ch-7 loops)
The sc stitches fall at sts 1, 7, 13, and so on through st 67. That puts one sc at the top center (st 1) and another at the bottom center (st 37). These two sc become the valleys where the bow and center cord attach.
Rnd 4 (petals): Sl st in the first ch-7 loop. Work a Petal in each ch-7 loop around. Sl st in the first sc to join. (12 petals; 12 x 11 = 132 sts)
Fasten off Color A. Each ch-7 loop arches over 5 skipped stitches, which leaves an open window under every petal.
Checkpoint: 2.75 x 3.75 in (7.0 x 9.5 cm)
Scalloped Border (Color B, Pink)
Border gauge: 8 sc = 1 in (2.5 cm), measured along the curved edge. Each petal’s outer edge is about 1.5 in (3.8 cm) along the curve, which fits 12 sc at that gauge. Since every petal gets the same count, the scallops stay even all the way around.
Border Rnd 1 (conversion round): Join Color B with a sl st in the first sc of the petal just right of top center. Ch 1. In each petal:
– sc in the sc and in the hdc
– sc in each of the first 3 dc
– 2 sc in the center (4th) dc
– sc in each of the last 3 dc
– sc in the hdc and in the sc
Join with a sl st. (132 sts worked 1 per stitch + 12 extra = 144 sc; 12 sc per petal)
Number the 12 sc of each petal as positions 1–12. Positions 6 and 7 sit at the petal’s crown.
Border Rnd 2 (scallops): Ch 1. In each petal:
– sl st in position 1, sc in position 2, hdc in position 3
– dc in positions 4 and 5
– 2 dc in position 6, 2 dc in position 7
– dc in positions 8 and 9
– hdc in position 10, sc in position 11, sl st in position 12
Join with a sl st in the first sl st. (14 sts per petal; 12 x 14 = 168 sts; 84 sts per left or right half)
Why the math works: The wreath has 12 petals, and each petal is handled the same way: 11 sts, then 12, then 14. The added stitches always fall at the crown, so every scallop curves outward evenly while the sl sts stay in the valleys. Each half of the oval has exactly 6 petals, so the left and right sides match at 72 sc after Border Rnd 1 and 84 sts after Border Rnd 2.
Do not fasten off yet.
Hanging loop: You are now at the top-center valley. Ch 28 and sl st in the same valley. Folded in half, the loop stands 1.75 in (4.4 cm) tall. Fasten off and weave in the end.
Checkpoint: 3.25 x 4.25 in (8.3 x 10.8 cm)
Bow (Color B, Make 1)
Rnd 1: Ch 24 and sl st to form a ring without twisting. Ch 1, sc in each ch, and join. (24 sc)
Rnds 2–3: Ch 1, sc in each st around, and join. (24 sc)
Fasten off, leaving a 12 in (30.5 cm) tail. Flatten the tube with the seam at the center back. You should have a double-layer band about 1.5 in (3.8 cm) wide and 0.375 in (1.0 cm) tall. Wrap the tail tightly around the center 8 times to cinch it into two loops, then secure it at the back.
Tails (make 2): Join Color B at the back of the cinched center. Ch 9, sc in the 2nd ch from the hook and in the next 7 ch. (8 sc, about 1 in / 2.5 cm)
Fasten off. Make the second tail the same way, angled toward the other side.
Bells (Color A with B Rim, Make 3)
Rnd 1: 6 sc in MR. (6)
Rnd 2: 2 sc in each st around. (12)
Rnds 3–4: Sc in each st around. (12)
Rnd 5: (Sc in next st, 2 sc in next st) 6 times. (18)
Rnd 6: Sc in each st around. (18)
Rnd 7: (Sc in next 2 sts, 2 sc in next st) 6 times. (24)
Change to Color B.
Rnd 8 (ruffle rim, conversion round): Sc in next st, (hdc, dc, hdc) in next st. Repeat from * 11 more times, then join. (24 sts worked 1 per stitch + 24 extra = 48 sts)
Fasten off. Each bell measures 1 x 1 in (2.5 x 2.5 cm).
Clapper: Thread a 6 in (15.2 cm) length of Color A down through the center of the MR. String 1 pearl onto it and knot it so the bead hangs just below the rim. Leave the upper end at the top of the bell for attaching the cord.
Cords and Assembly
Center cord: Use the beading needle to string 1 pearl onto Color B, then slide it out of the way. Join Color B with a sl st in the bottom-center valley. Ch 14, slide the bead up against the hook, and ch 2. (16 ch, 2 in / 5.1 cm, plus the bead) Fasten off, leaving a 6 in (15.2 cm) tail.
Side cords (make 2): Join one cord in the valley to the left of the bottom-center valley and one in the valley to the right. Each valley is one petal, about 0.75 in (1.9 cm), from the center. String 1 pearl first. Ch 8, slide the bead up, and ch 2. (10 ch, 1.25 in / 3.2 cm, plus the bead) Fasten off, leaving a 6 in (15.2 cm) tail.
Attach the bells: Pass each cord tail down through the top of a bell. Tie it securely to the clapper thread and weave both ends inside the bell.
Attach the bow: Sew the bow over the top-center valley, just below the hanging loop.
Final Blocking
- Weave in all ends securely before blocking.
- Dilute the fabric stiffener as the label directs, or use heavy spray starch.
- Dip only the wreath, bow and bells, keeping the beads out of the liquid. Squeeze out the excess gently.
- Pin the wreath flat on the board to 3.25 x 4.25 in (8.3 x 10.8 cm). Shape the inner opening to about 1.5 x 2.25 in (3.8 x 5.7 cm).
- Pin each scallop crown outward, and open each window with a pin.
- Shape the bow loops around rolled paper. Stand each bell over a small cone of plastic wrap, then fan out the ruffle.
- Let everything dry completely, which takes 12–24 hours.
Final Quality-Control Checklist
- Wreath measures 3.25 x 4.25 in (8.3 x 10.8 cm)
- 12 open windows and 12 even pink scallops
- 168 sts in Border Rnd 2, with 84 sts per half
- Bow is centered over the top valley and the loop stands upright
- Center cord is 2 in (5.1 cm) and the side cords are 1.25 in (3.2 cm)
- All 6 pearls are secure
- Bells are the same size and their ruffles are even
- No visible tails
Troubleshooting
- Wreath is round, not oval: Your dc stitches are too short. Pull the yarn-overs up to full height.
- Ring twisted: Before joining Rnd 1, check that the chain lies flat.
- Border ruffles: Your tension is loose. Use a smaller hook for the pink rounds only.
- Border cups inward: Your tension is tight. Go up one hook size for the pink rounds.
- Bells lean: Center each cord through the middle of the MR before tying it off.
- Beads slide around: Work a tight ch on each side of the bead.
Care
Spot clean with a damp cloth. Store the ornament flat in tissue, and re-starch if it softens.

Final Notes
Each stage builds on the one before it. Rnd 1 starts at 1.75 x 2.5 in (4.4 x 6.4 cm), Rnd 2 grows it to 2 x 3 in (5.1 x 7.6 cm), and Rnd 4 brings it to 2.75 x 3.75 in (7.0 x 9.5 cm). The 0.25 in (0.6 cm) border on every side finishes the wreath at 3.25 x 4.25 in (8.3 x 10.8 cm). The stitch counts stay locked to the 12 petals: 132, then 144, then 168. If you check each measurement as you go, the bells and bow will be in proportion to the finished wreath.
Happy crocheting!